Insulating basement walls the wrong way is one of the most expensive mistakes in home improvement—and it usually looks fine for the first year or two.
Quick answer: The safest, most reliable way to insulate basement walls is rigid foam board (XPS, EPS, or polyiso) installed directly against the concrete, with all seams taped and gaps sealed. Skip the interior plastic vapor barrier, never put fiberglass batts directly against concrete, and fix any bulk water problems before you insulate anything. Many current energy codes require R-10 continuous insulation in milder basement climates, and R-15 continuous, R-19 cavity, or R-13 plus R-5 continuous in colder zones—always check your local code.
This guide is for typical poured-concrete and block basement walls; stone foundations, flood-prone basements, and historic foundations may need a different assembly.
That’s the short version. The long version—why fiberglass-and-poly walls turn into moldy “diaper walls,” which foam to choose, and how to do it right the first time—is below.
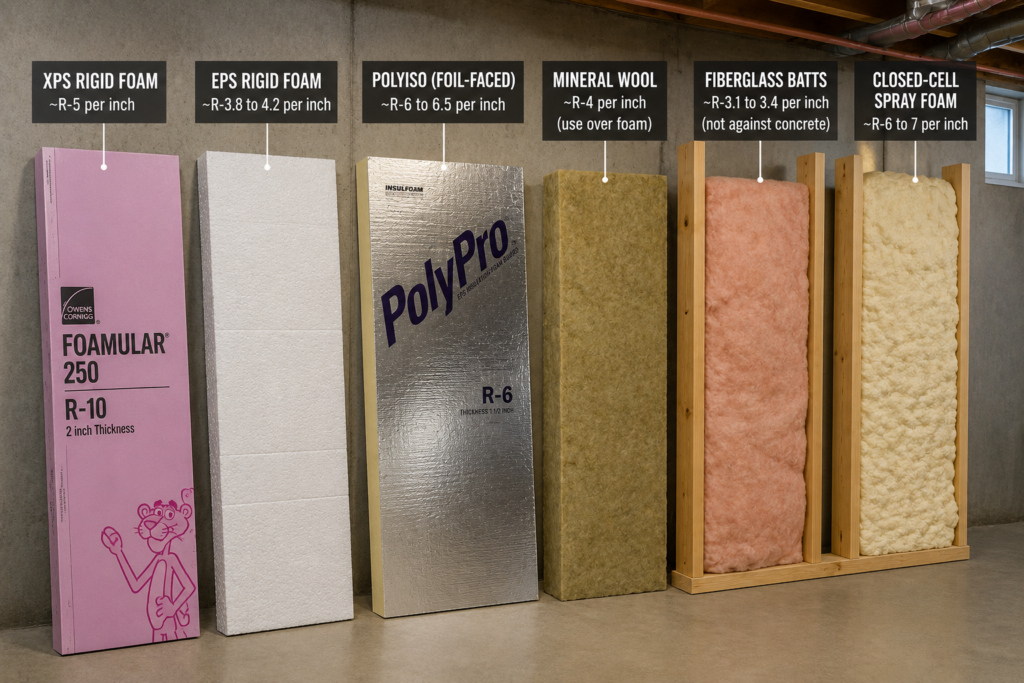
Basement Wall Insulation Options Compared
Insulation Type
R-Value (per inch)
Moisture Tolerance
DIY Difficulty
Relative Cost
Best For
XPS rigid foam
~R-5
Excellent
Easy
$$
Most typical poured-concrete or block basement walls
EPS rigid foam
~R-3.8–4.2
Very good
Easy
$
Budget-friendly full coverage
Polyiso (foil-faced)
~R-6–6.5
Good (keep off the floor)
Easy
$$$
Maximizing R-value in thin walls
Closed-cell spray foam
~R-6–7
Excellent
Pro install
$$$$
Uneven walls, rim joists, rubble foundations
Fiberglass batts (alone, against concrete)
~R-3.1–3.4
Poor
Easy
$
Nothing. Don’t do this on basement walls
Mineral wool batts (over foam layer)
~R-4
Good
Easy
$$
Adding R-value inside a stud wall built in front of foam
The pattern to notice: every safe assembly starts with a foam layer against the concrete. Fluffy insulation is only acceptable as a second layer inside a stud wall, after the foam has already separated the framing from the cold, damp wall.
Why Basement Walls Are Different From Every Other Wall in Your House
Above-grade walls dry to the outside. Basement walls can’t—they’re buried in soil that holds moisture year-round.
Concrete and block act like a giant sponge. Ground moisture wicks through the wall continuously, and the wall releases that moisture as water vapor into your basement. At the same time, the concrete stays cold because it’s in direct contact with the earth.
That combination—cold surface plus humid interior air—is the whole problem. When warm, moist basement air touches concrete that’s below the dew point, water condenses. In summer, a below-grade wall can sit at 55–60°F while the air in the room carries humidity from the whole house. Every gap in your insulation becomes a condensation point.
So a basement insulation system has two jobs, not one:
Slow heat loss (the job you were thinking of)
Keep interior air from ever touching the cold concrete (the job that determines whether the wall grows mold)
Rigid foam does both. Fiberglass alone does neither—air passes right through it and condenses on the wall behind it.
The Classic Mistake: Fiberglass, Studs, and Poly
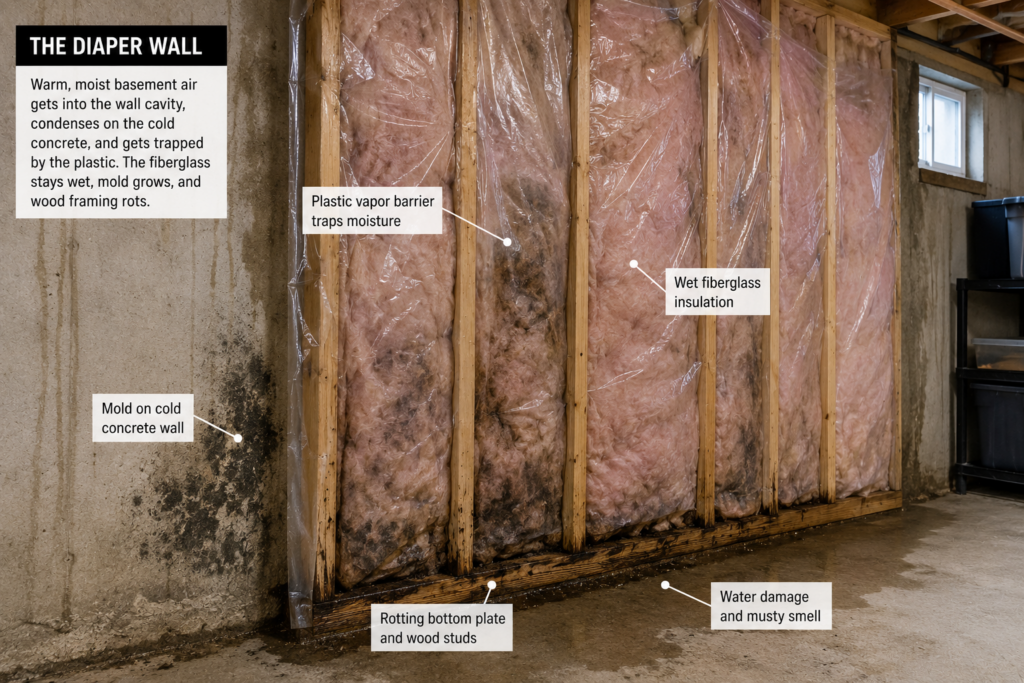
❌ The Mistake: Framing a 2×4 wall against the concrete, stuffing it with fiberglass batts, stapling up a sheet of 6-mil poly, and hanging drywall. This is how basements were finished for decades, and it’s still the first thing many DIYers reach for because it’s how the upstairs walls are built.
Here’s what happens. Water vapor leaves the concrete and enters the stud cavity. Interior air leaks into the cavity from the room side and condenses on the cold wall. The poly sheet blocks the assembly from drying inward. The fiberglass soaks it all up and holds it against the wood framing. Builders have a nickname for this assembly: the diaper wall—and it earned that name from the smell.
The result is wet insulation, moldy drywall, and rotting bottom plates, often hidden until someone notices the odor or pulls off a baseboard. If a basement already has this assembly and a musty smell, the fix is removal, not treatment.
The Regret: The painful part is that a diaper wall usually looks perfect for the first year or two. By the time the problem shows, you’re not repairing insulation—you’re demolishing a finished room, treating framing, and starting over. The material savings of batts over foam board is typically a few hundred dollars on an average basement. The teardown costs thousands.
The Best Assembly for Most DIYers
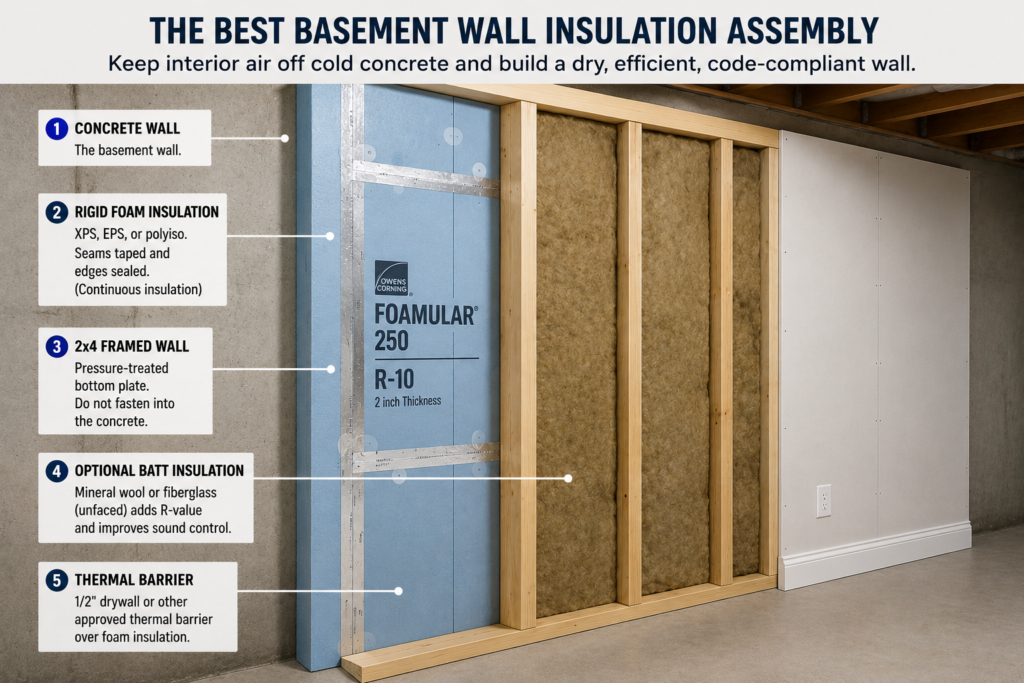
If you just want the recipe, here it is:
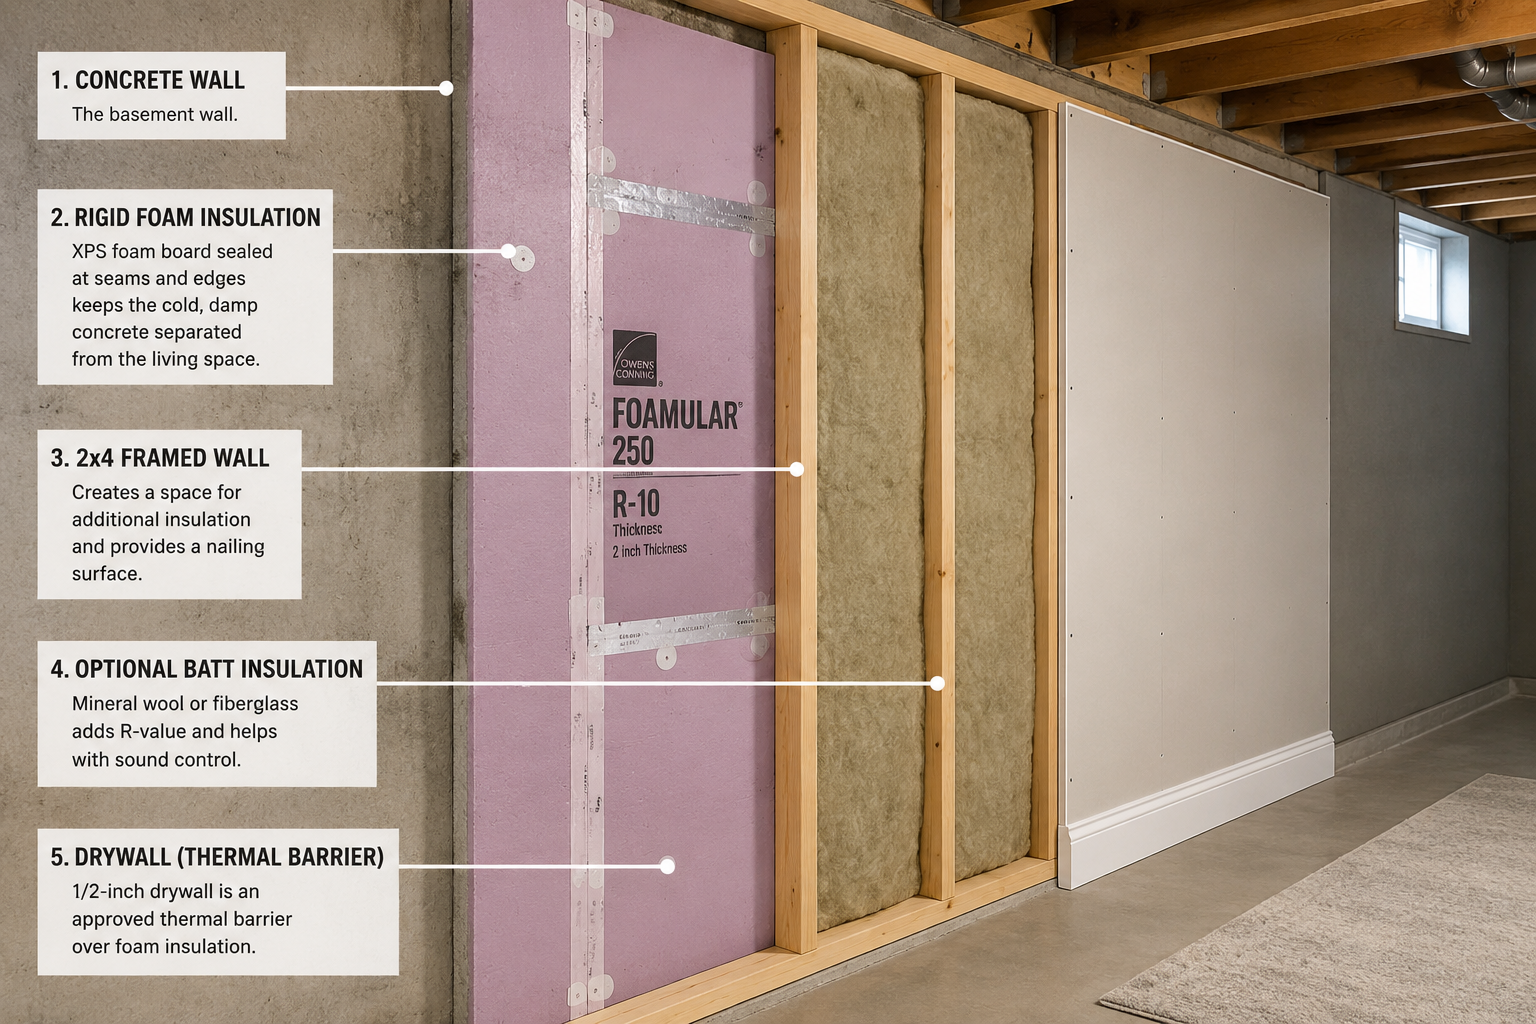
Concrete wall → enough rigid foam to meet your local R-value requirement (often 2 inches for R-10, thicker in colder zones), glued flat with seams taped and edges sealed → framed 2×4 wall (pressure-treated bottom plate) → optional unfaced mineral wool or fiberglass in the stud bays → 1/2-inch drywall or another approved thermal barrier.
That assembly keeps interior air off the cold concrete, lets the wall dry slowly inward, meets the continuous-insulation approach most codes prefer, and uses nothing exotic. Everything below explains why each layer is there and how to get each step right.
Step 1: Fix Water Problems Before You Insulate Anything
Warning: Insulation is not waterproofing. If your basement wall shows active leaks, white powdery efflorescence, or damp patches after rain, covering it with insulation traps the problem and hides it while it gets worse. No wall assembly survives bulk water.
Before the first sheet of foam goes up:
Grade and gutters first. Soil should slope away from the foundation, and downspouts should discharge several feet from the wall. This one change solves a surprising number of “leaky basement” complaints for almost no money.
Seal visible cracks with hydraulic cement or an appropriate crack-injection product.
Address chronic seepage with an interior perimeter drain and, if needed, a sump pump. This is the one part of the job worth pricing out professionally.
Then wait through a heavy rain and confirm the walls stay dry before you close anything in.
Concrete can look dry and still be releasing significant moisture, so verify before you close anything in. A concrete moisture meter, a taped plastic-sheet test (tape a 2-foot square of poly to the wall for 24–48 hours and check for condensation underneath), or a professional moisture test will tell you what you’re actually working with. Don’t rely on a basic wood moisture meter for concrete—most inexpensive pin meters are calibrated for lumber and give misleading readings on masonry.
Step 2: Choose Your Foam
All three common rigid foams work on basement walls. The differences are cost, R-value per inch, and one placement rule.
XPS (Extruded Polystyrene)
The pink or blue boards. Around R-5 per inch, doesn’t mind moisture, easy to cut with a utility knife. Two inches of XPS (R-10) meets the continuous-insulation requirement in many climate zones and is the default choice for most basement projects. Modern “NGX”-type formulations have also improved the blowing agents over older XPS, if the environmental footprint matters to you.
EPS (Expanded Polystyrene)
The white beaded foam. Slightly lower R-value per inch (~R-4), noticeably cheaper. You’ll need a bit more thickness to hit the same R-value, but on a large basement the savings add up. Use a denser grade (Type II) so it doesn’t crumble during handling.
Highest R-value per inch (~R-6+), usually foil-faced. Great where every fraction of an inch of floor space matters. One rule: keep polyiso off the slab. It can absorb water if the basement ever floods, so hold it an inch above the floor or run a strip of XPS along the bottom course. Also check the manufacturer’s instructions before placing foil-faced polyiso directly against masonry—some foil facers can deteriorate in contact with cement or mortar, depending on the product.
Closed-Cell Spray Foam
The premium option. It insulates, air-seals, and blocks vapor in a single application, and it conforms to rubble foundations, stone walls, and anything too irregular for boards. It’s also the best answer for rim joists (more on that below). The downside is cost and the fact that it’s a professional install for full walls.
The Cost Reality: For a typical 1,000 sq ft of basement wall, rigid foam materials often land in the low thousands once you account for foam type and thickness, tape, adhesive, canned foam, fasteners, and waste—and colder zones needing R-15 push the number up. Professionally sprayed closed-cell foam for the same space typically costs several times that. For most poured-concrete or block walls in decent condition, board foam delivers 90% of the performance at a fraction of the price—spray foam earns its premium on irregular walls and rim joists, not flat concrete.
Step 3: Install the Foam Against the Concrete
The goal is a continuous, airtight foam layer with no gaps where room air can sneak behind and find cold concrete.
Clean the wall. Brush off dust and efflorescence so adhesive can grip.
Cut boards to height, leaving a small gap at the slab that you’ll seal with canned foam (this also keeps the foam out of any minor water that ever reaches the floor).
Glue boards directly to the concrete with a foam-compatible construction adhesive (standard solvent-based adhesives can melt foam—check the label). Press firmly so the board sits flat with no air channels behind it.
Tape every seam with a quality sheathing tape, and seal the top and bottom edges plus any penetrations with canned spray foam. This step is what turns a stack of foam boards into an air barrier—don’t skip it.
For foil-faced polyiso, use a foil tape on seams for the cleanest seal.
If you’d rather not rely on adhesive alone, boards can also be pinned with furring strips fastened through the foam into the concrete with masonry screws—which conveniently gives you a nailing surface for the wall finish.
What About the Vapor Barrier?
You already installed it. The foam is the vapor control layer, positioned exactly where it belongs—against the concrete, where it keeps interior air off the cold surface while still allowing slow drying.
Do not add poly sheeting on the room side of the assembly. An interior vapor barrier in a basement traps moisture between two impermeable layers and recreates the diaper wall problem with extra steps. If your local inspector requires an interior vapor retarder by code, use a “smart” variable-permeability membrane rather than poly, and confirm the requirement actually applies to below-grade walls—many jurisdictions specifically exempt them.
Step 4: Frame, Add More Insulation (Optional), and Finish
With the foam sealed to the concrete, the risky part is over. Now it’s ordinary construction:
Frame a 2×4 wall in front of the foam (or use the furring strips if you fastened the foam mechanically). Use a pressure-treated bottom plate, and set it on a capillary break—a strip of foam sill seal or composite shims—so it never wicks moisture from the slab.
Optionally fill the stud bays with unfaced fiberglass or mineral wool for extra R-value. This is now safe because the foam keeps the cavity warm and dry. Skip faced batts—the facing is a vapor retarder you don’t want.
Cover the foam. Building codes require foam plastic in living space to be separated from the interior by an approved thermal barrier—typically 1/2″ gypsum board. This is not optional; foam burns, and the drywall layer is what makes the assembly code-legal.
For the finish layer itself, drywall is the default but far from the only option—basements are exactly where moisture-tolerant alternatives earn their keep, and we’ve covered the best ways to finish basement walls without drywall in detail. If you’re weighing wood-based finishes for durability, the plywood vs. drywall comparison breaks down where each one wins. And if any wood paneling or plywood is going into the assembly, stick to sheets made with exterior-grade adhesives—the waterproof plywood types guide explains which stamps to look for, and sealing cut edges properly is covered in our step-by-step plywood waterproofing guide.
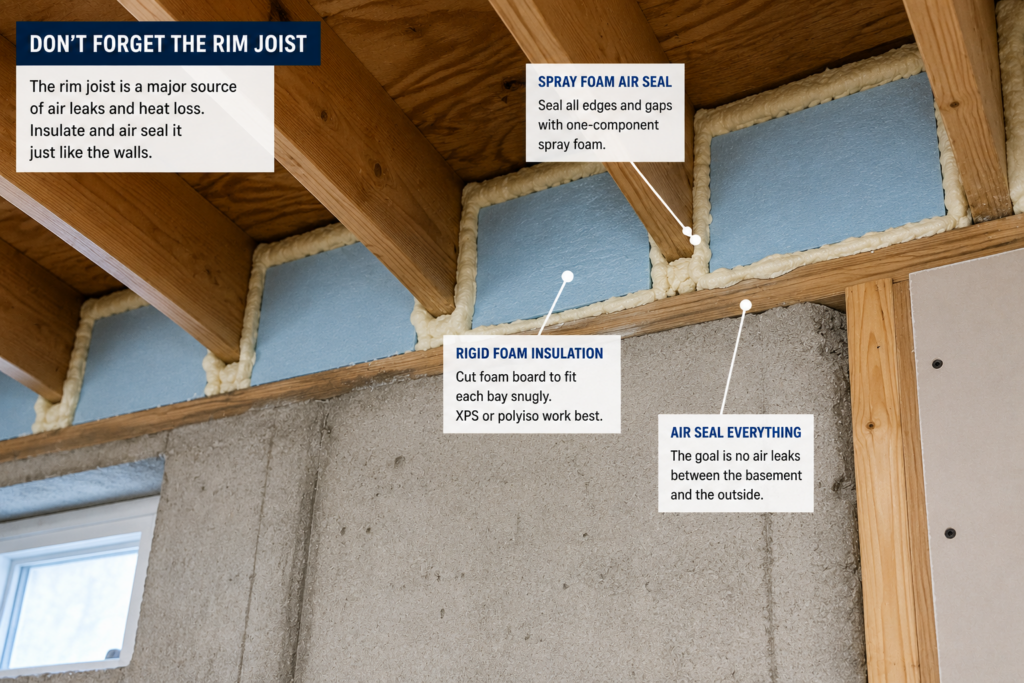
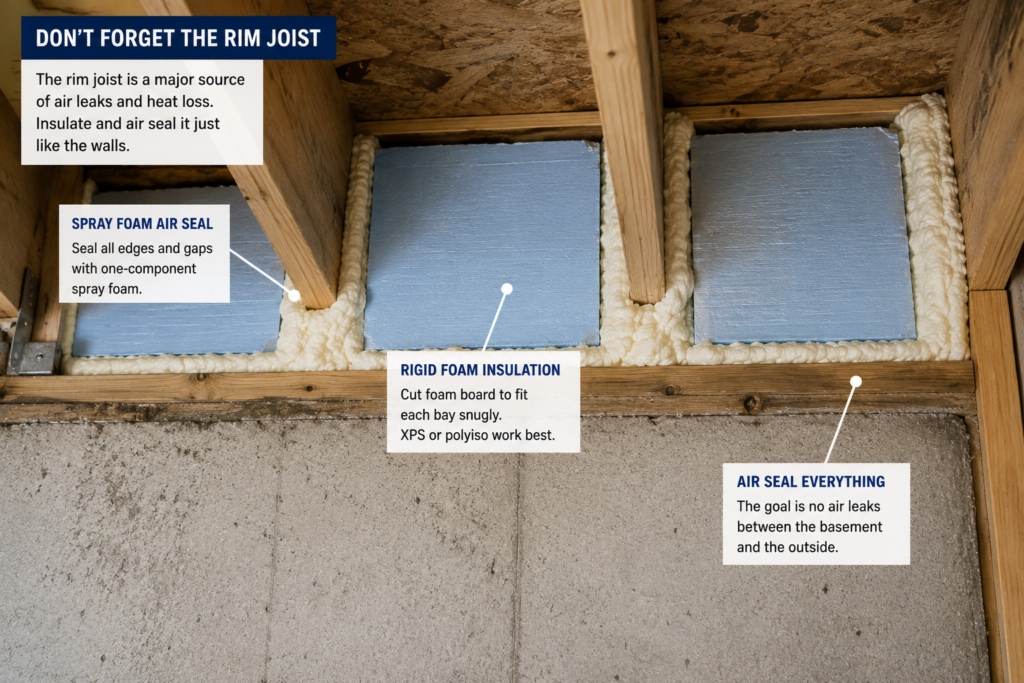
Don’t Forget the Rim Joist
The rim joist—the band of framing sitting on top of your foundation wall—is often the coldest, leakiest, most condensation-prone part of the whole basement, and most insulation projects skip it entirely.
The fix is simple: cut rectangles of 2″ rigid foam to friction-fit into each joist bay against the rim, then seal the perimeter of every piece with canned spray foam. Or, if you’re hiring spray foam for anything else, have them hit the rim joists while they’re there—it’s the single best-value spray foam application in the house. Avoid stuffing fiberglass alone into rim joist bays; it lets humid air reach the cold wood and condense, which is how rim joists rot from the inside.
Common Basement Insulation Mistakes to Avoid
❌ Insulating over an active leak. Fix water first, always. Insulation hides leaks; it doesn’t cure them.
❌ Fiberglass batts directly against concrete. The batts wick moisture, sag, and grow mold. Foam first, fluffy second (or never).
❌ Poly sheeting on the room side. Below grade, interior poly blocks the only drying path the wall has.
❌ Leaving foam seams untaped. Unsealed seams let room air reach the concrete, and each gap becomes a hidden condensation line.
❌ A regular lumber bottom plate on the slab. Concrete wicks moisture into untreated wood. Pressure-treated plate plus a capillary break, every time.
❌ Leaving foam exposed. Uncovered foam plastic is a fire hazard and a code violation in finished spaces. Cover it with 1/2″ gypsum board or another approved thermal barrier.
Recommended Products
Owens Corning Foamular XPS Rigid Foam – a common choice for basement wall insulation. Two-inch boards provide about R-10, but choose thickness based on your local code and climate zone.
Loctite PL 300 Foamboard Adhesive – Formulated specifically for foam; won’t dissolve the board like standard construction adhesive can.
Rockwool Comfortbatt (R-15) – Unfaced mineral wool for the stud bays: moisture-tolerant, fire-resistant, and easy to friction-fit.
Frequently Asked Questions
What is the best insulation for basement walls?
Rigid foam board (XPS, EPS, or polyiso) installed directly against the concrete is the best insulation for most basement walls. It insulates and controls moisture in one layer. Closed-cell spray foam performs even better but costs significantly more and is best reserved for irregular walls and rim joists.
Do I need a vapor barrier when insulating basement walls?
No separate plastic vapor barrier is needed—the rigid foam layer against the concrete acts as the vapor control layer. Adding poly sheeting on the interior side of a basement wall traps moisture in the assembly and often leads to mold growth.
Can I use fiberglass insulation on basement walls?
Only as a second layer inside a stud wall built in front of a sealed rigid foam layer, and only unfaced batts. Fiberglass installed directly against concrete absorbs moisture and supports mold growth.
What R-value do basement walls need?
Many current energy codes require R-10 continuous or R-13 cavity insulation for basement walls in milder climates, while colder zones typically require R-15 continuous, R-19 cavity, or R-13 cavity plus R-5 continuous. Two inches of XPS delivers R-10; always check your local code for the exact requirement.
Should basement insulation go on the inside or outside of the wall?
Exterior insulation performs slightly better and keeps the foundation warm, but it’s only practical during new construction or major excavation. For existing homes, interior rigid foam is the standard approach and works well when installed airtight.
How much does it cost to insulate basement walls?
DIY rigid foam materials often run from a few dollars per square foot and can land in the low thousands for a full basement once you include foam, tape, adhesive, canned foam, fasteners, waste, and local R-value requirements. Professional closed-cell spray foam usually costs several times more.