In many DIY shops across the globe, the table saw is the work horse, the engine and the beating heart of many shops. However, the accuracy, precision and utility of the typical table saw improves dramatically with the creation of a few simple jigs or additions to the saw that comes out of the box. One of those jigs (a crosscut sled) can be improved to allow for accurate 45° cuts as well as perfect 90° cuts.
Miter Sled
Miter sled
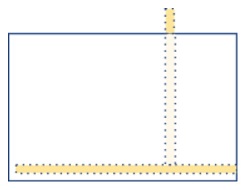
A basic crosscut miter sled improves the functionality of the standard-issue miter gauge that comes with most table saws as it increases the stability, safety and accuracy of cuts made on larger pieces. Commercially available versions of a miter sled are available on the market today, but often at prohibitive expense. It is assumed the reader has already fabricated a miter sled (as seen on the right) and wishes to upgrade it to include the 45° fence. The edge on the right hand side of this sled is the side that runs along the blade at a perfect 90° angle.
Miter sled at 45 degrees
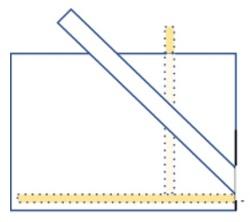
To fabricate the piece that can be used for the 45° cut, select a piece of hardwood that’s approximately 2–3” (5–8 cm) wide and long enough to cover the entire sled (see the figure on the right). If you’re going to make miter cuts in taller/thicker pieces of stock, then perhaps Make sure that the right hand edge has been jointed perfectly level as this affects the precision of your miter cuts. Also note how it protrudes on both the top and the side…that’s deliberate and necessary for this stage. To attach this strip to the miter sled, choose a point on one side of the hardwood runner and drill a small pilot hole through the jig and the piece of hardwood. Make sure you clamp the piece of hardwood in place so your pilot holes align properly. Once you’ve drilled the pilot hole, turn the jig over and drill a hole for the bolt—a ¼” (6 mm) diameter hole should suffice; countersink this hole to accommodate the bolt head but make sure it doesn’t go all the way through the plywood base. Now that you’ve drilled and countersunk the bolt, it’s time to drill a ¼” hole in the 45° fence. Note that it’s not critical at this point to have the angle exactly at 45°, just make sure the fence piece overhangs the right-hand edge so it can be trimmed shortly.
Once you’ve drilled a hole for the bolt, it’s time to lock it down to make the exact 45° cut. Several knobs are available to do this and they’re very inexpensive—just make sure the thread count of your bolt matches your knob. Using a reliable 45° angle source—several are available in varying price ranges and almost any home center, set the angle on your miter sled with this gauge and then secure your piece of hardwood using the bolt/knob. Note: this piece of hardwood “should” be resting against the 90° fence and that fence should represent the exact point where the blade makes contact with the wood. In doing this, you’ve established your future reference point for any/all 45° cuts. Run the miter sled through the saw and trim off the excess edge associated with the 45° cut. Your miter sled will now look something like this (see right). With this angle now properly established, you’ll be able to add or remove this guide as necessary since you’ve registered it perfectly against the fence and can bolt it down to ensure perfectly reproducible mitered cuts. From time to time, it might be prudent to check the absolute accuracy of the fence, particularly if you utilize it repeatedly. One final caution, it would also be wise to slightly chamfer the underside of the fence that attaches to the miter sled as dust can sometime accumulate and detrimentally impact the angle of the cut since the wood cannot properly register against the fence.
Miter Saw Table by Admin June 29, 2023 Installing The miter saw table has become one of the most useful power tools in many workshops, replacing the radial arm saw, which has all but…
Table Saw Push Stick by Admin July 8, 2023 DIY Power tools can be dangerous but easy to use. People get injured all the time doing seemingly effortless, normal work on their power tools; often…