Tree slices and slabs have been used as functional and decorative tables for centuries. While examples of refined furniture like those used by the Egyptian Pharaohs date back to around 2500 BC, it’s likely that simpler tables, crafted from logs or large wood cuts, existed long before that. These primitive tables may have lacked finesse, but they laid the foundation for more elaborate designs.
A tabletop made from a thick slab or slice of wood offers a relatively flat surface, something early builders likely found useful. While rough tools made the task challenging, even ancient civilizations like the Olmecs, who carved massive stone heads using only stone tools, were clearly up to the task. If they could shape basalt, shaping a wood slab wasn’t out of the question.
This natural style of table has seen a resurgence since the 1960s. As people grow increasingly disconnected from nature, furniture that showcases organic edges and tree rings brings a sense of grounded beauty back into our homes. Today, tree slice tables are especially popular in rustic, bohemian, and farmhouse-inspired interiors.
However, raw wood slices large enough to serve as coffee or side tables can be expensive. One way around this is by using slices from felled trees in your yard or from a neighbor. It’s a practical way to reuse resources and create a memorable piece that adds warmth and natural character to your home.
Slabs vs. Slices: Understanding the Difference
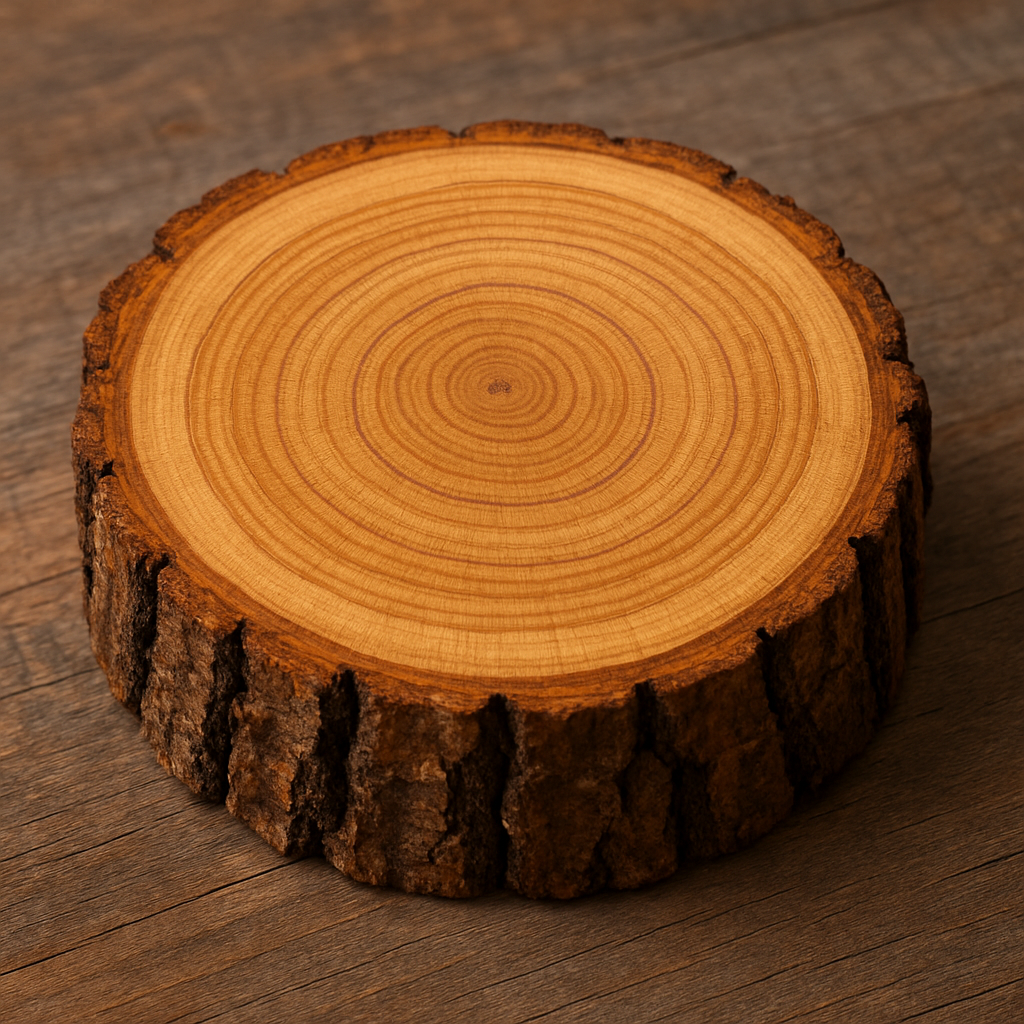
Both slabs and slices fall under the “live edge” category, which refers to wood with a natural edge preserved. A slab is cut along the grain, down the length of the trunk, exposing the long grain. A slice, on the other hand, is cut perpendicular to the grain, across the trunk, displaying the tree’s growth rings.
There are even hybrid cuts where the log is sliced at an angle, creating an oval shape with a mix of long grain and growth rings. These are rare and usually custom-cut at sawmills.
This guide focuses on tree slices, though many of the methods for preparing and finishing them apply to slabs as well.
Getting a Tree Slice
Finding a large tree slice isn’t always easy. While smaller slices (12″–16″) are readily available online, larger ones (24″+) are less common and often pricey. You can check sites like Etsy or look into kiln-dried slices like this walnut slab on Amazon.
If you have access to a fallen tree, you might be able to cut your own. A large mesquite or oak trunk, for example, could provide a usable slice. Just be aware that you’ll need a commercial-grade chainsaw or a sawmill attachment to handle the size.
A 30” diameter log can easily weigh over 1,700 lbs. Once cut, transporting it becomes a serious undertaking—think heavy machinery or teamwork with friends.
One trick to get a clean slice is using a chainsaw mill attachment. These typically cost around $200 and allow you to make parallel cuts with precision.
Drying the Wood Slice
Thicker slices take time to dry—about one year per inch of thickness. To speed things up, you can:
Store it in a dry, shaded area with good airflow
Use a space heater or homemade kiln (120°F is ideal)
Check progress with a moisture meter. The goal is 6–9% moisture
Stack the slice with spacer strips between boards to promote airflow. Add weight on top to reduce warping.
Preparing the Tabletop
Once dried, your slice will likely have some cracks (also called “checks”). Decide if you want to preserve the bark. If not, remove it before flattening the slice.
Use a router sled to plane both sides. A 3HP router and a large planing bit work best. Build a sled with rails to support the router evenly.
Flatten the underside first, then flip and level the top.
Sand the top surface with a random orbital sander, starting with 80 grit and working up to 220 or 320.
Cracks can be dealt with in one of two ways: installing a bow tie wood joint or filling the crack with colored epoxy. Both are common in the style of furniture that is made from wood slabs and slices.
You have two options for fixing splits:
Colored Epoxy Filler: Use mica powder to tint resin and pour into cracks. Hot glue and polyethylene sheeting can create a mold to hold the resin.
Bow Tie Inlays: Cut bow ties from a contrasting hardwood. Chisel matching mortises into the slab and glue the inserts in. This creates a rustic yet polished effect.
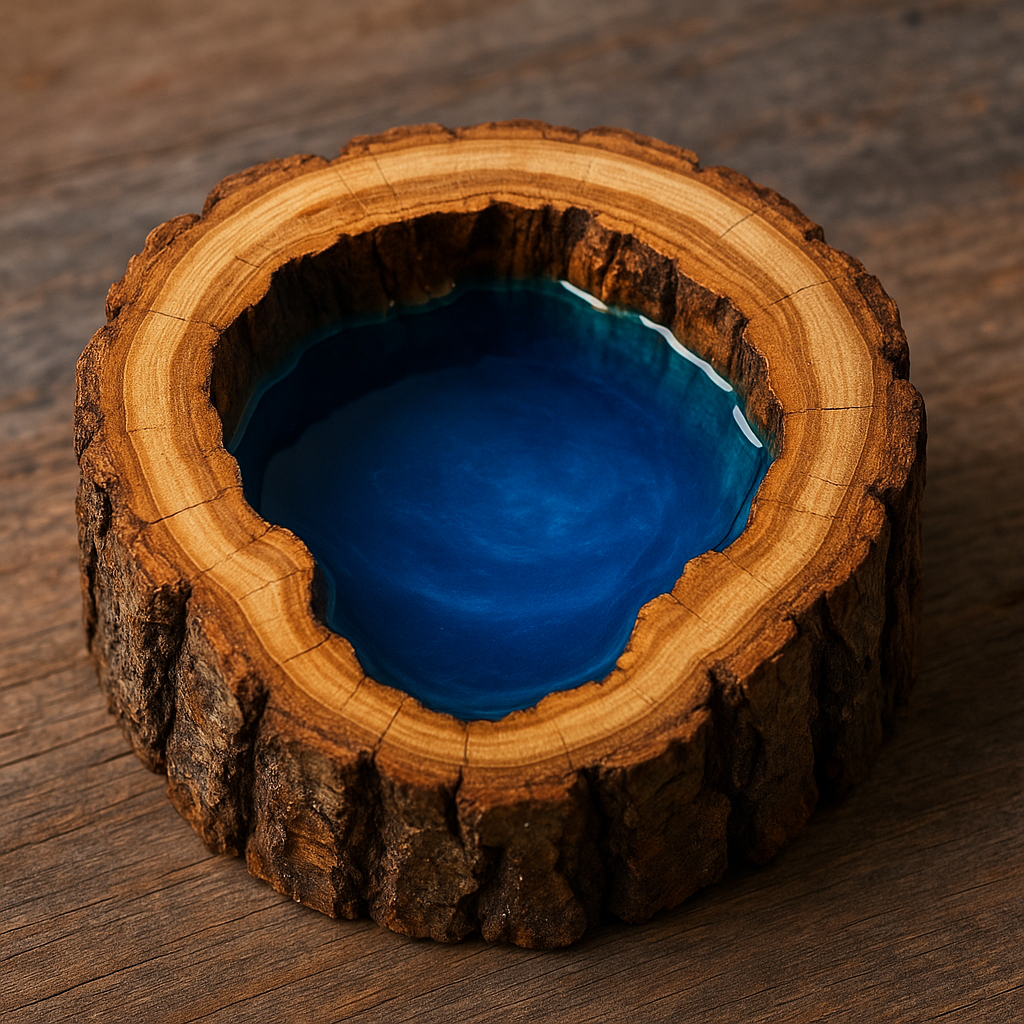
Epoxy Lakes
If the tree was hollow, fill the void with translucent blue epoxy to simulate a lake. Add small stones, sand, or shells before pouring for visual depth.
Finishing the Surface
End grain absorbs more finish than long grain, so a poured epoxy topcoat works well. Alternatively, try:
Use threaded inserts and bolts if the wood is dense, or pre-drill for wood screws.
Caring for Your Tree Slice Table Long-Term
After all the time and effort you’ve put into making your tree slice table, it’s worth learning how to keep it looking its best. These tables aren’t just pieces of furniture—they’re works of nature, so they need a bit of ongoing attention to age gracefully.
First off, I’d suggest keeping it away from direct sunlight or heating vents. I learned this the hard way when the finish on one of my early builds cracked after a few weeks near a radiator. Wood is sensitive to changes in temperature and humidity, so anything too extreme can cause new checks or warping over time.
Cleaning is easy—just wipe it down with a soft, dry cloth. If the table sees daily use (mine is a go-to coffee perch), I occasionally apply a light coat of wax or furniture oil to revive the luster. If you used Danish oil or another penetrating finish, you might want to reapply it once a year. Just scuff it lightly with fine sandpaper beforehand to help the wood soak it in.
Epoxy-filled cracks usually hold up well, but it’s smart to check them now and then. If you notice shrinkage or dulling, a quick touch-up with more resin can bring things back to life.
And finally, tighten up those leg screws every few months. Wood can shift just a little with the seasons, and loose hardware can sneak up on you.
With a little TLC, your tree slice table will only get better with time, developing richer tones, deeper character, and more stories to tell with each passing year.
Final Thoughts
Making a tree slice table requires time and patience, but the final result is a conversation piece that connects your home to the natural world. The wood’s imperfections—cracks, knots, rings—tell a story that can’t be replicated in factory-made furniture.
How to Join Planks for a Tabletop: A Complete DIY Guide by Admin March 20, 2025 Installing Creating a sturdy and beautiful tabletop starts with properly joining planks together. Whether you're making a dining table, coffee table, or workbench, a strong and…
Mastering the Art of Finishing Plywood for Stunning Results by Admin March 18, 2025 Finish Applying a finish to a woodworking project can be intimidating. A well-executed finish enhances the wood’s natural beauty, highlights craftsmanship, and gives the piece a…
Suar Wood: A Stunning Choice for Unique Furniture by Admin September 25, 2025 Hardwood A Personal Introduction to Suar Wood I didn’t go looking for suar wood. I just happened to wander into this workshop in Yogyakarta one hot…