
The paracord bracelet has become somewhat symbolic of the prepping and survival movement, often referred to as a “survival bracelet.” One might wonder why it is referred to as a survival bracelet, considering that there really isn’t much 10 feet of rope can do to ensure one’s survival. While it might be helpful, it’s not really a key piece of survival gear.
While survival may have been the origin of the paracord bracelet, it has become a bit of a fashion fad, being worn by many who have no interest in prepping or knowledge of survival. These people will probably never take their bracelet apart to use it in a survival situation; but will rather wear it as a fashion accessory. Since the commercial copycat versions of paracord come in a variety of different colors and patterns, the same basic paracord bracelet can be made to go with pretty much any outfit.
Those who want paracord bracelets in a variety of colors might want to make their own. Others might see a small business opportunity here, and want to make bracelets to sell. In either case, it’s much easier to make a paracord bracelet if one has a jig to work on.
Why Paracord?
Paracord is a shortening of the words “parachute cord,” because the original paracord was made during World War II for use in parachute risers. MIL-SPEC MIL-C-5040 details the requirements for seven different types of paracord, including type III, which is what most people know of as paracord. While created originally for use in parachute risers, soldiers quickly found it to be useful for a host of different applications, where lightweight but strong cordage was needed.
Paracord has actually been used for a wide variety of purposes, including being the cord of choice for suspending bars on the marimba and xylophone. It has also been used for making whips. In a survival situation, the cord can be disassembled, allowing the interior yarns to be used for a variety of purposes.
What makes type III Paracord so amazing is that even though it is only 4mm or 5/32” thick, it has a minimum tensile (pulling) strength of 550 pounds. All it takes is a look at the cordage available at any hardware store or home improvement center to realize that most common types of cordage aren’t anywhere near that strong.
So, what makes paracord so strong? It’s the specific construction that is detailed in the MILSPEC. type III paracord has 7 to 9 core yarns, each made of 3 strands. That is encased in a braided nylon sheath made of either 32 or 36 strands. The combination of the two makes for an incredibly strong cord.
Originally, the MIL-SPEC defined only “natural” or olive drab sheathing; however, manufacturers for the civilian market have expanded upon that, making both MIL-SPEC and copycat paracord in a wide variety of colors. While the copycat versions of the cord may look like the real thing, they do not meet the complex MIL SPEC requirements and will not support as much weight. The only secure way to identify which is real and which is false is to look at the core; non-MIL-SPEC cord will have less inner yarns or have a core made of a bunch of threads, not turned into yarns.
There is also a patented modification of the paracord, called SurvivorCord. It does meet the MILSPEC requirements, being manufactured with a seven yarn core; but the core also contains a monofilament fishing line, waxed jute to use as tinder for a fire and a brass wire for making snares, along with a candy-stripe manufacturer’s market strand to identify the cord.
Making the Jig
While the jig needed for making a paracord bracelet isn’t all that complicated; it can be all but impossible to make the bracelet without it. The jig holds the two halves of the buckle in place, which is necessary as two strands of the cord are looped through one half of the buckle, then the other. The amount of cord left between the two buckles determines the overall length of the finished bracelet, so the positioning of those two halves of the buckle while that cord is being looped through the two halves, as well as holding that length is crucial to making the bracelet.
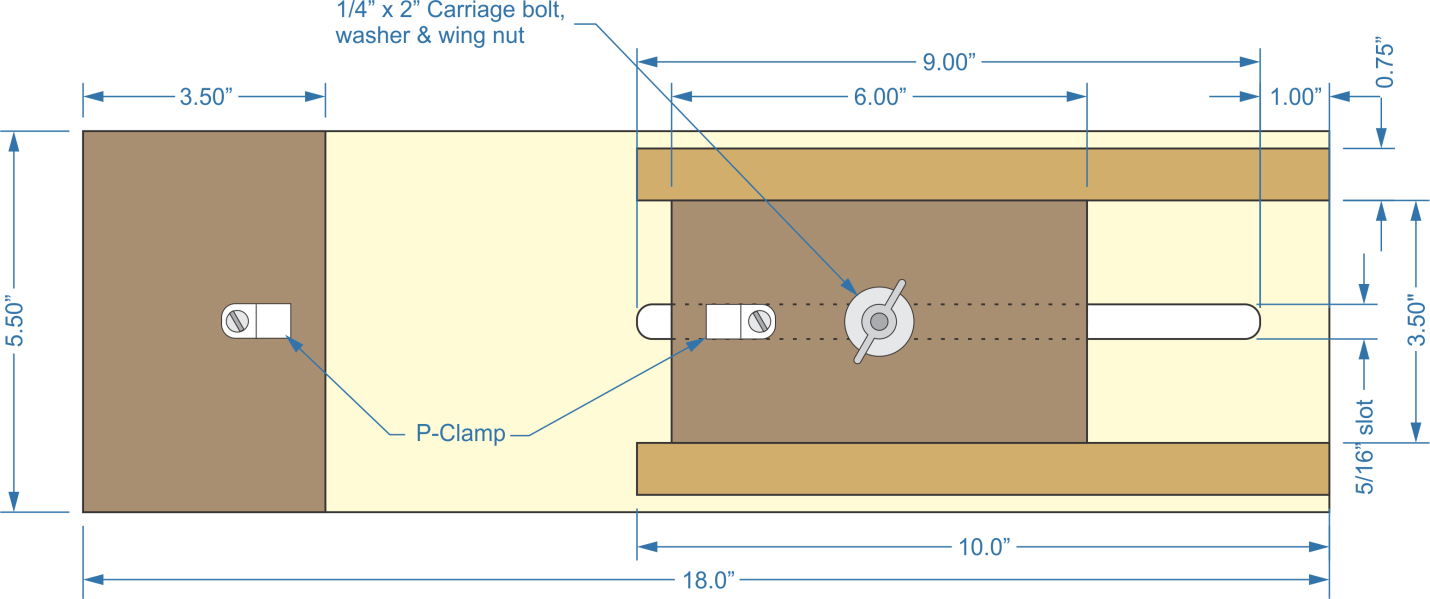
The base of the jig is made of an 18” long piece of 1”x 6”. Two pieces of 1”x 4”, one of which is 5.5” long and the other which is 6” long are also needed, as well as some ¾” square dowel. Rather than buying ¾” square dowel, ripping strips ¾” wide from a 1” thick board works well.
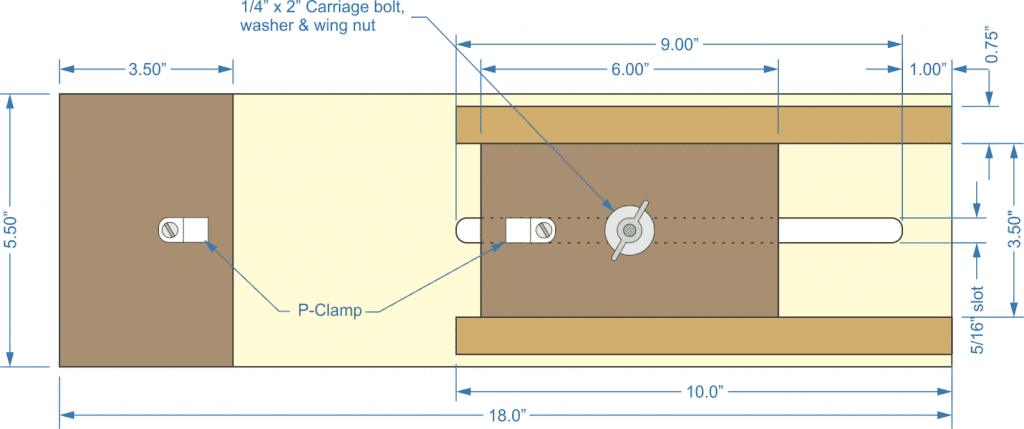
A slot will need to be cut through the baseboard, along its centerline, to make the jig adjustable. To make this, start by drilling 6/32” holes in both ends of the slot (in white above). Then scribe lines between the outer edges of those holes and cut the sides of the slot with either a jigsaw or scroll saw. While a perfectly cut slot is ideal, the big concern is that the ¼” carriage bolt will fit, sliding down the slot, while the slot being narrow enough to keep the carriage bolt from turning.
Attach the 5.5” long 1”x 4” block to the opposite end of the baseboard, aligning it with the edges of the base. While not a lot of strength is needed, it would be appropriate to glue the two pieces together, using brad nails to hold it while the glue dries.
The other 1”x 4” block needs to be left free-floating, able to slide down the track made by the two pieces of ¾” square dowel. Set it in place, installing the carriage bolt through the bottom, with the ash and wing nut to hold it. But do not tighten the wing nut, leaving the block able to slide. Then use that as a gauge for locating the two pieces of ¾” square dowel, gluing and nailing them to the base, with just enough room for the 1”x 4” inch block to slide between them. If this ends up being a bit snug, rub beeswax on the mating surfaces to help them slide.
Either way, it’s a good idea to remove the sliding block and either scribe a scale or glue one to the baseboard, so that spacing between the two blocks can be determined, without having to use a tape measure or rule. This spacing is intentionally adjustable, as it determines how long the bracelet will be.
The final step in making the jig is to install the two P-Clamps. These will hold the two halves of a buckle, with the female half attached to the mounted block and the male half mounted to the moving block. Loop the P-clamps through the buckle halves and screw them into the respective blocks, so that the mating edges of the buckle are flush with the facing edges of their respective blocks. A bit of accuracy is needed here to ensure that the bracelet length ends up as desired.
To help prevent the head of the carriage bolt from damaging the tabletop the jig will be attached to, it’s a good idea to install self-adhesive rubber feet to the four corner of the bottom of the jig. These are available in the hardware department of any home improvement center.
Using the Paracord Bracelet Jig
Making a paracord bracelet is easy, once the jig is available to use. Start by clamping the jig, overhanging the edge of a table with spring clamps. Then set the position of the sliding block for the length of the paracord bracelet desired. Snap the two halves of a buckle to the fixed buckle pieces on the jig. Then cut a piece of paracord, allowing one foot for every inch of bracelet length. Singe the ends of the paracord’s nylon sheathing with a butane lighter, to keep the cord from unraveling.
- Fold one piece of the paracord in half, then loop it through the near buckle. Pull the ends of that same piece of cord through the loop that is formed, tightening up the loop up against the buckle, making a half hitch.
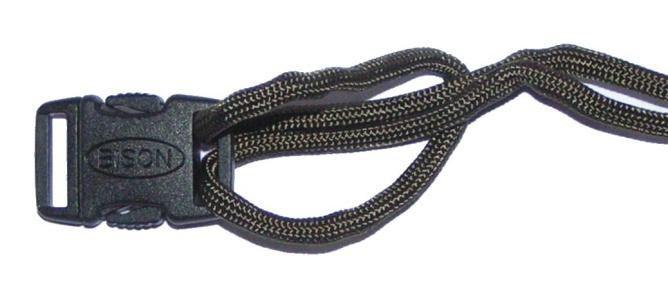
- Run the ends of the same piece of paracord through the loops on the far buckle. The bracelet will be woven around these two strands, using them as a core.
- Take one of the loose ends and pass it under the two core strands, then take the other loose end and pass it over the two core strands.
- Pull the end of the back strand through the loop made by the front strand. Then push the end of the front strand through the loop made by the back strand. Pull the knot that has been made snug, but not overly tight.

- The side that goes over and the side that goes under changes with each successive row knotted on the bracelet. As it shows in the photo above, the top loop left from the previous knot identifies which strand goes under the two core strands. Specifically, the strand coming out of the side of the knot with that top loop is the strand that goes under the core strands for the next knot.
- Continue tying knots, alternating over and under, until the near half of the buckle is reached. Once there, cut the ends of the cords off about 1/8” from the crossing. Then seal the ends of the cord by melting the nylon sheathing with a butane lighter.
Please note that these are directions for only tying the basic paracord bracelet pattern. There are other patterns used, including doing another layer over the basic one and using multiple colors of cord. Belts and other wider straps, such as guitar straps are made differently. However, the focus of this article is about making the jig, not about making the bracelets. So, we’ll leave that for those who are interested to research elsewhere.