If you’ve ever run out of space for your lawn tools, garden gear, or even firewood, you’re not alone. Many homeowners eventually find themselves needing more storage, but renting a self-storage unit is expensive, and having to drive across town just to grab a shovel is a hassle.
The good news? You can build your own lean-to shed right next to your house or garage over a weekend. It’s affordable, space-efficient, and you won’t need to pour a fortune into materials or permits.
In this guide, I’ll walk you through how I built my lean-to shed—start to finish—including tools, material picks, and expert tips to save time (and money).
🧱 What Materials Do You Need to Build a Lean-To Shed?
When it comes to building a lean-to shed, choosing the right materials up front can save you time, frustration, and money. This isn’t just about grabbing whatever’s on sale at the hardware store—certain materials hold up better in the weather, resist rot and pests, and make construction easier for a solo DIYer.
Here’s a breakdown of the core materials you’ll need, along with some smart tips based on what I used for my shed build.
Pressure-Treated Lumber
Start with pressure-treated 2x4s or 2x6s for all your framing. These will resist moisture and insect damage better than standard lumber. Use:
2x4s for wall framing and studs
2x6s or 2x8s for roof rafters and headers
4×4 posts if you’re anchoring into the ground or adding extra support
Pressure-treated lumber will have a greenish hue and should be allowed to dry out before painting or staining. Don’t skip this—it prevents bubbling and peeling down the line.
Siding Options
Your siding plays a big role in both looks and weatherproofing. Here are popular choices:
T1-11 Plywood – Easy to cut and install, plus it gives a rustic shed look. Paint or stain to protect it.
Vinyl Panels – Match your house siding, great for low maintenance.
Metal Panels – Durable, fire-resistant, and secure.
Whichever you choose, use galvanized nails or exterior screws and seal around the edges with waterproof caulk.
Roof Materials
For a standard lean-to shed, you’ll want a roof pitch of 2:12 to 3:12, which is enough for water runoff without looking too steep. Here’s what to layer:
EPDM rubber (great for waterproofing flat or low-pitch roofs)
🛑 Don’t forget drip edge flashing and sealant tape—those small extras make a big difference.
Fasteners & Anchoring
Use exterior-grade wood screws or galvanized nails throughout your build. For attaching ledger boards or securing rafters to an existing wall, lag bolts are a must.
If you’re anchoring to concrete or pavers, grab some masonry anchors or Simpson Strong-Tie brackets for a rock-solid hold.
Paint, Sealants, and Extras
Finally, once your structure is built, you’ll want:
Exterior paint or wood stain
Weatherproof caulk
Heavy-duty shed hinges and latches
Weatherstripping foam for the door
Shed vent or small window for airflow
✅ Quick Tip: I used leftover deck stain on my exterior T1-11 panels to match my fence and keep things budget-friendly. Held up great through two winters and counting.
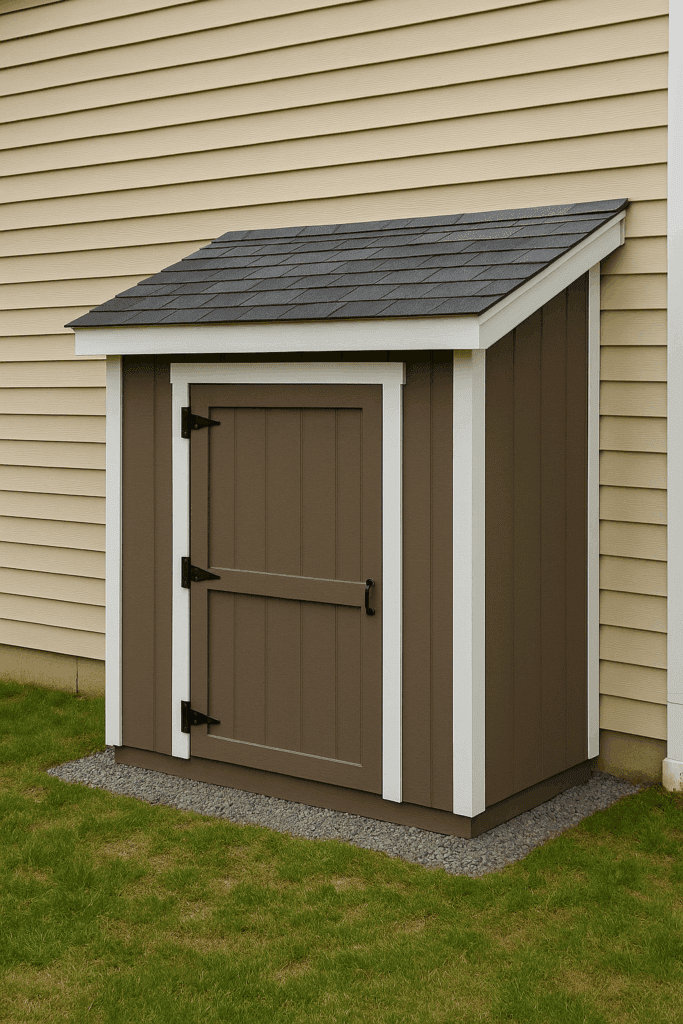
What Is a Lean-To Shed?
A lean-to shed is a simple, three-sided structure with a sloped roof that leans against an existing building—like your house or garage—for support. It’s a minimalist alternative to a traditional four-wall shed and costs far less to build.
It’s the perfect solution for:
Lawn mower storage
Rakes, shovels, and garden tools
Firewood stacking
Camping gear or bikes
Trash can shelter
Because it’s attached to another structure, it uses fewer materials and gains stability from the existing wall.
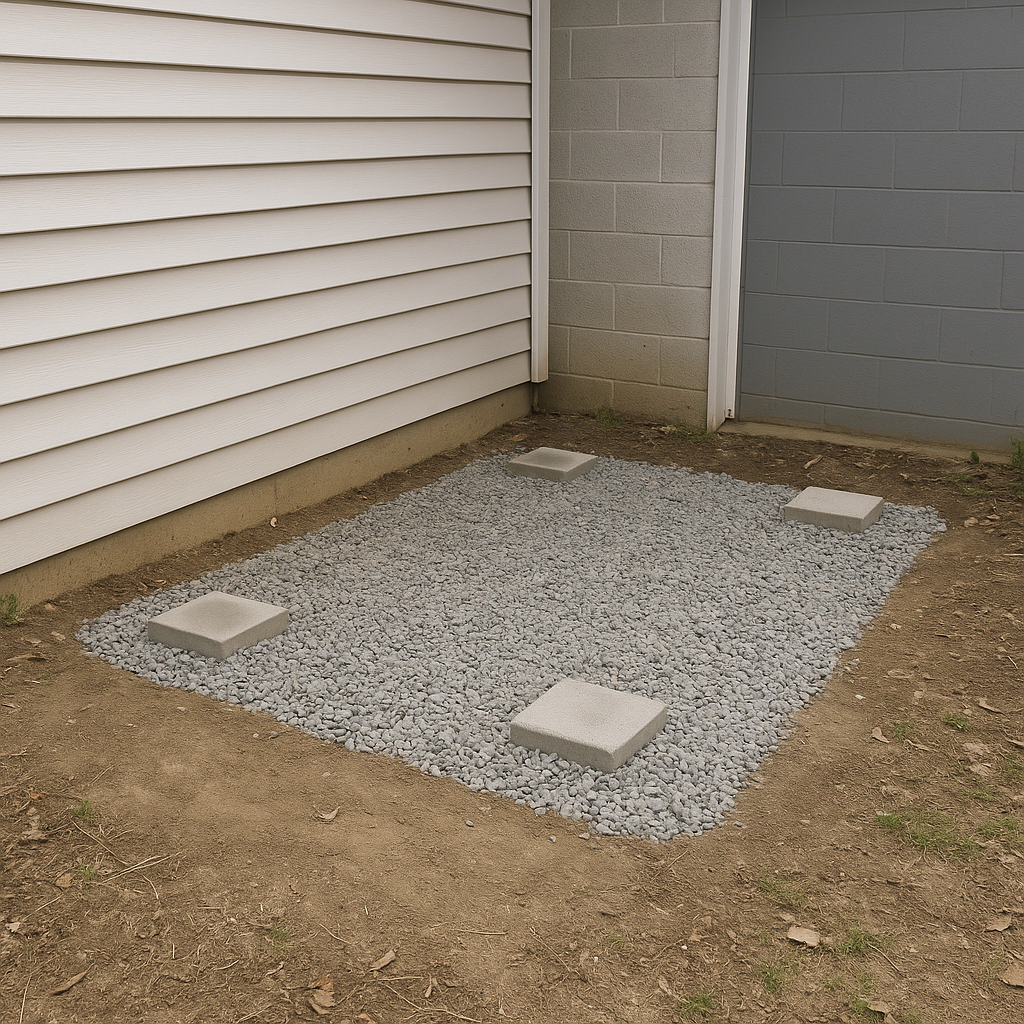
Step 1: Choose the Right Spot and Prepare the Base
🔹 Location Tips
Look for a flat area against a solid wall that’s not prone to flooding. Make sure the roof can slope downward away from the main building, allowing water to drain properly.
🔹 Foundation Options
You’ve got three solid choices for shed flooring:
Concrete Slab – Long-lasting and durable. Ideal if you’re storing heavier equipment.
Wooden Floor – Easier for DIYers. Use pressure-treated joists over pavers or concrete blocks.
Dirt Floor – Fast and free, but only ideal for weather-resistant storage or firewood.
👉 If you’re using a wood floor, space your support blocks evenly and double-check for level before framing.
You don’t need a full-blown contractor setup to build a lean-to shed—but having the right tools on hand makes the difference between a smooth weekend build and a frustrating mess of splinters and stripped screws. Here’s what I used, plus a few upgrades that saved me serious time.
Measuring & Layout Tools
Tape Measure – Get a 25-foot model with a strong standout. You’ll measure roof spans, wall heights, and stud spacing.
Framing Square & Speed Square – For squaring corners and marking angled cuts.
Level – A 4-foot level helps check base blocks, wall plumb, and roof pitch. Don’t eyeball it!
✅ Pro Tip: I marked stud placement with a pencil on both the top and bottom plates to make framing go faster.
Impact Driver (optional) – If you’re using long structural screws or building solo, this saves your wrist.
Nail Gun (optional) – Speeds up siding and roof sheathing, but not necessary.
You’ll also need a good set of drill bits, screw tips, and a magnetic bit holder.
Assembly & Lifting Tools
Clamps – Use these to hold wall frames square while you drill. I used 6″ and 12″ sizes.
Ladder– A 6-foot ladder is enough for most lean-to sheds under 8 feet tall.
Rubber Mallet– Great for nudging boards into place without damaging edges.
🔧 Don’t underestimate a solid work surface—I used a pair of sawhorses and an old door as my cutting station. Game changer.
Safety Gear
Safety Glasses– Always protect your eyes when cutting or drilling.
Work Gloves – Pressure-treated wood splinters are no joke.
Ear Protection – If using power tools for extended periods.
And yes—wear a dust mask when cutting plywood or OSB. Those fine particles add up.
Step 2: Frame the Walls
You’ll be building three walls—the house or garage forms the fourth.
🔹 Back Wall (Attached Wall)
This side leans against your home. No framing is needed unless you’re notching for clearance. Just anchor a ledger board for the rafters.
🔹 Side Walls
Use 2×4 pressure-treated lumber for the frame. Stud spacing should be 16 inches on center. One wall should be taller than the other to create your roof slope.
🔹 Front Wall (With Door)
Frame this like a basic stud wall, but include double studs on either side of the door opening for strength. You can build a custom door later or buy a pre-hung model.
🛠️ Tip: Temporarily screw the walls together and check that everything is level before final anchoring.
Now that you’ve got the bones and roof up, it’s time to close things in.
🔹 Siding Options
T1-11 Plywood – Budget-friendly and easy to paint.
Vinyl Panels – Low maintenance, good for matching your home.
Metal Sheets – Long-lasting and secure.
Secure panels to the studs with galvanized nails or screws. Be sure to seal edges with exterior-grade caulk.
🔹 Door Installation
You can either build a door from ¾” plywood and 1x4s or hang a pre-hung shed door kit. Use heavy-duty hinges, weatherstripping, and a hasp-style lock for security.
A lean-to shed is one of the easiest, most rewarding projects you can take on as a homeowner. You don’t need a ton of space, you don’t need special permits in most areas, and you can build it over a weekend with basic tools.
More importantly, it gives you real-world function—whether that’s keeping your rakes out of the rain or organizing seasonal gear.
If you want to regain control of your clutter without dropping $3,000 on a prefab shed, this build is your best bet.


")
")
")
")
")
")