Wood ducks are rather unique. Unlike other species of duck, who normally nest at ground level, wood ducks like getting up off the ground, typically building their nests in hole found in trees. They are, by far, not the only birds to nest in cavities found in trees and in fact will often occupy holes left behind by woodpeckers and other birds, as well as naturally occurring holes in trees.
This provides an opportunity for those who have ducks on their property or who want to invite them. Building duck houses, as with building any other bird, will provide a safe nesting place for the birds, encouraging their proliferation. Properly located, near water, wood duck houses allow these birds to nest in their natural habitat, protected from predators which would eat their eggs.
Wood ducks are fairly small, as ducks are concerned; but they are still larger than most birds that one would make a birdhouse for. Therefore, any house that is made for them needs to take that into account, providing the necessary space. Fortunately, an adequate sized house can be built from a single 1”x 10”, 10’ long. Ideally, this should be some sort of wood which will withstand moisture, such as cedar or redwood. Pine can be used, but it will not last as long, as the moisture will tend to cause the wood to rot.
Looking at the various wood duck boxes that are available for purchase online, there are a couple of things that are commonly seen. We’ll want to incorporate these details into our own design:
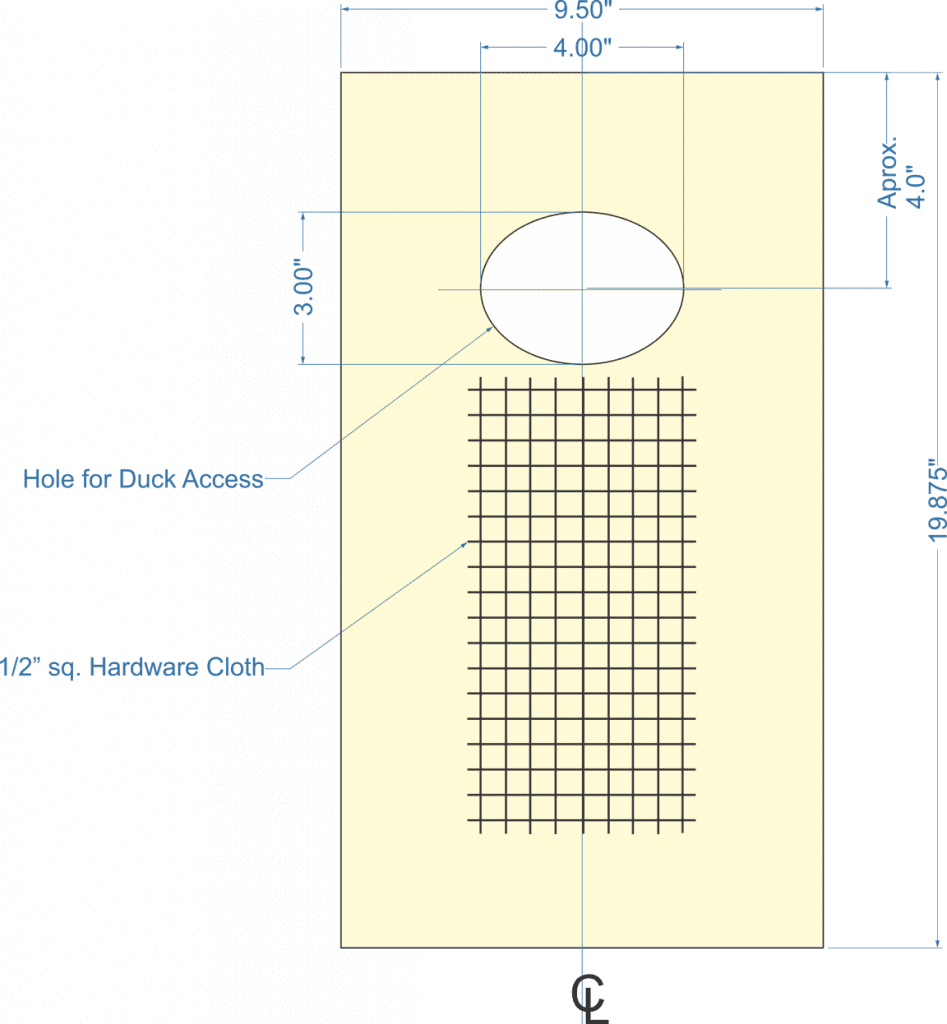
The entry hole is usually oval, rather than round. Birds which nest in holes can be picky about this, as well as the size of the hole. This hole is also usually high up on the box.
The roof needs to overhang the front of the box, providing protection from the rain. A sloped roof will help the box’s roof shed that rain.
One side of the box needs to hinge open, allowing for the nesting material inside to be replaced. At the same time, it also needs to latch in place for use.
The inside of the front (below where the hole is located) needs to have hardware cloth stapled to it, in order to provide a means for the chicks to climb up to the hole and exit the house.
Building the Box
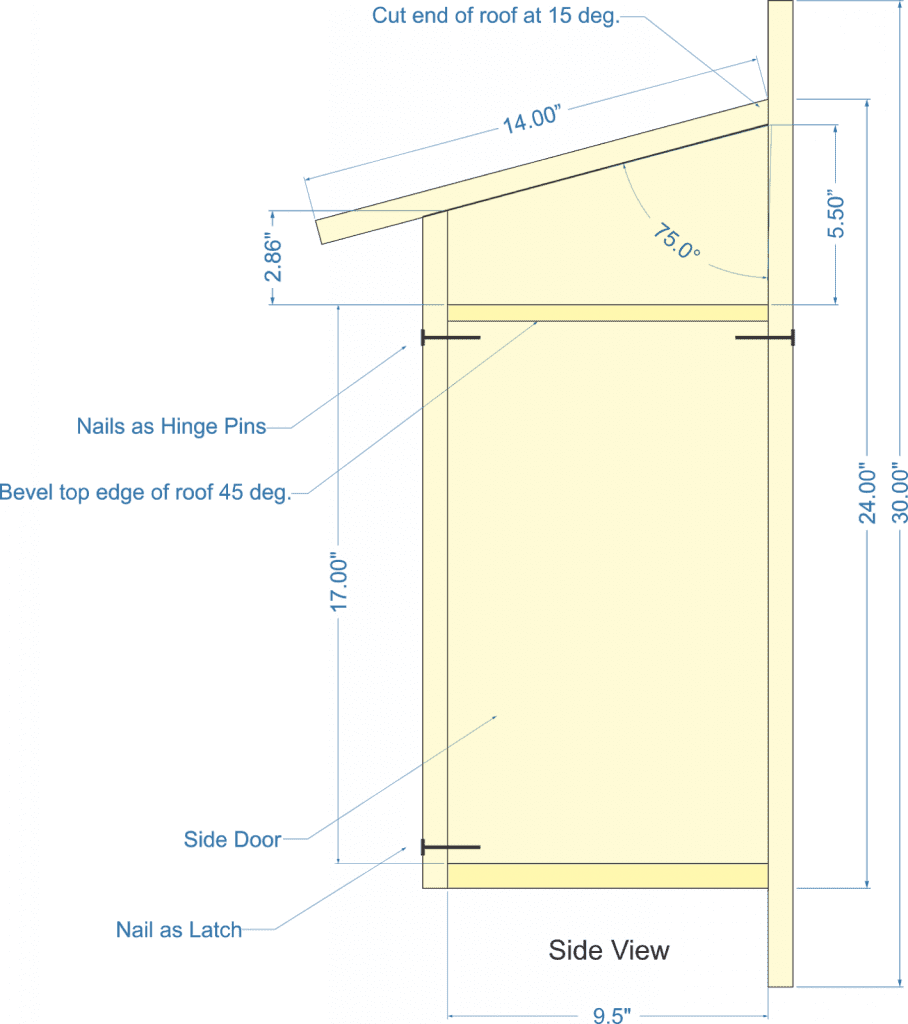
Since we are going to build the nesting box out of a single 1”x 10”, that limits out size somewhat. Obviously the maximum width of the box will be 9 ½”, but it doesn’t need to be quite that deep. However, we will leave it that deep to make the project easier. The overall height will be 22 ½”. As do many other people who make their own wood duck houses, we’re going to put a longer back on this one, which will make it easier to mount the house when it is done.
Dimensions for the duck house can be extrapolated from the side view drawing below. Keep in mind that these dimensions, while accurate, can be considered to be approximate, allowing the woodworker to adjust them as they feel might be needed.
It is easiest to cut all the pieces first, and then assemble the house. Three pieces need to have bevel cuts made on them, the roof, the front and the door. This can be easily accomplished on a table saw, band saw or with a handheld circular saw. If they are cut with a circular saw, it is recommended to use a square as a guide.
Side view
The door shown in the drawing above only needs to appear on one side. The other side is a solid piece. To cut, make both pieces identical, and then cut off the angled top part of the piece which will be used on the door side. This piece will be permanently attached to the front, roof and back. The door needs to have the top edge beveled, in order to allow it the necessary clearance to swing on the hinge pins.
The front of the wood duck house, shown below, also has one end that is bevel cut at15 degrees, allowing it to meet up neatly with the roof, without leaving a gap. Since the hole is not a circle, it will need to be cut out with a jigsaw or scroll saw. Be sure to smooth out the edges with a rasp.
There is hardware cloth attached to the inside of the front piece of the house, as shown in the diagram below. This is to allow the ducklings something to climb up, so that they can get out through the hole. Adult ducks can easily jump that high, but the ducklings cannot. As an alternative to the hardware cloth, parallel slits can be cut into the inside of the piece, providing a more natural setting; not that the hardware cloth will cause any problems for the ducks.
Door dimensions
To assemble the wood duck house, it is best to use a combination of wood glue and screws. The ducks won’t care how neatly it is assembled; but we all know that any true woodworker is going to want to do a good job. Start working from the back, attaching first the fixed side, then the fixed piece of the other side, the front, bottom and roof, checking the fit of each part before attaching it.
The door is not permanently glued and screwed to the rest of the house. Rather, two nails are used as hinge pins at the top and a third nail as a latch at the bottom, to keep it closed. drill holes, slightly larger than the diameter of these nails, so that there is clearance for them to pass through the front and back of the duck house. The holes for the hinge pins should not be full depth, allowing the nails to grip into the wood of the door. But the hole for the latch needs to be deeper than the nail is long, so that it can be slid in and out as needed.
The wood duck house should be fairly water tight, as is, with the roof overhanging the sides and front. Even so, it might be a good idea to run a single bead of caulking along the back of the roof, where it butts up against the back board. This is the one potential leak point. It is not necessary to paint the house, but is better rather to allow the wood to weather, fitting into the environment.
Using the Wood Duck House
The wood ducks that will inhabit the house need bedding in the bottom of it. A few inches of cedar shavings are ideal for this; not sawdust, but shavings. These can be cut from scrap with a plane or purchased from pet supply stores, as they are used for bedding for a variety of small animals. The cedar shavings will need to be replaced every year, after the chicks have hatched and the mating couple has moved out of the house.
All ducks are waterfowl so the house needs to be placed near fresh water, facing the water and away from trees. Keep in mind that the ducks will need clear access to fly up to the front opening and land there. It will need to be mounted to some sort of pole, either a 4”x 4” or a metal fence pole. The ducks don’t want their house to move.
The house should be mounted at least three feet above the high water mark. If mounted on the land, mount it about six feet above the ground. A predator guard needs to be added below the house, to keep raccoons and other predators from gaining access. While there are several different variations of this, the most common is an inverted cone made out of aluminum flashing.
Drying Wood in Oven: A Complete DIY Guide by Admin September 23, 2025 More About Most people don’t give a second thought to drying wood in an oven until something goes wrong. I didn’t either. I slapped together a pine…
Best Practices for Using Mineral Spirits on Wood by Admin May 20, 2025 Finish . Looking to clean old wood or prepare it for stain? Mineral spirits offer an easy, safe, and effective method for refreshing wood without damage.…