When most people think about a canoe, they picture something old. Not outdated—just established. A shape that’s been around forever and somehow still works exactly the way it should.
That’s because the canoe is one of those rare designs that never really needed fixing.
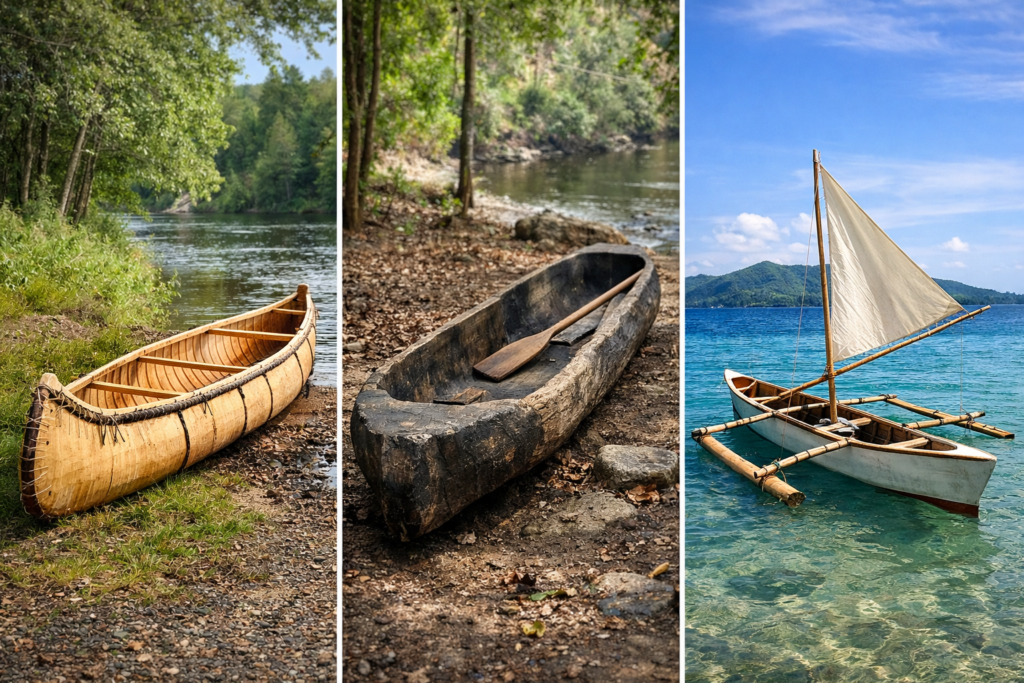
Long before powerboats, long before aluminum hulls and molded plastics, people were moving across water in canoes. Not just in North America, either. Indigenous cultures around the world developed their own versions. Some stayed close to rivers and lakes. Others went out onto the open ocean, using outriggers to stay upright in rough water.
When Europeans arrived in the New World, they didn’t improve the canoe. They adopted it.
Their ships were impressive, but their small boats weren’t. Longboats were heavy, awkward, and poorly suited for shallow rivers. Canoes, on the other hand, were light, fast, and capable of slipping through narrow water that larger boats couldn’t touch. Fur traders figured this out quickly. For a long time, the canoe was the primary means of moving goods and people inland.
The materials changed over the years—birch bark, dugouts, canvas, aluminum, fiberglass—but the canoe itself barely did. Same basic shape. Same purpose.
That’s part of why building a canoe today still makes sense.
Why Build a Canoe Out of Plywood?
Traditional canoe building usually means bending solid wood planks over a frame. It’s beautiful work, but it’s slow, demanding, and unforgiving. Every plank has to be shaped just right. Miss by a little, and the hull suffers.
Plywood simplifies the process.
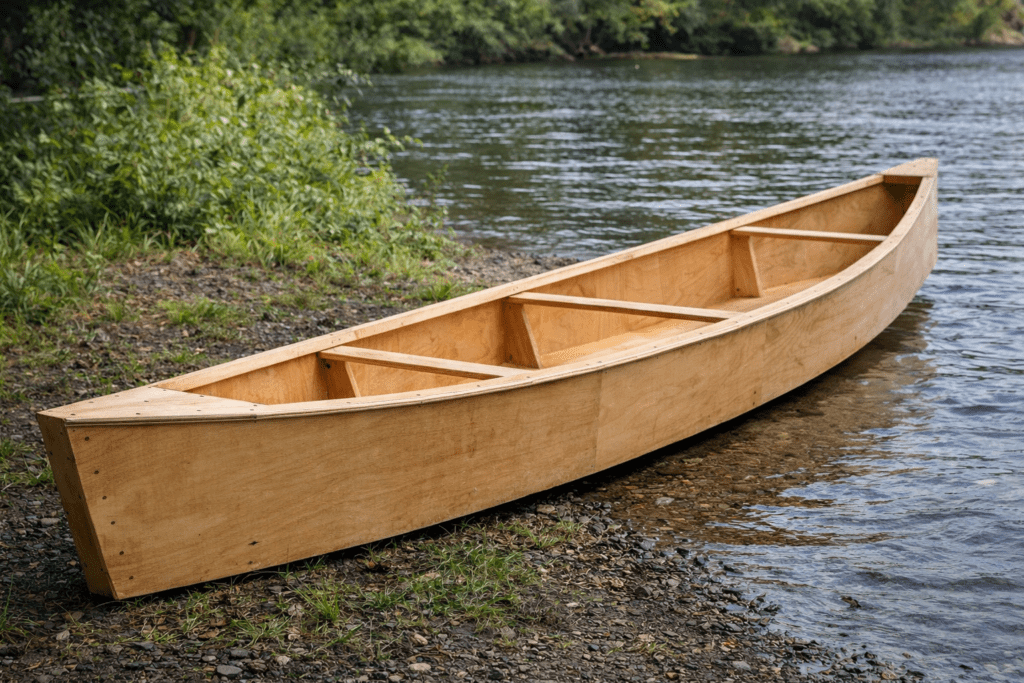
Instead of dozens of shaped planks, a plywood canoe is built from a few large panels—usually two sides and a bottom. Those panels bend just enough to form the hull without needing extreme shaping or specialized tools.
Yes, the hull ends up a little more angular than a traditional plank-built canoe. In practice, that doesn’t matter much. On the water, a well-designed plywood canoe paddles cleanly, tracks straight, and handles calm rivers and lakes without trouble.
For anyone who wants to build a canoe without years of boatbuilding experience, plywood makes the project realistic.
A Brief Look at Traditional Canoes
Before plywood, Native American canoes generally fell into two categories.
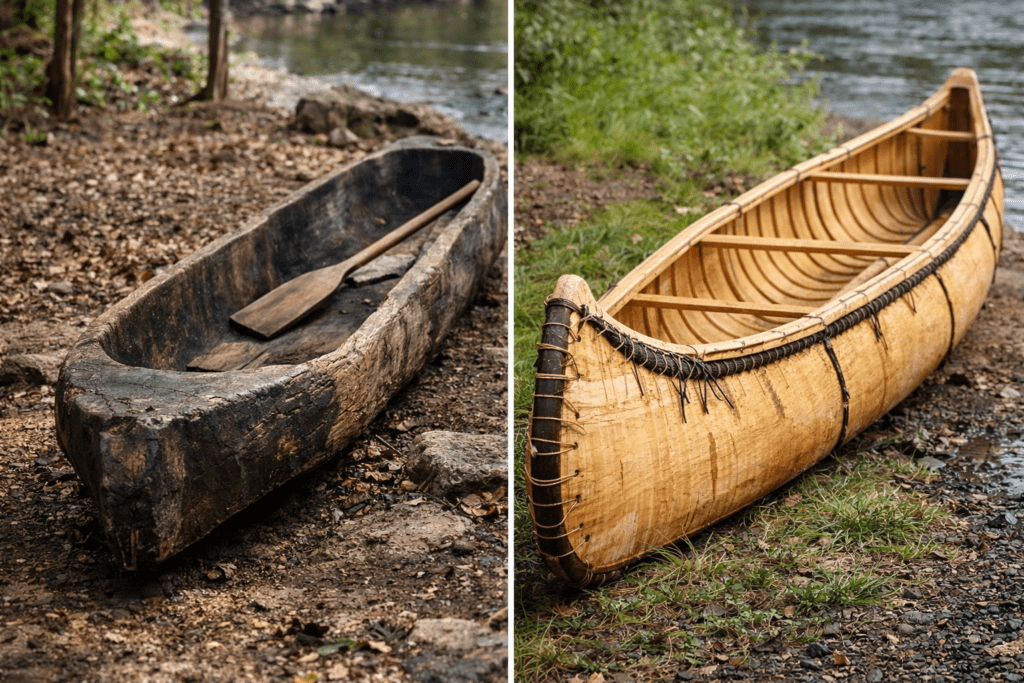
In areas where large trees were available, dugout canoes were carved from a single log. Fire and hand tools hollowed them out, and hot water softened the wood, allowing the sides to be spread for stability. They were heavy, but tough.
In the Northeast and upper Midwest, birch bark canoes were more common. Birch bark could be peeled without killing the tree as long as part of the bark was left intact. Builders stretched the bark over a wooden frame and sealed the seams. When large birch trees became scarce, canoe builders adapted by using multiple strips instead of a single sheet.
By the late 1800s, canvas-over-wood canoes became popular. After World War II, aluminum and fiberglass took over. Still, the canoe itself stayed the same. Only the materials changed.
A plywood canoe fits naturally into that progression.
Choosing a Canoe Design
Plywood canoes come in a few styles. Some designs use multiple narrow panels to create a rounded hull. Others keep things simpler.
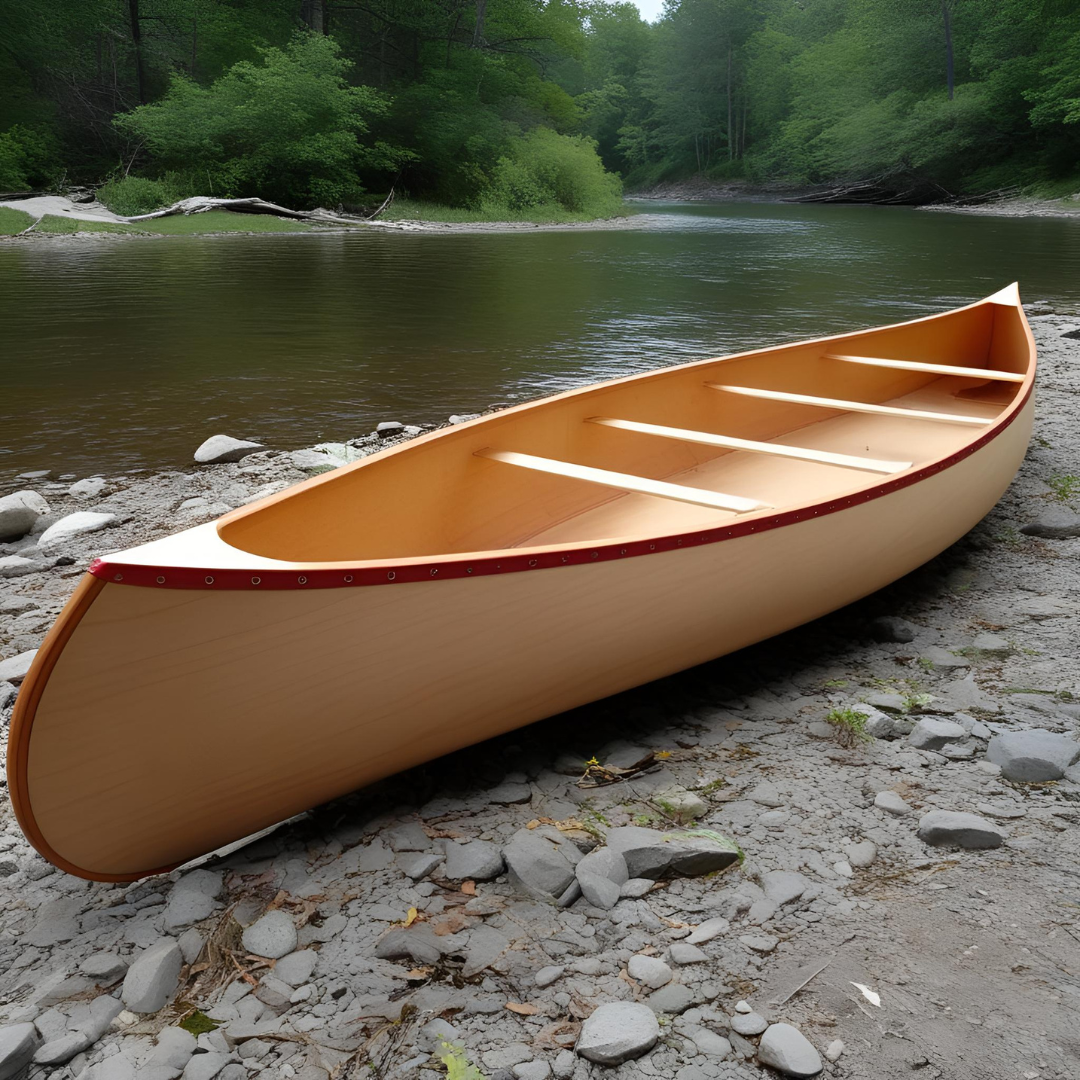
The most straightforward design is the pirogue, a flat-bottomed canoe. It can be built from three sheets of plywood and usually ends up around 15 to 16 feet long. It’s stable, easy to paddle, and forgiving for first-time builders.
Plans are widely available, including free ones. They’re usually not full-size templates but scaled drawings showing how to lay out the panels. While it’s possible to design a canoe from scratch using cardboard models, starting with proven dimensions avoids a lot of frustration.
Tools and Materials You’ll Need
You don’t need a full boat shop to build a canoe. Most of what’s required is basic woodworking gear, plus a few materials that matter more for quality than convenience. If you already do DIY projects, there’s a good chance you already own half of this.
The most important material is the plywood itself. A canoe lives in water, so regular construction plywood isn’t a good idea. Marine-grade plywood is the standard choice because it uses waterproof adhesive and doesn’t contain internal voids that can trap moisture over time. Most builders use thinner sheets for the sides and something slightly thicker for the bottom to balance flexibility and strength.
You’ll also need clear, straight lumber for parts like the gunwales, stems, and seats. Cedar is popular because it’s light and easy to work with, but other hardwoods are also commonly used. What matters more than species is avoiding knots and twisted grain.
Epoxy is used throughout the build. It bonds the panels, seals the wood, and keeps water out. Some seams are reinforced with fiberglass cloth, while others are filled with epoxy thickened using wood flour or fiber. Both methods work when done properly.
For finishing, a marine varnish or exterior paint is needed to protect the epoxy from sunlight. Epoxy alone doesn’t handle UV exposure well, so this step isn’t optional if you want the canoe to last.
As for tools, a jigsaw or handsaw handles curved cuts, a drill is used for drilling holes and installing fasteners, and clamps help during glue-ups. Sanding takes more time than people expect, but patience matters more than equipment here.
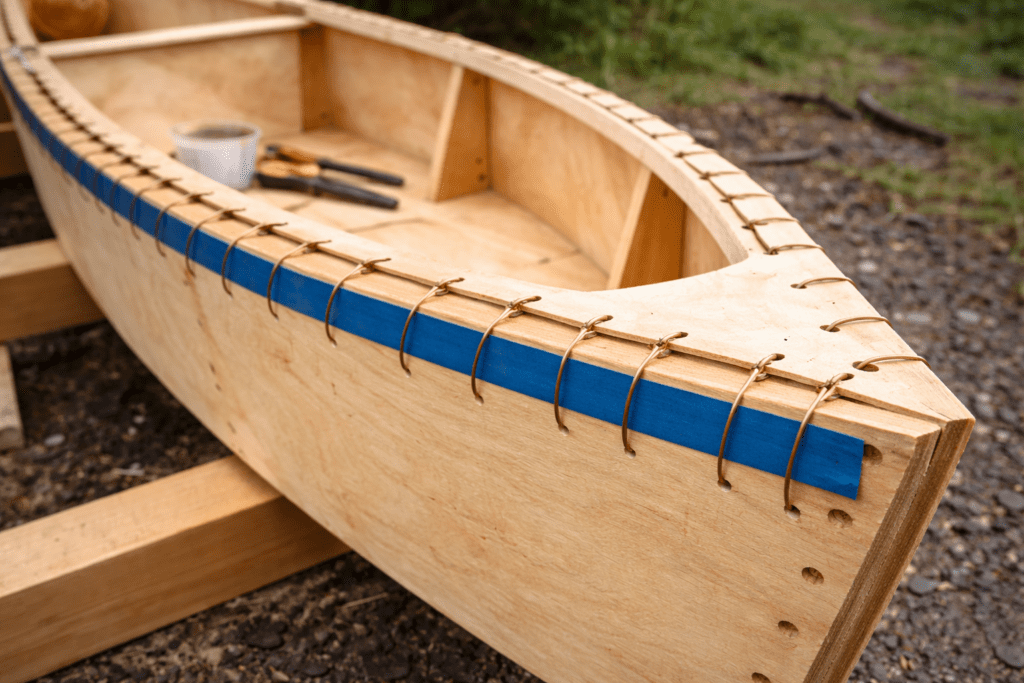
Stitch-and-Glue Canoe Construction
Most plywood canoes are built using stitch-and-glue construction. Instead of clamps and heavy jigs, the panels are temporarily stitched together using wire or ties.
Small holes are drilled near the panel edges, usually about 3/8 inch in. The wire is threaded through and tightened just enough to align the panels. Everything stays loose at first. Once the shape looks right, the stitches are snugged up.
Many builders tape the outside seams before stitching to help hold alignment. That tape comes off later.
The seams are then bonded with epoxy. Some builders use fiberglass cloth. Others use epoxy thickened with wood flour. On the inside, the epoxy is shaped into a smooth radius along the seam. After it cures, the canoe is flipped, and the outside seams are reinforced.
Once the epoxy sets, the stitches are removed, and the holes are filled later during finishing.
Each side panel and the bottom panel are usually made from two pieces joined end-to-end. This allows a longer canoe to be built from standard plywood sheets.
The shapes are laid out using measurements from the plans. Brads are tapped in at reference points, and a thin strip of wood is bent against them to draw smooth curves. Scoring the face veneer before cutting helps prevent splintering.
Panels are cut slightly oversized and sanded back to the line. It’s slower, but cleaner.
The panel halves are joined using reinforced butt joints. A backing strip is glued across the joint on the inside face. Thickened epoxy is used, and weight or clamps keep everything flat while it cures.
Installing the Stems
At the bow and stern, solid wood stems are installed to reinforce the pointed ends of the canoe. Without them, those areas rely entirely on plywood edges.
Stems are cut from knot-free lumber. The angle between the side panels is measured, and half that angle is cut into each side of the stem blank. The fit doesn’t need to be perfect right away. Fine-tuning is expected.
The stem is glued in place and clamped. After curing, it’s trimmed flush with the hull. Some builders add a stainless bolt through the hull into the stem for extra insurance against impacts.
Installing the Gunwales
Until the gunwales go on, the canoe still feels flexible. That changes quickly once they’re installed.
Gunwales come in two parts: an inwale on the inside and an outwale on the outside. They stiffen the hull, protect the edge, and provide attachment points for seats and decks.
The strips are soaked and pre-bent to reduce stress during installation. Forcing dry wood into place sometimes works. Other times, it cracks halfway through clamping.
Both gunwales are glued on at the same time, which means a lot of clamps and some patience. Doing one side at a time is fine if clamps are limited.
After curing, the top edge is trimmed, sanded, and optionally rounded over. This makes the canoe more comfortable to carry.
Keel Installation
A canoe keel isn’t structural in the traditional sense. It’s there to take the abuse and help the canoe track straight.
The keel is a narrow strip of hardwood shaped to match the hull. Some designs taper it so it’s thicker near the bow and stern.
It’s glued in place with epoxy and temporarily screwed from inside the canoe since clamping isn’t practical. Once cured, the screws can be removed or left in place if they’re stainless.
Rounding the keel edges reduces drag and prevents it from catching on rocks.
Spreaders, Seats, and Decks
Permanent spreaders are installed near the gunwales to keep the hull from flexing inward. At least one goes in the center. Others may be added depending on the design.
Seats are installed later, after the hull is fully stiffened. Mocking them up with scrap wood first helps get placement right. Balance matters more than people expect.
Bow and stern decks are cut from plywood scraps and installed on top of the gunwales. Adding support underneath is important, since these areas are often used as lifting points.
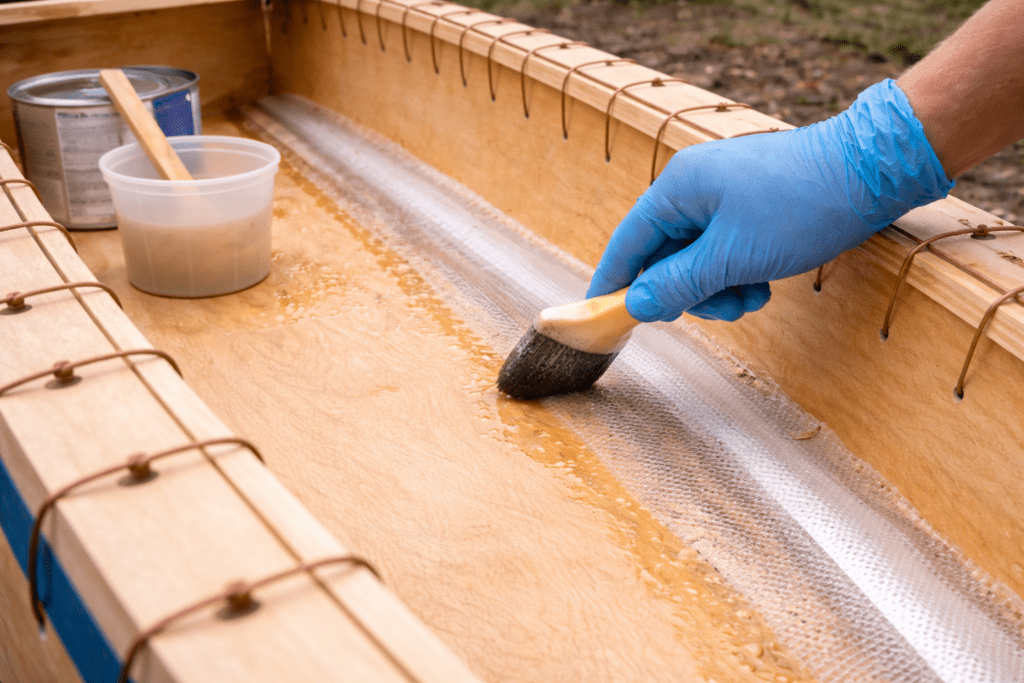
Finishing the Canoe
A finished canoe starts with sealing.
Most builders apply three coats of epoxy to the entire canoe, inside and out, sanding lightly between coats. Epoxy waterproofs the wood but isn’t UV stable, so it needs protection.
Some people paint the exterior and varnish the interior. Others varnish everything. The choice is personal. What matters is protecting the epoxy from sunlight.
After final sanding and touch-ups, the canoe is ready.
It probably won’t be perfect. That’s normal. A canoe doesn’t need to be flawless. It needs to float, paddle well, and hold together—and if you built it yourself, you’ll know exactly why it does.
Is a plywood canoe actually durable? Yes. When it’s built correctly and sealed properly, a plywood canoe can last many years. Most problems come from exposed edges or skipped sealing steps.
How heavy is a homemade canoe? Most plywood canoes fall between 45 and 65 pounds, depending on design and materials.
Is a plywood canoe good for beginners? Flat-bottom designs, such as pirogues, are very stable and well-suited for calm lakes and slow rivers.
Can a canoe be stored outdoors? It can, but covered storage or good airflow will greatly extend its life.
How long does it take to build a canoe? Most people complete a canoe over several weekends. Epoxy cure times slow things down more than the work itself.
Related Posts:
How to Build a Lean-To Shed (Step-by-Step DIY Guide) by Admin June 17, 2025 DIY If you’ve ever run out of space for your lawn tools, garden gear, or even firewood, you’re not alone. Many homeowners eventually find themselves needing…

")
")
")
")
")
")