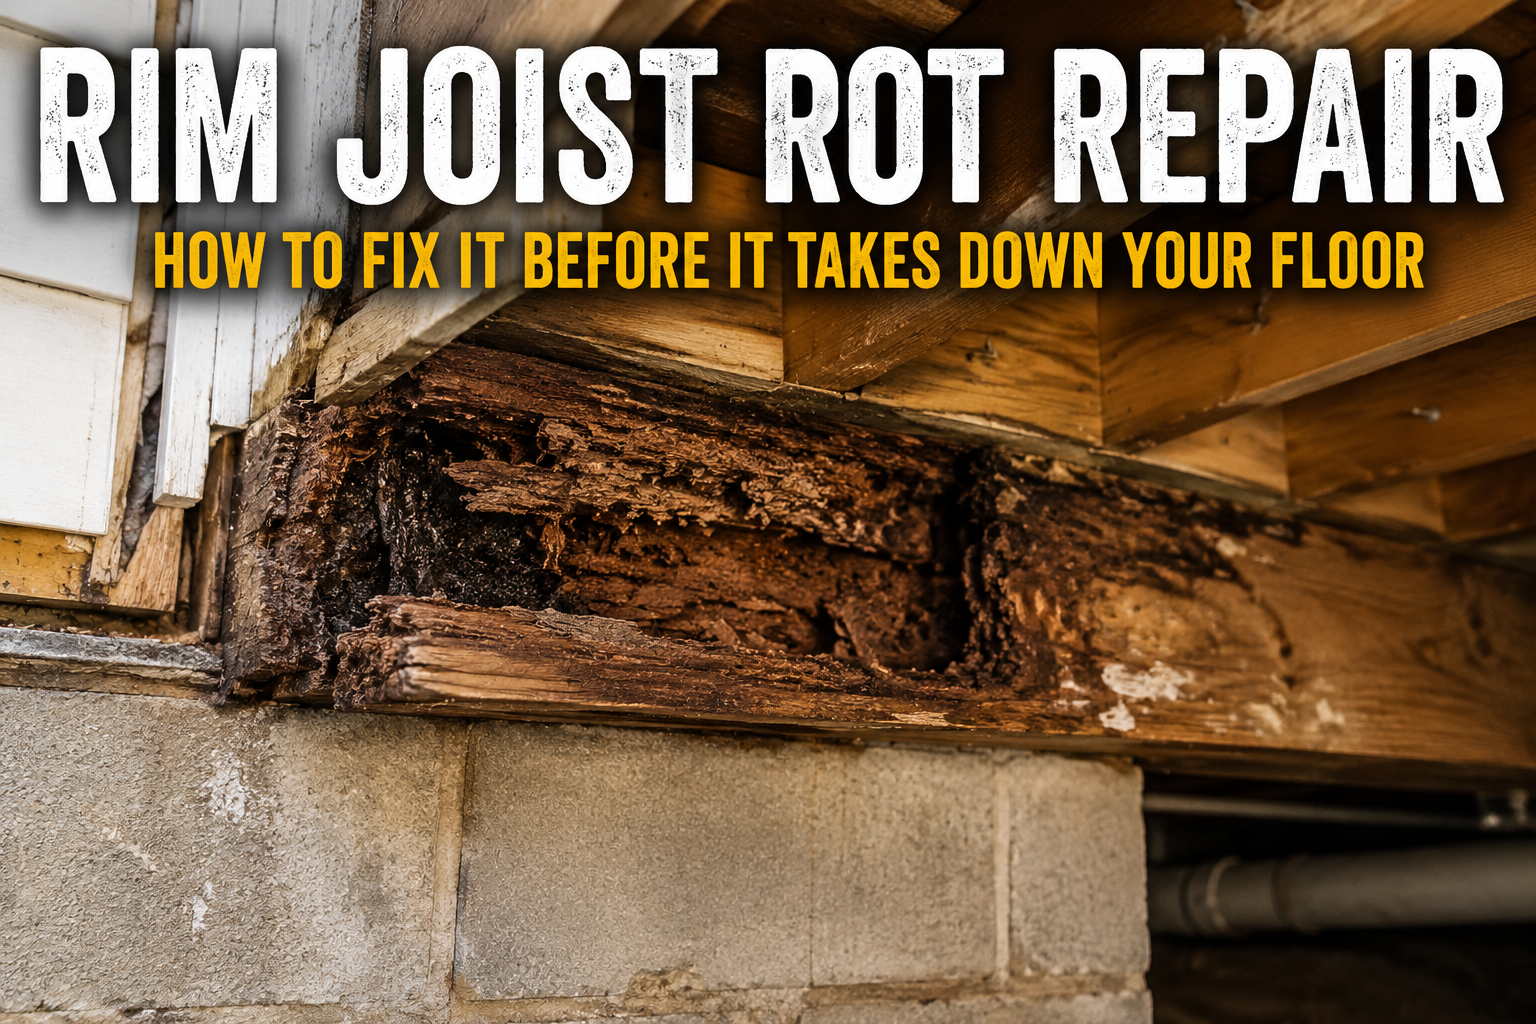
Rim joist rot is one of those problems that hides in plain sight. It sits along the outer edge of your floor framing, tucked behind siding or buried in a crawlspace, quietly soaking up moisture for years before anyone notices. By the time you spot the sagging floor or the soft spot near an exterior wall, the rim joist may already be carrying only a fraction of the load it’s supposed to support.
This guide walks through how to identify rim joist rot, when you can repair it versus when you need to replace it, and exactly how to do the job so it actually holds.
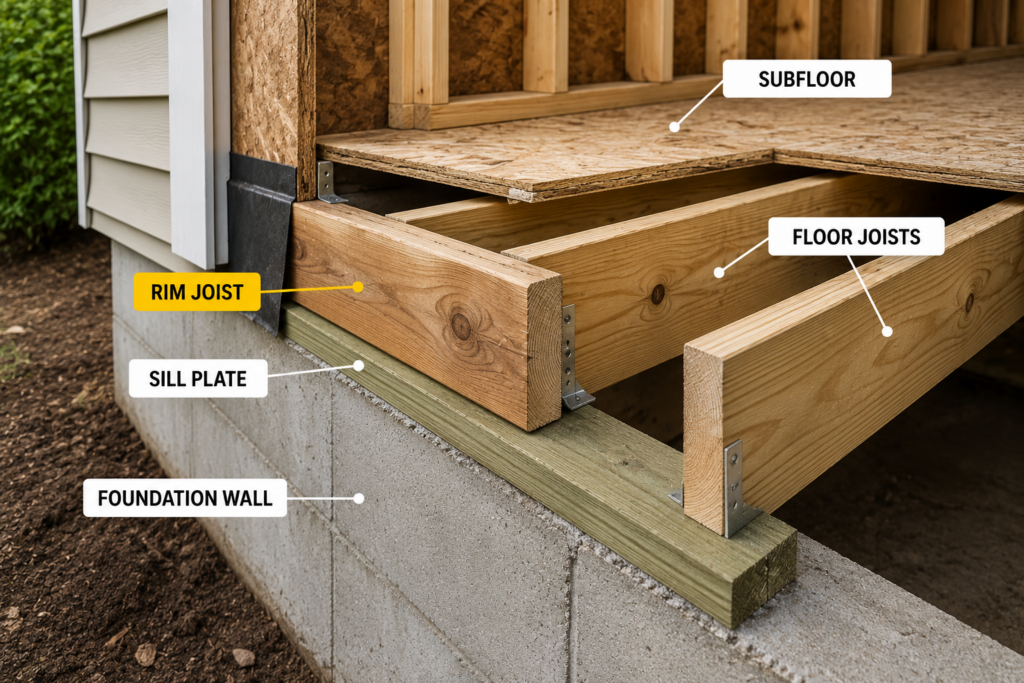
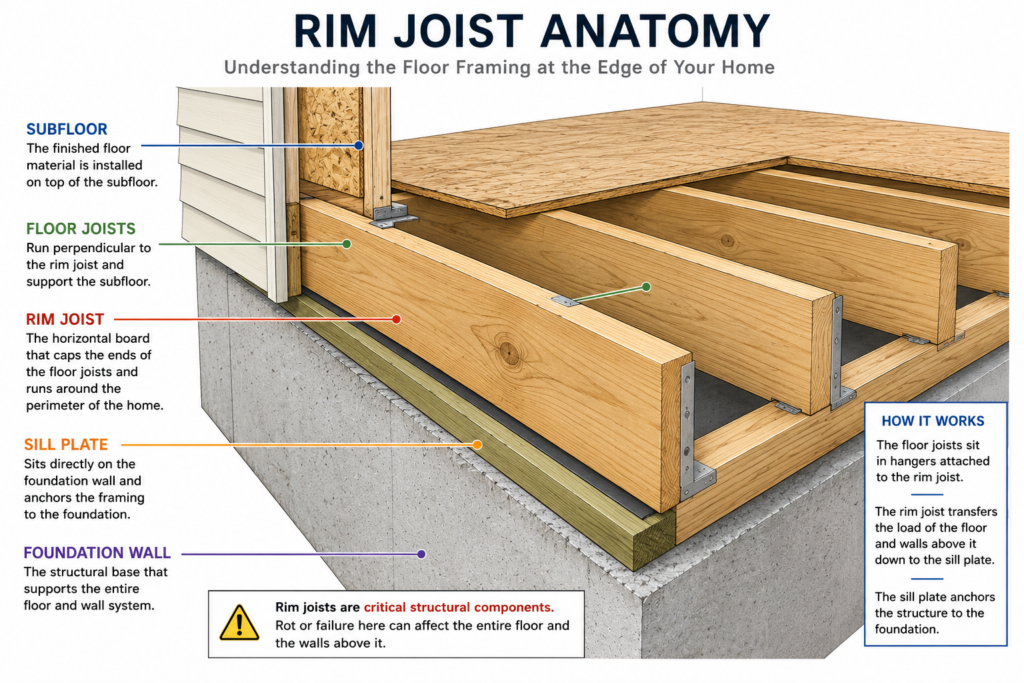
What Is a Rim Joist (And Why It Rots So Often)
The rim joist (also called a band joist or end joist) is the horizontal board that caps the ends of your floor joists, running around the perimeter of your home where the floor framing meets the foundation or exterior wall. It’s structural — it transfers the weight of your floor and the walls above it down to the foundation.
It also sits in one of the worst spots in the house for moisture exposure. It’s close to grade, often poorly ventilated, and frequently the first piece of wood that gets hit when siding, flashing, or a sill plate fails to keep water out. Unlike a fascia board or a window sill, a rim joist is load-bearing, which is exactly why rot here gets expensive fast if it’s ignored.
Common Causes of Rim Joist Rot
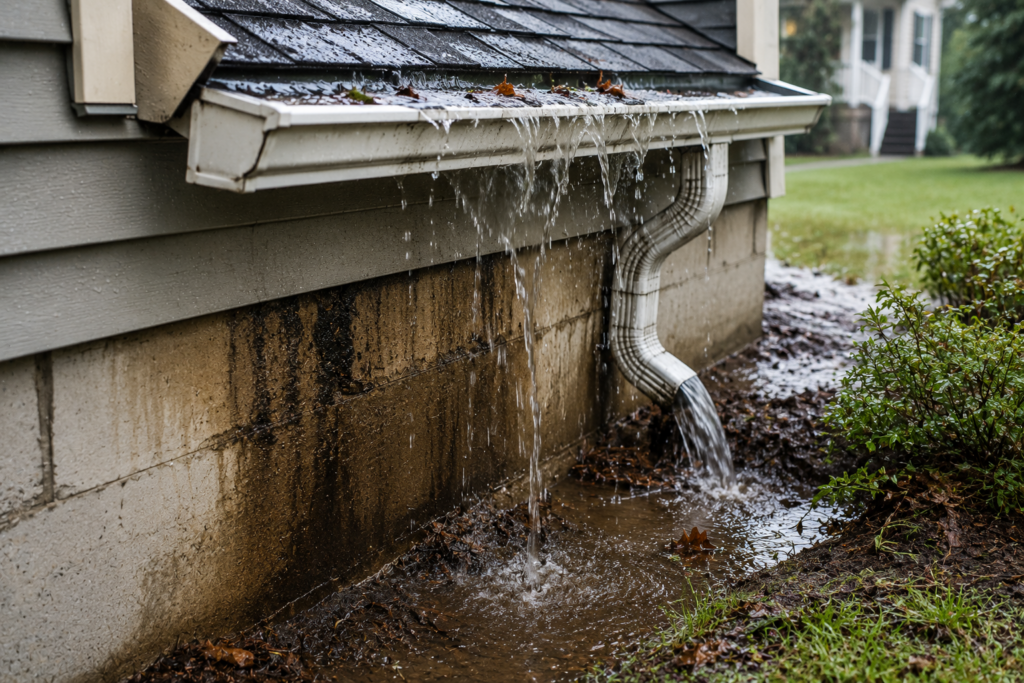
Failed flashing where siding meets the foundation
Gutters that overflow or downspouts that dump water right next to the foundation
Poor grading that slopes water back toward the house
Condensation in unvented or poorly insulated crawlspaces
Sprinkler heads or hose bibs spraying directly onto the band board
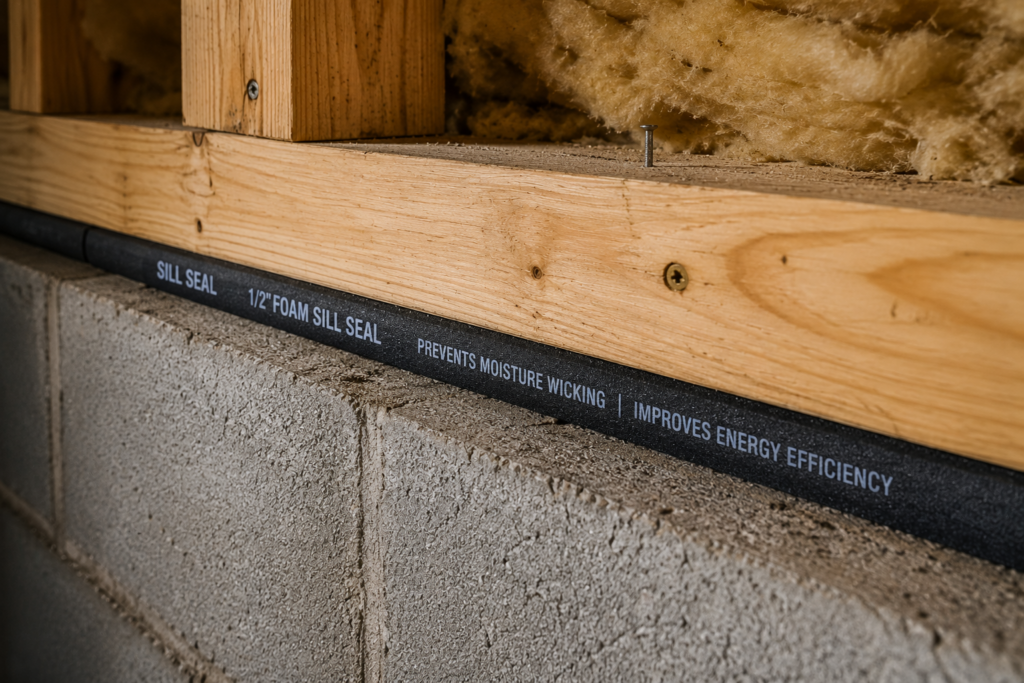
Missing or deteriorated sill seal between the foundation and the rim joist
Old, single-pane basement windows with failed caulking that let water track down the wall and onto the joist below
If you’ve already dealt with rot elsewhere in your framing, the underlying moisture mechanics are the same ones covered in our guide on how to stop wood rot before it spreads — the rim joist is just one of the highest-stakes places it can show up, because unlike a deck board or trim piece, it’s actually holding your house up.
Rim Joist Rot vs. Other Framing Rot: Quick Comparison
Repair Type
Typical Cost (DIY)
Structural Risk
When to Call a Pro
Rim joist rot
$150–$600 (materials)
High — supports floor & wall load
Rot spans more than 4 ft, or wall above is load-bearing
Sistering a floor joist
$50–$150 per joist
Moderate — localized
Sag exceeds 1/8″ per linear foot
Window sill rot
$30–$100
Low — non-structural
Rot extends into the wall framing
Sole/sill plate rot
$200–$800
High — bears entire wall load
Almost always — jacking a wall is unforgiving
❌ The Mistake Most Homeowners Make
The most common mistake isn’t skipping the repair — it’s patching the surface and ignoring the source. Slapping epoxy filler on a rim joist without first fixing the flashing, grading, or ventilation problem that caused the rot is like bailing water out of a boat with a hole still in the hull. Within a year or two, you’re back to square one, except now the new wood is rotting too, and you’ve already used up your one shot at an easy fix.
This is the same lesson that comes up constantly in joist work generally — repairs only last as long as the surrounding conditions stay dry. It’s why any serious sister joist repair starts with figuring out why the original joist failed before a single new board gets cut.
💸 What It Costs If You Wait
A rim joist caught early — soft but not crumbling — can often be treated and reinforced for under $200 in materials over a weekend. Wait until it’s structurally compromised, and you’re looking at jacking the floor, removing siding, cutting out and replacing full sections, and possibly bringing in a structural engineer if a load-bearing wall sits above it. That’s a $2,000–$6,000 job instead of a Saturday project, and that’s before factoring in any drywall, flooring, or siding repair needed to put everything back together afterward.
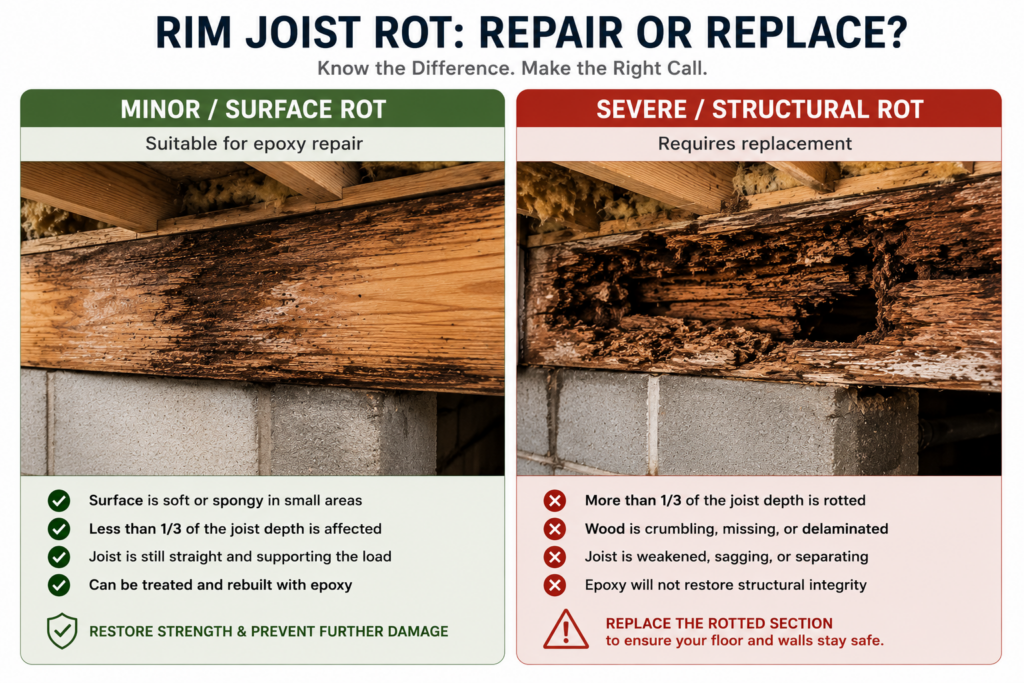
How to Tell If Your Rim Joist Has Rot
Visual inspection: Look for discoloration, peeling paint, or a slightly sunken appearance along the band board, especially near corners and under windows or doors.
The screwdriver test: Press a flathead screwdriver into the wood at an angle. Sound wood resists. Rotted wood gives way with little pressure, or the tip sinks in easily.
Check from inside: In a basement or crawlspace, look at the rim joist where it meets the foundation. Rot often starts here first, where moisture wicks up from concrete.
Sagging or bouncy floors near exterior walls: If the floor near an outside wall feels softer or lower than the rest of the room, the rim joist or the joist ends resting on it may be compromised.
Musty smell or visible fungal growth: A sweet, musty odor in a crawlspace or basement near the perimeter wall is often the first sign of damage before visible signs appear.
Gaps opening up at baseboards or window trim: As a rotted rim joist loses strength and the floor settles slightly, you’ll sometimes see small gaps or cracks appear at the base of interior walls nearest the affected area.
😬 When Repair Won’t Cut It
⚠️ If more than a third of the rim joist’s depth has turned soft or crumbly, or if the rot runs continuously for several feet, filler and epoxy aren’t going to give you back the structural strength you need. At that point you’re cutting out the damaged section and scabbing in new lumber — which is a different job than a surface repair, and one where getting the bearing and fastening wrong can actually make the floor less safe than before you started. This is also the point where it’s worth checking your local building code requirements for sistering joists, since most jurisdictions have specific rules about fastener type, span overlap, and inspection sign-off for structural floor repairs — and a rim joist splice falls under the same category.
How to Repair Rim Joist Rot (Step-by-Step)
For Minor, Surface-Level Rot
Find and fix the moisture source first. Reroute downspouts, repair flashing, regrade soil away from the foundation, or improve crawlspace ventilation. Skipping this step means having to redo the repair in a few years.
Remove all soft, crumbling wood with a chisel or oscillating tool until you reach solid material.
Let the area dry completely. A moisture meter reading under 15% is a good target before you treat or seal anything.
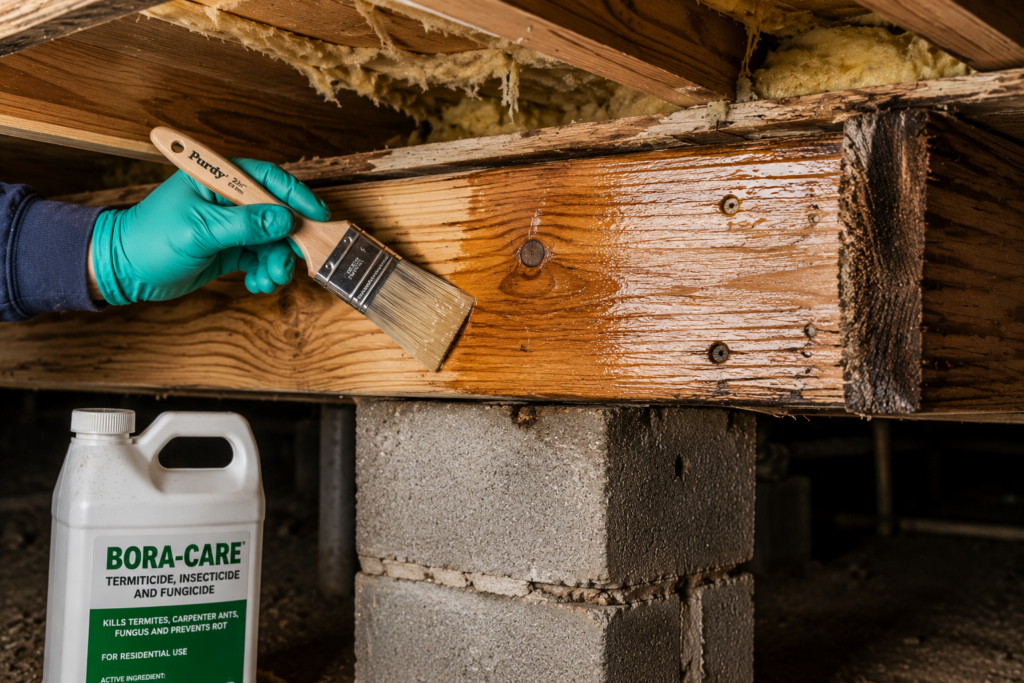
Apply a borate-based wood preservative to the exposed wood to kill any remaining fungal spores.
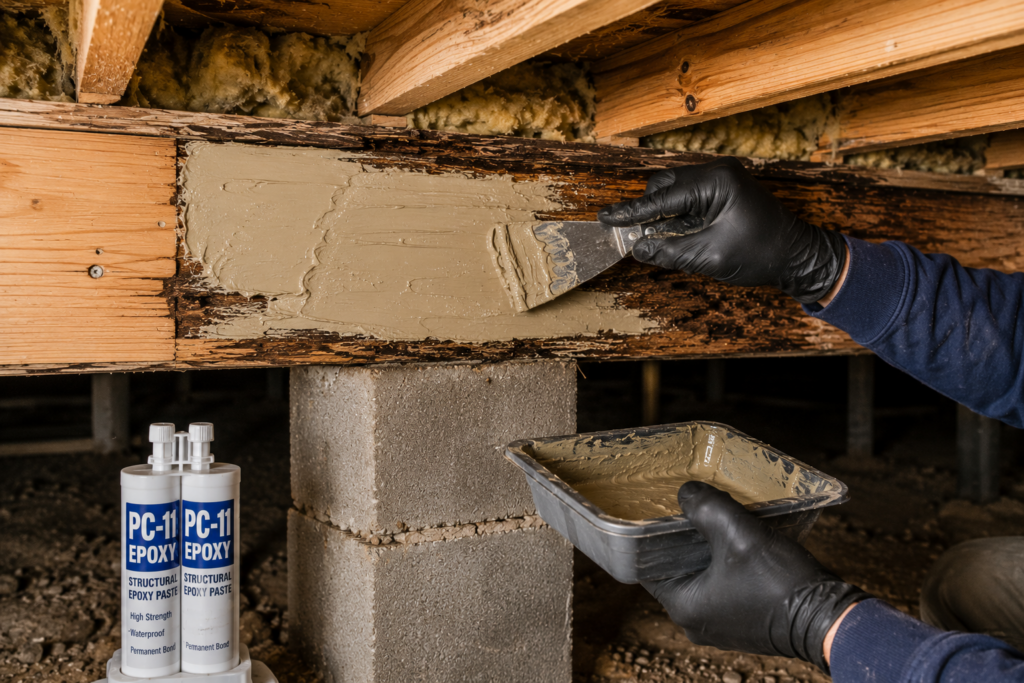
Use a two-part epoxy wood filler to rebuild the missing wood. This is the same approach detailed in our wood filler guide, where epoxy is identified as the only filler rated for structural repairs such as rotted joists and sills, because it cures with zero shrinkage and bonds deep into the surrounding fibers.
Sand, prime, and paint or seal the repaired section to protect it going forward.
For Moderate to Severe Rot (Structural Reinforcement)
When the rot has eaten into the joist’s load-bearing capacity, filler alone won’t do it. You need to reinforce or replace the damaged section:
Temporarily support the floor above the damaged area with a jack and posts before cutting anything out.
Cut out the rotted section of the rim joist back to solid wood, squaring off the cut.
Fabricate a new section using lumber that matches the original dimension — never downsize, even if a smaller board happens to be what you have on hand.
Sister or splice in the new lumber, securing it with construction adhesive and structural screws or bolts, not just nails. This follows the same fastening logic used when sistering a floor joist, where lag bolts or structural screws are required because nails alone don’t provide the clamping force inspectors look for.
Treat all exposed end grain with a borate preservative before closing anything up — end grain is the most absorbent part of any board and the most common place rot restarts.
Have the repair inspected before covering it if it’s a structural fix. Most jurisdictions want eyes on the actual joint, not photos after the fact, and covering a repair too soon can mean having to tear it back open later.
If the rot has spread from the rim joist into the floor joists themselves rather than staying isolated to the band board, the access and leveling challenges are covered in more depth in our guide to sister joist repair, since getting to the joists is often the hardest part of the whole job — more so than the actual cutting and fastening.
🧪 What Actually Stops Rim Joist Rot From Coming Back
Seal the sill plate gap. A foam or rubber sill seal between the foundation and the rim joist blocks moisture wicking up from concrete — the single most common cause of rim joist rot in basements and crawlspaces.
Keep gutters clean, and downspouts extended at least 4–6 feet from the foundation.
Grade soil to slope away from the house at a minimum of 6 inches over the first 10 feet.
Vent crawlspaces properly or install a vapor barrier if humidity is the driving cause rather than bulk water.
Recheck exterior caulk and flashing annually, especially around windows and doors near the rim joist line, the same spots called out in our guide to protecting wood from fungi, where unsealed end grain resting against masonry is one of the most common starting points for dry rot.
Use a rot-resistant species or treated lumber for any replacement section. If you’re sourcing material for the splice, our breakdown of marine grade plywood is a useful reference for understanding why core quality and edge sealing matter so much in high-moisture framing applications, even though most rim joist repairs use dimensional lumber rather than plywood itself.
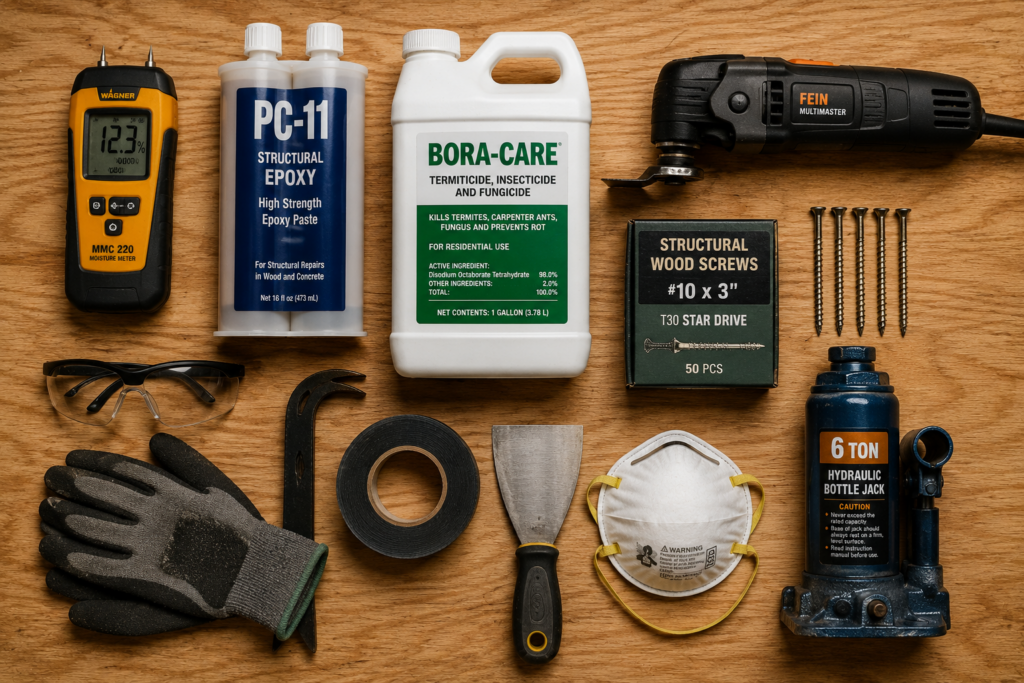
Tools and Materials You’ll Need
Moisture meter
Sharp chisel or oscillating multi-tool
Borate-based wood preservative
Two-part epoxy wood consolidant and filler (for structural repairs)
Pressure-treated lumber matching original joist dimension (for splicing/sistering)
Construction adhesive and structural screws or lag bolts
Hydraulic jack and temporary posts (for load-bearing repairs)
Can a rim joist be repaired without replacing it? Yes, if the rot is limited to the surface and hasn’t compromised more than about a third of the wood’s depth.
Removing the damaged wood, treating with a borate preservative, and rebuilding with structural epoxy filler is a legitimate, widely accepted repair for minor to moderate rot. Once rot extends deeper than that or runs along several feet of the joist, splicing in new lumber is the safer option.
Is rot in rim joists covered by insurance? Usually not. Most homeowners insurance policies exclude damage from gradual deterioration, wear and tear, or maintenance neglect, and rim joist rot is almost always classified as such because it develops slowly over months or years.
There are exceptions: if the rot resulted from a sudden, covered event — like a burst pipe that wasn’t addressed because it was hidden — some policies will cover the resulting damage. It’s worth reading your policy’s water damage exclusions closely or calling your agent before assuming either way.
Does homeowners insurance pay for rot damage? Generally no. Standard homeowners policies are built to cover sudden and accidental damage, not the slow, ongoing moisture exposure that causes wood rot. If the rot is traced back to a specific covered peril, such as storm damage that breached your roof or siding, the portion of the repair directly tied to that event may be covered, but the rot itself is typically treated as a maintenance issue that falls to the homeowner.
How long does a rim joist replacement take? A single accessible section, say a few feet, typically takes one to two days for an experienced DIYer, including jacking the floor, cutting out the old material, fitting and fastening the new lumber, and treating the area. A full perimeter replacement, or one complicated by tight crawlspace access, finished walls, or siding removal, can stretch to a week or more, especially if you’re waiting on inspection sign-off before closing everything back up.
What’s the difference between a rim joist and a sill plate? The sill plate is the horizontal board bolted directly to the top of the foundation. The rim joist sits on top of the sill plate and caps the ends of the floor joists. Both are common rot locations, but they’re different components, and a sill plate repair is typically a heavier structural job since it bears the weight of the entire wall above it.

")
")
")
")
