In millions of DIY shops across the globe, the one tool that is almost as essential as it is overlooked is the workbench. Just about anything we do and anything we work on requires someplace to work; I don’t care if you’re talking about cutting, planning, chiseling or drilling. Unless that project is big enough to sit on the floor, that means having a workbench to put it on.
Not only does the workbench have to provide a place to do that work, it needs to be solid enough, so that it will support the work, without bending, sagging or warping, as well as providing a perfectly flat area for clamping to. A good workbench provides the foundation for everything the woodworker does. In addition, the space under the workbench is often converted to shelves or drawers for storage of the woodworker’s tools, readily at hand; but we’re not going to get into that here.
To clear things up, there are actually two basic types of workbenches that we can be talking about:
General Workbench – This is nothing more than a table or counter to work on. It might have benchtop tools permanently mounted to it and be used as a place to stack project parts until they are needed. Repairs on tools, sharpening chisels and cleaning rust off of an antique clock might all be done on this workbench. General workbenches are often used by people other than woodworkers.
Woodworker’s Workbench – The woodworker’s bench is a solid piece of furniture, whose main purpose is to prove a way of clamping wood pieces while being worked and clamping woodworking projects together. Its top must be perfectly flat and solid, so that any project clamped to it, will come out square. People who aren’t woodworkers don’t appreciate the value of a woodworker’s workbench.
We will talk about both types of workbenches here; although my main focus is going to be on the woodworker’s workbench, as making a top for one of these out of plywood is a bit more challenging.
Why Plywood for a Workbench Top?
Building a workbench, especially a woodworker’s workbench, out of laminated hardwood can run over $1,000 without a problem. That’s because you can easily use a hundred board feet of hardwood to build one, laminating them together like a butcher’s block. While that makes for a wonderful workbench, unless you’re a professional woodworker, it’s hard to justify that cost.
Plywood provides a smooth, flat surface, which won’t bend or warp. Being dimensionally stable, the workbench you build won’t be changing from one use to the next. It can be built as solid as you need and can support as much weight as necessary, depending on how you build it.
But the big reason to build out of plywood is cost. You can buy enough sanded softwood plywood or MDF (medium density fiberboard) to make a very respectable woodworking workbench, for $100 to $200, depending on the actual material you choose. A general purpose workbench, which usually has a thinner top, can be built for under $100.
What’s the Best Plywood Product for a Workbench Top?
You can literally build a workbench top out of any plywood you can find. Nevertheless, there are some types of plywood which provide capabilities you don’t really need and would just be a waste of money. At the other end of the spectrum, there are plywood products, like particle board and OSB (otherwise known as waferboard) which really won’t make a good workbench top because they aren’t strong enough.
For most workbenches, the best plywood products to use are sanded softwood plywood, marine grade plywood, Appleply, Baltic Birch, MDF, or phenolic board.
If you’re looking to build your workbench the most budget friendly possible, stick with softwood plywood, with either MDF or tempered hardboard for the top layer. However, if you’re building a woodworker’s workbench and you’re concerned about voids in the wood, which may cause a problem for vices and bench dogs, then I’d pick marine grade plywood, or MDF.
General Workbench Top
Even if you’re a woodworker, you’re probably going to need a general workbench top. I have two in my workshop, giving me a combined 14 feet of workbench space. These two benches have some tools mounted to them, but they serve mostly as a staging area for me to set parts on, as well as a place to work on small items, such as details that need to be carved, before being attached to a larger project.
Since these workbenches are not used for clamping and gluing woodworking projects together, they don’t need to be as thick and sturdy as a woodworking bench top does. This is especially true if you attach the workbench to a wall of your workshop to give it added stability and keep it from moving. A single layer of 3/4” plywood is sufficient to make this sort of workbench, if it is provided with the proper support by the workbench’s frame.
A typical size for this sort of workbench is 24” deep, by however much width you have room for. The 24” dimension is important though, as it allows you to get two pieces of workbench top out of one sheet of plywood. In most cases, a workbench that is more than 24” deep is difficult to work with.
Typically, the workbench top would be built 36” off the ground, the same height as a kitchen countertop. However, I built mine 42” off the ground, and found this gave me the benefit of having whatever I was working on closer to my eyes, without having to bend over all the time. That’s nice for doing repairs on small, intricate items, as well as for carving a decorative piece.
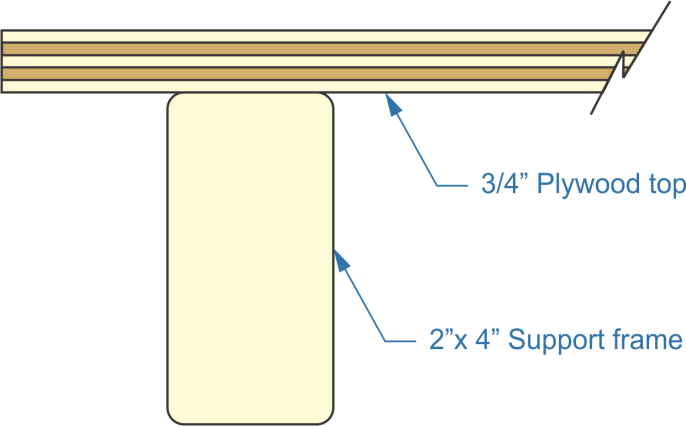
Simple workbench top
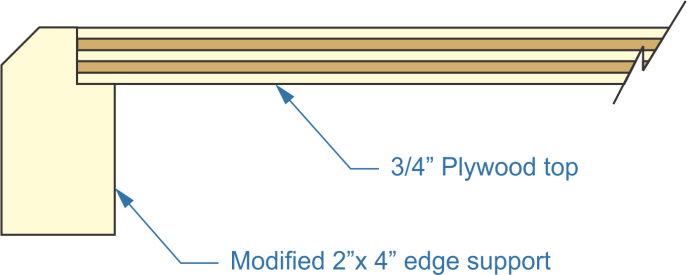
The easiest way to make this sort of workbench top is to build a frame out of 2”x 4”dimensional lumber, covering it with 3/4” thick BC grade softwood plywood, as shown in the above-left image. However, with a very little bit more work, you can have a much better workbench, simply by cutting a rabbet in the 2”x4” and chamfering the edge, as shown in the above-right image. This will cover the edge of the plywood, preventing it from catching on clothing and scratching your arm.
Improved workbench top
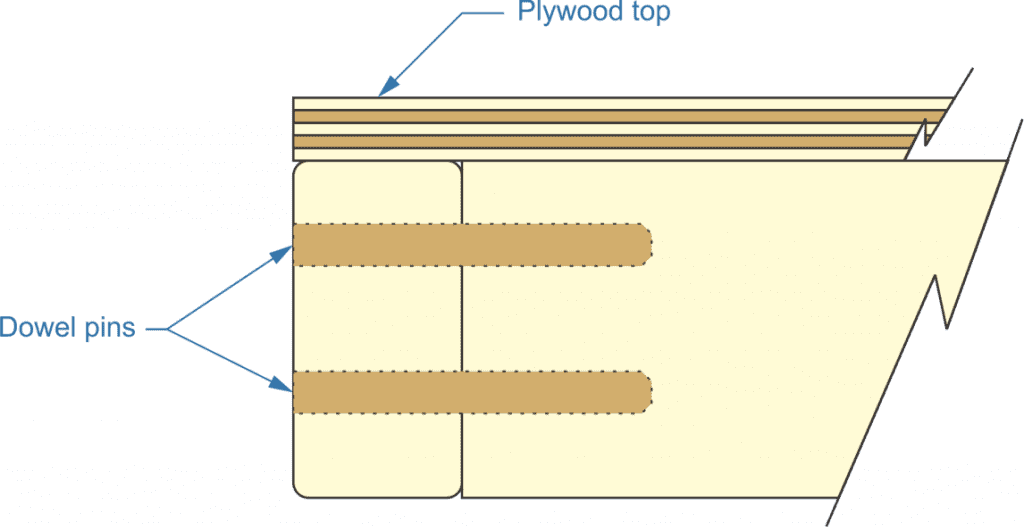
In either case, the supporting frame should have sufficient crossbars to ensure that it can carry the weight of anything placed on it. I would recommend putting crossbars every 16”. I would also recommend doweling those crossbars, as it will make for a much stronger joint than merely attaching it with screws or nails, as you would be screwing or nailing into end grain.
Doweling the Frame
Doweling this sort of frame is actually much easier than you might expect. We’re not talking hidden dowel joints here, which can be a bit difficult to align. Rather, we’re talking about using visible dowel joints, using 1/2” hardwood dowels. You should always use at least two dowels when assembling each corner, to avoid any possibility of the wood twisting later.
To do this, you will need:
At least one corner clamp (4 are better)
An electric drill with a ½” space bit
Hardwood dowel
Pocket knife
Wood glue
Wood or rubber mallet
Flush cut saw
Clamp the corner, as it should be assembled, taking care to ensure that you aren’t building a twist into the framework while you’re at it. A twist will happen if the two pieces of wood being attached together to make the corner aren’t perfectly horizontal in the clamp. You’ll probably need to use scraps of wood to support the opposite ends of these pieces, in order to keep them horizontal.
With the wood pieces clamped, drill a half inch hole through the side of one 2”x 4” and into the end of the other, making one continuous hole. You’ll want the hole to go at least two inches into the end of the second piece.
With a pocket knife, create a chamfer on the end of the dowel rod; it doesn’t have to be neat.
Put a small amount of wood glue all around the inside of the hole, then push the chamfered end of the dowel rod into the hole. Drive it all the way in with the mallet.
Cut off the dowel, flush with the surface of the wood.
Repeat for the second dowel.
Dowel pins
A Mobile Version
You may also want to consider making a smaller version of this sort of workbench, which could serve a secondary purpose of being an extension table for your table saw, either on the left side of the saw, to support a full sheet or as an outfeed table.
In this case, you’ll want to make the table with locking castors; preferably with all four of them having locks on them. You’ll also want to make the finished height of the workbench the same height as your table saw, or a shade lower, so that the wood doesn’t catch on it when sliding off the table saw’s table.
The major difference between a woodworker’s workbench and any other is that the entire woodworking workbench is a clamping system, used for holding wood pieces as they are being worked on, as well as entire projects as they are being clamped and glued. Except for the most economical manufactured versions, they will have two woodworking vices on them, one of the front and one on one end. Sometimes the one on the end is wide enough so as to be the entire end of the workbench.
These workbenches can vary considerably in size, depending on the needs of the woodworker, how much space they have available to them, and how much money they can afford to invest in a workbench. I have seen workbenches of this type which were six feet wide and eight feet long; but most are about two feet wide by six feet long.
The top of a woodworker’s workbench is usually made of laminated hardwood; beech, maple, oak or ash. Professional level workbenches typically have a three inch thick top, but those can cost starting at $1,000 and run over $3,000. The ones intended for home workshops are considerably less expensive, but also have much smaller and thinner tops.
Thickness of the top is important for two reasons. The first is to ensure that it remains flat, not warping, something that’s not really much of an issue with plywood. The other is to provide solid support, when bench dogs are used in conjunction with one of the vices. A bench dog run into a one inch thick bench top can’t support as much pressure as one run into a three inch thick bench top. It will have more of a tendency to angle, wallowing out the hole in the one inch thick bench top.
Even considering this, we can still make an effective woodworker’s bench top out of plywood, if we take care to assemble it well. To do this, we’re going to a flat work area; either a table, shop floor or table saw table – check it for flatness, but not for level, with the edge of a 4’ carpenter’s level. We also need several weights, to function as clamps, holding the plywood sheet together while we screw them.
It is not necessary to use hardwood plywood for making this sort of workbench top, although you might want to use MDF or some other plywood with a hard surface for the top layer. The other layers can be made of 3/4” thick softwood plywood. While three inches thick (4 layers) would be ideal, if you’re trying to watch your budget, you might consider using only three layers, ending up with a finished thickness of 2-1/4”.
Start by cutting all your pieces to the size you want your workbench top to be. When calculating this dimension, keep in mind that we’re going to wrap the edges with 1/4” thick wood, making the bench top 1/2” longer and wider. Check the surfaces of each sheet for high spots. Although they are rare, they make it difficult to laminate the sheets together. It isn’t necessary, but you may want to consider filling any voids you see in the surfaces with wood putty and sanding them smooth.
As I mentioned a moment ago, you’ll need to find someplace extremely flat to assemble the workbench top. If your workshop floor is flat, that’s fine; but check it to make sure. Any fault in the flatness of your assembly area will appear in your workbench top and be transmitted into your projects from there.
You will be working from the top down, building the workbench top upside-down. This is so that when you are finished, there won’t be any exposed screws or screw heads in the surface of the workbench. Assembly will be done with wood glue and drywall screws.
Spread a thin layer of wood glue onto what will become the bottom of the top sheet of plywood and the top of the fist core sheet. Don’t just drizzle a line of glue around and call it good. We want to actually laminate these pieces together. So go ahead and drizzle your glue, but then follow it up with a wide putty knife or drywall knife and spread that glue around.
With glue on both surfaces, flip the second sheet over and place it on the top sheet, aligning the edges. Weigh the sheet down to hold it in place.
Double check the alignment of your sheets, then screw then together near one corner, driving the 1 1/4” drywall screw to just below flush in the plywood. Take care to not go more than 1/16” below flush.
Check the alignment of the sheets again, and then use another screw to attach the sheets together at one of the corners in the opposite end of the sheet. With these two screws in place, you can now screw the sheets together, putting screws every 12” to 16”. These screws are only to clamp the pieces of plywood together while the glue is drying. Although they will be left in place, they will not be holding the sheets of plywood together.
Add your additional sheets of plywood in the same manner, spreading the glue on both surfaces and using a slightly different screwing pattern to ensure that your screws don’t run into the screws from the previous layer. Once all the layers are glued and screwed together, leave the workbench top for the glue to dry.
To provide a clean edge to the workbench top, rip 1/4” thick strips of hardwood, slightly wider than the workbench top is thick and slightly longer than it is long. The hardwood will provide a more durable edge, while covering up the end grain of the plywood. Install the strips with glue and finish nails, putting the ends on first and then trimming them to their final length before attaching the long edges. Cut all the ends flush and plane or sand the top and bottom of the workbench top to make the edge banding flush with the surface.
Using Screws
Important note. Don’t use too many screws to attach the layers together! It doesn’t take that many to hold the layers together until the glue dries. Your workbench has holes for bench hooks, bench dogs and other holdfasts. Be careful that you don’t put screws into a place where you will put a vice, bench dog holes, a holdfast or some other adjustment to the top. It helps to make a drawing of the top and note the location of the screws used. When attaching the third (or fourth) layers to your benchtop, the only thing you have to worry about is accidentally overlapping screws from a previous layer. With this third (or fourth) layer firmly attached, you should now have an incredibly heavy workbench top that will contribute significantly to ensuring your bench doesn’t move when you’re working on it. Consider a plywood top! Economical, heavy, stable and with a coat of oil and very light paste wax—beautiful to boot!
With the workbench top assembled, it can be attached to whatever base or stand you are using. I prefer something with storage, but that’s up to you. Make sure you have a solid connection, using blocks, if needed, to bolt the two parts together.
As I mentioned earlier, a woodworker’s workbench usually has two vices attached to it; a “front vice”, usually mounted at the left side of the front of the bench, and an “end vice,” usually mounted to the right end. The screw mechanisms for these can be purchased separately, from various online retailers, and attached to your workbench with your own wood jaws attached to them. They are actually mounted to the underside of the workbench top. The front vice works in conjunction with a series of holes in the front-right leg, so that long items, like doors, can be supported between the vice and a peg placed in one of those holes, for planning the edge.
Both the front vice and end vice are designed to work with bench dogs. These are pieces which are stuck into holes in the workbench top, allowing the range of the vice to be extended. There is usually one row of 3/4” holes used for the front vide and two parallel rows for the side vice. These holes should be spaced evenly so that they are no more than half the jaw opening capacity of your vices apart. That way, there will be no distance at which your vices can’t hold a piece of wood.
Once all assembly is complete, the workbench should either be oiled or varnished, to protect it. You don’t want a slick finish, but rather something that will seal the surface of the wood and allow easy cleanup of glue and paint spills.
Related Posts:
Making a Table with a Floating Top by Admin August 31, 2021 DIY Tables have taken on an extensive variety of different shapes and styles through the ages. Functionally, the shape and style aren’t the important part; what’s…
How to Get Moisture Out of Plywood Subfloor by Amy Reed March 30, 2023 Repairs Plywood is a suitable choice for subfloors in all types of environments. It can be used as a subfloor for bathrooms, bedrooms, attics, sheds, basements,…