The cabinets are a large part of any kitchen remodeling project, especially in an older home. Upgrading cabinets by replacing them with new ones can make a kitchen look reborn. Considering how much of a home’s character comes from that kitchen, an upgrade to kitchen cabinets can change how one feels about one’s home.
Any kitchen has two basic types of cabinets: base and wall. The base cabinets sit on the floor, usually with a countertop on them. Wall cabinets are installed, providing additional storage space between the countertop and the ceiling. In most cases, there is a space between the two, but some specialized cabinets, like pantries and appliance garages, might take up some of that room, adding more usable storage space at the price of losing some counter space.
There’s quite a difference between installing base cabinets and wall cabinets. It supports base cabinets on the floor. The only fasteners needed are a few into the wall, usually along the top of the cabinets, and screws holding the face frames together so that they cannot shift. There is little concern about the weight of these cabinets or their falling off the wall because the floor supports their weight.
Wall units are a bit different in that they depend highly on the support they receive from the wall. We refer to installing these cabinets as “hanging” them, much like hanging pictures. There are some similarities between the two, as the ability of the wall to support the weight of the cabinet and what it contains are critical.
For wall units, the studs are typically considered critical for support of the cabinets. The drywall is not deemed to be strong enough to support them, so the carpenter must find the studs and screw the cabinet into them.
But what if the studs can’t be found?
Walls are framed with studs every 16”. That’s the industry standard, reflecting what’s written into the building code. But there are always exceptions, especially circumstances where studs are slightly farther apart due to construction constraints or carpenter error. This is especially true when the homeowner builds a home, most of whom don’t know much about industry standards or the building code.
Another thing that can cause problems is that some narrow cabinets may not even be 16” wide, especially the cabinets on either side of a sink. In that case, the spacing might work out so that the cabinet falls between studs. That creates the problem of installing the cabinet without the necessary support behind it.
Let’s Examine the Physics of the Situation
Wall cabinets are usually attached at the top so that the weight is hanging down from the screws. But because the bottom of the cabinet hits the wall and the center of gravity of the cabinet is several inches out from the wall, the cabinet is not only pulling down, but the leverage tries to pull the top of the cabinet away from the wall. This is where the real problem is.
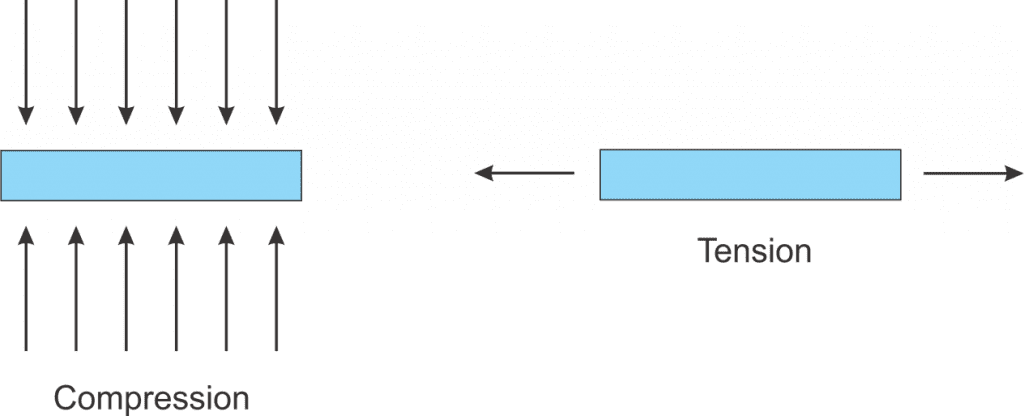
Drywall, a gypsum board, is a dry, powdery mineral like chalk. As such, it crumbles easily. But like any rock, it is stronger under compression than under tension. Even as weak as gypsum is, it is strong under compression because it is already compressed in the drywall. But if it is pulled on, specifically if it is pulled on across the board, where the thickness of the gypsum is less than one-half inch, it can be made to crack.
Compression; Tension
When we put a screw into the drywall to hang a cabinet, those screws put the drywall under both compression and tension. While the drywall can handle a few hundred pounds of compression without problem, it can’t withstand much tension. The weight of the cabinet and its contents is putting those screws under stress, which is then transferred to the drywall.
Making matters worse, the very act of putting a screw into the gypsum also puts it under tension, breaking it up. Therefore, there is little besides the paper outer layer of the drywall to hold the screws in place. So, when tension is put on the screws, by the weight of the cabinet, they break easily.
Of course, putting the screw through the drywall into a stud solves this problem, as wood is strong under both compression and tension. Not only that, but the fibrous wood grain structure allows the screw threads to dig into the wood, separating the grain without significantly weakening it. That’s why it is preferred to mount the wall cabinets into studs, taking advantage of that strength.
What About When There Aren’t Any Studs?
Something has to be done when there aren’t any studs to screw into when mounting wall cabinets. There are several options, each of which has its advantages and disadvantages.
Adding a Stud
The most substantial way of mounting the cabinet to the wall is to cut out a section of the drywall large enough to install a 2”x 4” horizontally across the space between two existing studs, toe-nailing it to them. The hole is then filled back in with drywall to level the wall surface. It isn’t necessary to finish the joint between the drywall, as the cabinet will cover it.
This method is not very popular due to the mess it can make on the wall. If the studs are outside the area that the cabinet will cover, it is very hard to nail the new piece of 2”x 4” into place without making a hole big enough that the cabinet won’t cover it. That means the drywall must be taped and finished, providing a level surface again. Doing that so that it is not visible is usually tricky.
Adding a Mounting Strip
Attaching a 1”x 4” strip to the wall at the necessary height for screwing the cabinet to the wall can solve the problem of not having any support. This works well when several cabinets need to be installed together, but one cabinet falls in such a way that there aren’t any studs to mount to. The mounting strip can be screwed to the existing studs, and the loose end, where there is no stud, can be attached using one of the various drywall anchors mentioned below.
When doing this, it is necessary to mount two 1”x 4” strips, one at the top of the cabinet and one near the bottom, even if the cabinet will only be screwed to the top one. Otherwise, the cabinet will hang crooked, leaning out from the wall.
This method either needs to be planned for, with the cabinets built to allow for a mounting strip, or a piece of trim will need to be cut and fitted into the visible end at the back of the cabinet, covering up the extra ¾” of space between the back of the cabinet and the wall. When cabinets are ordered, the manufacturer often supplies them aboard, finished to match the cabinets, just to fill such spaces.
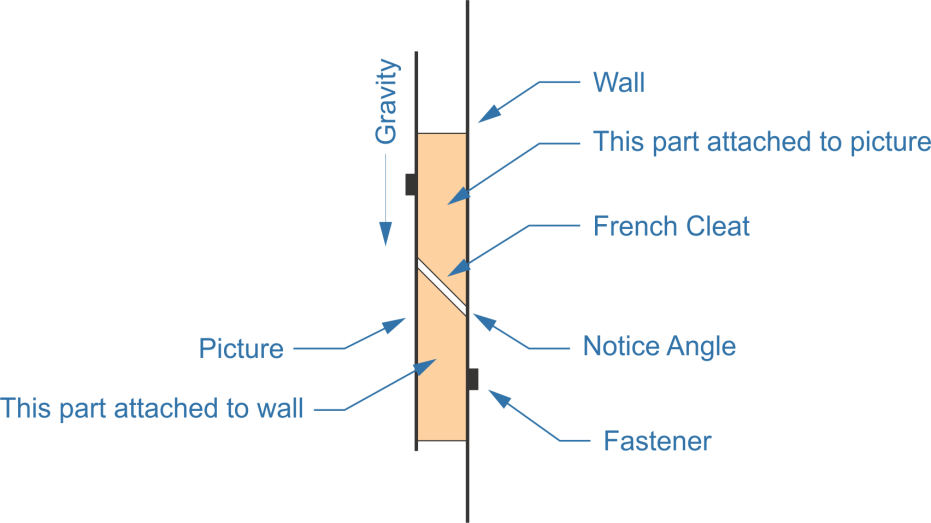
Using French Cleats
Rather than using the mounting strip mentioned above, it is easier to hang the cabinets if a French cleat is used. Commercially manufactured aluminum French cleats are available alongside the other cabinet hardware in the local home improvement center. However, as an alternative, French cleats can be cut from a single piece of 1” dimensional lumber and attached to the cabinet and the wall, much like the one discussed with a mounting strip above.
Homemade French cleat
The significant advantage of using French cleats, rather than using the mounting strip mentioned above, is that with the French cleats, the cabinet can be hung on the cleat and then attached with screws, rather than having to try and hold the cabinet in place with one hand, while running the screws in with the other.
Using Drywall Anchors
Several different kinds of drywall anchors can be used to mount a wall cabinet, either in conjunction with the mounting strip and/or French cleat mentioned above or alone.
Anchors
The issue with most drywall anchors is that they aren’t strong enough for the purpose. While the drywall itself can hold up to over 400 pounds of weight under compression, the anchors will often pull out of the wall long before that.
Expansion Anchors
Expansion anchors are the simplest form of anchor to use with drywall. They, or at least something similar, can also be used with masonry. The anchor is a split sleeve with a small hole in the middle. When a screw is driven into the hole, it causes the sleeve to split, with the two to four sides separating like flower petals, pressing into the sides of the hole in the drywall and the space beyond. Various styles exist, with some having a greater capacity to expand in the space behind the drywall.
Expansion anchors are only good for holding up to about 20 pounds. So, if you have a very light cabinet that will only hold very light things, it might be possible to use an expansion anchor, but it’s better to use a stronger anchor.
Threaded Anchors
Threaded anchors are a solution that was developed specifically for use with drywall. They consist of a molded plastic body with a very coarse thread. The thread bites into the gypsum of the plywood, much like any other screw would. But because it is so coarse, it holds the gypsum in place, even while breaking it up. That provides a stronger bond than any other screws can. Still, it’s only good for about 30 pounds.
Molly Bolts
Molly bolts are traditionally an all-steel anchor, making them much more substantial than either of those previously mentioned. However, there are some plastic molly bolts on the market as well. The molly bolt has a barrel body, with slits cut in it and a threaded end. When the screw is driven into it, the clamping pressure causes the body of the molly bolt to collapse outwards, making “ears” that stick out on the back side of the sheet of plywood, clamping the plywood between the ears and the head.
It is important to select molly bolts that are the correct size for the drywall wall so that they match the thickness of the drywall. If the molly bolts used are too short, the ears won’t extend properly, and the clamp action will be lost. If they are too long, they will remain loose, with no clamping action.
A problem with no clamping action can also happen in cases where the drywall is damaged, such as in older homes where moisture in the wall may have attacked the paper covering inside the drywall. Avoid using a hammer in molly bolts in that case, as they might cause a chunk of gypsum to break off on the inside. It’s better to use the ones requiring a drilled hole so that the molly bolt can go through the hole and clamp the drywall from the back side.
Molly bolts hold about 60 pounds each, so with two of them in a wall unit, the cabinet and its contents can weigh as much as 120 pounds.
Toggle bolts can be the most difficult to work with, but they are also the most vital anchor that can be used with drywall. The fastener consists of a machine screw with a spring-loaded toggle mechanism. To insert, the toggle mechanism is closed and inserted through a hole in the wall. Then, the spring causes the toggle to open back up, where it is captured on the back side of the wall. As the screw is tightened, the wall and the back of the cabinet are captured between the toggle and the screw head.
Toggle bolts are difficult to use because they need a much larger hole than the other fasteners we’ve mentioned, typically something around 5/8” to 3/4”. This makes precise locating difficult, as the right position can be anywhere within that hole. If not properly tightened, the cabinet could slip down slightly to the limits of the hole.
However, because of the toggle’s large footprint, these fasteners clamp a larger surface area of the drywall than any others. This makes them considerably more vital, with each toggle bolt supporting over 100 pounds.
Related Posts:
Installing Garage Wall Cabinets: A Complete Guide by Amy Reed February 28, 2023 Installing Installing garage wall cabinets is a great way to free up floor space, create extra storage, and boost the aesthetics of your garage. In some…
How to Remove Wall Cabinets – Easy DIY Guide by Admin March 8, 2025 DIY Why You Should Consider Removing Wall Cabinets Yourself Cabinets are a central feature in most kitchens, often being the first item replaced during a remodel.…