There are myriad reasons that require the cutting of a curve for the home do-it-yourselfer in a piece of wood, plywood or drywall. The prospect of cutting such a curve can pose a daunting challenge to novice and expert DIY’ers alike. However, with the right tools and knowhow, cutting curves needn’t cause a panic attack. In this article, we will cover making curves in plywood for an archway, how to bend narrow pieces of plywood without steaming it and how to cut longer curved sections.
Tools
The tools of the curve-cutting trade consist of both hand and powered tools. The hand powered tools for cutting curves include a coping saw for very small and delicate curves or a bowsaw for larger curves. The advent of power tools has relegated the bowsaw to a mere curiosity or wall decoration and really isn’t much used for cutting curves any longer; they are, however, quite adept at making this cut if properly tuned up and sharpened. There are more power tools available to cut curves in plywood than hand tools and they come in a price range for any budget. The least expensive option is probably the common jigsaw; this tool is found in the toolkit of almost every DIY’er. While economical, jigsaws don’t excel at delicate work and the edges of the cut must often need additional attention afterwards. They leave rough edges on the underside of the cut— even when using a blade with more teeth per inch (TPI)— and often splinter the underside. For cutting archways in plywood with a radius of less than about 30” (80 cm) and to produce a much cleaner cut on both faces of the plywood, many DIY’ers turn to another common and relatively inexpensive tool—the router. This tool, with the right bit of proper sharpness will leave a smooth and clean face on both sides of a piece of plywood, though it normally takes more than one pass to accomplish this, especially if the plywood is > ½“ (12 mm). If your shop has the luxury of a bandsaw, then cutting curves in smaller pieces of plywood is quite simple and the support of the outfeed table keeps the plywood from splintering. Due to the size of most plywood panels, a bandsaw isn’t a good option if you have to cut an arch or semi-circle using the entire panel.
Cutting an Arch
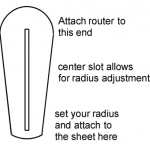
Sketch: attaching router
Cutting an arch or circular shape in a piece of plywood begins with accurate layout. For circular shapes in non-delicate work, that layout can be as simple as a piece of string attached to a pencil to form a crude compass. Simply trace the circle with the pencil and cut with a jigsaw. If the work is more delicate, using a router and a dedicated router trammel makes for a fast, reliable and clean cut. A router trammel is nothing more than a glorified compass with your router attached to one end of an adjustable radius guide. It looks like the graphic on the right. You can purchase one of these at your local home centers for approximately $30–40 (25–35€) or easily make one of your own out of some scrap plywood stock. The trammel is attached to the piece of plywood at the desired radius while the router moves freely. The desired radius defines the arc the router travels. Further, if this arc is being cut in a thicker piece of plywood, it is better to make this cut in two passes to minimize friction and dulling of the router bit. It also helps ensure a cleaner cut on both the top and bottom faces of the plywood. Similar trammels can be made for a bandsaw to cut out larger radius shapes, but those normally require a supporting outfeed table to handle the size and mass of the plywood sheet.
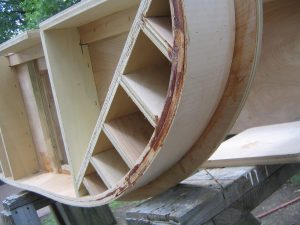
Curve for whacky wood and birch bending face, Kikisdad
When a piece of wood is cut with the intention of bending it into a desired shape, it’s normally steamed, making the wood bendable. Thinner boards can be bent into arcs of tighter radii. However, plywood, by its very construction and nature resists bending; even storing it in a sauna probably wouldn’t work well for bending plywood unless the wood itself is pretty thin (¼“ or 6 mm). When cutting a narrow piece of plywood with the intention of bending it, and the plywood is of nominal dimension— ¾” or 20 mm— you can actually bend the plywood into a pretty tight space if you make a series of kerf cuts in the back of the plywood. The cuts would look something like the picture below—featuring a ‘before and after’ as the dashed lines represent the cutouts made by a table saw, circular saw or even a hand saw. The depth and spacing of these kerf cuts dictate the radius the plywood can be bent into. Deeper and wider cuts allow for more extreme bending, but removing too much wood can weaken the board itself. Shallower and narrow cuts limit how far the board will bend, but the structural integrity of the board is a little stronger. Regardless of the type and depth of the cut, if you push it too far, the board will split. Sketch: kerf cuts
Cutting a Long Curve
To cut a long curve in a sheet of plywood, the layout can often be accomplished by using a simple piece of reasonably pliant wood of sufficient length. If the wood itself is less than 6 mm or ¼”, it will bend with little resistance. As long as you attach or clamp that piece of wood properly, it will bend and form the desired arc— often this arc is subject to the builder’s own eye and taste. Nevertheless, layout of this arc, which simply represents a circle of a very large diameter, is pretty straightforward. As long as the sheet of plywood isn’t too large and/or unwieldy, you can cut this arc using a bandsaw if you have one available. If not, then using a jigsaw with a fine-toothed blade to minimize tearout and taking one’s time will yield very good results.
How to Oil a Cutting Board by Admin June 3, 2021 Finish Cutting boards are a popular project amongst woodworkers, allowing them an opportunity to express their creativity on a fairly simple project, which is still extremely…
How to Clean a Wooden Cutting Board by Admin June 4, 2021 Finish There’s a lot of false information around about wood cutting boards, mostly due to restaurants not using them. This has led people to think that…
How to Figure Angles for Cutting Wood by Amy Reed October 27, 2022 DIY Calculating angles is an essential part of most woodworking projects. You'll usually need to figure angles when building furniture, or starting any project that requires…