Beeswas for wood works great as a finishing a project is just as important as any other step in building it. Proper finishing protects the wood and makes the grain stand out, showing off the wood’s true natural beauty. Depending on the finish selected, it can even help establish the piece’s mood, with a top shine or glossy finish attracting attention to the project. In contrast, a low-sheen finish is more peaceful and relaxing.
Fortunately, we have a lot of finishes available that we can choose from. Varnish is probably the most popular finish out there, but by no means the only one available. Some commercial manufacturers use lacquer, rather than varnish, due to its fast dry time and high gloss.
Since most home woodworkers don’t have a separate spray booth, they tend to avoid using lacquer. Then there are oils and waxes, both of which have a long history of use by professional woodworkers. The true varnish is mostly boiled linseed oil.
When many of us think of wax and wood polishing, we tend to think of wax furniture polishes, especially those in an aerosol can. But in reality, wax can be used alone on furniture as a finish, protection, and natural wood polish.
Wax brings out the grain in the wood while protecting it and even provides a semi-waterproof finish to furniture (it can’t be submersed in water) that won’t be damaged by condensation from cold, wet glasses of one’s favorite beverage.
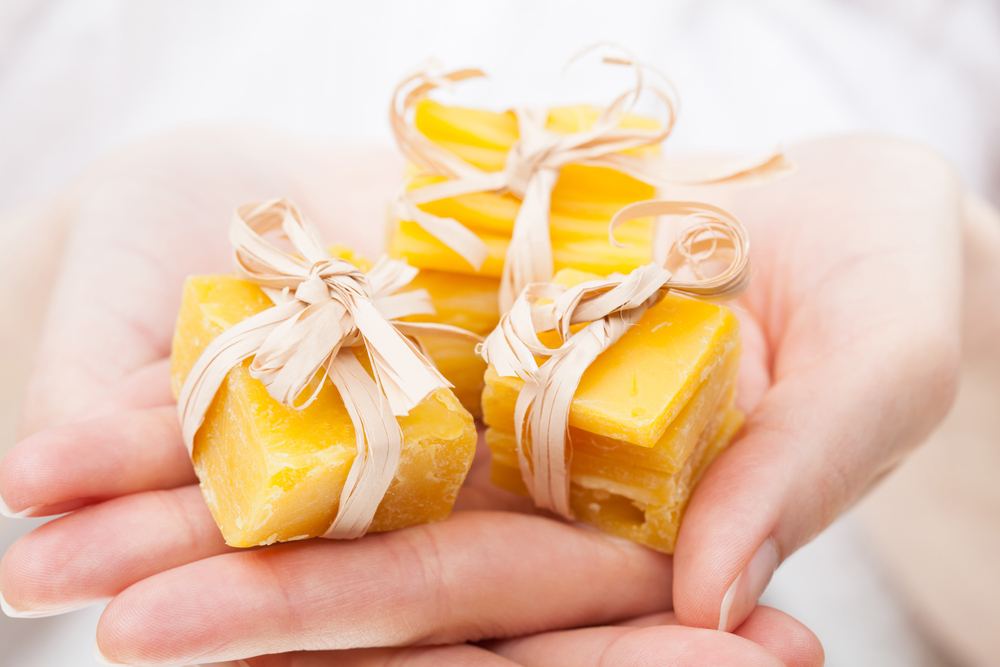
Unrecognizable woman’s hands holding pieces of natural beeswax, packed and decorated
When discussing waxing wood, we typically use natural beeswax and not paraffin. While paraffin is considerably cheaper than natural beeswax, natural beeswax is softer. This allows it to soak or be rubbed into the wood’s grain better, providing a better seal and helping to bring out the grain pattern even more.
Beeswax can work as a natural grain filler for open-grained woods like oak, filling the pores and providing a smoother, glossier finish.
While the traditional color of beeswax polish is yellow, white beeswax polish also exists. The white is made from the yellow simply by refining it further. Beeswax polish does tend to darken the wood surface slightly, as does any other finish used on it.
That’s not so much darkening the wood as bringing out its natural color by “wetting” the surface. Nevertheless, finished and repeatedly polished wood with all-natural beeswax will gradually darken. White beewax polish also slows this process.
Wax is not heatproof, though; therefore is probably not the ideal finish to use for protection on outdoor tables, cabinets, and wood furniture, especially for people in hot climates. But then, that’s not something that is commonly done.
Oils and oil-based stains are often used to protect tables, cabinets, and wood f furniture outdoors if the bare wood is not painted.
The one drawback to waxing on wooden furniture is that it can wear off over time. It is not a maintenance-free finish. But then, what is finish truly? Pretty much any finish needs cleaning occasionally, and it’s common to wax wood polish varnished antique furniture often to maintain or restore the luster.
So adding more wax to a piece of antique wooden furniture that has been waxed before really is no more work.
However, this “disadvantage” is also an advantage with beeswax wood polish, as any light damage generally affects stains only the finish rather than stains the underlying wood. Being a wax finish, it can be repaired in minutes, whereas wood polish with a varnished or lacquered finish takes much longer to repair
Beeswax Over Other Finishes
Beeswax or beeswax wood polish can also be used as a final finish on top of varnish, much like it is used as a furniture polish. The wax will fill minute scratches that remain on the surface of the varnish, allowing it to be buffed to a higher sheen than the varnish alone, giving more the appearance of a lacquered finish.
This is an easy way to rejuvenate a varnish finish, only requiring one microscopically thin layer of wax. Adding additional natural or beeswax furniture polish or beeswax wood polish between layers doesn’t help, as it doesn’t build up.
The wax should be applied with a soft, lint-free cloth when using furniture polish. Using beeswax furniture polish with wax isn’t to build up and create a heavy finish, as it would be with varnish or epoxy; rather, use the minimal amount of wax necessary to achieve the desired luster. Most of the wax is applied with a soft cloth rubbed off.
Use the cloth to pick up a small dab of beeswax from its container and then rub it into the wood, spreading it as far as it goes. Unlike paint, there’s no need for beeswax to build up enough finish to cover all natural the existing wood grain. Instead, when the wax melts, the idea is to bring out the grain, so less is more.
Once the wax is applied all-natural well, wipe off the excess with a clean cloth. The wax can be buffed by hand or with a buffing pad on a random-orbital sander.
Applying Beeswax Finish
Beeswax can be applied as a sole finish to protect the wood. When doing this, remember that the wax will be soaking the mineral oil into the wood’s pores, so it will be necessary to use more wax. Use the color of the wood to gauge when a small amount more wax coat is needed, as the wax will be bringing out the natural grain, not mineral oil, which tends to darken it.
Before applying a protective coating to the beeswax furniture polish, wood furniture polish, or wax furniture polish again, the workpiece must be sanded smooth, but not too smooth. This isn’t the time for 600 grit sandpaper.
Rather, sand it, using nothing finer than about 120 grit sandpaper, and then raise the grain by rubbing over it with a damp cloth. Then sand it again lightly, removing the lifted fibers. If a stain is to be applied, do it at this point before applying the beeswax furniture polish finish.
When applying finishes onto carved-out wood furniture or molding, the trick is getting it down inside the low points of the carving. A cloth cannot be easy, so that a soft toothbrush can be useful. Allow the wax to dry after application and before rubbing it down for a few minutes.
There will undoubtedly be some wax that sticks down in the crevices and low points in the carving, building up higher there than beeswax polish or wax in other parts, but that’s not a problem.
Beeswax oil and polish can also be tinted, allowing it to be used for antiquing or creating other finish effects on wood furniture. A white-tinted beeswax oil and polish will provide a quick and easy “pickled pine” effect on raw wood. Sanding with medium sandpaper or using a handheld wire brush on the surface of the beeswax wood furniture polish will open up the pores, allowing them to absorb more wax and, therefore, more of the tint.
For antiquing a furniture polish, two contrasting colors of wax or a mixture of wax and a stain can be used together, with one color filling in the low points on wooden surfaces and the other on the high points on carved surfaces or moldings.
Apply one color first, being sure to cover the entire surface, and then the other is either used just to hit the high points or applied to everything and rubbed off the high points. Part of this charm is the imperfections in how evenly the finish is rubbed off, making the antiquing process look more natural wood authentic as if the piece is old.
Tinted waxes on tables also restore old varnished table finishes, which tend to crack. In this case, the preference is to use a wax tinted close to the color of the refurbished furniture. Light-colored wax on a walnut table will make those hairline cracks in the finish stand out, while dark-colored wax on oak tables will blend in and enhance and protect the natural look of the wood’s grain.
While several manufacturers provide these beeswax wood finishes, including some specializing in it, it can also be made at home. This allows the woodworker to make a full beeswax wood finish that best suits their wood-using needs and working style, considering how heavy-bodied the wax is and any tinting requirements.
There are several different recipes for making beeswax polish, but they all say the same thing. The idea behind polish is to make beeswax polish by mixing beeswax with some oil blend. This can be turpentine, food-grade, linseed oil, or animal oils. But for the most part, mineral linseed oil is the best for the money and can be used on projects with beeswax wood in contact with food.
First, make the all-natural beeswax furniture polish, and melt ¼ cup of beeswax in a double boiler. Beeswax melts at 144 to 147°F, so not much heat is needed. Once the wax has melted, add ¾ cup of oil and gently stir until the two have fully homogenized.
A few drops of lemon, orange oil, lavender, or other scented essential oil can also be added, providing a nice aroma to smell the pieces of furniture that the wax is used on. Once melted and mixed, pour the wax finish into a wide-mouthed glass jar and allow it to cool and solidify for two to three hours. When solidified, it should have the consistency of lip balm.
Related Posts:
Will Wood Burn When Cooking by Admin March 6, 2022 More About Using wood in cooking is nothing new. We use wood to provide heat for cooking, as well as using wood inside the oven or over…
Remove Wood from Concrete by Admin March 7, 2022 DIY Wood and concrete may not seem like two materials that can go together; but they actually do. Concrete is poured into a wood mold, called…
Wood Burning Stove in Basement by Admin April 6, 2022 Installing Many Americans choose the option of having their homes built with an unfinished basement, if they are fortunate enough to live in a part of…