Modern homes don’t have enough storage space. Closets are getting smaller, and you rarely find a house built with linen and coat closets anymore. Basements are an option, at least in those areas of the country where one can be put in. At a time when most of us are accumulating more and more possessions, we’ve got less and less space to store them.
This has fueled the growth of the mini-storage industry, with many families renting a small storage space to store the things they can’t fit into their homes but can’t bring themselves to get rid of. If only there was more room to store those things in the house without turning our garages into junk piles. And for those who use our garage for a workshop, that’s not an option.
Once upon a time, people used their attics to store all those things, back when roofs were made with rafters rather than trusses. But somehow, once we started building with trusses, we concluded that we couldn’t use our attics for storage anymore.
That’s just not true. In comparison, using an attic for storage is more complicated if you have trusses than if you have rafters; you can still do it. Rafters are strong enough to support the weight of flooring and items you would store up there. The only difficulty is that the stringers used in making the truss’s web make it harder to install flooring, move around the attic, and store large items. But those aren’t insurmountable obstacles for many of the things any of us would want to store in our attic.
Part of the trick to making your attic usable is having easy access to it, both for you and for the things you want to put in it. I can tell you from personal experience that as useful as drop-down attic stairs are, it’s no fun to carry large boxes up them. You’re better off with an attic lift.
Commercial Attic Lift Systems
Many companies offer ready-to-install attic lifts for those who don’t have the time to build them and don’t mind paying for them. A few of them will even install them for you for a price.
Most of these lifts provide a 2’ x 4’ platform (although some are larger) with a cable hoist system that attaches to all four corners. This makes them a bit more complex, as it takes some spools and pulleys to make it so that one motor can pull on all four cables. That makes it more complicated than something you might want to try building at home. It also looks like there’s a real potential for problems if the cables aren’t synchronized.
On the plus side, these commercial systems can be installed anywhere in your home because once they are lifted, there’s almost nothing visible from downstairs. The bottom of the lift is covered with a white panel, making it blend into your ceiling quite well. Some even use Bluetooth for the controls so that you can run the lift from your smartphone.
The big problem with these lifts, and the reason we don’t see them in more homes, is that they are rather expensive. While there are cheaper lifts out there, they really aren’t made to do what attic lifts do. They’re more like a storage system that lifts things up and uses the space near the ceiling of your garage for storage. That’s not the same as actually getting things up into the attic.
Making Your Garage Attic Lift
The best solution is to make your attic lift. This isn’t as hard as you might expect. All the components are readily available, and the one really complex piece of equipment, a cable hoist, isn’t even all that expensive. You can find good cable hoists that will lift several hundred pounds for one to two hundred dollars.
I’m calling this a garage attic lift because it will have tracks that need to be mounted to the garage wall. That probably wouldn’t look all that good in your living room, and you can’t trust your kids not to play with it if you put it in one of their bedrooms.
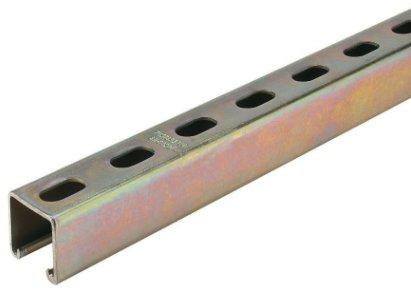
For tracks, you can use Unistrut, also known by the trade name Superstrut. Unistrut comes in different sizes, but the basic design is a C channel with “ears” on it, making it possible to use it as a track. Check an industrial supply if you can’t find it at your local home improvement center. You’ll also need four trolleys to go with the Unistrut. While these are generally used for overhead applications, they also have the necessary wheels and bearings to be used for a vertical track. Just make sure that the size of the trolleys you buy matches the size of the Unistrut.
Unistrut
To install a lift in your garage, you must make a hole in the attic floor above. This will have to be in the gable end, as that’s the only place where the ceiling will be high enough to install the lift and allow you to unload it at the top end. Don’t worry about this getting in the way of parking your cars, as the lift should be stowed in the up position for safety when not in use.
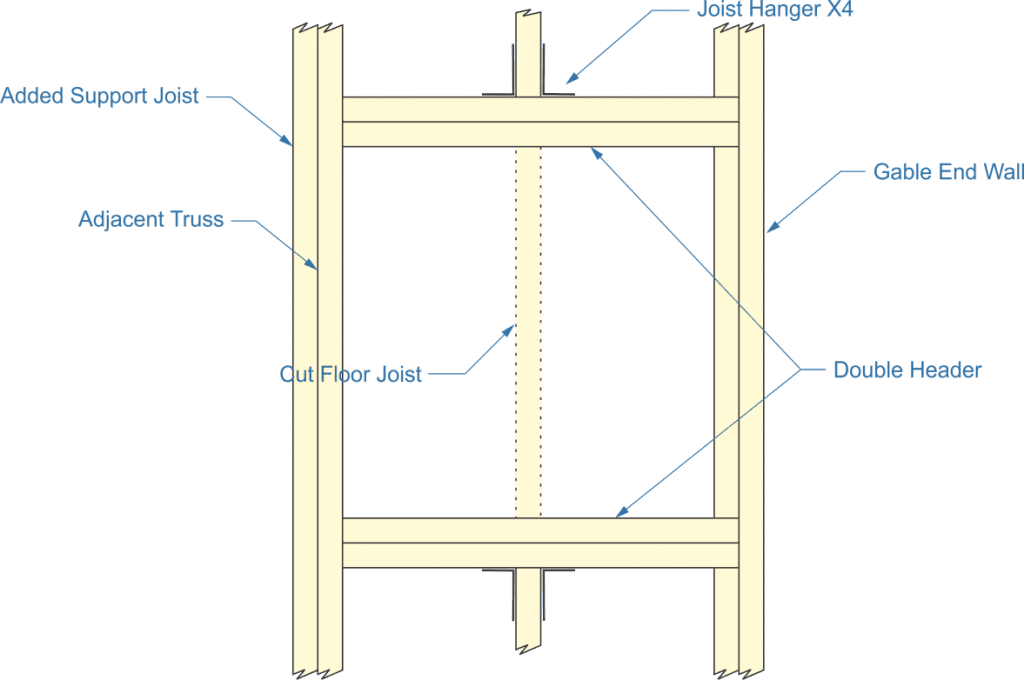
Making that hole will require cutting the floor joist part of the truss closest to the wall and installing a double header. As this joist is an integral part of the truss, you will want to reinforce the adjacent truss and attach the cut joist to the doubleheader well on both sides. I’d recommend using joist hangers for this, as they will ensure a solid connection between all the parts.
Double header
The two Unistrut tracks that you will use for your lift’s platform to ride up and down need to be mounted to the wall so that they protrude up through this hole. Be sure to keep the tracks perfectly parallel so that the trolleys don’t bind up as the lift is raised up and down. Use whatever blocking is necessary to support the tracks, keeping in mind that they must be strong enough to support a couple of hundred pounds.
You want the entire weight of your lift, along with whatever is being hoisted up on it, to be carried by the wall of your garage, not the rafters. While the rafters could probably support the weight without a problem, they aren’t designed for that. Nor is the floor of the attic. On the other hand, any weight on the wall will be supported by the studs in the wall, which will carry that weight down to the foundation.
Whatever you plan on putting up in the attic will ride up and down on a track, somewhat like a simple elevator. So, you’ll need a platform for the “elevator car.” this doesn’t need to be fancy, but it does need to be strong. It will have to support the weight of whatever you decide to put up in the attic, including yourself.
As you can see in the diagram below, the platform should be constructed in an L shape with a diagonal support stringer. The vertical part of the L will be what rides along the track. A large eye bolt attached to the top will be an attachment point for an electric hoist, which will do all the work. To ensure sufficient strength, it’s a good idea to add a diagonal support stringer between the back and the platform because the entire weight of the platform and its load is cantilevered. Without this stringer, there’s too much of a chance of the joint of the L breaking.
Four trolleys for the Unistrut should be attached to the platform, two for each track, one at the top of the back and the other at the bottom. The more distance between them, the smoother the lift will operate.
Attic lift platform
The overall size of the platform needs to be slightly smaller than the hole you’ve made in the attic floor. Ideally, you want about 1/2” of space all the way around so that you can make sure the lift will fit in it smoothly. For safety, avoid going with a much bigger gap.
The Mechanism
You will need an electric wire rope hoist to provide power for your attic lift. These can be purchased for as little as $69.99, which will lift 220 pounds. Even so, you might want to spring for a little better one. Like buying a winch for a four-wheel-drive vehicle, it’s always better to buy a bigger one than you think you’ll need.
One precaution when looking at these is always to check if the manufacturer’s rating is with a single or double line. A single line means that the steel cable from the joist is going directly to the item being lifted, in this case, the attack lift. Adding a pulley at the platform, running the wire rope from the hoist down through that pulley, and back up to the hoist is called a double line. This allows the hoist to lift double the weight but will operate at half the lifting speed.
Even though using the hoist single line without a pulley is quicker, I’d recommend adding the pulley and using it as a double line. Your hoist may be able to handle the weight without doing this, but this gives you a more significant safety margin.
The tricky thing to do here is to mount your hoist so that the rafters aren’t holding the weight but rather by the wall. To do so, you’ll need to build a sturdy L bracket to mount the hoist, which can attach to the wall. If you attach it to the rafters, make it long enough to attach to several, spreading the weight.
You may also need to extend the controller cable; most only have a fairly short cable. But that cable only has a maximum of three wires, so cutting it and splicing a longer wire in isn’t really much of a problem. You can use a cheap three-wire extension cord for the wire, but make sure you solder all the connections and tape them well to prevent them from shorting out.
One last thing you should do with your attic lift is to paint the area on the floor where it comes down yellow. This is a warning sign not to put anything where the lift is so that whatever would otherwise be placed there won’t be in the way of the lift. Alternatively, you could store something easily moveable there, like your trash can, keeping people from piling other things in that place.
An Attic Lift in Your Home
If you can’t install an attic lift in your garage for some reason, you can still install one in your home. Ideally, this would be in a closet, much like an elevator. But you probably don’t have room for this. That leaves you putting your attic lift somewhere in the middle of a hallway, much like people do with an attic ladder. You will probably have to remove a section of the floor joist for this, just as we did in the garage version.
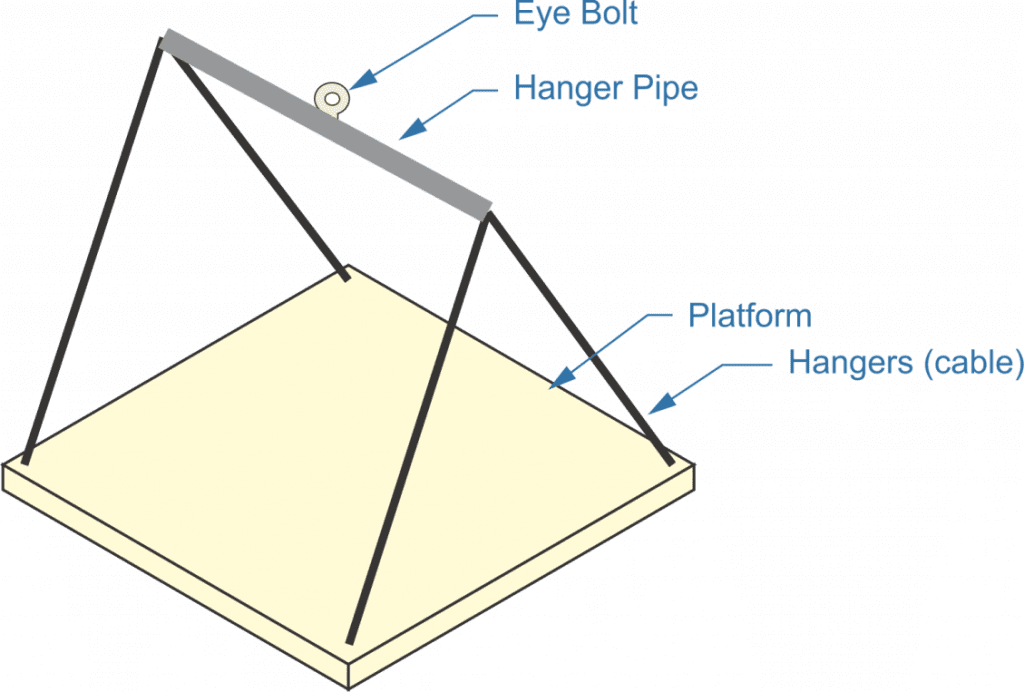
The main difference in doing this is that you won’t be able to use a rail for the attic lift. Instead, the platform will need some hanger to attach the cable from the hoist. In the drawing below, the hanger consists of a steel or iron pipe, with an eye bolt attached in the middle and holes in the ends for cables to be strung. Those cables are connected in turn to the four corners of the platform.
Variations of this can be made, with iron pipe and fittings being used to create a similar means of attaching, albeit with squared-off corners, rather than trying to mount the pipe in such a way as to make the angles shown above.
Either way, there is a slight problem with the lift tending to turn while being raised and lowered. So, it will need to be guided while being raised.
To give your lift a finished appearance, attach a piece of AC plywood to the underside of it. Finish the edges neatly and paint the entire board to match your ceiling. That way, while it will still be visible in the raised position, it won’t be so obvious.
Related Posts:
Attic Insulation Removal by Admin June 6, 2023 Repairs Unknown to many people, the insulation in a home’s attic is the most important part of any home’s insulation. That is a simple application of…
Best Attic Stair Insulation by Admin July 9, 2023 Installing Attic stairs are a great convenience, making it easy to go up into the attic at any time and utilize the space up there for…