Living with a squeaky plywood floor can drive you nuts. One step creaks, the next groans, and before long, it feels like the whole house is talking back at you. I had it happen in my own hallway — every late-night trip sounded like a warning alarm — and I’ve helped friends with the same issue. The good news? Learning how to fix a squeaky plywood floor isn’t nearly as scary as it sounds. Most of the time, you don’t need to rip anything up or spend a pile of money. A drill, a few screws, maybe some glue, and a little patience will usually shut it up for good.
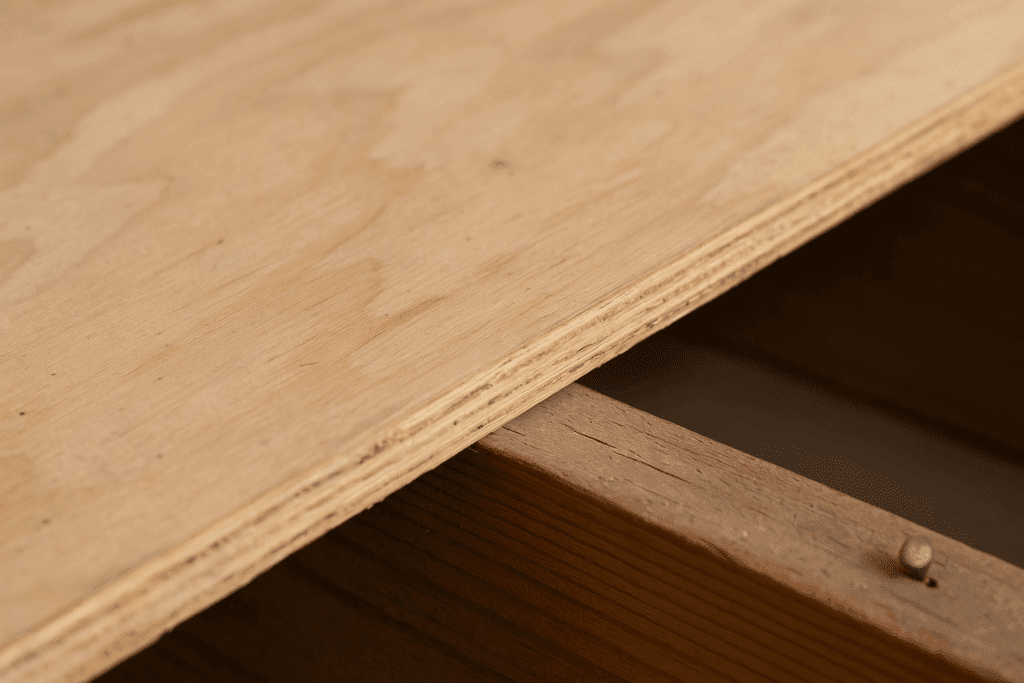
No matter if the noise is coming from under the carpet, hardwood, or tile, the reason is usually the same: the plywood subfloor has started to shift slightly against the joists below. Once you know why that movement happens, figuring out how to fix a squeaky plywood floor is surprisingly straightforward.
Why Does a Squeaky Plywood Floor Happen?
Squeaks happen when two surfaces rub against each other. In most homes, the culprit is a gap or loose connection between the plywood subfloor and the floor joists. Here are the most common causes:
Loose nails: Over time, nails can back out of the plywood, allowing movement.
Seasonal expansion and contraction: Wood swells in humidity and shrinks in dry weather, creating gaps.
Improper fastening: Builders sometimes used nails instead of screws when installing subfloors.
Settling of the house: As a house ages, joists may shift slightly, stressing the plywood connections.
Unsupported spans: If plywood sheets don’t land squarely on joists, they flex and squeak.
👉 Suggestion: R-Value of Plywood (good resource on plywood performance in different conditions).
Tools and Materials to Fix a Squeaky Plywood Floor
Before starting, gather the right tools. You’ll save frustration if you have everything ready.
Cordless Drill/Driver – DEWALT 20V Max Drill (Amazon affiliate link) Honestly, you can’t do this job without a drill. I keep the DEWALT 20V around because it’s light in the hand, and the battery doesn’t quit halfway through a repair.
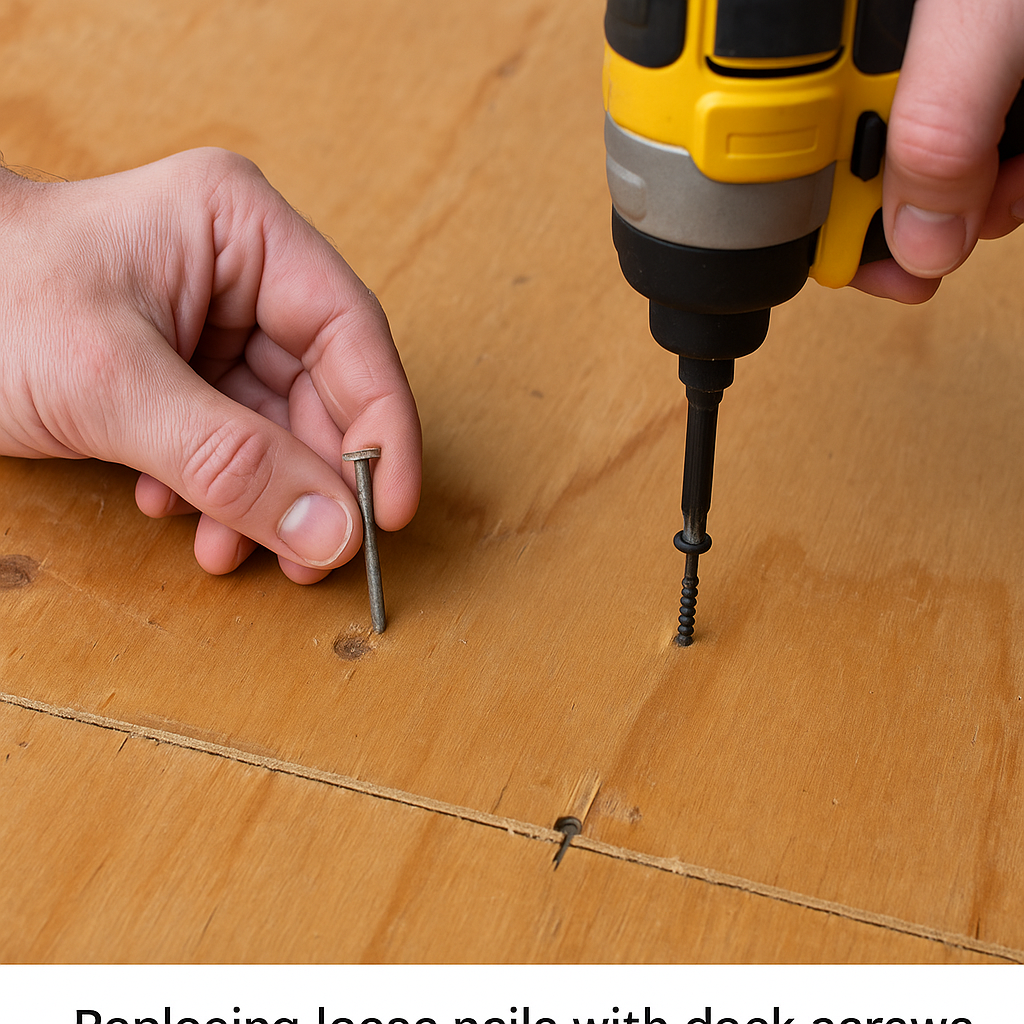
Wood Screws (2″–3″ deck screws work best) Nails pop loose. Screws don’t. Grab a box of deck screws and you’ll notice the difference—once they’re in, the floor stays quiet.
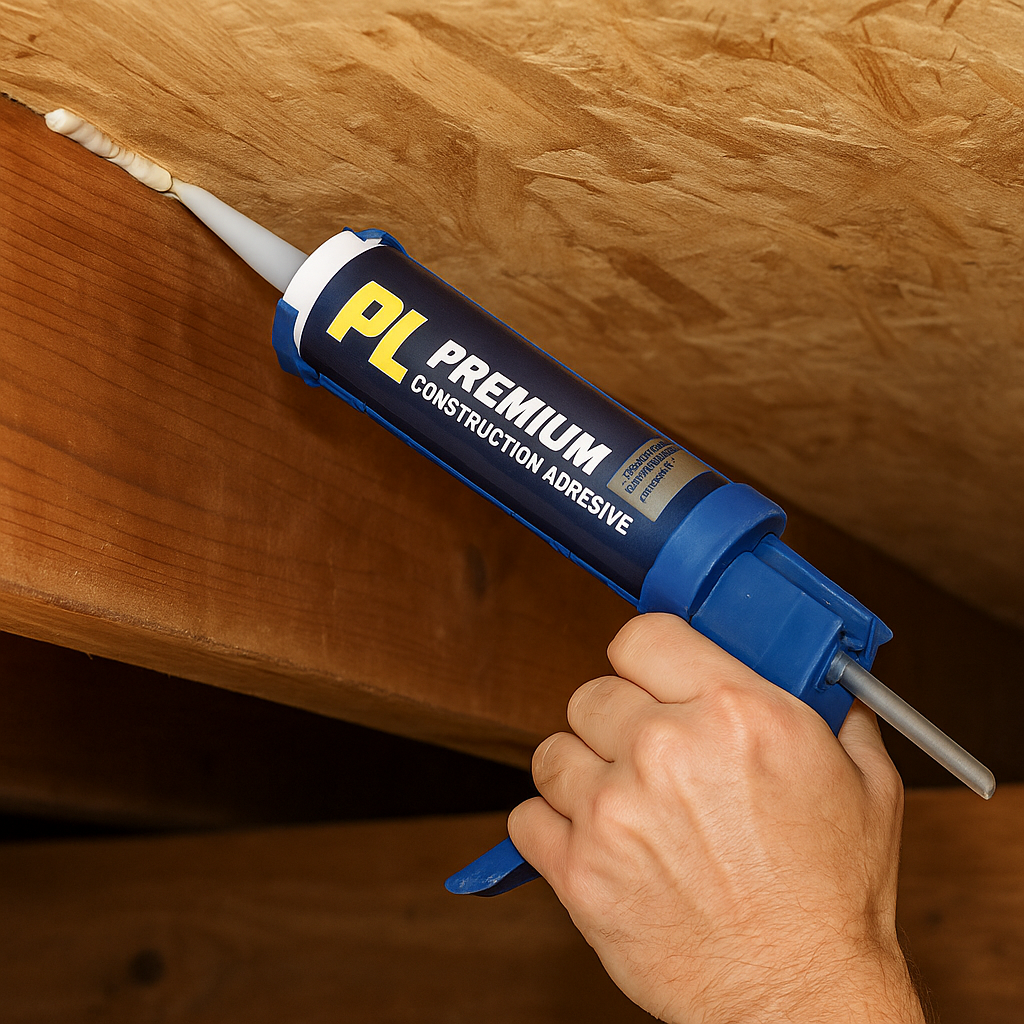
Construction Adhesive – Loctite PL Premium If you find a gap between the joist and plywood, glue is your friend. PL Premium is sticky stuff; once it sets, the boards won’t move again.
Shims – Thin wood or composite Sometimes there’s just a tiny space causing the squeak. A shim tapped in gently will tighten things up. I always keep a handful in my toolbox.
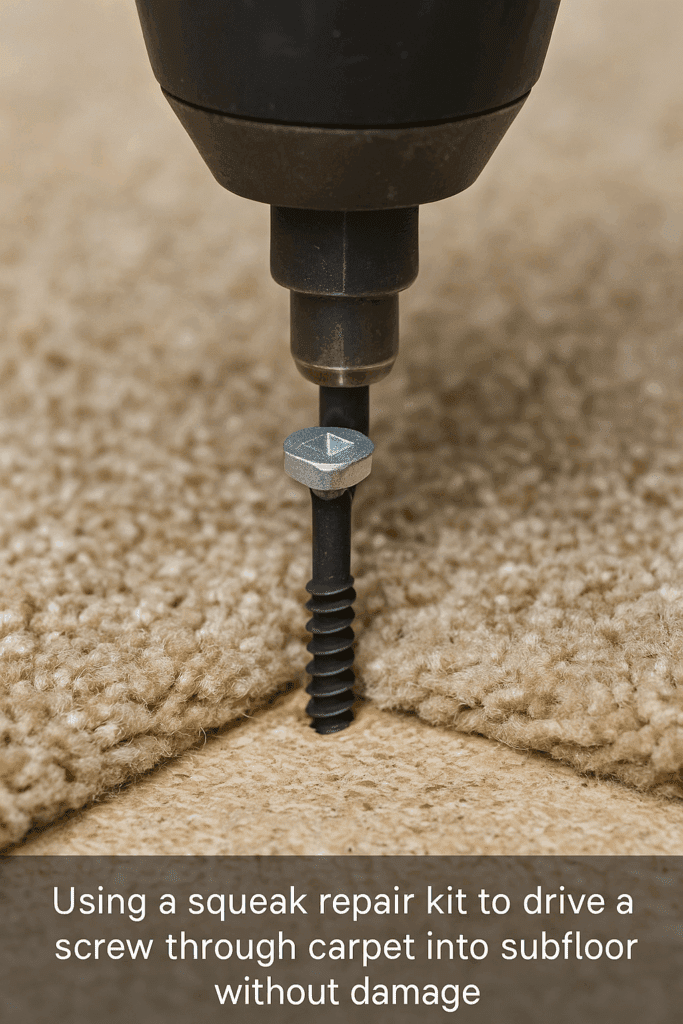
Squeak Repair Kit – Squeeeeek No More (for carpeted floors) These are smart kits. The screws pull everything tight, then snap off below the surface so you don’t even see them. Perfect when the noise is under the carpet.
Hammer and Nail Set Not every squeak needs new screws. Sometimes you drive the old nails back down. A nail set lets you sink them without chewing up the floor.
Utility Knife Convenient for trimming carpet or underlayment, allowing you to reach the trouble spot. It’s one of those tools you never think you’ll need until you do.
Caulk Gun (for adhesive) If you’re using glue, you need a caulk gun. Squeezing adhesive straight from the tube is a mess, and you’ll waste half of it.
Safety Gear – Glasses and Ear Protection I know it’s boring, but I always put on glasses and ear protection before I start. Wood chips fly, drills scream—it’s not worth risking an eye or your hearing.
Step-by-Step: How to Fix a Squeaky Plywood Floor
Step 1: Find the Squeak in Your Plywood Floor
I just walked around until I heard it. Creak here, groan there. Marked the spot with tape. Then I had someone else walk while I crawled underneath to listen. Sure enough, plywood is moving against the joist. Classic.
Step 2: Underneath Fix (Best Case)
If you’ve got basement access, do it this way. I ran a bead of adhesive on the joist, then shot a couple of screws up at an angle. Pulled the plywood down tight, squeak gone. ⚠️ Don’t overdo the screw—I’ve punched one through the floor before. Ugly surprise.
Step 3: Repairing a Squeaky Plywood Floor from Above
Sometimes you don’t get lucky. Here’s what I’ve done:
Carpet: Used a Squeeeeek No More kit. Screw goes right through the carpet, pulls the floor down, and snaps off under the surface. No damage.
Hardwood/Vinyl: Drill, sink a trim screw, fill the hole. If the filler color is close, nobody notices.
Tile: Not worth it. Screwing through tile is a crack waiting to happen. Fix it from below or live with it.
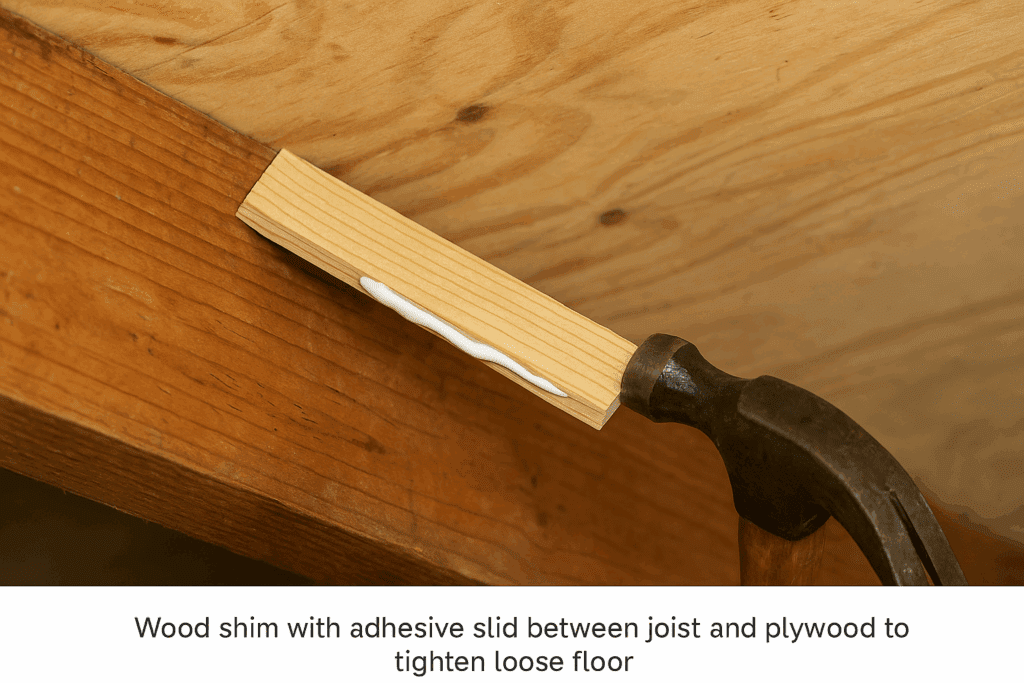
Step 4: Shim the Gap
Found a little daylight between joist and subfloor once. Slid in a shim with glue, just tight enough. Don’t pound it or you’ll make things worse.
Mistakes to Avoid When Fixing a Squeaky Plywood Floor
I’ve fixed more squeaky floors than I can count, and every time I’ve learned a little more about what not to do. These are the traps most people fall into—and a few that tripped me up along the way.
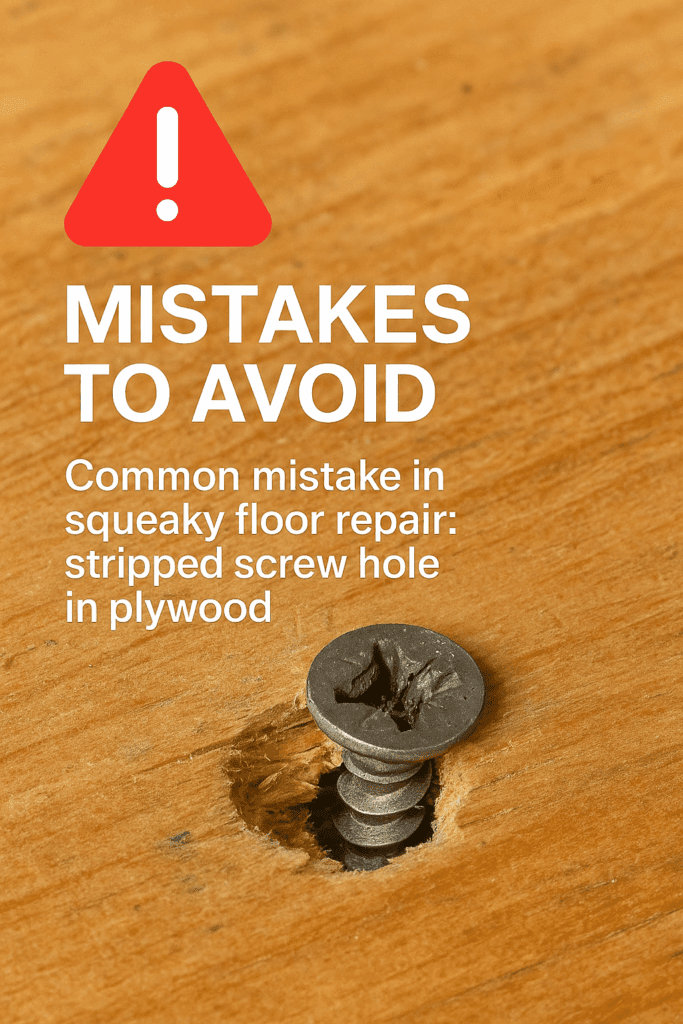
Over-tightening screws It feels natural to keep driving the screw until it sinks as deeply as possible. The problem is, plywood doesn’t forgive over-tightening. Push too far and you strip the hole so the screw has nothing left to bite into. The squeak won’t stop, and now you’ve weakened the spot. I stop turning the screw the second the head is just below the surface. Firm, not buried.
Nailing next to loose nails I made this mistake in my first house. A nail had popped loose, so I thought hammering another one beside it would keep the board tight. It didn’t. Within a week, both nails worked themselves up and squeaked in unison. Nails simply don’t have the holding power. If you see a loose nail, pull it out and replace it with a decent deck screw.
Skipping the adhesive Glue doesn’t just help—it’s what makes the repair last. Screws hold today, but adhesive keeps the wood from rubbing again tomorrow. A quick bead of construction adhesive between the joist and subfloor makes the difference between a temporary fix and a permanent one. I never skip it anymore.
Forgetting about moisture Floors move with the seasons. In the summer, humidity swells the wood; in winter, it dries and shrinks. If your basement or crawlspace is damp, that movement only gets worse. A dehumidifier or better ventilation can be as important as the screws you put in. Ignore moisture and you’ll be chasing squeaks every year.
My Takeaway on How to Fix a Squeaky Plywood Floor
These little details matter. I’ve seen people replace whole sections of flooring when all they needed was glue, a few screws, and a dry basement. Go slow, avoid these mistakes, and you’ll stop the noise for good. And trust me—walking across a quiet floor after years of creaks is one of the most satisfying feelings in DIY.
Recommended Products for a Quiet Floor
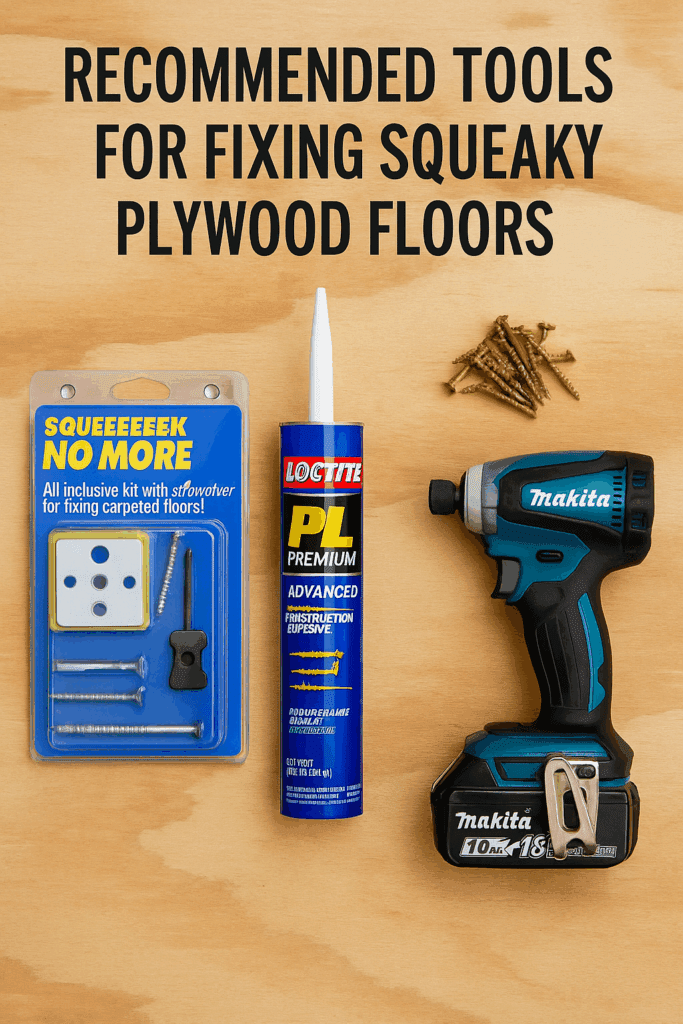
Squeeeeek No More Kit If the squeak is under the carpet, this kit is a lifesaver. You don’t have to pull up the carpet or padding to get at the subfloor. The special screws drill right through the carpet, grab the plywood, and then the heads snap off flush below the surface. No visible damage at all. I’ve used it in a bedroom, and you literally couldn’t tell where the screw went in once the job was done. It’s one of those clever tools that actually works as advertised.
Loctite PL Premium Adhesive Adhesive is the “hidden hero” in squeak repair. Screws lock things together right now, but adhesive keeps the bond tight for years. Loctite PL Premium is my go-to because it’s strong, waterproof, and doesn’t get brittle. I run a bead along the joist before driving screws, and the plywood is rock solid afterward. Without glue, you may end up chasing the same squeak again later.
GRK R4 Screws Not all screws are created equal. GRK R4 screws are self-countersinking, which means the head bites down into the plywood neatly without tearing it up. They’ve got an aggressive thread design, so they hold like crazy. I switched to these after stripping out cheaper screws, and the difference was night and day. If you want the floor to stay quiet long-term, use good screws.
Cordless Impact Driver – Makita XDT14Z Driving dozens of screws by hand or with a weak drill gets old fast. An impact driver makes the work quicker and less frustrating. I like the Makita XDT14Z because it’s compact, powerful, and the battery lasts. The extra torque means screws sink in without cam-out, and you don’t burn up your wrist. If you’re tackling more than one squeaky spot, you’ll be glad you’ve got an impact driver in your kit.
Final Thoughts on Repairing a Squeaky Plywood Floor
Fixing a squeaky plywood floor doesn’t mean tearing your house apart or paying for an expensive remodel. Most of the time, the problem comes down to one thing—plywood rubbing against joists because the connection isn’t as tight as it should be. A few screws, some adhesive, or a specialty squeak kit are usually all it takes. I’ve spent afternoons chasing squeaks around my own home, and once you know the tricks, you’ll be surprised how quickly the noise disappears.
The payoff is huge. A quiet, solid floor makes the whole house feel sturdier, and you stop wincing every time someone walks through the hallway at night. It’s one of those small DIY wins that changes the feel of your living space more than you’d expect.
The best part is that once you’ve done it once, you’ll know how to handle squeaks anywhere—bedrooms, living rooms, even that one annoying step on the stairs. Instead of living with the creak, you’ll grab your drill or repair kit and deal with it in minutes. Silence, in this case, really is golden.
Related Posts:
Building a Dance Floor That Feels Right by Admin May 31, 2025 DIY If there's one thing I've picked up from years of helping my daughter chase her ballet dreams—and reliving a few moves from my dancing past—it's…


")

")
