Best Wood Stain for Pine (No Blotches + Real Tested Results)

Quick Answer

Pine wood before and after staining showing blotchy vs smooth finish using proper prep

If you’ve ever stained pine and it came out uneven, blotchy, or just… wrong—you’re not alone.

Pine is tricky because it absorbs stain unevenly. Some areas soak it in fast, others barely take any at all.

Here’s what actually works:

  • use a wood conditioner first
  • use a gel stain for the most consistent finish

If you want a simple breakdown:

  • Best overall → gel stain (no blotches)
  • Best natural look → water-based stain
  • Best deep color → oil-based stain (with conditioner)

If you don’t want to experiment, start with gel stain. It removes most of the guesswork.


Best Wood Stains for Pine (Tested Picks)

After trying different stains on pine, these consistently gave good results.

ProductTypeBest For
General Finishes Gel Stain – Antique WalnutGelNo blotches
Minwax Water-Based Wood Finish – Amber PineWaterIndoor projects
Varathane Fast Dry Wood Stain – Ipswich PineOilDeep color

Some stains look great on the label but behave unpredictably on pine. These three are reliable.


What to Look for When Choosing a Wood Stain

Not all stains are the same, even if they look similar on the label.

Here’s what actually matters:

Color tone
Some stains lean orange, some lean brown, some lean gray. This changes how the wood looks completely.

Thickness
Thicker stains (like gel) are easier to control.

Drying time
Water-based dries faster, oil-based takes longer.

Ease of use
Some stains are forgiving, others are not.

If you’re just starting out, don’t overcomplicate it—go with something easy to control.


Why Pine Is So Hard to Stain

The first time I stained pine, I thought I messed something up.

I sanded it smooth, cleaned it, applied stain… and within seconds I could see dark patches forming in random spots.

It didn’t look smooth or natural—it looked uneven.

At first, I thought it was the stain.

But it wasn’t.

Pine has uneven density:

  • soft sections absorb stain quickly
  • dense sections resist it
  • grain patterns change across the board

That’s what causes blotching.

Once you understand that, you stop trying to “fix” it after the fact and start controlling it before you even apply stain.

That’s why learning how to properly prepare wood for staining makes such a big difference in the final result.


How to Stain Pine Without Blotches (Step-by-Step)

This is the process I follow on every project now. It’s simple, but skipping any step usually shows in the final finish.


Step 1: Sand the Wood Properly

Sanding wood properly before staining using multiple grit levels for smooth finish generate image

Start with:

  • 120 grit
  • then 150
  • finish with 220

Pine is soft, so sanding marks don’t disappear—they get highlighted after staining.

I’ve had projects that looked smooth before staining, but once the stain went on, every swirl mark showed up.

That’s when you realize sanding wasn’t as good as you thought.

👉 Take your time here
👉 Clean all dust before moving on

If you want a full breakdown, follow this guide on how to sand wood before staining.


Step 2: Use a Wood Conditioner (Most Important Step)

This is where most people go wrong.

A wood conditioner:

  • slows down absorption
  • evens out the color
  • prevents dark blotches

Without it, stain soaks into soft areas instantly and leaves hard areas behind.

Apply it:

  • wait 10–15 minutes
  • wipe off excess
  • stain within 2 hours

Step 3: Test Your Stain First

This step feels unnecessary—until it saves your project.

Even boards from the same piece of wood can react differently.

Test:

  • different stain colors
  • different wipe times
  • different application methods

👉 Testing takes minutes
👉 Fixing mistakes takes hours


Step 4: Apply the Stain

Applying wood stain evenly with cloth along the grain for smooth finish generate image

Keep this simple:

  • use a foam brush or cloth
  • apply with the grain
  • don’t overload the surface

Wait a couple of minutes (2–5), then wipe off excess.

👉 Want it darker? Add a second coat later
👉 Don’t try to force color in one pass

If you’re unsure about technique, this guide on how to apply wood stain evenly without streaks explains it well.


When Staining Goes Wrong (And You Don’t Know Why)

Sometimes everything seems right—you sanded, you applied stain, you wiped it off—and it still doesn’t look good.

That usually comes down to small things that are easy to miss.

For example, I’ve had boards where one side looked perfect, and the other side looked completely uneven. Same stain, same process, same piece of wood.

The difference? Slight variation in grain and how much pressure I used when sanding.

Another time, I left stain on just a bit longer than usual. It looked fine at first, but once it dried, certain areas were noticeably darker.

👉 That’s the frustrating part about staining—small differences show up big.

The solution isn’t doing more—it’s doing things consistently.


Step 5: Seal the Wood

Stain gives color—but the finish protects it.

Without a topcoat:

  • wood scratches easily
  • color fades
  • surface feels rough

Apply 2–3 coats, sanding lightly between each.

If you’re not sure which finish to use, this breakdown of polyurethane finishes and when to use them helps.


How to Stain Wood (General Process)

Even outside of pine, the process stays the same:

  1. Sand
  2. Clean
  3. Condition (if needed)
  4. Apply stain
  5. Wipe
  6. Seal

The difference is how each wood absorbs stain.

Pine just makes mistakes more obvious.


How Different Woods React to Stain

Not all wood behaves like pine.

Here’s a simple breakdown:

  • Pine: uneven absorption, needs conditioner
  • Oak: absorbs evenly, easy to stain
  • Maple: can blotch like pine
  • Birch: similar to pine, needs prep

That’s why techniques change depending on the wood.

If you’re working across multiple materials, it helps to understand how different surfaces respond to finishes, especially when comparing types of plywood and how they absorb stain.

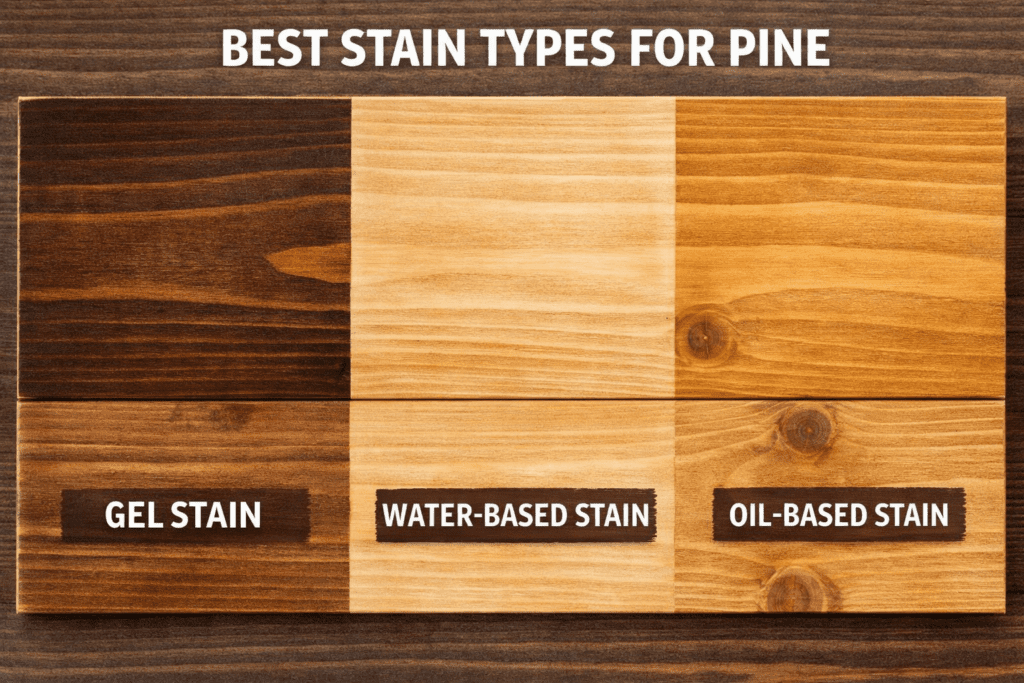
Gel vs Oil vs Water-Based Stain (Real Differences)

Here’s the simple breakdown:

Gel stain

  • easiest to use
  • hides blotches
  • great for beginners

Water-based stain

  • dries quickly
  • low odor
  • cleaner look

Oil-based stain

  • deeper color
  • traditional finish
  • needs proper prep

If you want predictable results → gel stain.


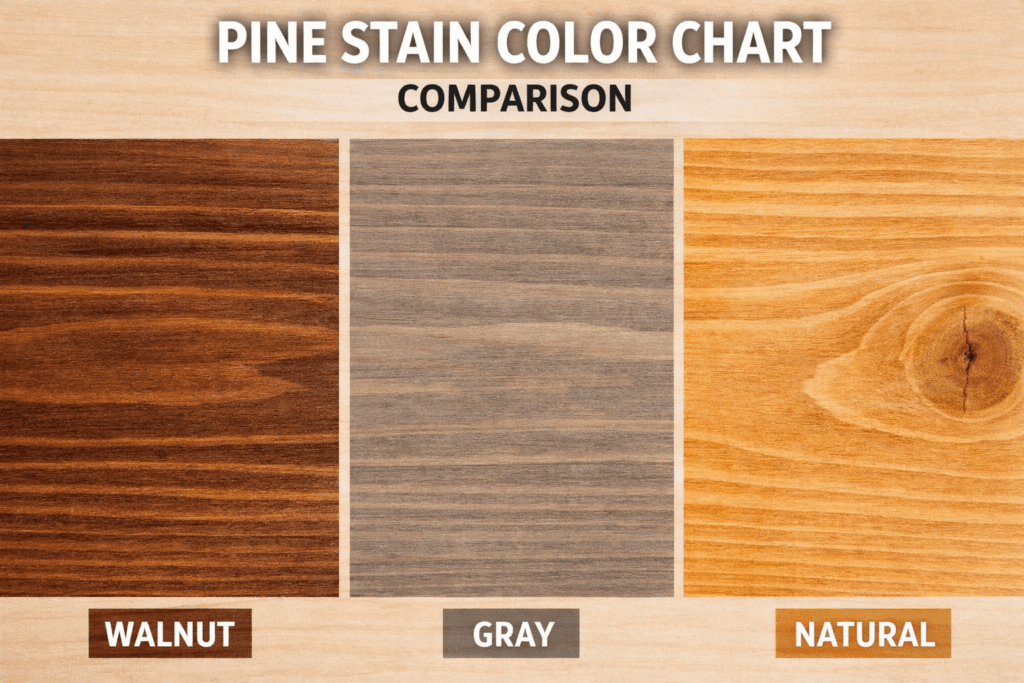
Best Stain Color for Pine (By Style)

Pine wood stain color chart showing walnut, gray, and natural finishes

Choosing the right color matters more than most people think.

StyleBest StainWhy It Works
FarmhouseSpecial WalnutWarm, hides yellow tones
ModernClassic GrayClean, neutral
NaturalAmber PineKeeps brightness
High-EndAntique WalnutRich finish
WeatheredWeathered OakAged look

If you’re unsure, go with Special Walnut—it’s hard to mess up.


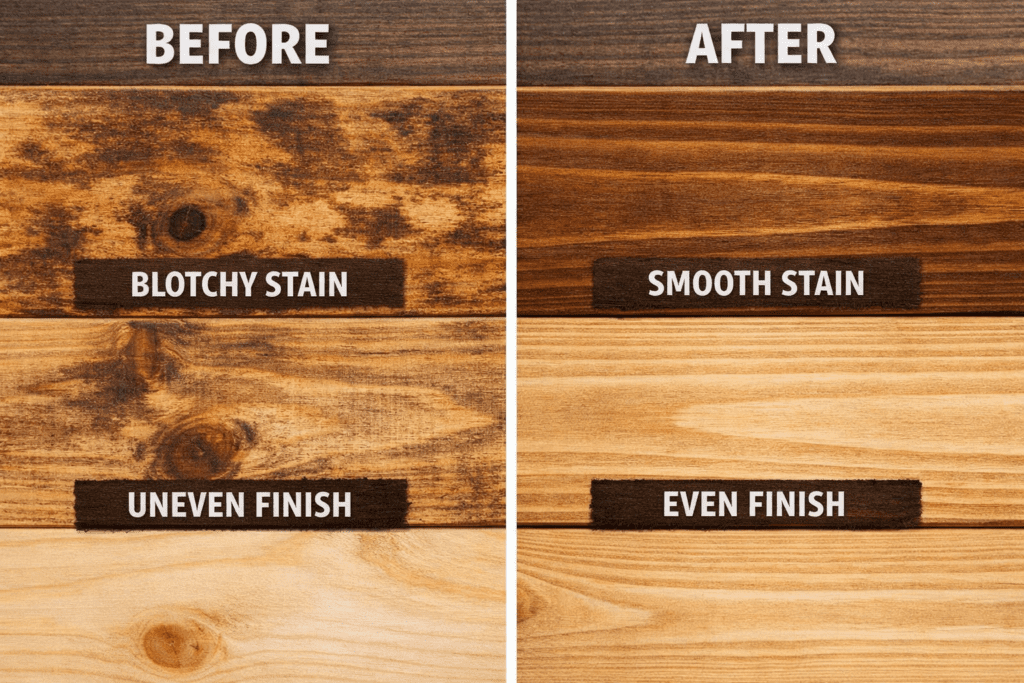
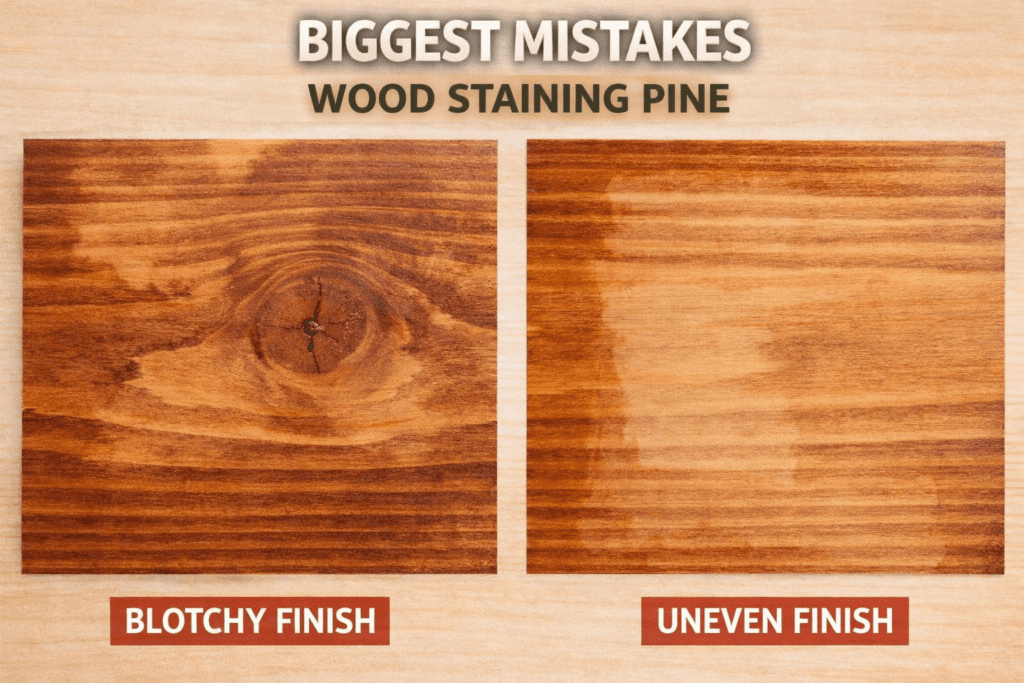
Biggest Mistakes When Staining Pine

These are the ones I see over and over:

Skipping sanding
Leads to visible scratches

Skipping conditioner
Causes blotchy finish

Using too much stain
Creates uneven color

Not wiping properly
Leads to sticky surface

Skipping topcoat
Shortens lifespan of finish

Many of these problems can be avoided just by following proper prep.


What Happens If You Skip Conditioner

I tried skipping conditioner once to save time.

It didn’t save time.

The stain soaked unevenly, leaving patches everywhere. No matter how much I wiped, it didn’t fix it.

I ended up sanding the whole project down and starting over.

If you’ve already run into issues like this, it helps to know how to fix wood stain mistakes properly.


When Pine Actually Looks Good

Despite its reputation, pine can look great.

It’s used in:

  • furniture
  • shelving
  • wall paneling
  • ceilings

When properly finished, it has a warm, natural look that many people prefer to hardwood.

It just needs the right process.

If you’re working with different materials, it also helps to understand the types of plywood and how they absorb finishes:


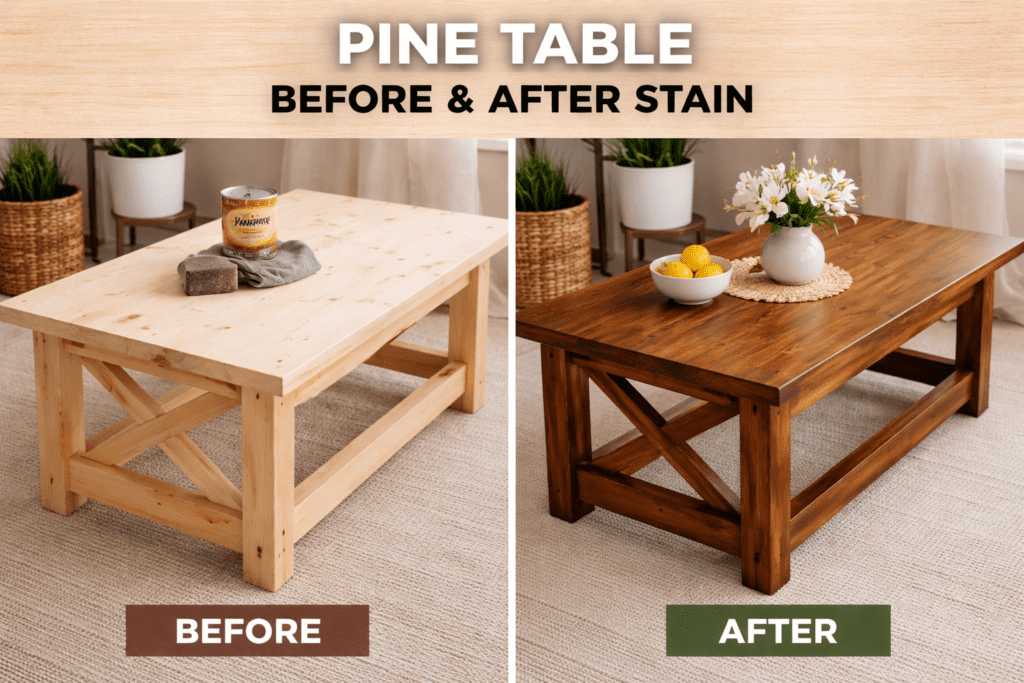
Real Project Example

I built a pine table once that looked great unfinished.

After staining, it looked uneven and slightly orange.

I almost scrapped it.

Instead, I:

  • sanded it down
  • used conditioner
  • switched stain

The result looked completely different—darker, smoother, and more consistent.

That’s when I realized the issue wasn’t pine—it was how I was using it.


Common Pine Staining Problems (Quick Fix)

ProblemCauseFix
Blotchy finishNo conditionerSand and reapply
Too orangeWrong stainUse darker tone
Rough surfaceRaised grainLight sanding
Sticky finishToo much stainWipe more
Dull lookNo topcoatApply finish

FAQ: Staining Pine and Wood Properly

What is the best stain for pine wood?

The best stain for pine wood is gel stain because it sits on the surface rather than soaking unevenly into the grain. This helps prevent blotching and creates a more consistent finish. Oil-based stains can also work, but only if you use a wood conditioner first.


Why does pine wood turn blotchy when stained?

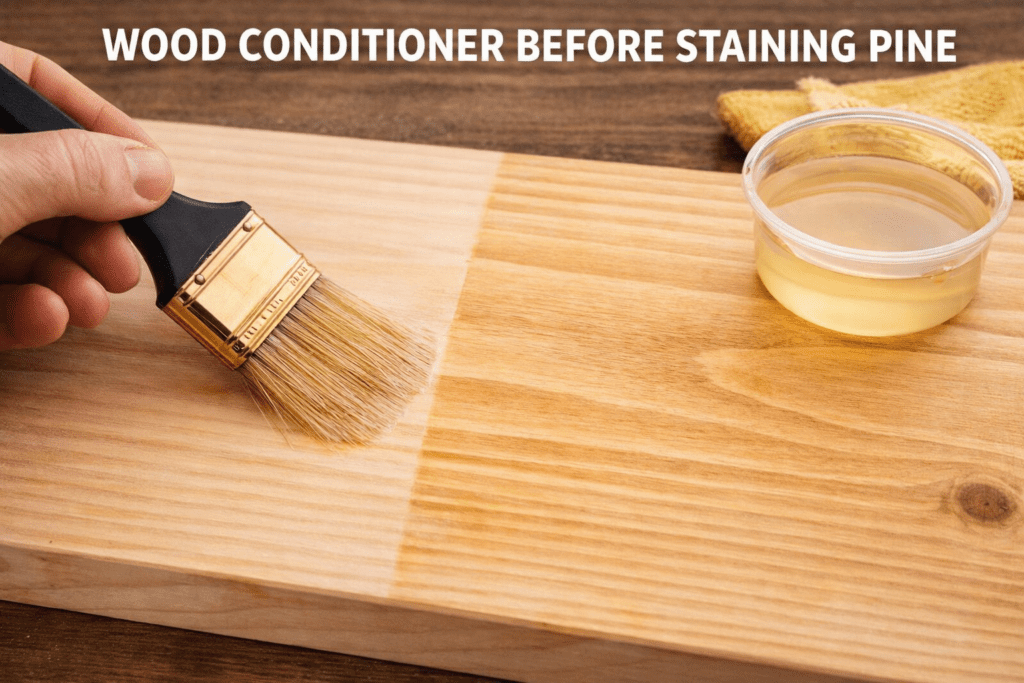
Pine turns blotchy because it has uneven density. Softer areas absorb stain quickly, while denser areas resist it. This causes dark and light patches across the surface. Using a wood conditioner before staining helps balance absorption and reduce blotching.


Do you need wood conditioner before staining pine?

Yes, using a wood conditioner is strongly recommended for pine. It evens out how the wood absorbs stain and helps prevent uneven color. Skipping this step is one of the most common reasons pine finishes look patchy.


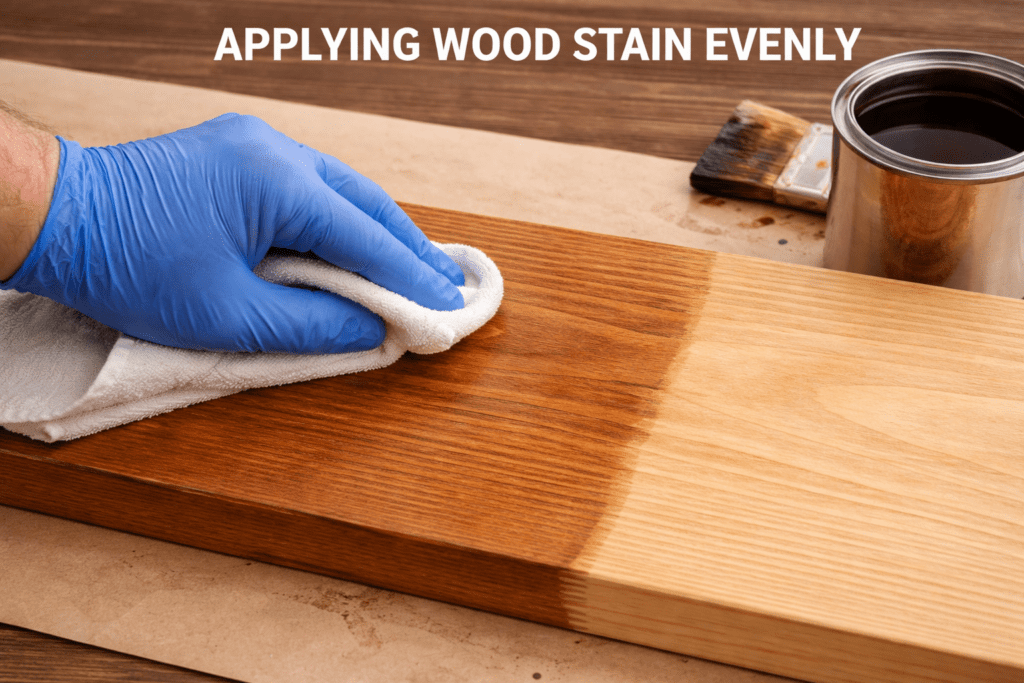
How long should the stain sit before wiping?

The stain should usually sit for 2 to 5 minutes before being wiped. Leaving it longer will create a darker color, but it can also lead to uneven absorption on pine. It’s better to apply a second coat than to leave too much stain on the surface.


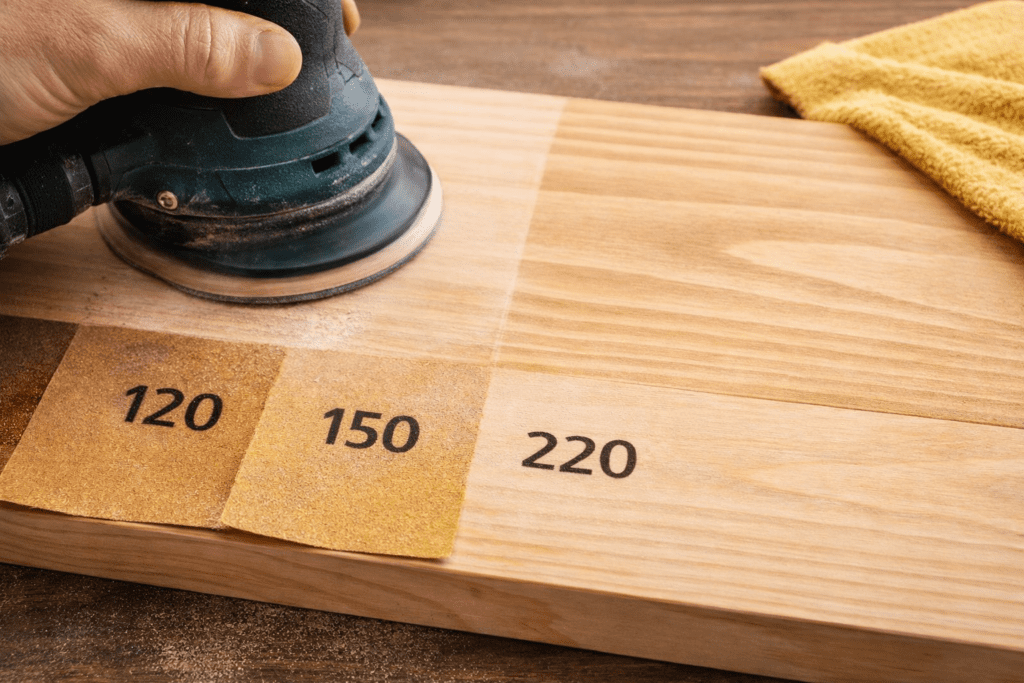
Can you stain pine without sanding?

You can, but it’s not recommended. Sanding smooths the surface and allows the stain to apply evenly. Without sanding, the stain may highlight scratches, rough areas, or inconsistencies in the wood.


What is the easiest way to stain wood evenly?

The easiest way to stain wood evenly is to:

  1. Sand the surface properly
  2. Apply a wood conditioner
  3. Use a gel stain
  4. Wipe off excess stain quickly

This method reduces blotching and gives more control over the final color.


Why does my stained wood look orange?

Wood can appear orange after staining because natural yellow undertones react with certain stain colors. This is especially common with pine. Using darker stains or gray-toned stains can help neutralize the orange appearance.


Can pine look like oak or walnut after staining?

Yes, pine can look similar to oak or walnut with the right stain and preparation. Using a wood conditioner and a darker stain, such as walnut, helps create a more uniform, richer appearance that mimics hardwood.


What happens if you don’t wipe off the excess stain?

If you don’t wipe off excess stain, it can dry unevenly and leave a sticky or glossy surface. It may also lead to darker patches and longer drying times. Always wipe off excess stain after a few minutes for best results.


What is the difference between gel stain and regular stain?

Gel stain is thicker and sits on top of the wood, while regular stain soaks into the grain. Because of this, gel stain is easier to control and works better on woods like pine that absorb stain unevenly.


How many coats of stain should you apply?

Most projects only need one or two coats of stain. If you want a darker color, it’s better to apply a second coat after the first one dries rather than leaving excess stain on the surface.


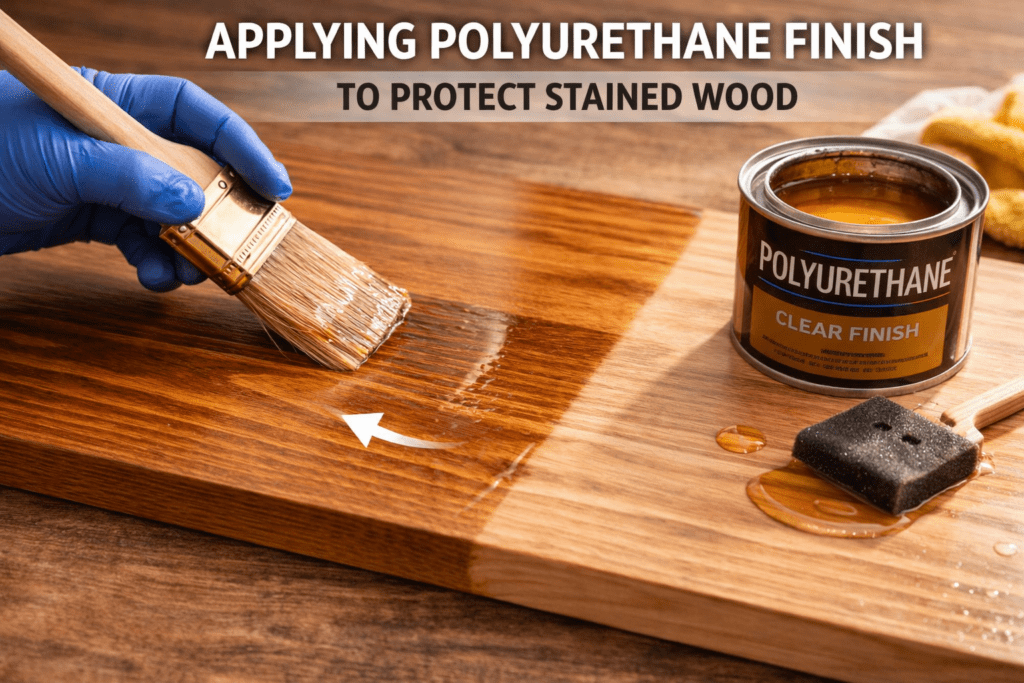
What is the best finish after staining wood?

The best finish for wood after staining is polyurethane. It protects the surface from scratches, moisture, and wear. Water-based polyurethane keeps the color lighter, while oil-based polyurethane adds warmth and depth.


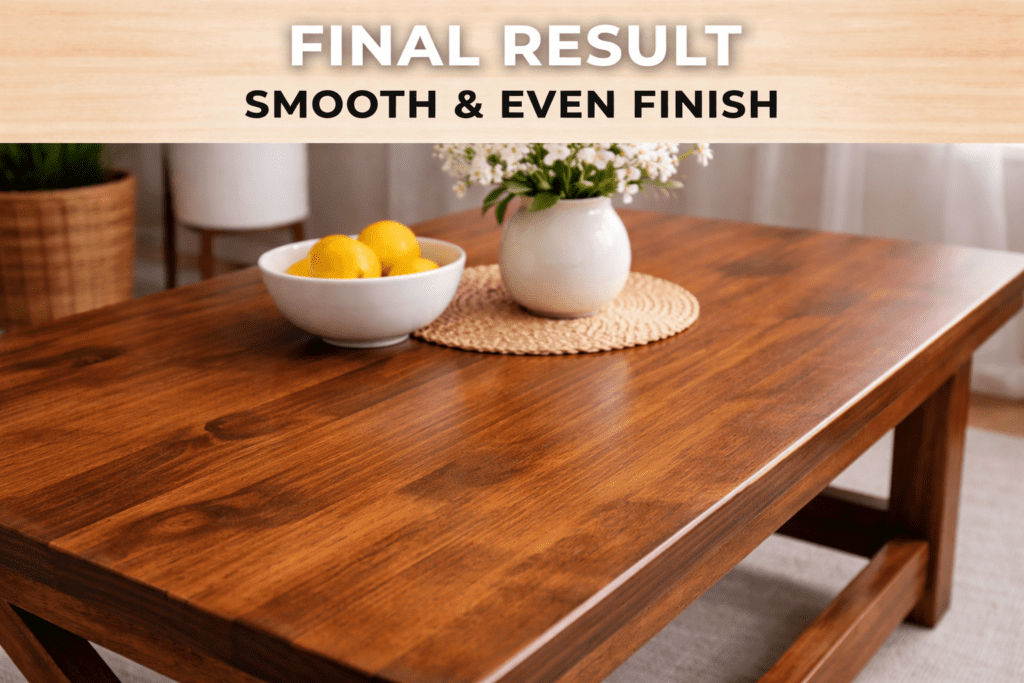
The Difference Between a Good Finish and a Great One

A lot of people stop once the stain looks “good enough.”

That’s usually where projects fall short.

The difference between something that looks DIY and something that looks professionally finished is usually:

  • smoother sanding
  • more even application
  • better topcoat

You don’t need expensive materials to get a good result.

But you do need consistency.

That’s really what staining comes down to.


Final Takeaway

Pine isn’t difficult—it just requires the right approach.

Once you:

  • sand properly
  • use conditioner
  • apply stain correctly

…the results become predictable.

That’s the difference between a project that looks off and one that actually looks finished.