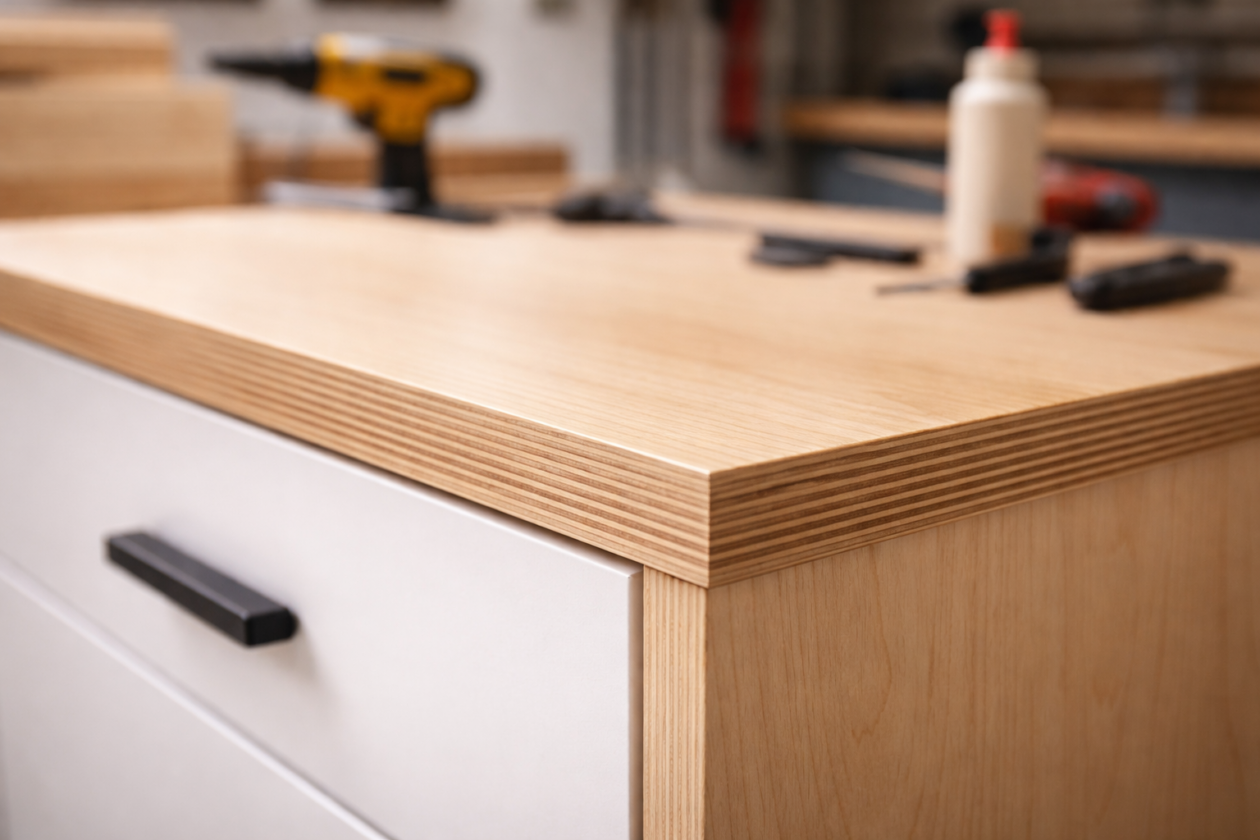
Walk into any modern kitchen or look inside a custom-built cabinet, and you’ll see a neat, finished look along the exposed edges of plywood or MDF. That smooth finish isn’t magic; it’s edge banding. Edge banding is a key woodworking technique that hides the rough edges of plywood or MDF.
It gives your project a polished appearance, making it suitable for display. Whether you’re a weekend DIYer or an experienced woodworker, knowing how to apply edge banding can greatly improve your projects.
In this detailed guide, we’ll walk you through:
What edge banding is and why it matters
Types of edge banding (and which is best)
Tools you’ll need (with top Amazon picks)
Step-by-step instructions
Common mistakes and pro tips
Where to buy quality edge banding materials
Maintenance and long-term care
Let’s start at the beginning.
🪵 What Is Edge Banding?
Edge banding is the process of covering the exposed edges of sheet goods like plywood, MDF, or particleboard with a thin strip of material. This not only improves the appearance but also protects against moisture, chipping, and delamination.
🧱 Why Edge Banding Matters in Real Woodworking Projects
The first time I built something out of plywood, I was genuinely proud of it—until I stepped back and looked at the edges. Everything else was solid: the joints were tight, the surfaces were flush, and I’d even taken time to sand it carefully. But those raw, layered sides? They completely gave away the fact that it was made from sheet goods. No matter what I did—paint, filler, even a little wood glue—they looked unfinished.
That’s when it clicked: you can’t ignore the edges.
It turns out that’s a lesson every woodworker eventually learns. Plywood is a great material—affordable, strong, stable—but every single cut exposes its inner layers. Unlike solid wood, which only shows end grain at the ends, plywood wears its insides on all sides. If you’re building furniture, cabinets, or shelving, that layered edge doesn’t just look raw—it cheapens the whole piece.
Edge banding solves that.
It gives you a clean line, seals off those exposed layers, and makes your work look intentional. Instead of highlighting the fact that it’s plywood, you’re telling the eye, “This is a finished surface.” And if you’re building anything modern or minimalist, where clean lines matter, edge banding is non-negotiable.
There’s also the durability factor. Raw plywood edges soak up moisture. They chip easily. With particleboard or MDF, the problem gets worse—they can swell and crumble just from humidity in the air. But with edge banding? You’re locking in the strength and protecting your project from everyday wear and tear.
Once I saw how much cleaner and more professional my projects looked with edge banding, I started using it on everything—from shelves and tables to garage storage cabinets. It’s one of those finishing steps that separates a decent build from something you’d be proud to show off or even sell.
📦 Types of Edge Banding
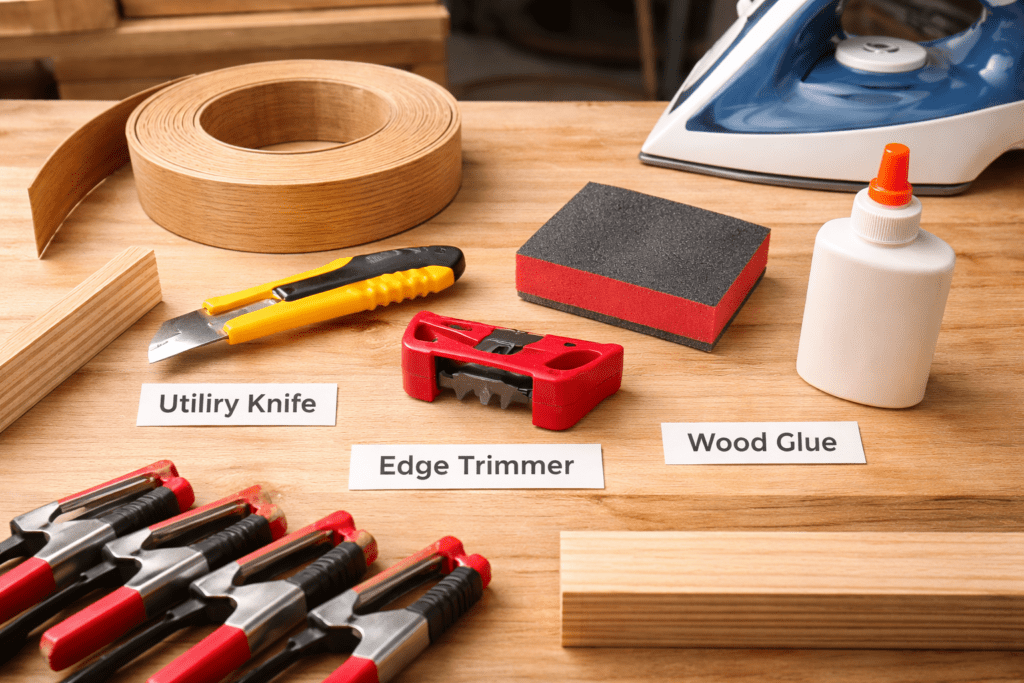
1. Pre-Glued Edge Banding (Iron-On)
This version comes with heat-activated glue. Just apply it with a household iron.
✅ Best For: DIYers, small shops ⛔ Drawback: Glue bond is weaker than commercial-grade options
2. PVC Edge Banding
Plastic-based and flexible. Popular in cabinet shops.
✅ Best For: Durability, water resistance ⛔ Drawback: Requires an edge banding machine
3. Wood Veneer Edge Banding
Thin strips of real wood. Perfect for high-end furniture.
✅ Best For: Staining to match surfaces ⛔ Drawback: More expensive and less flexible
4. Acrylic Edge Banding
Thick, glossy, and ultra-modern.
✅ Best For: High-gloss kitchens and modern cabinetry ⛔ Drawback: Expensive and requires special tools
Sand the plywood or MDF edge lightly to remove any burrs or dust.
Wipe with a tack cloth to ensure the glue bonds well.
Step 2: Cut the Edge Banding
Cut a strip slightly longer than your edge.
Leave a 1/2″ overhang on each side to trim later.
Step 3: Apply Heat (Iron-On Only)
Set your iron to cotton/no-steam setting.
Place the banding and press the iron firmly over it for 20–30 seconds.
Work in small sections to avoid shifting.
Step 4: Press It Down
Use a roller or a block of wood to apply pressure while the glue is hot. This helps ensure a tight bond.
Step 5: Trim the Edges
Use a specialized trimmer or utility knife to cut excess overhang.
Always trim downward to avoid splintering.
Step 6: Sand and Finish
Lightly sand the edges for a flush, smooth finish.
You can apply a stain or a clear coat to wood veneer.
✅ Edge Banding Mistakes Checklist (Avoid These Every Time)
Use this checklist before and during application to prevent peeling, bubbling, and uneven edges.
☐ Clean the edge thoroughly before applying edge banding Even fine-sanding dust can block adhesion by acting as a release layer between the glue and the plywood or MDF.
☐ Use moderate, consistent heat—never excessive heat Too much heat can cause bubbling, discoloration, or soften the veneer enough that it shifts or wrinkles as it cools.
☐ Apply firm pressure immediately after heating Without a roller or wood block, the adhesive may not fully bond, especially near corners and along the edge line.
☐ Use a sharp, high-quality edge banding trimmer Cheap or dull trimmers tear veneer instead of cutting cleanly, leaving damage that’s difficult to sand out later.
🔍 Quick Tip
If edge banding fails, the cause is almost always surface prep, heat control, or pressure—not the banding material itself.
Use these simple maintenance steps to keep edge banding secure and looking new over time.
☐ Avoid soaking edge-banded surfaces with water Excess moisture can weaken adhesive bonds and cause swelling along plywood or MDF edges.
☐ Use a wood touch-up marker for chips or scuffs Small touch-ups prevent minor damage from standing out or spreading into larger edge failures.
☐ Do not drag heavy objects across furniture edges Sliding weight across banded edges can crack veneer or cause plastic banding to lift over time.
☐ Re-glue peeling corners as soon as they appear A small amount of contact cement applied early can stop peeling from spreading further.
🔍 Maintenance Tip
Most edge banding failures are gradual—catching them early prevents full replacement later.
🔄 When to Replace Edge Banding
Use this checklist to decide when edge banding should be repaired versus fully replaced.
☐ The edge banding is peeling or delaminating Once the adhesive bond fails across longer sections, re-gluing is usually temporary, and replacement is more reliable.
☐ You are refinishing the surface in a new color or finish Old edge banding often won’t accept stain or paint the same way, leading to visible color mismatches.
☐ The edge banding no longer matches due to fading or wear Sun exposure, cleaning products, and daily use can change the color or sheen over time, making replacement the cleanest fix.
🔍 Replacement Tip
If more than one edge on a project needs repair, replacing all edge banding usually produces a more consistent final result.
❓ Edge Banding FAQs
What is edge banding in woodworking?
Edge banding is a finishing method that covers the exposed edges of plywood, MDF, or particleboard with a thin strip of material to improve appearance and protect the core from damage.
Is edge banding necessary for plywood projects?
Yes. Plywood edges are vulnerable to moisture, chipping, and delamination, and edge banding protects those edges while giving the project a clean, finished look.
What is the best edge banding for DIY projects?
Iron-on edge banding is the best option for most DIYers because it requires only basic tools, such as a household iron and an edge trimmer.
Can beginners apply edge banding successfully?
Yes. With proper surface preparation, controlled heat, and firm pressure, beginners can achieve professional-looking results using iron-on edge banding.
Does edge banding make plywood look like solid wood?
Wood veneer edge banding can closely match the plywood face and, when finished correctly, makes plywood edges resemble solid wood.
Can you paint over edge banding?
Yes. Sanded veneer edge banding and properly primed PVC edge banding can be painted for a smooth, uniform finish.
Why does edge banding peel off over time?
Edge banding usually peels due to poor edge preparation, insufficient pressure during application, overheating the adhesive, or prolonged moisture exposure.
Is PVC edge banding better than wood veneer?
PVC edge banding is more durable and moisture-resistant, while wood veneer edge banding offers a more natural appearance and can be stained to match wood surfaces.
How long does edge banding last?
When applied correctly and properly maintained, edge banding can last many years, even in high-use furniture and cabinetry.
Can edge banding be repaired instead of replaced?
Small sections can often be re-glued, but if edge banding is peeling extensively, mismatched, or damaged, full replacement usually produces better results.
Do you need special tools for edge banding?
No. For iron-on edge banding, a household iron, an edge trimmer, a roller, and a sanding block are sufficient for most projects.
What causes edge banding to bubble?
Bubbling is usually caused by excessive heat, uneven pressure, or trapped air during application.
Is edge banding waterproof?
Edge banding improves moisture resistance, but it is not fully waterproof. Prolonged exposure to standing water can still cause failure.
Should edge banding be applied before or after finishing?
Edge banding should be applied before staining or painting so the finish blends evenly across the surface and edges.
Yes. Heat can soften the adhesive, allowing the banding to be peeled off carefully before sanding and reapplying new material.
Is edge banding used in professional cabinets?
Yes. Edge banding is standard practice in both residential and commercial cabinet manufacturing.
🧠 Final Thoughts: Is Edge Banding Worth It?
Absolutely. Whether you’re flipping furniture, updating your cabinets, or building from scratch, edge banding is a small investment with a big payoff. It instantly elevates your project, gives it a professional look, and helps your work last longer.
Once you’ve done it a few times, you’ll find it’s not intimidating at all—just another valuable woodworking skill in your toolbox.


")
")
")
")
