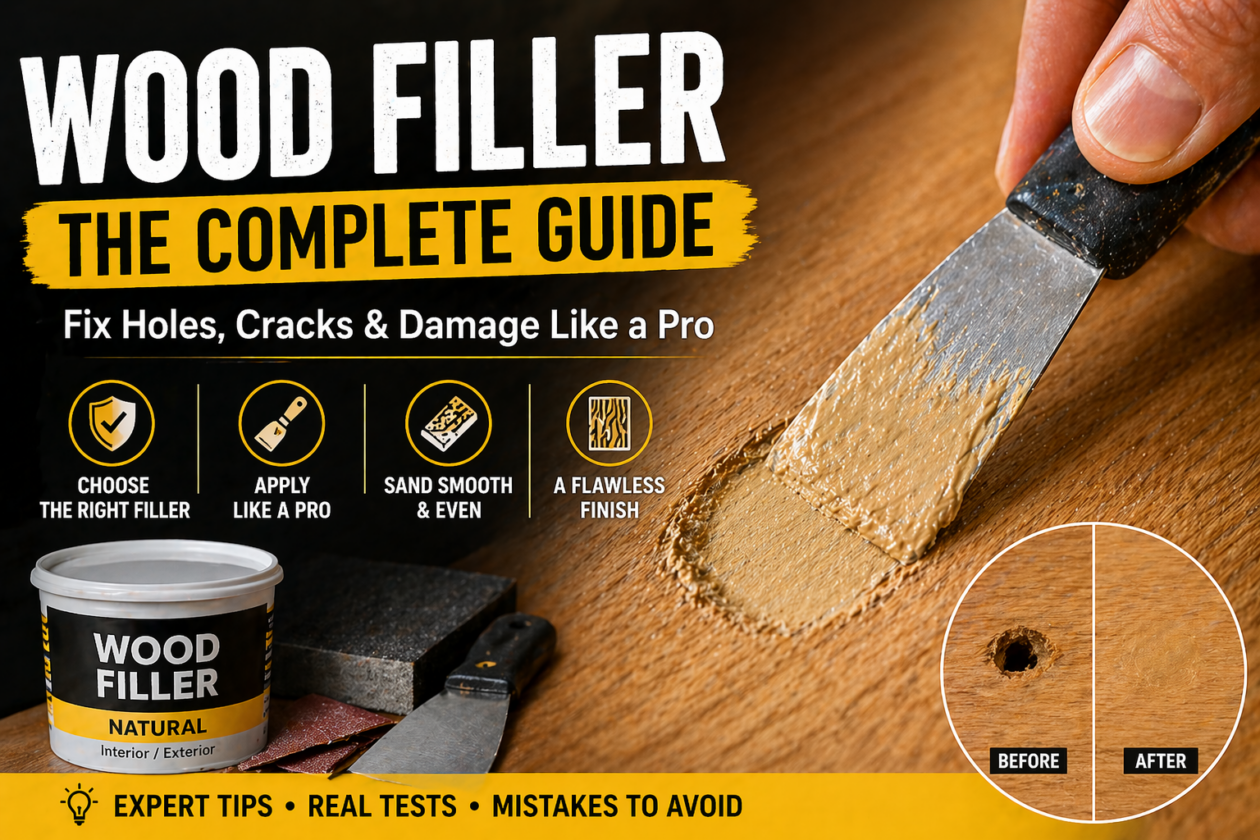
In the world of DIY, few things are as frustrating as finishing a beautiful walnut table, only to realize you filled the nail holes with a “natural” filler that looks like neon-yellow highlighter. Or worse, watching your exterior deck repair crumble into dust after the first winter because you used an interior-only water-based paste.
Choosing the right wood filler isn’t just about grabbing a tub from the hardware store; it’s about matching chemistry to wood species and environment. Whether you are filling a structural gouge or hiding a tiny mistake, this guide will save you the regret of a failed finish.
🔥 “Quick Fix Rule” (Pro Tip)
Use wood filler before finishing (sanding/staining). Use wood putty after finishing (over paint/clear coat). If the repair is structural or outdoors, skip both and use 2-part epoxy.
✅ Wood Filler Quick Comparison Table
Before we dive into the “why,” here is the “which” for your current project.
Feature
Water-Based Filler
Solvent/Petroleum-Based
2-Part Epoxy
Homemade (Glue + Dust)
Best For
Interior trim, small holes
Hardwood floors, exterior
Structural rot, large voids
Perfect color matching
Drying Time
15–60 mins
1–2 hours
20–30 mins (Cure: 24h)
2–4 hours
Shrinkage
High (Expect 2 coats)
Minimal
Zero
Low
Stainability
Moderate
Good
Poor (Best to paint)
Excellent
Cleanup
Soap and water
Mineral spirits
N/A (Disposable)
Water or Sanding
🛠 Best Wood Fillers by Project Type (2026 Buyer Picks)
Choosing the wrong product for your specific wood type is the fastest way to end up with a repair that sticks out like a sore thumb. Here is how the top performers stack up this year.
Pro Choice: If you’re only buying one, choose Timbermate. It’s the most forgiving and easiest to fix mistakes with because it can be re-hydrated indefinitely. It’s particularly essential when working with the best plywood for cabinets where you need a premium finish.
🎨 Wood Filler Color Matching Guide (Avoid the Ugly Patch)
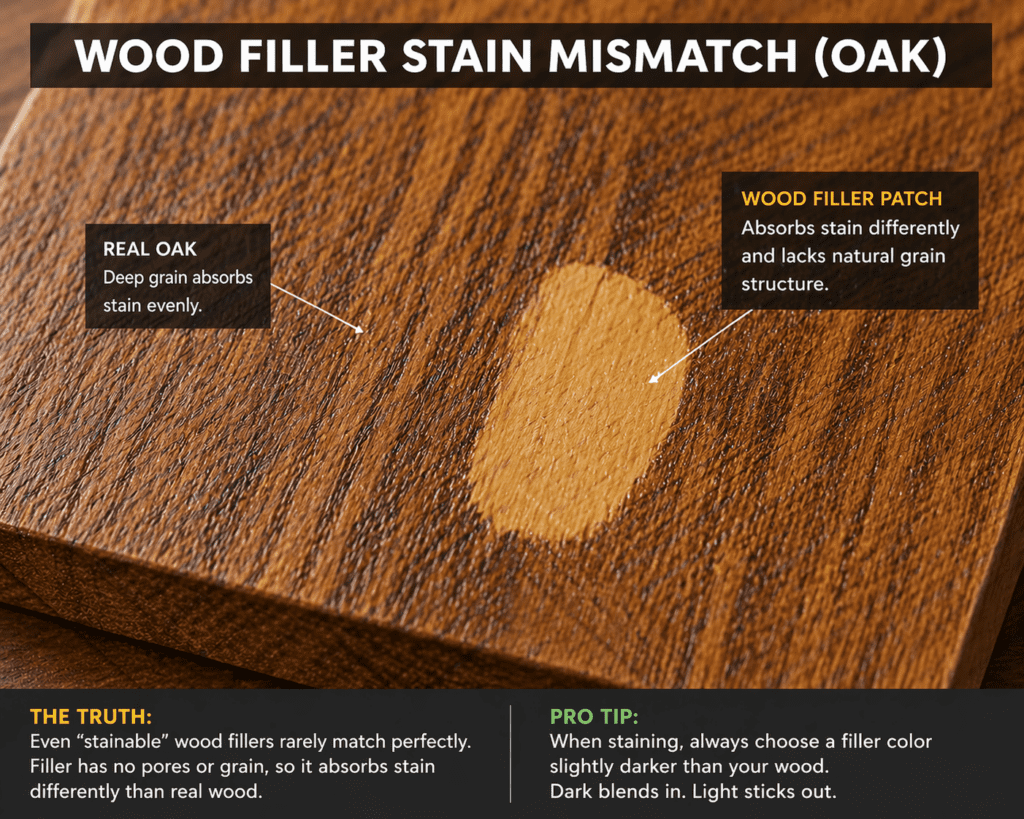
The biggest warning I give to new woodworkers is this: Stain is not magic. It will not magically turn a white blob of filler into a piece of mahogany.
Wood filler never perfectly matches wood because it has no natural grain. Even stainable fillers absorb color differently, creating visible patches that lack the vascular structure of real lumber.
The Professional’s Strategy:
Oak Example: Oak has a heavy, deep grain. Use a “White Oak” tinted filler, and after it dries, use a fine-tip graining pen to draw “fake” grain lines over the patch.
Walnut Example: Always match the darkest part of the grain. A light patch in a dark board looks like an amateur mistake; a dark patch looks like a natural knot.
The “Darker is Better” Rule: If between two colors, go darker. Light filler sticks out; dark filler blends into the wood’s shadows.
⚠️ The “Regret” Warning: Wood Filler vs. Wood Putty
The single most common mistake that leads to project failure is using filler when you need putty.
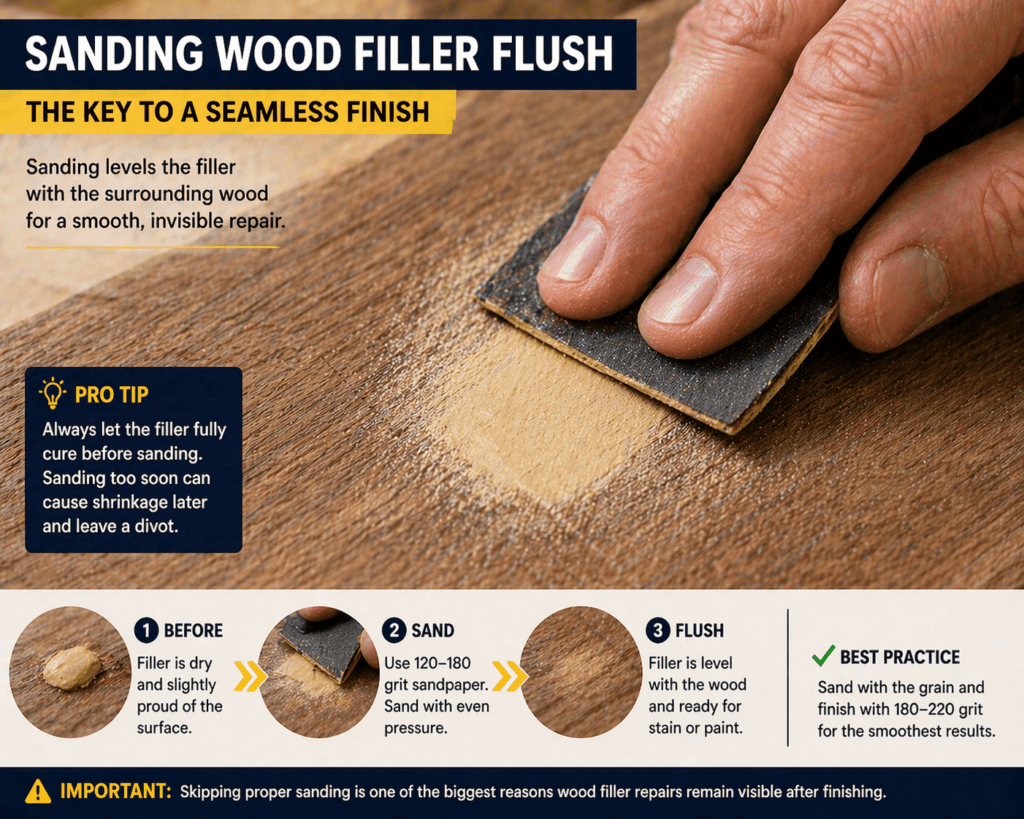
Wood Filler: Dries rock hard. It is porous and designed for unfinished wood. It shrinks as it dries, so you usually need to overfill the hole and sand it flush.
Wood Putty: Stays pliable and contains oils to prevent hardening. It is meant for finished (already stained/sealed) wood. You press it into nail holes on finished furniture and wipe away the excess. You cannot sand wood putty.
🧪 Deep Dive: Understanding Filler Chemistry
To truly master wood repair, you have to understand what is inside the tub. Wood fillers generally fall into four chemical categories, each with its own cost difference and performance profile.
1. Water-Based Fillers (The Standard)
These are primarily made of wood flour, calcium carbonate, and a water-soluble binder. They are the most popular because they have almost no odor and clean up with a damp rag.
The Benefit: You can mix them with water to create a “slurry” for grain-filling large surfaces.
The Warning: Because they contain water, they cause the wood fibers around the repair to swell (grain raising). You must sand thoroughly after they dry.
2. Solvent-Based Fillers (The “Old Reliable”)
Often called “Plastic Wood,” these products use chemicals such as acetone or wood alcohol as carriers.
The Benefit: They dry much harder than water-based options and are more resistant to moisture. They bond exceptionally well to the wood’s internal fibers.
The Regret: If you leave the lid off for five minutes, the entire tub will turn into a useless rock. They also emit strong fumes (VOCs).
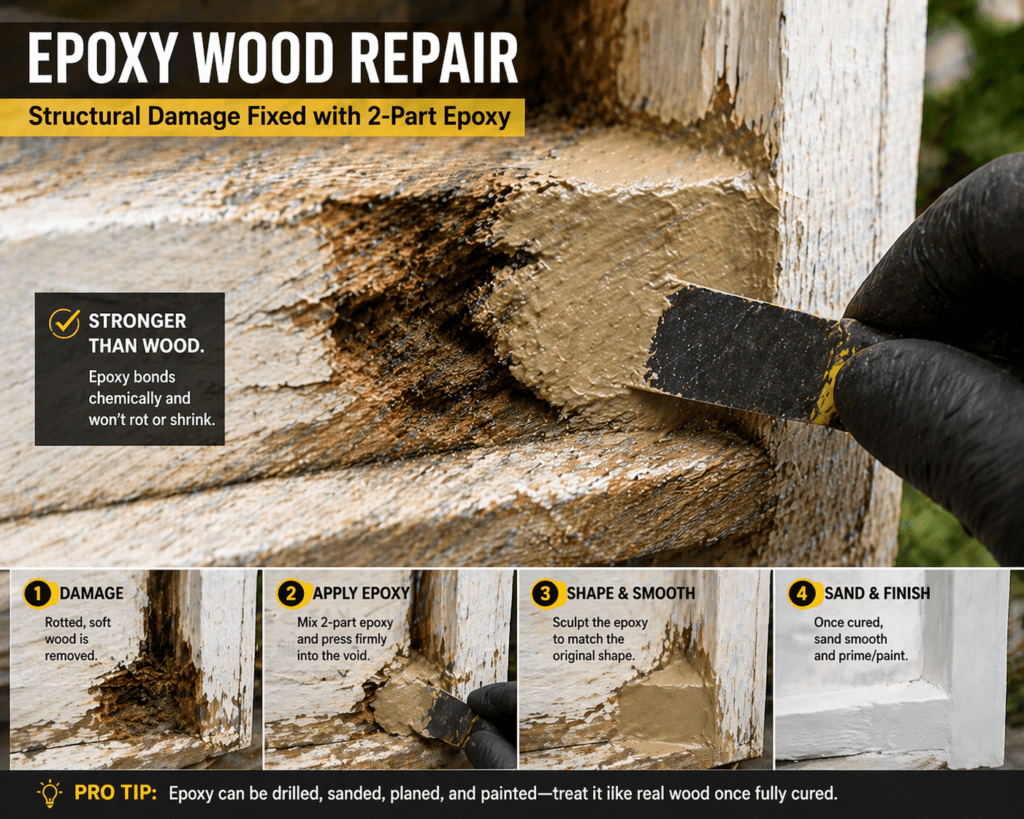
3. Two-Part Epoxies (The Structural Savior)
This is a chemical reaction between a resin and a hardener. It doesn’t “dry”; it “cures.”
The Benefit: Zero shrinkage. You can fill a hole the size of a baseball in one pass. It is the only choice for structural repairs, such as rotted joists or window sills.
The Mistake: You cannot easily stain epoxy. It is almost always a “fill and paint” solution.
💸 The High Cost of the Wrong Choice
I’ve seen $5,000 custom cabinetry jobs ruined by a $10 tube of “all-purpose” filler.
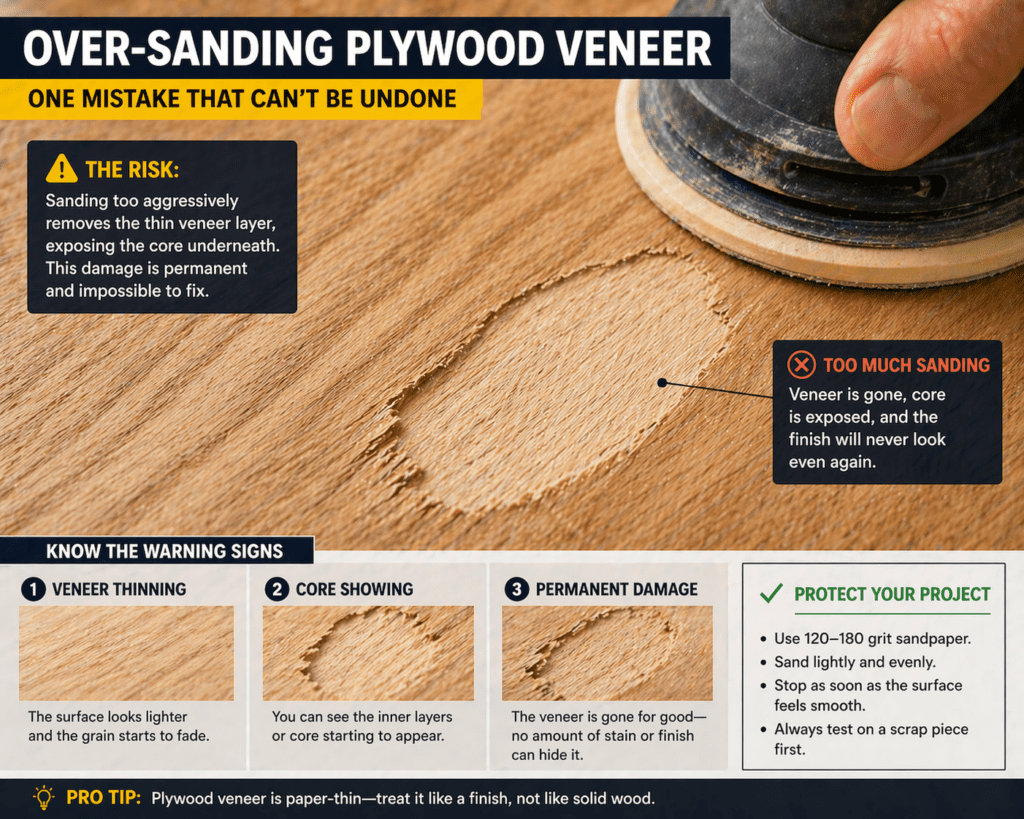
The Veneer Disaster: If you use a high-shrink filler on thin plywood, the filler’s drying tension can actually pull and crack the surrounding veneer. Check your plywood thickness guide before performing deep repairs on thin panels.
The “Halo” Effect: Many cheap fillers contain oils or silicones. When you apply stain, these chemicals repel the pigment, leaving a permanent white ring or “halo” around your repair that no amount of sanding can fix.
❌ 5 Mistakes That Will Kill Your Wood Finish
1. The “Pimple” Effect
Sandpaper is expensive. When you leave a massive mound of filler to “sand later,” you aren’t just wasting time—you’re risking the finish. If the center of that mound isn’t dry, it will shrink after the paint is applied.
The Fix: Fill 1/16th inch above the surface and wait.
2. Ignoring “Sandpaper Loading.”
If the filler gums up your paper, it’s wet. This is a huge risk when sanding plywood, as it can smear into the delicate grain. This creates a “plasticized” surface that stain cannot penetrate.
3. The “Homemade” Color Fail
Mixing sawdust and wood glue usually turns dark and plastic-like. Most wood glues dry yellow or amber.
The Pro Secret: Use cellulose-based sanding sealer mixed with dust instead. It keeps the wood’s natural color much better than PVA glue does.
4. Filling Large Voids in One Go
Deep holes must be filled in layers. If you fill a 1-inch hole in one go with water-based filler, the outside will dry, trapping moisture inside. This leads to a mushy core that will eventually rot the wood from the inside out.
5. Over-Sanding Plywood Veneer
Plywood face veneer is incredibly thin. Before you sand, understand that the “sandable” layer is often less than a millimeter thick. Use a sharp wood chisel to pare down the excess filler first.
When working with the best plywood for cabinets, your goal is invisibility. Use a filler like Timbermate that matches the wood species (Maple, Birch, or Oak).
Pro Tip: Mix the filler with a tiny bit of the actual stain you plan to use. This “pre-tints” the repair.
For Hardwood Floors
Floorboards flex. A brittle filler will simply turn into powder and be sucked up by your vacuum within a month. Look for “Full Trowel” fillers designed for floors that contain a slight latex component for flexibility.
For Exterior Structural Wood
If you see rot, standard wood filler is a death sentence for your wood. It traps moisture. You must excavate the rot, apply a “wood hardener” (a liquid plastic), and then use a 2-part epoxy.
🧭 Wood Filler vs. Caulk vs. Epoxy (Decision Matrix)
Plywood edges are notorious for having “voids” or gaps in the inner plies. This is especially true in lower-grade construction plywood.
The Fix: Use a thick, paste-like filler and pack it tightly with a flexible putty knife.
The Alternative: Sometimes filler isn’t the answer. If you have large, consistent voids, you should consider plywood edge-finishing techniques such as edge banding or solid-wood “breadboard” ends. Filler on edges often looks messy; edge banding looks professional.
💡 Personal Experience: 3 Pro Tips for Invisibility
1. The Wet Finger Trick
Water-based fillers (like Elmer’s or Timbermate) are water-soluble until they cure. After you press the filler into a hole, dip your finger in warm water and lightly “wipe” the surface. This spreads the filler perfectly flat. If you do this right, you only need one light pass with 220-grit sandpaper once it dries.
2. The Shellac Barrier
One of the biggest issues with filler is “smearing” into the surrounding grain.
The Secret: Apply one thin coat of clear, de-waxed shellac to the project before you fill the holes. The shellac seals the wood pores. Then, when you apply the filler and sand it back, the filler only stays in the hole and doesn’t stain the surrounding wood.
3. The “Two-Tone” Method
For high-contrast woods (like Zebrawood or Hickory), don’t use a single filler color. Mix a small batch of light and a small batch of dark. Fill the hole with the light color, then “streak” a bit of the dark color through it with a toothpick. This mimics the natural variegated grain of the wood.
🧪 Real-World Test: Our Top 3 Favorites
We put these products through a real-world “stress test” on plywood and solid oak.
Minwax Stainable Wood Filler: High-speed drying. Excellent for those in a rush, but be warned—it gets brittle if applied in layers that are too thick. Check Price on Amazon.
Elmer’s Carpenter’s Wood Filler (Max): My go-to for paint prep. It doesn’t crumble when you drill into it later. Check Price on Amazon.
J-B Weld WoodRestore: I used this to save a rotted exterior door frame. It doesn’t just fill; it structurally reinforces the wood. Check Price on Amazon.
❓ Wood Filler FAQs
Can wood filler be stained?
Yes, but it is never a 1:1 match. Wood filler is more porous than solid wood, so it usually absorbs more stain and turns darker. Always test on a scrap piece.
How long does wood filler last?
In the tub, water-based filler lasts about 6–12 months. Once applied and sealed with a high-quality polyurethane or lacquer, a wood filler repair can last for decades.
Can you use wood filler outside?
Only if it is specifically rated for exterior use (solvent-based or epoxy). Water-based fillers will dissolve and pop out when exposed to rain and freeze-thaw cycles.
Why is my wood filler cracking?
Cracking is usually caused by two things: filling a deep hole in one single pass (shrinkage) or the wood itself expanding/contracting too much for the rigid filler to handle.
Does wood filler expire?
Yes. If it feels like a rock or has a foul, moldy smell (which is common in water-based fillers), throw it away. Using “revived” filler that has gone bad will lead to poor adhesion.
To ensure your wood filler doesn’t ruin your project, follow this checklist:
Identify the finish: If staining, match the species. If painting, match the durability.
Check the environment: Use epoxy for outdoor use, water-based for indoor use.
Mind the thickness: On plywood, be gentle to avoid burning through the veneer.
Seal it up: Always apply a topcoat over filler to lock it in and prevent moisture from wicking in.
For more guidance on preparing your wood for a flawless repair, see our guide on how to cut plywood to avoid the splinters and gaps that lead to filling in the first place. Whether you are building cabinets or fixing a floor, the right prep makes the difference between a “hand-made” piece and a “homemade” one.
Related Posts:
Luan Plywood: What It’s Good For (and Where It Fails) by Admin January 17, 2026 DIY Luan plywood is a thin, lightweight, non-structural plywood used for underlayment, cabinet backs, and paneling. It’s cheap and easy to work with, but it’s weak,…
Stainable Wood Filler: A DIY Guide to Smooth Repairs by Admin September 24, 2025 Repairs Woodworking projects rarely go perfectly. Even the most careful craftsman ends up with nail holes, gaps, dents, or minor cracks in their boards. That’s where…

")
")
")

")