The centerpiece of any kitchen can be considered to be the stove. That’s where the action of cooking happens, so those who design kitchens tend to make the stove stand out.
Along with the furnace, we often find some hoods and filters designed to catch the smoke from cooking in the hood and remove it from the kitchen or filter it, returning the air to purify the room.
Range hoods are not necessarily required by building code. They are not included in the Universal Building Code, although they may be required by state or local ordinances.
Before building a kitchen without one or removing one that already existing, it would be a good idea to check with the local code enforcement office, which can provide information about building codes specific to kitchen construction in that municipality or county.
However, even if the building code doesn’t require a range hood, installing one is a good idea. A range hood will capture as much as 90 percent of the smoke off the back burners and 40 percent off the front, helping to keep the home smoke-free.
When building codes call for a range hood, they don’t generally mention what type of range hood needs to be installed. Traditional range hoods are connected to a vent pipe, expelling the air drawn in outside the home.
Latest Wood Range Hood
But more recently, filtering range hoods that return the air to the room have become more popular. The main reason for this is cost, as there is no need to run the vent out through the home wall. However, while these ductless range hoods work, they aren’t as effective as the ducted kind.
Since most kitchen ranges have these hoods installed, it only makes complete sense that cooks and designers would be inspired to look for ways to make the kitchen range hoods more attractive.
This inspired move has led to the design and manufacture of many styles of much fancier metal, copper, and stainless steel kitchen range hoods, styled after commercial ones, as well as some quality wood range hoods that match the woods of kitchen cabinets.
These wood range hood cooktop range hoods are wall-mounted and mounted range hoods with covers, as the original metal front and wall-mounted range hoods and cooktop hood are left in place, with the wood one covering it. This makes sense, as the metal wall-mounted range hoods cooktop range hood is much more fireproof than any wood one could be.
But the wood one provides an attractive accent to the kitchen. Purchasing a few wood range hoods and covers can be rather costly, ranging up to as much as $1,500, with the average cost being slightly larger at about $750.
Building a DIY Wood Range Hood
With a price tag of $750 or more, there’s plenty of motivation to make a homemade wood range hood rather than buy one. Any average woodworker should be able to build this project, assuming they have the right tools. This project’s most critical special tools aren’t all that unusual in a home workshop. They are a compound miter saw and a pocket screw jig.
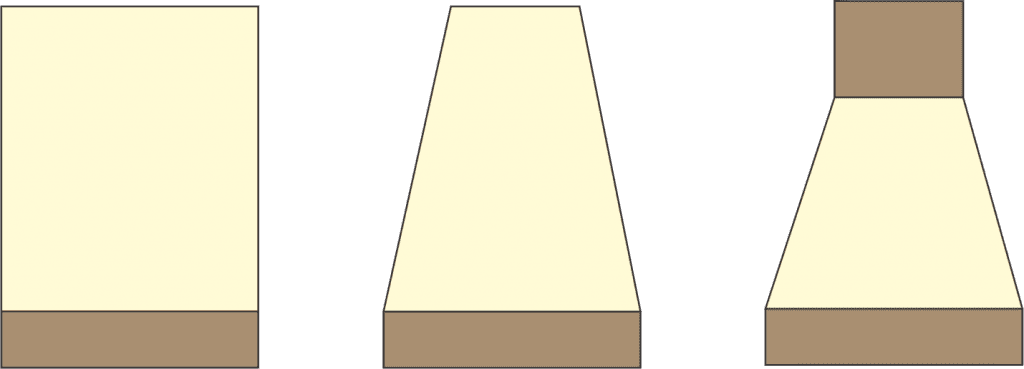
While the range hood can be built without these tools, not having those limits design options and makes it harder to build a durable range hood. Wood range hoods can take on any shape and style the woodworkers desire; three common types are used.
All of these have the front of the wood range hood, and the wood range hoods, sloping back from the bottom edge, are slightly larger. Still, as seen in the diagram below, the difference is the one on the left does not have any slope to the sides, while both of the other does, with the one on the right having the most pitch and an upper boxed section.
All three basic cabinet styles can be skinned over in various ways to match and complement the kitchen cabinetry or create or provide an accent. One common form of accenting is to check the color of the wood range hood to the hardwood flooring. Another similar option is to match the color of the countertop.
Range hood styles
In any case, the first part of building any two wood range hoods is building the framework. This is best done in the workshop rather than the kitchen. However, the metal range and wood range hoods should also be brought to the workshop.
If it is a new one, be sure to assemble it, and in either case, be sure to have a piece of the ductwork to ensure sufficient space is left inside the wood species and the wall-mounted wood range hoods for the ventilation duct to go through.
It would also be helpful to build a temporary “wall” on the kitchen workbench to attach the wood range hoods for assembly.
The idea is to have the wall mount a vertical surface perpendicular to the top of the cooking surface of the kitchen workbench, which will help ensure that the wood range hood is assembled correctly. It doesn’t need to be a complete wall, merely a solid vertical surface to which parts can be clamped.
Making the Framework
The framework for the modern range hood brackets is typically made from 2″ x 4’s, although smaller materials can be used. In the case of the leftmost range of form in the diagram above, no compound angles need to be cut. However, the outer corner pieces for brackets in the fitting range hood and other designs will require compound corners.
To simplify construction, it is a good idea to make the front and side angles of the range hood the same in both cases.
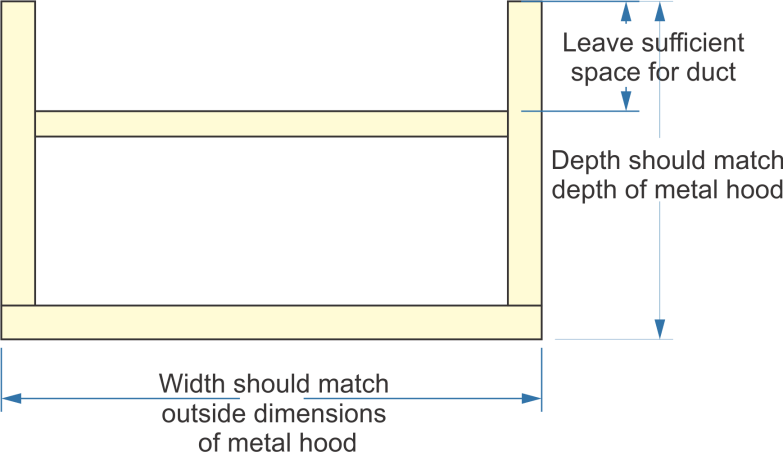
Start by building a bottom frame. This will attach directly to the top panel of the cabinet of the metal range hood using the mounting hole provided. The main functionality and purpose and functionality of this bottom frame are two-fold, allowing the wood range hood options to be attached to the top panel and wall mount of the metal one and providing a foundation for access to and installing the rest of the wood range hood options.
Keep in mind that the height requirement of this frame will be added to the thickness of the metal hood to meet the height requirement of the fascia panel and board on the bottom panel of the hood. If a smaller fascia panel is desired, it might be necessary to make this framework out of 2″ x 2″ s instead of 2″ x 4″ s.
Lower framework
While this stainless steel framework can be assembled using either j series and nails or screw through one frame member and into another, doing so would require putting the screws or nails into the end grain.
A much more durable and robust stainless steel frame can be made using pocket screws to assemble it. Attach this frame to the top of the metal hood.
The remainder of the cabinetry panel and the framing panel will be built directly onto this base. One of many styles, the key thing to determine is the angle for the back panel, cabinetry panel front, and panel sides.
This will depend mainly upon the space needed for the ductwork, assuming a ducted hood is used. However, in most cases, about 10 degrees seems to work out.
Hood framing
The outer corner pieces are the key to this whole frame, as they are the ones that will require a compound miter. Cut those first, then use them to determine the other parts’ size and angle. Fitting these two pieces in place is another of the reasons why it is a good idea to use a pocket screw.
While those pocket screws may not be needed for cross-bracing, they will be for all four exterior corner braces.
The horizontal bracing element in the diagram above is not critical; it can be located wherever convenient. However, preceding it is probably not a good idea, as it will help keep the frame rigid while working on it.
The top frame element is less important than the bottom one, as its primary purpose is to provide ventilation and a means of attaching the ventilation hoods to the ceiling.
The chimney frame must be sturdy enough to be moved, even without being skinned over, as there will be a need to have access to the chimney framework to hang the wood hoods.
Once it is attached to the wall and ceiling, centered over the stove, the ductwork can be installed, and the wiring for the two wood range hoods can be connected. Then the wood range and stainless steel top hoods will be ready to be skinned over.
Skinning Over the Wood Range Hood
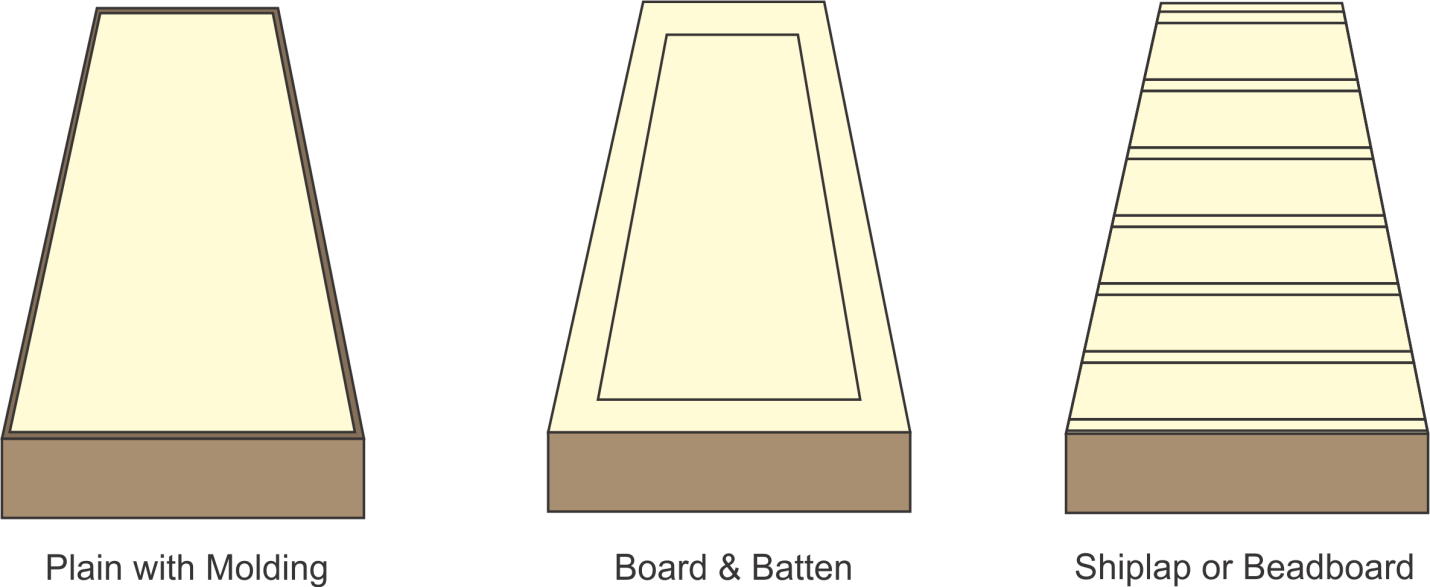
This is where the modern quality wood range hood differs from the woodworker’s preferred style. Some modern quality wood range hoods prefer to incorporate carved sections, especially for the fascia. However, most wood range hoods typically choose to follow three basic styles:
Skin styles
Plain skins for the range hood and cooktop are usually nothing more durable than ¼” plywood, although drywall can be used if the exterior cooking surface of the range hood cooktop is going to be painted. Board and batten is a popular style for cooktops, as it might match the style used elsewhere in the home.
If the range hood is large enough to accommodate them, multiple battens can be used to accommodate them. As an alternative, the central part of the range hood can be left plain, while the fascia is done with a board and batten style. Shiplap material or beadboard material is the hardest but provides an excellent finish.
As part of this design decision, one crucial thing that has to be decided is whether the wood range hood will be painted or stained and varnished.
A wood fascia board at the bottom of the kitchen cabinet with a painted wood range hood looks good, especially when the kitchen top fascia is carved and the rest of the kitchen is wood species. The correct range hood is painted to match the paint of the kitchen cabinets. But that only works with painted kitchen cabinets.
Stained-top kitchen cabinets need to complement stained wood range hoods too, and a stunning stained wood range hood can be quite attractive when used with painted kitchen cabinets to stand out even better.
Attach the sides before the front, as installing the show can cause problems getting the side pieces in place. Regardless of the style, the skin pieces should be glued and nailed with brad nails for security.
The brad nails are mainly there to clamp the pieces together, while the wood glue has a chance to cure. As with any other part of kitchen cabinets or furniture, they are attaching the front after the sides allowing the show to hide the end grain of the sides.
In the case of any board covering, like shiplap or beadboard, the hardest part of the installation will be aligning the seams between the boards. It helps considerably if the same angle is used for the front of the wood species, the range or wood hoods, and the sides.
If the angle is different, it will make the front or the sides longer, making it difficult to match up the seams. In most cases, this problem can be readily rectified by leaving more space between boards on the longer side, allowing some of the tongue from the tongue and groove to show. When there is no tongue and groove, the problem can be rectified by trimming the width of the boards.
The fascia is usually the last part of the hood to be installed, allowing it to hide the edges of the skin and provide a clean, attractive finish.
This is the most crucial part to install of the hood, visually speaking, because it is the one that is usually the most obvious. Care should ensure a good fit and finish on these parts.
The fascia must be cut from the top edge of the bottom frame panel down to cover grease further up the metal hood edge.
Allowing a little overhang is a good idea to hide grease from the metal hood, but don’t give it too much. Too much-exposed wood could provide a surface for oil to stick to, creating a fire hazard.
If a carved look is desired, simple molding for a wood range hood will create a full wood range hood only, but the woodworker making simple molding of the wood range hood is not a wood carver. The simple molding problem can be solved by adding a decorative wood overlay.
These are available in various shapes, sizes, styles, and types of wood, although most are light-colored, tight-grain wood, or woods like basswood. The overlay can either be stained or left its natural color, providing a contrast with the wood used for the fascia.
Be sure to avoid using paint on the range until the glue has dried thoroughly and the stain or finish has had a chance to dry. Using the content while either the bond or the paint or finish is dry could cause cracking which will be hard to repair.
Related Posts:
Drying Wood in Oven: A Complete DIY Guide by Admin September 23, 2025 More About Most people don’t give a second thought to drying wood in an oven until something goes wrong. I didn’t either. I slapped together a pine…
Best Practices for Using Mineral Spirits on Wood by Admin May 20, 2025 Finish . Looking to clean old wood or prepare it for stain? Mineral spirits offer an easy, safe, and effective method for refreshing wood without damage.…
Sandblasting Wood: How to Clean & Restore by Admin May 17, 2025 Finish There’s something satisfying about bringing old wood back to life. Whether it's barn siding, an antique door, or a weathered cedar plank, wood has a…