One of the benefits of using plywood for any application comes from its dimensional stability; plywood doesn’t expand or contract with changes in humidity like solid wood does. It also comes in large sheets, in a variety of thicknesses, eliminating the need to laminate pieces together to create a piece of wood that’s as large as you need, as well as the need to resaw lumber to get thinner pieces.
This makes plywood an excellent choice for furniture building, including building the drawers which go in many types of furniture: cabinets, dressers, tables, etc. The dimensional stability of plywood means that the sides of the drawer won’t expand in humid weather. Such expansion can cause the sides to bind in the drawer opening, making the drawer stick and hard to open. Using plywood for the bottom as well, minimize the movement from side to side, again preventing binding of the drawer along with its runners.
On top of these important benefits that plywood offers the woodworker who is making drawers, plywood construction reduces the overall labor required. When you’re making six drawers for a dresser, that can be important, saving a considerable amount of time.
Properly made, the only hardwood part needed for the drawer is the face, as plywood probably won’t match the wood used in the rest of the piece of furniture, even if it is the same type of wood. Lastly, using plywood is considerably cheaper than building with hardwood. Even if you use hardwood plywood, the only part of the sheet which is hardwood is the face veneer, saving on the cost of using solid hardwood throughout.
Plywood Drawer Construction
Regardless of the style, drawers consist of five parts; a front, back, bottom and two sides. The front is normally composed of solid wood and reflects the overall style of the piece being built. The back, bottom and two sides are often composed of plywood, even in commercially manufactured furniture.
In the case of drawers where the drawer front overlaps the furniture’s framework, there are actually six parts, although two are attached together as if they were one. These two are the structural drawer front and the decorative drawer face. If a decorative drawer front is used, the structural drawer front is also made of plywood. In the case of drawers where the drawer front sits flush with the cabinet frame, the structural drawer front also serves as the decorative drawer face.
Structural and decorative drawer front
Low-cost furniture may not have this structural drawer front, opting instead to use some sort of angle brackets between the drawer sides and the decorative drawer front. A block of wood in the corner can also accomplish the same thing.
Some lower cost furniture uses MDF or particle board for the construction of drawers, rather than plywood. While this works fine in most applications, MDF is not as strong as plywood and is harder to join together. MDF joints will not be as strong as laminated softwood or hardwood plywood will be and if they break, it is extremely difficult to make effective repairs.
MDF and particleboard are also more absorbent. When they do absorb water, it causes the pieces to swell, especially along the edges, weakening its structural integrity. This can cause several problems, including drawers sticking and falling apart.
Drawer Bottoms
There are two basic ways of mounting a drawer bottom into the drawer. As they affect the size of the size of the parts and how the parts are cut, deciding which way to mount the bottom is an integral part of the drawer design process.
The easier method of installing a drawer bottom is to cut a rabbet in the bottom edge of all the drawer parts for the plywood bottom to sit into. The drawer bottom then sits into this rabbet and is nailed in place. While easier to make, this method isn’t as secure and doesn’t allow any room for the wood to expand.
Drawer – bottom rabbet
In this design, the drawer side is made of ½” to ¾” thick plywood and the drawer bottom is made of 3/8” to ½” thick plywood.
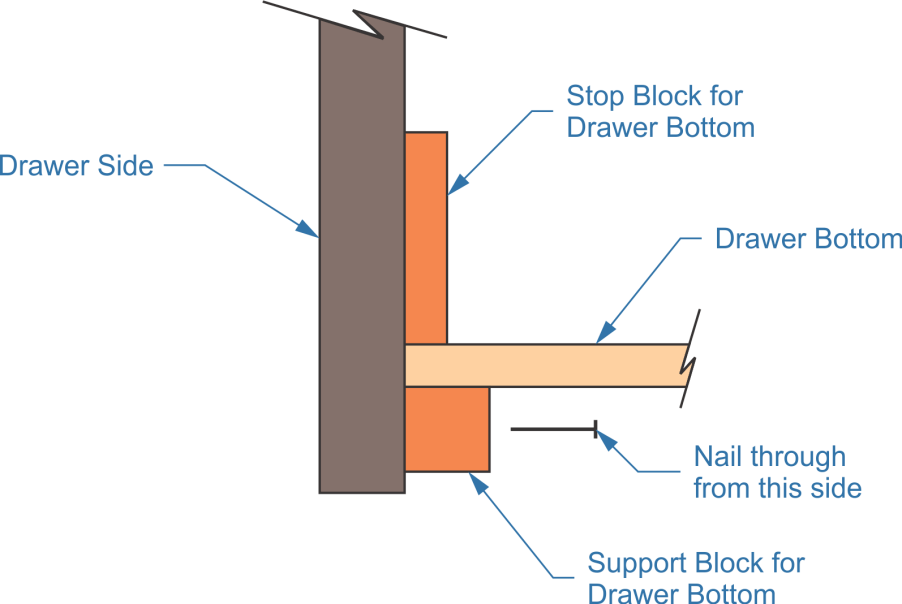
A variation on this design is to attach a thin piece of wood to the inside of the drawer’s sides and back, which leaves a step, similar to the rabbet cut. Small blocks of wood are installed below the drawer bottom, holding it in place. This is somewhat stronger than the first method, but makes the inside of the drawer both narrower and shallower.
Drawer – bottom supported
In this case, the drawer side is still ½” thick, but the drawer bottom might be only ¼” thick. However, it is best if the drawer bottom is 3/8” or even ½” thick, so that it can support more weight.
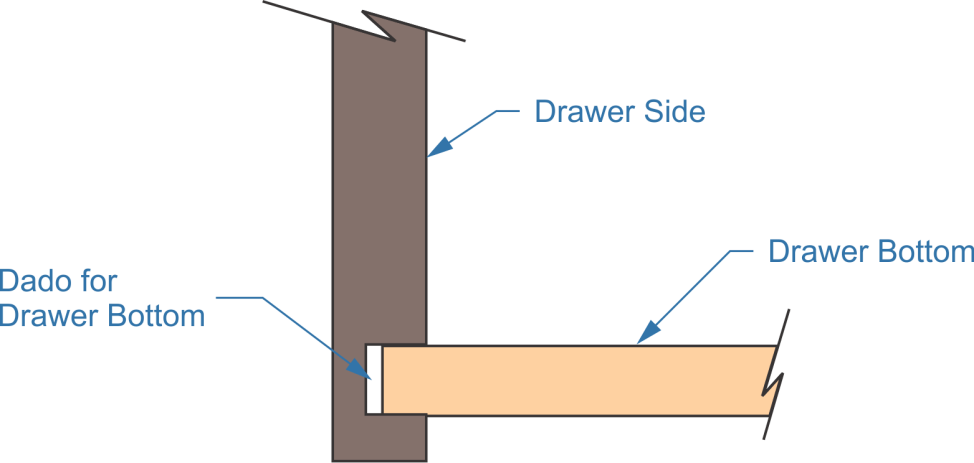
Finally, the most common method of installing a drawer bottom, especially for low-cost furniture, is to install it into a groove or dado. This reduces assembly time and allows the bottom some room for expansion due to moisture. For this reason, it was common in olden times, before plywood was used for making drawer parts.
In this third case, the drawer side is still ½” thick. Lower-cost commercially manufactured furniture will often use ¼” thick plywood or even masoninte for the drawer bottom. However, this makes for a rather weak drawer bottom. It’s better to use 3/8” or even ½” thick plywood and make the dado wider to receive it.
Drawer Sides
Drawers come in all sorts of sizes and styles, but the size is mostly determined by the drawer opening you make in the cabinet that the drawer is going to mount into. This is something you should decide before even starting the project. Determining exactly how your drawer will be made and its size is part of the design process.
The overall outside dimensions of drawers must always be smaller than the drawer opening, even if it’s only 1/16” smaller. You need a little clearance all the way around, just to ensure that the drawer doesn’t stick. At the same time, you don’t want too much space, as that could make it too easy for the drawer to go cockeyed in the opening, causing jamming.
Drawer runners or slides will have a big effect on the size of the drawer. Single runners, which mount under the center of the drawer will have the least impact, as they sit behind the frame, with only a small around pushing up into the recess in the bottom of the drawer. Pairs of side mounted drawer slides can have a greater impact, as most will take up from 3/8” to ¾” each, with ½” being the most common dimension. With ½” thick drawer slides, you need to make the drawer 1 1/16” to 1 1/8” narrower than the drawer opening . This difference has to be calculated into the overall size of the drawer, as well as the size of individual drawer parts.
The other major design consideration is whether the drawer front is flush with the cabinet frame or sits on top of the cabinet frame, overlapping the drawer opening, as we discussed above. If it overlaps, it is typical to make it overlap ½” to ¾” on each side, although it might not overlap by the same amount on all sides.
Drawer backs and sides are usually not the full height of the drawer opening, although the structural drawer front will be, less about 1/16”. Rather, these parts are cut ½” to ¾” shorter, to ensure that they will not bind up in the drawer opening. This is a judgment call, with some people preferring shorter sides and backs, to avoid binding and others preferring to make them as tall as they can, without binding, so that they can fit more in the drawer.
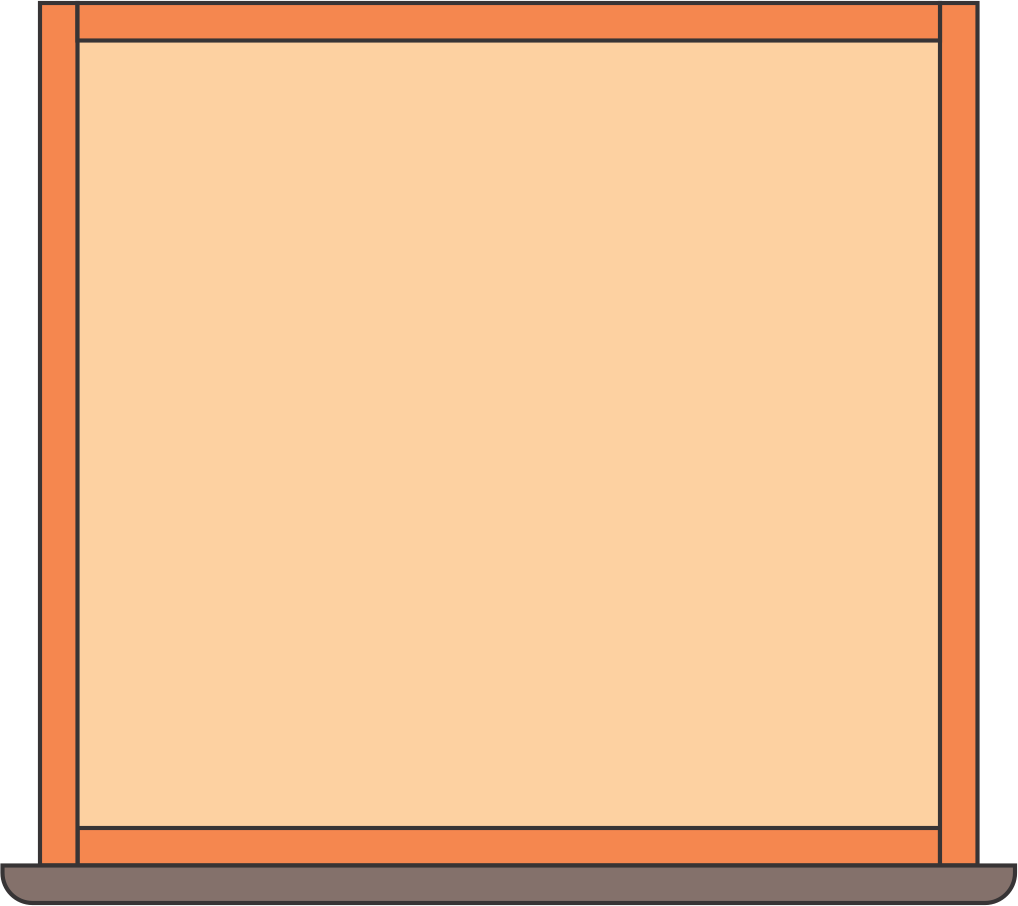
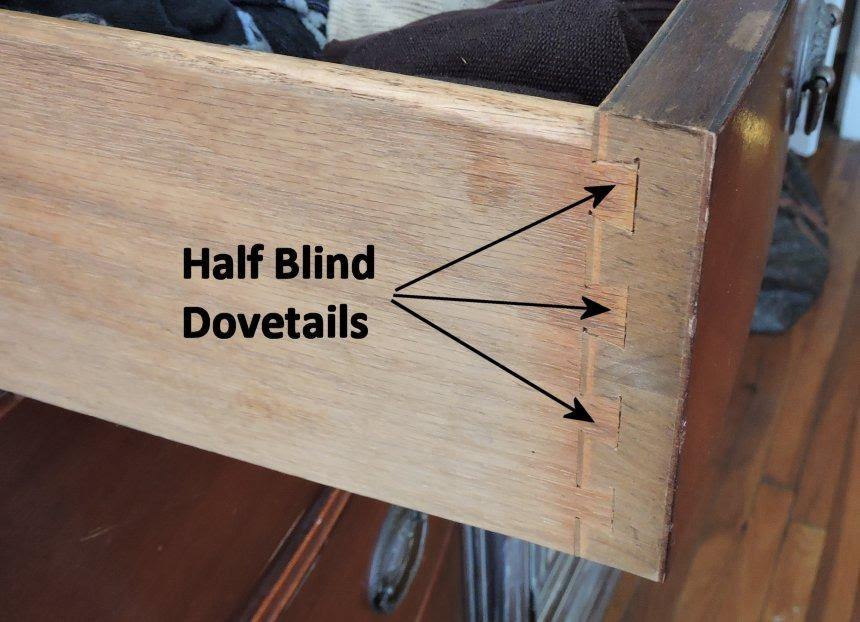
It is typical to run drawer sides full depth, overlapping the ends of the structural drawer front and the drawer back, in cases where there are both structural and decorative drawer fronts. In cases where there the decorative drawer front is also the structural drawer front, the drawer front will overlap the drawer sides, so as to hide the end grain there. On better quality furniture, this is done by assembling the drawer using half dovetails.
Drawer side construction
Determining the dimensions of the part starts with knowing the size of the drawer opening and the depth available. In some cases, shorter drawer slides are used and the drawers do not run the full depth of the cabinet. A lot depends on the drawer slides selected.
Assembling the Drawer
Attaching the drawer sides to the front and back pieces can be done in a number of ways. The simplest method to attach the sides to the back and front is using a simple butt joint. However, this simplicity comes with a cost; the joint is prone to separating and won’t stand up to heavy use.
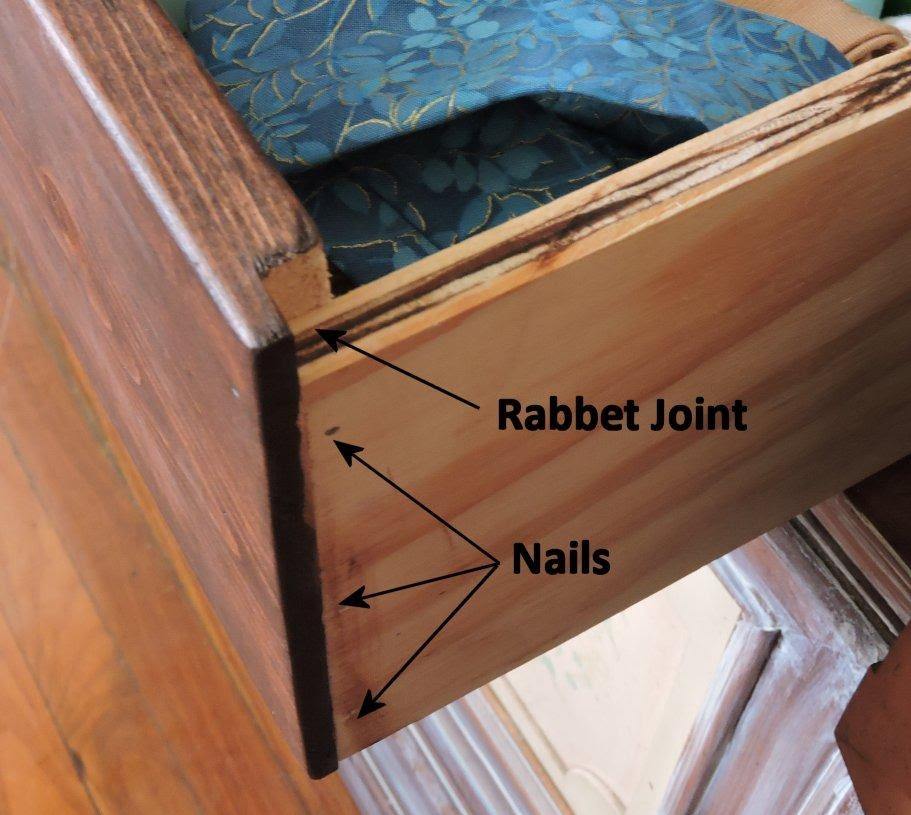
This can be improved upon by using a rabbet joint instead of the butt joint. This joint involves cutting a rabbet in the sides of the front and back pieces (equal to the thickness of the side pieces) and inserting the sides into this rabbet. The benefits of this joint involve additional surface area for the glue and the ability to use mechanical fasteners to reinforce the bond between the side pieces and the front/back pieces. However, the glue will be trying to stick to end grain, which does not make for the strongest joints.
Driving a nail or small diameter dowel from the side pieces into the front/back pieces adds considerable strength to the joint while remaining invisible on the exterior portion of the piece.
Rabbet joint – drawer front
A variation on this method, particularly useful if you have a table saw, is to cut a joint called a lock-rabbet joint. This joint attaches the front and back to the sides using a series of cuts that increase the glue area and add a measure of strength to the joint relative to a straight butt-joint or rabbeted joint. Cutting this joint is a little beyond the scope of this article and a good tutorial for cutting this joint has been published elsewhere.
The strongest way to attach drawer sides to the front and back to the sides relies on dovetail joints. Since showing endgrain is generally avoided whenever possible, the dovetails for attaching the drawer sides to the front are usually half-blind dovetails. Unless you are familiar with cutting half-blind dovetails by hand, the most effective way to cut them is using a dedicated dovetail jig and a router.
Half dovetails
However, using a router to cut tails out of plywood exposes one of the few weaknesses of plywood—blowout or tearout. Dovetail joints are a perfect match of pins and tails where the pins are cut in the front and back pieces while the tails are cut in the sides. Cutting the tails in the side pieces will occasionally result in the layers of plywood splintering as the router bit comes through on the backside. Since this backside represents the interior of the drawer, it won’t be seen when the drawer is closed, or is it visible on the outside of the drawer. However, it may cause problems on the inside of the drawer— with splintered wood damaging drawer contents or give the person opening it a splinter.
The easiest way to avoid this unpleasant occurrence is to cut the joint while using a very thin piece of backer-board—a sacrificial piece of thin wood or plywood behind the drawer side.
Related Posts:
Making a Table with a Floating Top by Admin August 31, 2021 DIY Tables have taken on an extensive variety of different shapes and styles through the ages. Functionally, the shape and style aren’t the important part; what’s…
Using Plywood for Bathroom Walls, Subfloors & Vanities by Amy Reed October 7, 2022 Finish Plywood is ideal for use in bathrooms because of its strength, moisture resistance, and adaptability for any residential construction project. Choosing the best plywood for…
Using Plywood Advantages & Disadvantages by Amy Reed January 27, 2023 More About Plywood is a very strong building material. During construction, each wooden panel is glued together with high pressure, which means it lasts a long period…