I wasn’t planning to make a wooden sword that day. I just needed something—anything—for my kid’s last-minute costume. We had the cloak. The shield was a painted pizza box. But no sword. And I wasn’t going to run to the store again.
So I went to the garage. Pulled a chunk of wood out from behind the paint cans. Might’ve been poplar? Didn’t matter. It was straight-ish. I drew the shape with a Sharpie. The blade wobbled to one side. I didn’t even bother erasing it.
Cutting it was the worst part. The saw kept sticking. At one point, I cursed out loud and scared the cat off the bench. It wasn’t pretty, but when I held it up, sawdust still on my shirt, it looked like something a little boy might swing at a dragon.
He did, too. Pillows were slain. So were lamp cords, accidentally. I’ve made five more since then. Not perfect. Doesn’t matter.
2. Why Make a Wooden Sword at All?
Because it feels different.
You hold a wooden sword you made yourself, and it just… hits differently. Doesn’t matter that the bevel is uneven or the handle’s wrapped in a shoelace you found under the couch. It’s yours.
I’ve bought plastic ones. They feel like air. The wooden ones have weight. They make that soft thud sound when they hit something, not like metal, not like foam. Something in between. Solid.
The best wooden sword I ever made was cut from a piece of stair tread. Too heavy for the kids, but man—it felt real. I’ve got another made from an old shelf. Still has the screw holes in it. I never bothered filling them. Adds character.
One even has a scorch mark on the handle from when I got careless with a woodburner trying to draw a rune. Looks awful. I love it.
None of them is perfect. That’s the point.
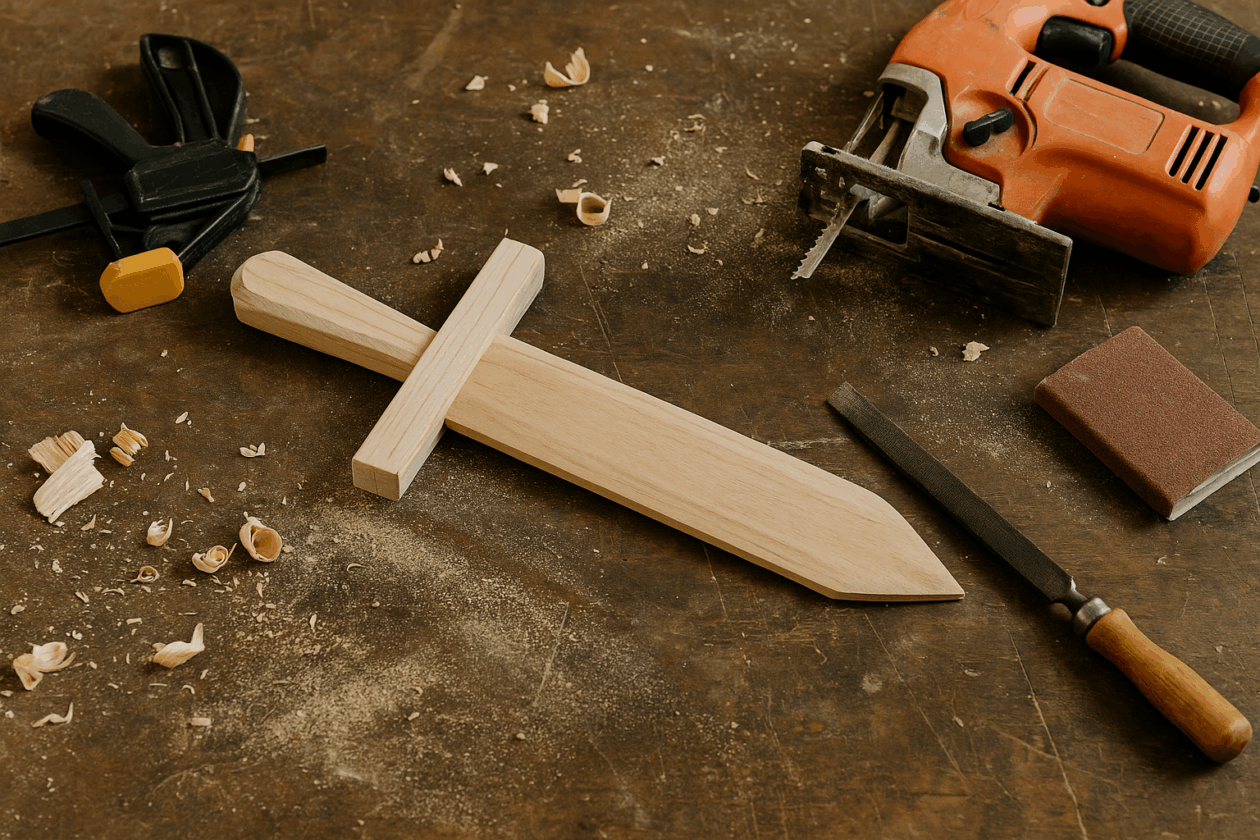
3. Tools & Materials (Nothing Fancy)
You don’t need a full-blown shop for this. I’ve made swords on the floor of a carport with one clamp and a handsaw that barely cut drywall. That said, if you’ve got better tools, use ’em. If not, you’ll still manage.
What I usually grab:
Jigsaw – Makes it easier, but I’ve used a coping saw too. Slower, but it works.
Clamp or two – To hold the board still. I’ve also just kneeled on it. Not ideal, but hey.
Wood rasp – For shaping the edges. Files or rough sandpaper can do in a pinch.
Sandpaper – Start around 80 grit, finish around 220. Or just whatever’s not too smooth or too rough.
Drill – Optional. Helps if you’re adding a crossguard or reinforcing with dowels.
Pencil + measuring tape – I never use the tape correctly. I mostly eyeball stuff.
Materials I’ve used (and scavenged):
1×3 hardwood board – Oak is great. Poplar’s easier. Pine if you’re desperate (it’ll dent fast).
Wood glue – Doesn’t need to be fancy. I’ve used Titebond and the cheap stuff.
A dowel – For strength in the crossguard. Optional. I’ve skipped it. Sometimes things wobble. It’s fine.
Paint or stain – Depends on the look. I’ve used leftover wall paint. No regrets.
Clear finish – Polycrylic dries fast. I’ve used that. Also used spray paint. Also used nothing. Again… fine.
Cord for the handle – Shoelace, paracord, a ripped strip of T-shirt. Use what you have.
Half the fun’s in improvising.
4. How I Make Wooden Sword (Step-by-Step, Sort Of)
These aren’t blueprints. This is just how I do it when I’ve got a free afternoon and a plank I don’t care much about.
Step 1 – Sketch Something
I usually just freehand a sword shape on the board. The blade is about two feet long. Handle about six inches. You can use cardboard first if you’re the “measure twice” type. I’m more of a “just start and see what happens” person.
Step 2 – Cut It Out
Clamp the board down (or sit on it if you have to). Then, slowly cut out your shape. Jigsaw works best. Coping saw works okay. Handsaw works if you’re stubborn and like sore arms.
Go slow around the curves. I rush, mess them up, and then have to fix it with sanding. Every time.
Step 3 – Shape the Edges
Grab the rasp or file and knock the corners down. You’re not making a weapon. Just giving it the look of one. I do both sides of the blade, taper it a bit, and round off the handle more than necessary—blisters aren’t fun.
Sometimes I make the “tip” too sharp. Learned that lesson after a cousin got poked. Blunt is better.
Step 4 – Add a Crossguard (Optional)
If I’m feeling fancy, I cut a piece of scrap wood about six inches wide and drill a hole through it. Slide it onto the handle. Add glue. Sometimes I drill a dowel through it. Other times I don’t, and it wobbles. Either way, the kid swings it around and doesn’t care.
Sometimes I just skip the crossguard. Easier.
5. Smaller Wooden Sword for Smaller Humans
If you’re making one for a little kid—like, under 8 years old—you’ve got to scale it down and round off everything. And I mean everything. Sharp corners turn into bruises real fast when someone’s swinging wild.
Here’s what I changed:
Blade length: around 18 inches
Handle: 4 or 5 inches, tops
Wood: Soft stuff like pine. It dents, but it’s lighter and easier for small hands.
Edges: No edges. I sand the whole thing until it feels like a rolling pin.
Finish: I’ve used non-toxic furniture wax, but honestly, I’ve left some unfinished too. Just make sure they don’t chew on it.
The real fun comes when they decorate it. One time, my daughter covered hers in glitter glue and Hello Kitty stickers. Another time, a neighbor kid used permanent markers and turned his into a “fire sword” with red lightning bolts and, for some reason, a smiley face near the tip.
They won’t care how straight it is. They’ll care that they made it theirs.
6. Things I’ve Messed Up (So You Don’t Have To)
This is the part nobody tells you: making wooden swords is easy, until it’s not. I’ve messed up plenty. Here are a few lessons from the field.
Crossguard keeps sliding loose?
Yeah, mine too. I once tried to glue it on without support, but my kid pulled it off within five minutes. Drill a hole, pop a dowel through the handle and crossguard, and glue it solid. If you don’t have a dowel, I’ve used a drywall screw. Worked fine.
The wood split while I was cutting.
This usually happens with scrap pine, or if I try to force a tight turn with the jigsaw. Go slower. Let the blade do the work. Also, avoid knots near the handle—they love to split when you’re least expecting it.
Paint ran under the tape.
Tried to stencil a lightning bolt once. Ended up looking like a melted ice cream cone. If you’re painting, use painter’s tape and dab, don’t brush. And don’t overload the paint. I always forget that.
The handle gave someone a blister.
Me. It was me. I got a blister because I didn’t round the grip enough. Since then, I have always spent extra time sanding the handle smooth and wrapping it with something that doesn’t feel like sandpaper.
Looks amazing at first, but your hands will smell like chemicals for days. Ask me how I know.
7. Finishing It Off (The Fun/Messy Part)
By now, the thing looks like a sword, sort of. Maybe not perfect, but it’s close enough that someone’s going to want to swing it. But don’t hand it over just yet—this is the part where you make it nice enough that it doesn’t get thrown in the “junk” pile.
Sanding
This part always takes longer than I expect. I start with 80 grit and knock off the rough stuff—splinters, pencil lines, whatever. Then I jump to 150 and usually end on 220 unless I run out or get bored. Have you ever sand until your fingertips feel weird? Yeah.
The handle’s the most important. If the blade’s a little rough, no big deal. But a scratchy grip? That’s a fast way to make someone hate it.
Paint? Stain? Sharpie?
I’ve tried all of it. Stain makes it look real, but I never remember to wear gloves, so my hands look like I’ve been digging in tree bark for two days. Acrylic paint’s easier. Once I painted a sword red and silver, trying to make it look “flaming.” It looked like a candy cane. Still cool though.
Let the paint or stain dry—don’t rush. I’ve smudged more than one finish because I got impatient. One time, I stuck a wet sword in a shoe rack to dry, and the paint peeled right off the next morning. Still mad about that.
Clear coat helps. I usually go with polycrylic. The spray version if I’m lazy.
Wrapping the Handle
This part’s fun. No wrong way to do it.
I’ve wrapped up with:
A shoelace from an old pair of sneakers
Some leather I found in a drawer (wasn’t even mine)
Black paracord I stole from a camping kit
An old t-shirt strip that kept unwrapping mid-battle (don’t recommend that one)
Wrap it tight. Tie it off. Glue if it’s slipping. That’s it.
8. Where to Put the Wooden Sword After
You don’t just toss a sword like this in a toy box. I mean—you can, and I have—but it deserves better.
One of mine’s mounted on a little rack in the hallway. Another one’s hanging on two screws in the garage, right next to the extension cords. The crooked one with the busted crossguard is in the closet. I pretend I’m going to fix it. I’m not.
I made a shield backboard once—painted it, mounted the sword across the front. Looked awesome. My wife made me take it down before guests came over. It’s in the shed now. Still awesome.
Other places to stash them:
Stick it on a bookshelf next to some fantasy novels
Mount it with a plaque (“Sir Declan’s First Sword – Age 5”)
Hang it behind a door where only the cool people will notice
Costume bin, if you’re brave
Under the bed, if you’re a kid who thinks monsters are still a thing
The more beat-up they get, the better they look. Nicks in the blade, worn handle wrap, faded paint—that’s proof it got played with. That’s the good stuff.
9. Wooden Swords Have Been Around Forever (No Really)
I didn’t go looking for some ancient tradition when I made that first wooden sword—I was trying to solve a problem. But after I’d made a few, I started reading up. Turns out, I stumbled into something that’s been happening for a long, long time.
Like, Romans used to train with wooden swords. Gladiators. They called them rudis, I think. They’d swing those things around until they were good enough for the real fights. Sometimes, if a gladiator got his freedom, he was given one of those wooden swords as a symbol, which is kind of amazing when you think about it. A piece of wood meant you’d survived.
And in Japan, samurai trained with bokken. Same idea—wooden version of the real thing. Not lighter either. I held one once, and it nearly took my wrist off. I didn’t swing it. Chickened out. The guy running the demo could probably break a tree in half.
Even medieval kids weren’t handed sharp steel first thing. They started with wood. Smacked each other around, learning the basics before they got real blades.
So yeah—turns out when you carve a sword out of scrap wood, you’re doing something people have done for thousands of years. I had no idea. Makes the crooked ones feel kind of important now.
10. Wrapping It Up (Before I Talk Too Much)
There’s something about this project that just feels good.
You start with a plain board, some tools that probably need to be sharpened, and you end up with a sword that somebody’s going to swing. Maybe it’s a kid, maybe it’s you—either way, it gets used.
And yeah, they get beat up. The tips snap off. Handles come loose. Paint flakes. The wrap starts unraveling. Doesn’t matter. That’s how you know it wasn’t just for show.
I’ve made a few that I was proud of. I’ve made a few, I wish I hadn’t rushed. Some are hanging up, some got lost under beds. One ended up in the trunk of my car for a year. Still have no idea how.
If you’ve got an hour and a plank, you can make something that’s going to get used. Maybe even remembered. Doesn’t have to be pretty. Just has to be your wooden sword!
Related Posts:
How to Make Wooden Gears by Admin April 2, 2025 DIY Building Wooden Gears — My No-Nonsense Notes from the Garage If you've ever thought about building wooden gears for a clock, a jig, or just…
How to Make the Perfect Wooden Name Plate by Admin April 25, 2025 DIY Name plates are more than just labels — they’re subtle symbols of professionalism, pride, and identity. Whether it’s hanging outside an office door or sitting…
How to Make a Wooden Barrel by Admin April 23, 2025 DIY Wooden barrels are a timeless blend of functionality and craftsmanship. From aging fine wine to storing whiskey, these coopered containers are built not just to…