Removing the wrong wall can crack ceilings, sag floors, and, in extreme cases, partially collapse a house. Before I opened up my kitchen, I spent weeks confirming whether the wall was structural—and even then, the beam installation was the most stressful DIY project I’ve ever tackled. Getting it wrong doesn’t just mean a crooked door; it means risking catastrophic structural failure or permanent damage to your home’s foundation.
In this honest, comprehensive guide, I’ll show you exactly how I tackled a load-bearing wall removal. From spotting structural clues to lifting a heavy LVL beam, this breakdown covers what went right, the hidden problems that surprised me, and the advanced contractor tips I wish I’d known before I started.
Quick Answer: TL;DR Box
Load-bearing wall removal requires:
Structural engineer approval and local building permits.
Temporary shoring walls to support weight during demolition.
A properly sized LVL or steel beam to replace the wall.
Solid support posts that transfer weight directly to the foundation.
Average Cost: $2,500–$5,000 (DIY with engineer) or $8,000–$30,000+ (Professional).
The Ultimate Wall Removal Checklist
Before jumping into the step-by-step breakdown, use this phase-by-phase checklist to track your project’s progress:
[ ] Hire a structural engineer to calculate load requirements and specify beam sizing.
[ ] Pull a structural permit with your local building department.
[ ] Verify joist direction and map out any hidden mechanical utilities in the wall.
[ ] Build temporary shoring walls to carry the weight during construction.
[ ] Confirm foundation support directly beneath the new point load locations.
[ ] Install the new beam onto properly sized jack and king studs.
[ ] Pass the framing inspection before any drywall is reinstalled.
[ ] Repair the drywall and patch the missing sections of flooring.
[ ] Paint and finish the space, or wrap the exposed beam.
Before & After: The Open-Concept Transformation
The visual payoff of this project is undeniable. Here is the difference it made in my own home layout:
Before: A narrow, dark galley kitchen cut off from the dining room by a central partition wall. The kitchen felt boxed in and disconnected from the rest of the house. The layout felt cramped, blocked natural light from the rear windows, and created a major traffic bottleneck during family gatherings.
After: Once the wall was gone, the house finally felt alive. Sunlight from the rear windows reached rooms that had always felt dark. By removing the central structural wall and hiding a flush beam in the ceiling, light now floods across the entire floor plan. The kitchen seamlessly transitions into the living space, making the home feel twice as large.
What Is a Load-Bearing Wall?
A load-bearing wall supports the weight of the elements above it—such as the roof, second story, or ceiling joists—and transfers that load down to the foundation. Successful load-bearing wall removal requires a structural engineer’s assessment and the installation of a properly sized replacement beam (typically LVL or steel) and support posts to maintain the home’s structural integrity.
Average Cost to Remove a Load-Bearing Wall
Project Type
Typical Cost
DIY with Engineer Consultation
$2,500 – $5,000
Contractor-Installed LVL Beam
$8,000 – $20,000
Steel Beam Installation
$12,000 – $30,000+
Practical Homeowner Budgeting Breakdown
When planning your open-concept renovation, remember that the beam itself is only a fraction of the price. Here is a realistic look at the line-item expenses you need to account for:
Item / Phase
Typical Cost Range
Engineer Visit & Stamped Plans
$300 – $700
Local Building Permit
$150 – $800
Engineered LVL Beam Materials
$300 – $900
Drywall Repair & Ceiling Texture Patching
$500 – $2,000
Electrical Rerouting (Outlets & Switches)
$300 – $2,500
Part 1: Structural Anatomy & Identification
Signs a Wall Is Load-Bearing
Before picking up a sledgehammer, look for these specific structural clues. Even if you spot them, you must consult the International Residential Code (IRC) or a local structural engineer to ensure your plans comply with safety standards.
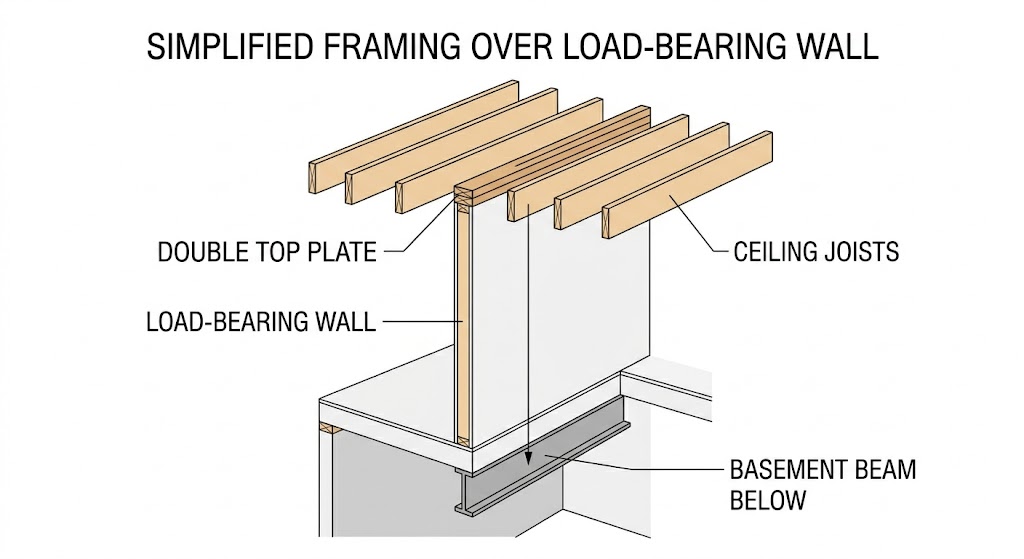
Ceiling joists run perpendicular: If floor or perpendicular ceiling joists rest on top of the wall at a 90-degree angle, it is load-bearing.
Wall sits near the center of the house: Center walls typically act as a “spine,” carrying the interior span of the floor joists.
Wall continues on floors above: Stacked walls usually indicate a continuous load path down to the foundation.
A beam or support exists below in the basement: A steel beam, lally column, or masonry pier directly beneath the wall means it’s carrying weight.
Roof framing lands on wall: In single-story homes, roof struts, purlins, or truss configurations may transfer roof weight directly to interior partitions.
Double-top plate inside wall: Structural wall framing almost always uses a double layer of dimensional lumber at the top.
Wall is exterior: Almost always, exterior walls support the ends of the roof rafters and the weight of the exterior cladding.
Pro Tip: When I still wasn’t 100% sure, I hired a structural engineer. It cost $450, and it was the best money I spent on this entire job. They provided the exact mathematical specifications for the engineered wood beam I needed.
Common DIY Mistakes During Load-Bearing Wall Removal
Because the stakes are so high during structural home remodeling, minor oversights can lead to major damage. Watch out for these frequent pitfalls:
Underestimating beam weight: A multi-ply 14-foot LVL beam weighs hundreds of pounds. Trying to manhandle it into place without a material lift or sufficient physical help leads to injuries and dropped loads.
Forgetting hidden utilities: Assuming a wall only contains wood studs is a recipe for disaster. Always scan or cut small inspection holes to check for plumbing stacks, gas lines, and HVAC ductwork.
Inadequate temporary shoring: Building temporary walls that are too weak, or placing them too far from the work zone, allows the ceiling joists to drop before the permanent beam is set.
Improper beam bearing length: Resting a heavy structural beam on less than 1.5 inches of solid wood framing can cause the wood fibers to crush under pressure over time.
Skipping engineering approval: Relying on online “rule of thumb” beam calculators instead of a licensed pro can result in a dangerously sagging ceiling.
Failing to reinforce the floor below posts: Forgetting to add solid wood blocking under the subfloor means the weight from the jack studs will crush right through your floorboards.
The Biggest Mistake I Almost Made
Early in the planning phase, I almost moved forward with demolition after only verifying the attic joist direction. I assumed that because my basement had a thick steel beam, the load path was straightforward.
Right before buying materials, my structural engineer crawled into the dark crawlspace near the rim joist and discovered a hidden point load: an old, concentrated framing post from a historical remodel that transferred a massive amount of upper-story weight directly onto a single section of the wall.
Had I removed that wall without adding an extra concrete footing in the basement, the new beam would have punched right through the kitchen floorboards, causing severe ceiling sag and a localized collapse. The engineer caught it, saving me from a structural disaster.
Part 2: Choosing Your Replacement Beam
When removing a structural bearing wall, you are replacing continuous support with a localized beam span.
LVL vs. Steel Beams
LVL (Laminated Veneer Lumber): The most common choice for residential remodeling. LVL beams are highly stable, resistant to warping, and can be fastened together on-site to create a thick, heavy-duty header. They are light enough for a few people to maneuver into place without heavy machinery.
Steel Beams (I-Beams): Chosen when the span is exceptionally long (typically over 16–20 feet). Steel beams can support longer spans with less thickness, which helps preserve ceiling height. However, steel requires crane or material lift assistance and specialized drilling/fastening.
Why Beam Size and Sizing Rules Matter
A beam that is too small can slowly sag over time, causing drywall cracks, bouncy floors in the story above, sticking doors, and visible dips in the ceiling. Experienced contractors often oversize beams slightly. Spending a bit more on a deeper beam or adding an extra ply of engineered lumber reduces “bounce” or floor vibration on the story above, keeping the floor feeling rock-solid for years to come.
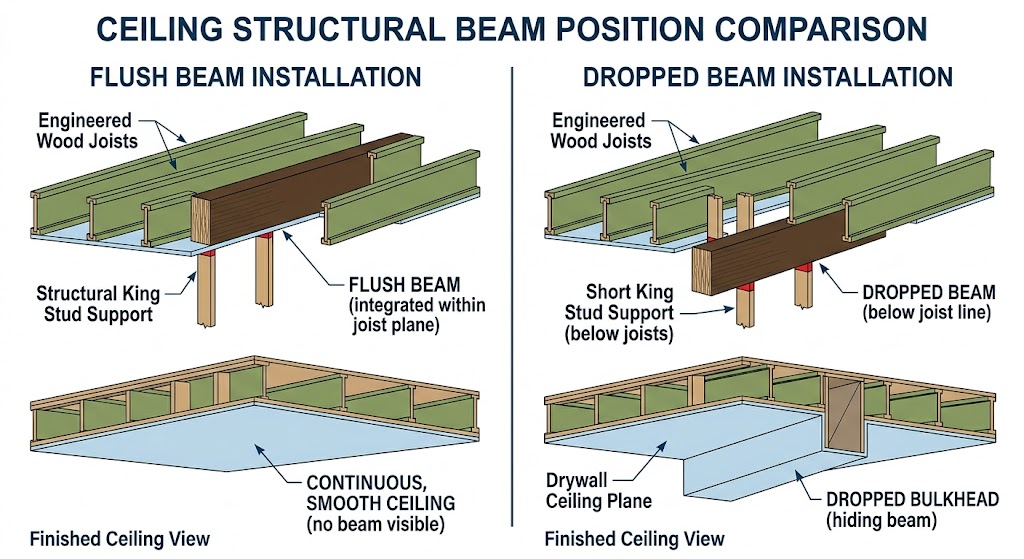
Flush Beam vs. Drop Beam: Which Is Better?
Feature
Flush Beam (Hidden)
Drop Beam (Visible)
Aesthetic
Seamless, flat ceiling across both rooms.
Creates a “defined” transition or cased opening.
Difficulty
High. Must cut floor joists and use joist hangers.
Moderate. Joists sit directly on top of the beam.
Cost
More expensive due to intensive labor and hardware.
More affordable and DIY-friendly.
Best For
Modern, completely open-concept layouts.
Rustic, traditional, or architectural features.
Flush Beam Installation Challenges
If you choose a flush beam to keep your ceiling flat, be prepared for significant extra work. You will need to install heavy-duty Simpson Strong-Tie joist hangers to connect every single ceiling joist to the vertical face of the new beam. This involves shoring up the ceiling on both sides, cutting the existing floor joists back with surgical precision, and sliding the new beam up into the joist cavity.
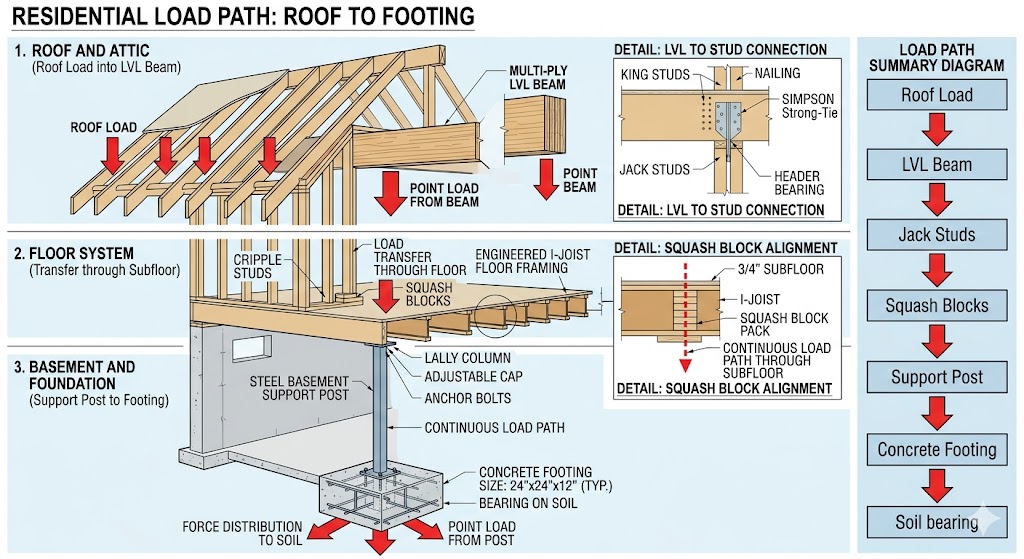
Understanding the Load Path and Point Loads
One of the biggest mistakes in structural remodeling is forgetting where the weight goes after it hits the beam. When you install a 14-foot beam, the weight that was spread evenly across 14 feet of wall studs is now concentrated entirely into two small spots at the ends. This is a concentrated point load.
You must ensure these end points transfer weight through king and jack studs, straight through the subfloor, down to the basement structure, and ultimately into a solid concrete footing. If your underlying floor isn’t up to the task, you must either install a proper plywood subfloor or add heavy blocking between your joists to establish a solid, continuous bearing path. This is especially critical if you plan on prepping the underlying floor as a durable subfloor for tile, where any structural flex will crack the grout lines.
Part 3: Step-by-Step Demo and Beam Installation
🛑 Contractor Warning
Never remove drywall from both sides of a suspected load-bearing wall before temporary shoring is installed. Even partial framing removal can allow joists to shift unexpectedly, making the framing unstable before you even touch a structural stud.
1. Permit Approval and Structural Inspections
Never bypass the building department on a structural modification. I submitted my engineer’s stamped framing plan to secure a structural permit. During the framing inspection, the code official verified the exact fastening schedule to guarantee that my multi-ply LVL beam acted as a single, unified structural element.
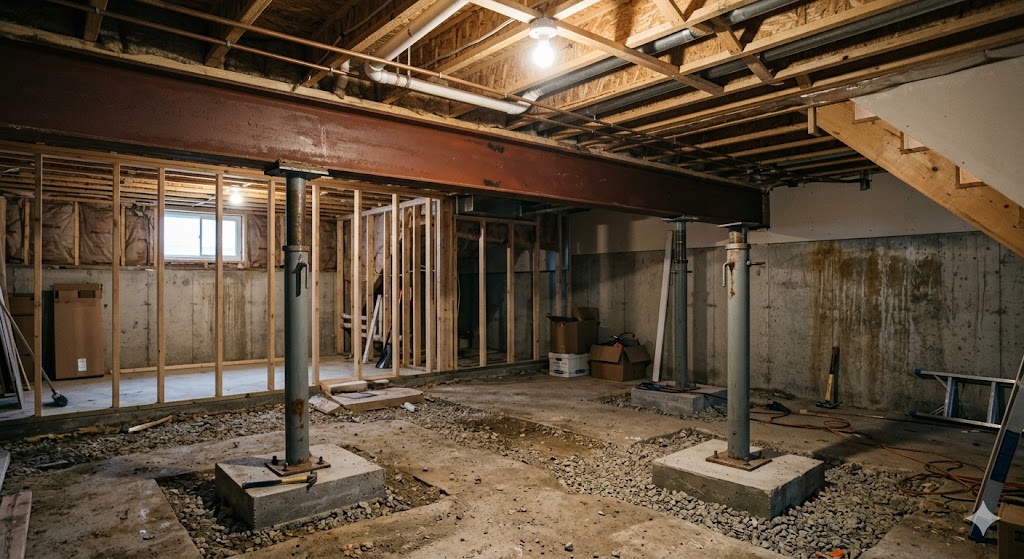
2. Temporary Support (Shoring)
Before touching a single stud, I built temporary “dead-man” shoring walls on both sides of the structural wall. I used heavy-duty Tiger Brand adjustable jack posts paired with double $2\times6$ wood top plates. These shoring walls took the weight of the floor joists above, holding the ceiling perfectly still.
The Moment of Truth: The loudest, most stressful moment happened when the final wall stud came loose. For a split second, the room went dead silent. Seeing thousands of pounds of home resting solely on temporary jack posts was terrifying. Even after the permanent beam was bolted in, I kept a high-visibility Bosch rotary laser level trained on the ceiling line for days because I was paranoid about structural settlement.
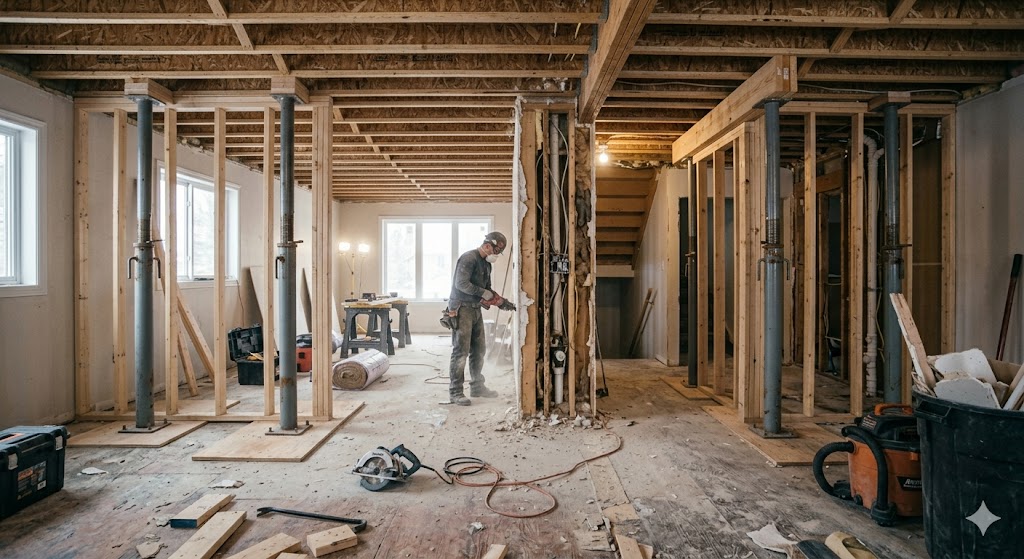
3. Demolition
Using a DeWalt 20V Max reciprocating saw paired with thick, carbide-tipped Diablo Demo Demon demolition blades, I sliced through the old wall studs and 50-year-old hardened nails. I took care to cut the studs out in manageable pieces, ensuring they didn’t bind or pinch the saw blade, which indicates that structural weight is shifting.
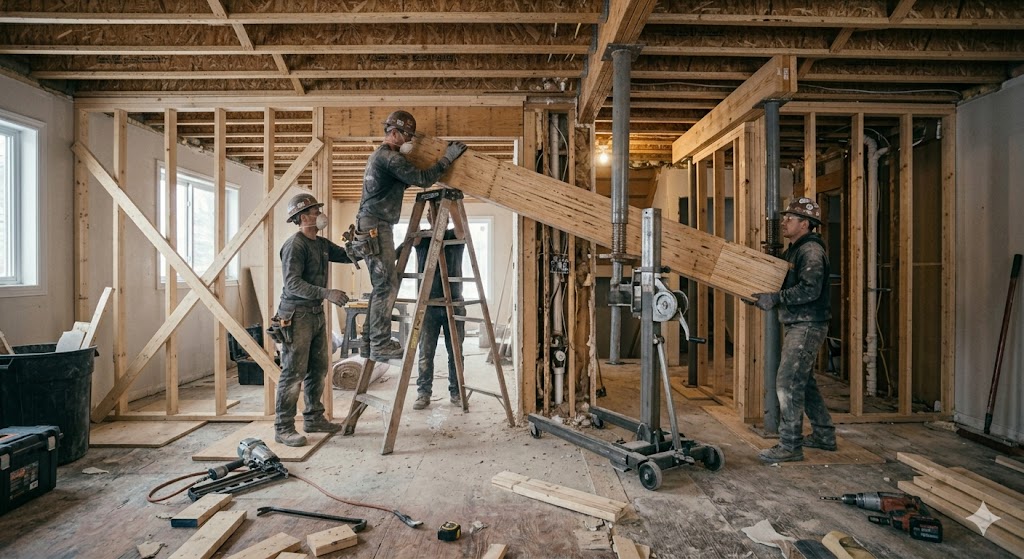
We lifted the multi-ply engineered lumber into place one ply at a time to make the weight manageable. To securely laminate the plies together on-site, we used heavy-duty Simpson Strong-Tie SDWS structural wood screws, which pull the lumber together tightly without pre-drilling.
The completed beam was seated onto vertical posts composed of jack studs (which directly carry the downward weight of the beam) and king studs (which run continuously to the top plate to provide lateral stability). For my 14-foot span, we used a triple 1-3/4″ x 11-7/8″ LVL assembly, ensuring a minimum of 3 inches of solid end-bearing length on the jack studs.
Tools I Actually Used: Worth Renting vs. Buying
To make this project possible, having the right equipment is non-negotiable. Here is the tool strategy I used, breaking down where you should invest and where you can save by heading to the rental counter.
Tool
Purpose
Recommendation
Tiger Brand Jack Posts
Building rock-solid temporary support walls.
Rent (Unless you tackle multiple projects).
VEVOR HEPA Air Scrubber
Keeping dangerous drywall and plaster dust out of the living space.
Rent (Critical for dust containment).
Bosch Rotary Laser Level
Ensuring the beam and ceiling are flat across the room span.
Buy (Invaluable for ongoing finish carpentry).
DeWalt Reciprocating Saw
Heavy-duty demolition of old wall studs and plate lines.
Buy (A core tool for any renovation).
Diablo Carbide Demo Blades
Slicing through old, hardened framing nails quickly.
Buy (Pick up a multi-pack).
Simpson SDWS Wood Screws
Binding multi-ply LVL beams together under code compliance.
Buy (Must be code-approved structural fasteners).
Part 4: Advanced Contractor Insights & Inspection Failures
Even if your beam looks straight, a building inspector can fail the project for common, easily avoided framing errors:
Improper Fastening Schedule: Using standard, thin framing nails instead of rated structural screws, or failing to follow the staggered, multi-row pattern required by the manufacturer to laminate individual LVL plies together.
Insufficient Bearing Length: Standard building codes typically require a minimum of 1.5 inches of bearing on wood. Next to your vertical support columns, check the overall health of your floor framing to make sure it can handle this concentrated stress.
Missing or Under-Specified Joist Hangers: On a flush beam installation, using standard light-duty hangers instead of structural-grade options, or failing to fill every single manufactured nail hole.
Unsupported Point Loads Beneath the Post: Failing to install a solid, continuous load path (such as structural blocking or a dedicated column) directly underneath the new jack stud framing down in the crawlspace or basement.
Part 5: Red Flags That Mean “Stop Immediately!”
If you are executing a wall removal and notice any of the following signs, stop work immediately and brace the structural frame:
🔊 Cracking, popping, or groaning sounds coming from the ceiling or floor joists during demolition.
📏 Visible ceiling movement or sagging away from the temporary shoring walls.
⚠️ Sagging, bowing, or flexing of your temporary shoring walls or jack posts.
🪵 Crushed or splintering wood at the top or bottom of your jack studs.
🚪 Doors or windows on the story above that suddenly stick, bind, or refuse to open/close.
🔄 Beam rolling or twisting out of vertical alignment during the lifting or loading process.
🫨 Excessive floor bounce or deflection near the base of the new structural support posts.
Part 6: Realities of Remodeling: Hidden Problems
I originally budgeted around $4,000 for this structural project, but unexpected mechanical, electrical, and structural issues quickly added to the cost.
The Surprise
The Impact
How I Fixed It
Hidden HVAC Duct
A major forced-air heat run was embedded deep inside the stud cavity.
Rerouted the ductwork through a nearby pantry closet, requiring drywall soffit work.
Uneven Ceiling Joists
Joists on the left side of the room sat 1/2″ lower than those on the right.
Used structural wood shims and a laser level to establish a perfectly flat, uniform ceiling plane.
Vintage Wiring
Encountered live, cloth-insulated wire hidden in the wall.
Paused the project to have a licensed electrician reroute new cables through the floor joists.
Dust Infiltration
Despite standard plastic sheeting, fine drywall dust traveled throughout the home.
I highly recommend deploying a commercial HEPA air scrubber to manage air quality during demo.
What I’d Do Differently Next Time
Even though the project ended successfully, the learning curve on my first open-concept renovation was steep. If I ever do this again, here are the changes I would make:
Rent a commercial dust barrier earlier: Standard plastic sheets taped to the ceiling always find a way to leak. Investing in a zippered ZipWall system on day one would have saved days of deep-cleaning the rest of the house.
Photograph every electrical wire before demo: Once you cut into the drywall, it’s incredibly easy to forget exactly how the existing circuits were routed through the stud bays.
Order the beam before opening drywall: I left my house sitting on temporary shoring walls for 4 extra days due to a local supplier’s delay with the engineered lumber. Next time, I’ll have the beam sitting in the garage before a single stud is cut.
Budget 30% more for hidden repairs: rerouting the hidden utilities costs far more than the wood and steel components themselves.
Schedule inspections earlier to avoid delays: Building inspectors are busy. Waiting until the day you finish framing to call for an inspection can leave your project stalled for a week.
Part 7: When This Project Is Beyond DIY
Do NOT attempt to tackle a load-bearing wall removal on your own if you encounter any of the following conditions:
Masonry or Brick Walls: Structural brick, block, or stone walls require massive hydraulic shoring setups, steel beams, and specialized masonry engineering crews.
Multi-Story Point Loads: If the wall supports heavy concentrated loads from above, such as a cast-iron bathtub, heavy tile flooring, or intersecting roof hips, the structural loads become much more complex.
Signs Your Installed Beam Is Undersized: If you complete a project and later observe progressive ceiling sag, fresh diagonal drywall cracks at wall corners, or binding doors, your beam is failing and requires immediate professional shoring. You might also want to read our detailed guide on sistering floor joists if you notice the subfloor underneath your new posts is beginning to deflect.
Part 8: Frequently Asked Questions
Can you live in the house during a load-bearing wall removal?
Answer: Yes, but it is challenging. Because the project requires building temporary shoring walls that cut into your usable floor space, a significant portion of the room will be blocked off. Additionally, the demolition stage creates a massive amount of airborne dust. If you choose to stay home, seal the work zone completely with heavy plastic sheeting and run a HEPA air scrubber constantly to manage air quality.
How long does removing a load-bearing wall take?
Answer: The structural framing changes themselves usually take 3 to 5 days for a standard 12-to-16-foot span. This includes building the shoring walls, removing the old framing, and installing the new beam. However, the total project timeline—including engineering consultations, waiting for permit approvals, rerouting hidden utilities, hanging new drywall, and painting—typically takes 3 to 4 weeks.
Does removing a structural wall increase home value?
Answer: Yes, in most markets. Open-concept floor plans remain highly desirable among modern homebuyers, particularly configurations that open up a dark kitchen into a central dining or living room. However, you will only see a positive return on investment (ROI) if the work is permitted and signed off by an engineer. Unpermitted structural modifications create red flags during home inspections that can derail a future sale.
Can you remove only a portion of a load-bearing wall?
Answer: Absolutely. You don’t have to remove the entire wall to make a space feel more open. You can create a wide cased opening, a pass-through window, or an archway. This process works exactly the same way as a full removal: you must still build temporary shoring walls, cut out the desired section of studs, and install a properly sized header beam, supported by jack studs at either end, to bridge the new gap.
Do load-bearing walls always run perpendicular to joists?
Answer: Usually. In standard residential construction, floor or ceiling joists rest across the tops of structural walls at a 90-degree angle to minimize span lengths. However, parallel walls can still be load-bearing if they align directly beneath upper-story walls or carry localized point loads from above. When checking your layout, it’s also worth verifying whether your home uses structural vs. non-structural plywood or varying plywood thicknesses for roof sheathing, as this affects how loads are transferred to interior partitions.
What size LVL beam do I need for a 12-foot span?
Answer: While a double 11-7/8 inch LVL beam is common for standard residential ceiling spans, only a licensed structural engineer can calculate the exact dimensions for your home.
Can a local building permit office tell me if a wall is structural?
Answer: Rarely. Permit technicians inspect submitted plans, but they will not assume liability for diagnosing your home’s structural framing on-site. They almost always require a signed and stamped letter from a licensed structural engineer before issuing a building permit to remove a load-bearing wall.
Final Transformation
Opening up my kitchen completely transformed how my family lives in our home. By rigorously adhering to our structural engineer’s calculations and respecting the continuous load path, the project was a massive success. Before you swing your sledgehammer, ensure you have your permits in hand, your shoring walls built, and your load path verified. Once the heavy work is complete, you can safely focus on design choices, like checking out our helpful tutorial on installing decorative wood beam wraps to finish the opening with a professional style.
Related Posts:
Fluted Wood Panels: Costs, Types & Mistakes to Avoid by Admin April 12, 2026 DIY Fluted wood panels are decorative wall panels featuring vertical grooves that add texture, depth, and a high-end modern look to interiors. Commonly used for accent…
Scroll Saw Guide: Uses, Costs, Mistakes & Best Models by Admin June 10, 2026 DIY Whether you want to cut detailed fretwork, craft custom children's puzzles, or step up your DIY woodworking game, a scroll saw is an indispensable workshop…
How to Remove Wall Cabinets – Easy DIY Guide by Admin March 17, 2025 DIY Planning a kitchen makeover? One of the first things that usually has to go is the old set of cabinets. Swapping them out for something…