I’ve built a few bed frames. Some were rock solid. One broke on me when I plopped down too hard. Another sagged after six months. I used the wrong wood—thought I was saving money, bur ended up rebuilding.
If you’re building a bed, you don’t need a ton of tools or even that much experience. But you do need to choose the right kind of wood. Otherwise, it won’t last. Doesn’t matter how good your screws are or how tight your joints are. Wrong wood = weak frame.
So here’s what I’ve learned the hard way.
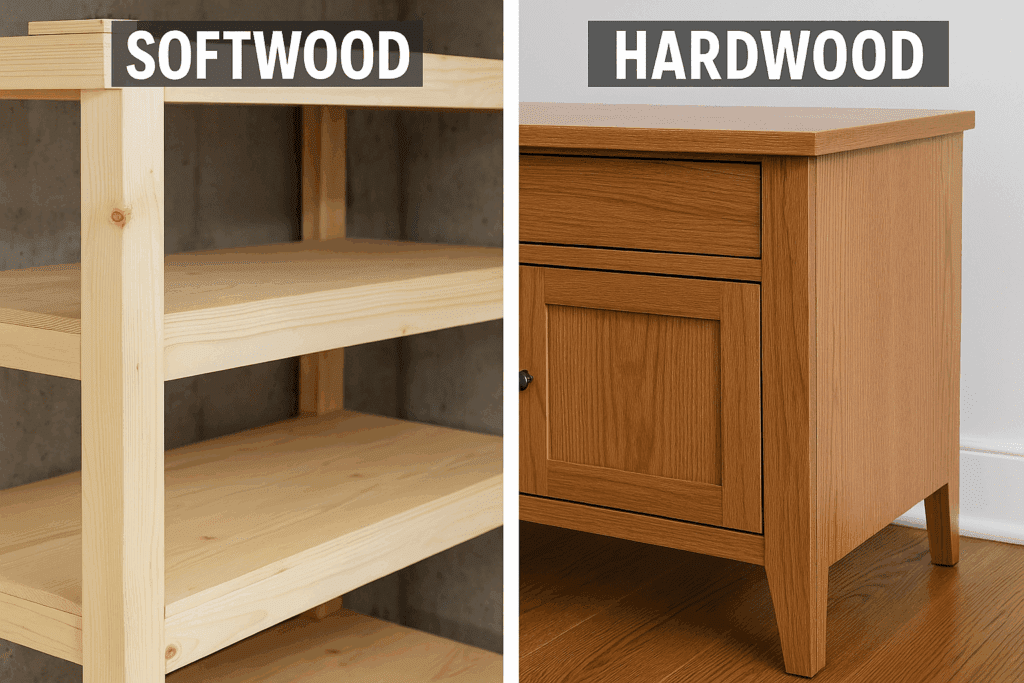
Softwood vs. Hardwood
The first time I heard “softwood” and “hardwood,” I figured softwood was soft and hardwood was hard.
Not always true.
It’s about the type of tree. Softwood comes from evergreens like pine. Hardwood comes from trees like oak, maple, and walnut.
But forget the science for a minute—here’s what matters in your garage
Softwood: Cheap, Easy, Not Always Great
Pine, fir, spruce… you’ll find this stuff everywhere. It’s light. You can cut it with a handsaw. It won’t kill your budget.
If you’re building your first frame, softwood is forgiving. Make a mistake? Cut another board. You’re out a few bucks.
But… It’s soft. Dents easily. Screws can strip if you go too hard. Doesn’t hold up well if you don’t reinforce the heck out of it.
I’ve made a couple of frames from pine. They held. But I had to add middle beams and metal brackets just to keep them from wiggling.
Hardwood: Heavy, Expensive, Solid as a Rock
Now, hardwood—oak, maple, walnut—that stuff’s a different beast.
It’s heavy. Hard to cut unless your tools are sharp. Costs more. But once you build with it, you’ll feel the difference. No wobble. No flex. Just solid.
One frame I built from white oak… thing hasn’t moved in 8 years. And we’ve moved houses twice.
If you’re after something that’ll last forever and look good doing it, hardwood is worth the extra bucks.
What I Usually Do
These days? I mix.
Use oak or maple for the legs and side rails. Then I’ll throw some pine or plywood in for the slats or anything hidden. Keeps it strong where it counts and saves some money too.
Best Softwoods for Bed Frames
If you’re sticking with softwoods—and honestly, I still use them sometimes—here are the ones I’ve had the best luck with. These aren’t fancy. But they can get the job done if you build smart.
🪵 Pine — Cheap, Everywhere, Gets the Job Done (Mostly)
You’ll see pine at every hardware store in the country. It’s probably the first wood most DIYers ever touch. That was true for me, too.
It’s super light, easy to cut, and easy to screw into. If you’re not building furniture for the ages—just want something that works—it’s a good place to start.
But let’s be honest: pine’s soft. Real soft. If you drop a hammer on it, it’ll leave a mark. If you overtighten a screw, it’ll spin in place. Not ideal.
Still, I’ve built a few bed frames from pine that held up fine, as long as I reinforced everything. I used a center beam under the slats, added corner brackets, and hit every joint with wood glue.
If you’re painting the frame, pine’s fine. Staining? Use a pre-stain conditioner first, or it’ll blotch like crazy.
🪚 Douglas Fir — Stronger Than Pine, Not as Pretty
Douglas fir is a little tougher than pine. Still technically a softwood, but it feels sturdier. It’s used in house framing, so you know it can take weight.
I used fir on a platform bed once, mainly because I had leftover 2x6s. Sanded it down, slapped on a dark walnut stain, and it turned out decent. Rustic-looking, but solid.
It holds screws better than pine. Doesn’t dent as easily. But it’s not going to win any beauty contests. The grain’s kinda plain, and the color can look a little yellow without stain.
Best part? It’s cheap and strong. If you’re going for function over style, fir’s a workhorse.
Best Hardwoods for Bed Frames (What’s Worth the Money)
If you’re serious about building something that won’t shake loose after a year or two, hardwood’s the move. It’s not cheap, and it’s not the easiest stuff to work with—but once it’s built, it stays built.
Here are the ones I’ve actually used and would use again.
🪓 Oak (White or Red) — Stronger Than It Has Any Right to Be
Oak’s a classic. There’s a reason old furniture made from this stuff is still kicking around. I used white oak for a bed frame I made five, six years ago. Still solid. Doesn’t squeak, doesn’t move, even when I shove it around to vacuum.
It’s heavy, yeah. And you’ll need a fresh blade unless you enjoy burning your way through cuts. But once it’s together? Feels like a tank.
Maple’s a weird one. Doesn’t look like much at first—pale color, kinda plain—but it’s sneaky strong. Denser than oak in some cases. The first time I used it, I underestimated it. Tried to rush cuts. Chewed through a blade and snapped a screw.
If you like that modern look—smooth, no wild grain—this one’s worth a look. I finished a platform bed in it with just a light oil, and it looked clean as heck. Held up great, too.
Just don’t try to stain it dark unless you’re using a conditioner first. Learned that the sticky way.
🌳 Birch — The Practical Option
Birch is what I go with when I want hardwood strength but not hardwood price. It’s not flashy. Doesn’t have dramatic grain. But it takes paint well and doesn’t crumble under load.
I’ve used it for headboards, side rails, and even slats once. You can stain it, but it gets blotchy. If you don’t mind a solid color finish, it works fine.
🌰 Walnut — Not Cheap. But Man, It’s Beautiful
This is the one you pull out when you want to make something special.
I used walnut for a low platform bed I made as a gift. Took me longer than usual because I didn’t want to mess it up. Cost me more, too. But that thing turned out beautiful. Dark, rich color. Tight grain. Just looked expensive.
If you’re building something to impress—or just want a bed frame that feels finished before you even stain it—walnut’s the top pick. You’ll feel the price tag, but also the difference.
Now, you’re not gonna want to make the entire thing out of plywood—don’t go building legs out of it—but for certain parts? It works better than solid boards, honestly.
Where It Makes Sense
Under the mattress — I’ve laid a sheet of 3/4″ birch ply right on a cleat system before. No squeaks. No sag. Just rock solid.
Headboards — Easy to cut, light enough to lift alone, and take paint or stain better than cheap 1x boards.
Side panels, drawer boxes — Pretty much anything flat that needs to stay square.
I built a platform bed for my nephew’s room a while back. Used plywood for the top deck and some fir 2x4s for the frame. The kid jumps on it every day. Still holding.
Not All Plywood Is the Same
If you’re thinking about using that flaky particleboard stuff? Don’t.
Go with cabinet-grade plywood—birch, maple, even oak veneer if you’ve got the cash. It should be smooth, sturdy, and 3/4″ thick or more.
Avoid OSB or MDF — unless you like sagging beds and chipped corners.
A Few Tips I’ve Learned
Seal the edges — If it’s exposed, slap on some glue or edge banding. Raw plywood edges soak up moisture and fray over time.
Don’t leave it floating — If you’re using it as a deck, screw it down tight every 12–16 inches. Sag creeps in fast otherwise.
Bottom line? If you use good plywood in the right spots, it’ll hold up better than cheap boards and won’t cost you hardwood prices. Just don’t cut corners—literally or figuratively.
Joinery Tips That Matter (A Lot More Than I Realized at First)
Alright—this part right here? It’s where most people screw it up. Not with bad wood. Not with a dull blade. The joints.
Doesn’t matter how pretty the frame is. If the thing’s loose or wobbly, it’s no good. You’ll hear it creak. Feel it shift. Might even wake up in a sag.
I’ve made that mistake—more than once.
🔩 Don’t Use Nails (Seriously)
If you’re thinking, “Oh, I’ll just nail it together and save time,” let me stop you right there. Nails loosen. Always. Eventually.
They’re fine for trim. Not for bed frames.
Use wood screws or bolts. I like lag screws for hardwood stuff—once they’re in, that board isn’t going anywhere.
🟡 Glue? Yes. Always.
Some folks treat wood glue like it’s optional. It’s not. It’s the difference between ‘meh’ and rock-solid.
Glue your joints, even if you’re using screws too. It’s not either/or. It’s both.
Just don’t overdo it. A bead along the edge is enough. Clamp it. Wipe the squeeze-out. Done.
You build the bed frame. You sand it. Looks good. You could stop there… but don’t. A raw wood frame might look nice now, but trust me—one season of humidity or a scuffed boot later, and you’ll wish you sealed it.
Finishing’s not just about looks. It protects your work. And once it’s done right, you won’t have to think about it again for years.
🎨 Stain or No Stain?
Up to you.
If the wood’s already good-looking—like walnut or oak—you might not need stain at all. Just oil or clear coat it and let the grain shine.
But if you’re working with pine or fir? That stuff looks a little bland untreated. Plus, it blotches like crazy when stained unless you prep it first.
Use a pre-stain conditioner. I used to think it was snake oil. Then I stained pine without it and got tiger stripes all over. Never made that mistake again.
Polyurethane: Use it when you want something tough. It dries hard. Resists scratches. Kinda plasticky if you go too thick, but great for high-wear pieces.
Oil Finish (like tung or Danish oil): Soaks into the wood. Brings out the grain. Not as tough, but feels more natural.
I’ll use oil for showpiece beds—stuff I want to feel warm. Poly for anything that’s gonna take abuse.
A rookie mistake I made once: I finished the top, sides, headboard, footboard… looked great. But I skipped the bottom.
Bad move.
Moisture sneaks in from all angles. Even if it’s just floor-level humidity, over time, it warps your base. Now, I always do at least one coat on the parts you don’t see.
🖌️ Quick Finish Tips
Use a foam brush for even coats—cheap, easy, toss it when you’re done.
Always sand between coats. Light grit. Just enough to knock down the grain.
Don’t rush drying. That last coat? Let it sit for 48 hours if you can. It’s worth it.


")
")
")
")
