Beginner-friendly instructions, real-world tips, and the tools I actually use.
Installing door trim looks simple from a distance—just a little molding around the doorway, right? But if you’ve ever tried to get tight corners, straight reveals, and clean caulk lines, you know it’s much more of an art than it seems. The good news: once you understand the sequence and a few small techniques, door trim becomes one of the most satisfying DIY upgrades you can do in a home.
Over the years, I’ve installed trim in houses built in the 1920s and in brand-new construction. Each time, the same rule applies: slow down at the measuring and cutting stage, and everything else becomes easy.
This guide walks you through exactly how to install door trim—start to finish—using the same approach I use in my own projects.
⭐ What You Need to Install Door Trim
Here’s the complete tool list I rely on. These are all beginner-friendly, and you can get any of them on Amazon (great place to plug your affiliate picks):
Flat, clean, and perfect for updated interiors. Pairs well with shaker doors.
2. Craftsman
Thicker headers, square lines, wider sideboards—beautiful in bungalows.
3. Colonial
Rounded, traditional, slightly more decorative.
4. PVC or composite
Best for bathrooms or damp areas—won’t warp or swell.
5. MDF
Cheapest option and smooth for painting, but dents easily.
Pro tip: If your house has uneven or wavy walls (old drywall or plaster), wood trim (pine or poplar) is easier to work with because you can flex or plane it slightly to fit better than MDF.
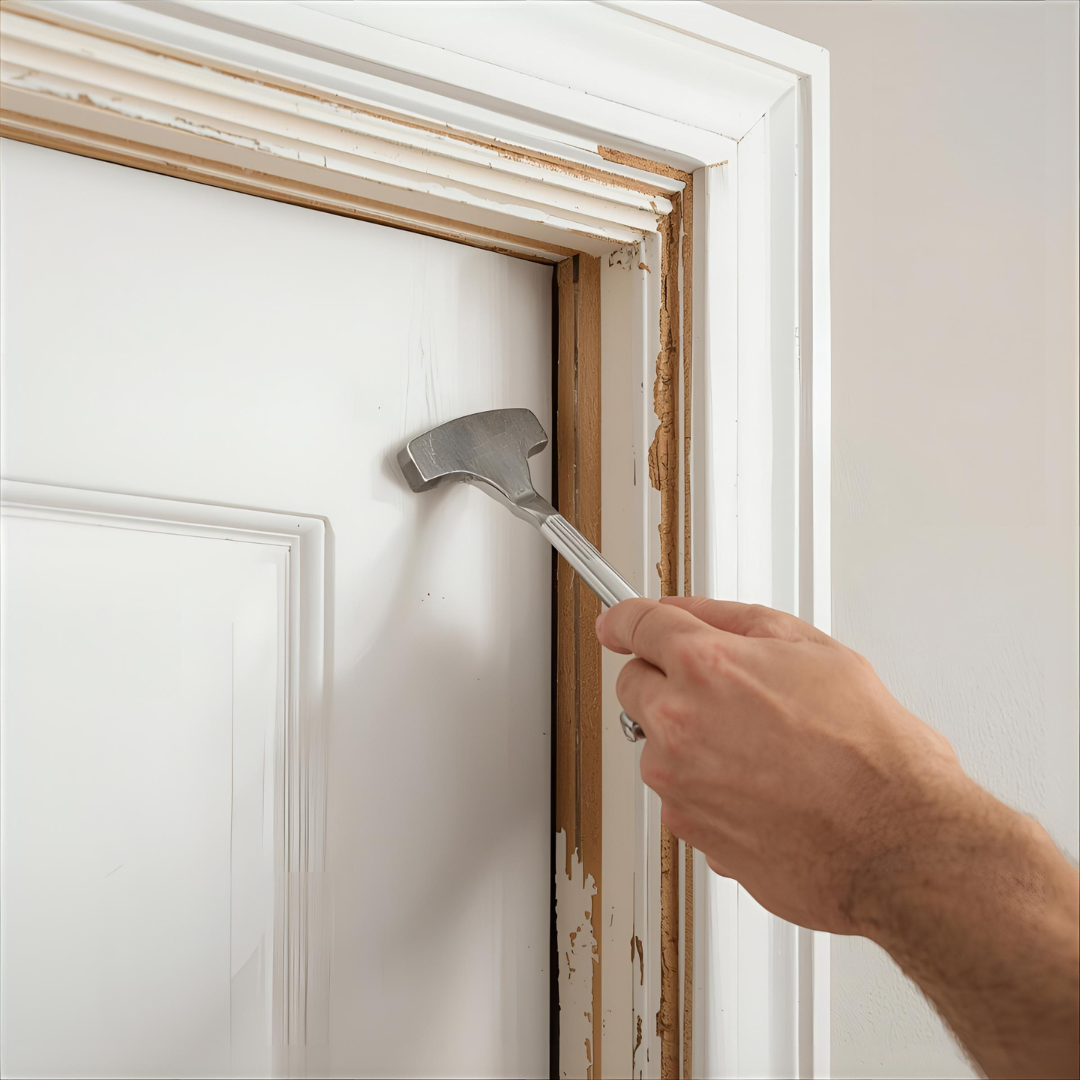
Step 1: Remove the Old Door Trim (If Needed)
If you’re replacing existing trim, use a utility knife to score the paint line where the trim meets the wall. This prevents peeling or tearing.
Then gently pry off the trim using a thin pry bar, working from bottom to top to avoid splitting the wood or tearing the drywall.
🛠️ What to watch for:
Look for old finishing nails—pull them through the back of the trim instead of hammering them out.
Make sure there’s no hidden caulk still bonding the trim to the wall.
Step 2: Measure the Reveal
The “reveal” is that little gap (usually ⅛ inch) between the door jamb and the trim. This creates a shadow line, making the door look clean and balanced.
How I set the reveal:
Measure ⅛ inch from the inside of the jamb.
Mark it lightly with a pencil.
Use a combo square or a scrap of the trim itself as a gauge.
Do this all the way around the door. These marks guide where your trim will sit.
Step 3: Cut the Side Trim Boards (Legs)
Each side piece gets a 45° miter cut at the top and a square cut at the bottom.
How to measure:
Hook your tape to the floor.
Measure up to your reveal mark at the top of the jamb.
Add ⅛ inch for safety—it’s easier to trim off a hair later than add length.
How to cut:
Make the bottom cut straight.
Make the top cut 45° inward, so it pairs with the header piece.
Pro tip: If your floor is uneven (common!), cut each leg board separately—never assume both sides measure the same.
Step 4: Cut the Top Trim Piece (Header)
Once both sides are cut and dry-fit in place, measure the exact distance between the two miters.
How to measure correctly:
Place both sideboards temporarily (don’t nail yet).
Measure from miter tip to miter tip.
Transfer that measurement to your header trim.
Cut both ends at 45° inward, forming a triangle shape.
This piece is what makes the corners look seamless.
Step 5: Nail the Trim in Place
This is where everything comes together.
How I nail door trim:
Start with one nail near the top of one leg piece to “hang” it on the wall.
Use your reveal marks to line it up perfectly.
Add more nails down the side, every 10–12 inches.
Then nail on the opposite leg.
Finally, place the header piece on top and nail it in.
Nail recommendation:
Use 1 ½” or 2” brad nails so they sink into the jamb, not just drywall.
Tip: If a wall bows inward or outward, use thin shims behind trim to straighten it visually.
Step 6: Fill Nail Holes and Sand
Once the trim is installed, fill all nail holes with wood filler or spackle.
After it dries:
Sand lightly with a 120–220 grit sponge.
Wipe off dust.
If you’re painting, don’t skip this—paint magnifies imperfections.
Step 7: Caulk the Gaps
Caulking is what makes trim look professional.
Run a thin bead of paintable white caulk:
along the wall-trim seam
along the header joint
inside miter corners
Then smooth it with a damp finger or a caulk tool.
If you see small gaps between the trim and the wall, this is normal—every home has it. Caulk hides everything.
Step 8: Prime and Paint
If you’re using pine or MDF trim, always prime first. Paint sticks better and looks smoother.
Paint recommendations:
Semi-gloss for a durable, wipeable finish
Satin for a softer look
Oil-based primer if using MDF (it drinks water-based primer)
My typical finish combo:
1 coat primer
2 coats of paint
Use a high-quality angled trim brush so brush strokes stay clean.
More Helpful Guides for Your Door Trim Project
As you get deeper into installing door trim, you’ll start noticing how these more minor details connect to other projects around the house. For instance, if your trim pieces aren’t lining up cleanly, the issue can start earlier—like not getting a perfectly straight rip when cutting plywood. If that sounds familiar, this guide on How to Cut Plywood Straight might save you a lot of frustration on future projects.
Choosing the right trim material also gets easier once you understand the pros and cons of different woods. If you’re unsure whether to go with pine, poplar, or MDF, take a look before you buy anything.
And when you’re working with tiny returns or mitered corners, the type of adhesive really matters. Some pieces stick better with construction adhesive, while others hold better with PVA. This breakdown—Liquid Nails vs Wood Glue—covers exactly when to use which one.
Door trim projects also blend nicely with bigger upgrades. For example, once the doorway looks clean and square, many people move on to accent walls or full-room makeovers. If shiplap is on your list, the tutorial on How to Install Shiplap Walls pairs perfectly with newly installed trim.
And if you’re updating floors around your doorways, you’ll definitely want smooth transitions. This guide on How to Prepare a Plywood Subfloor for Tile walks you through the prep work that makes your door trim look intentional instead of “added afterward.”
⭐ Troubleshooting: Common Door Trim Problems
Here are the issues I see most often—and how I fix them:
1. Gaps at the miters
Usually caused by imperfect angle cuts or wall curvature.
Recut the miters slightly.
Or caulk + wood filler (surprisingly effective).
2. Trim won’t sit flat
Walls or jambs are uneven.
Add thin shims behind the trim.
Then caulk the edges.
3. Nail holes tear the trim
This happens with MDF.
Use 18-gauge nails (not 16).
Lower the pressure on your compressor.
4. Header isn’t level
Always level the header first—then adjust the side pieces.
How Long Does It Take to Install Door Trim?
For beginners: 1–2 hours per doorway For experienced DIYers: 30–45 minutes
Painting adds extra drying time.
⭐ Cost to Install Door Trim (DIY vs Hiring Out)
DIY Costs
Trim boards: $20–$60
Nails: $10
Caulk + filler: $8
Paint: $20–$40
Tools (if needed): $100–$250
Hiring a pro:
$150–$300 per door (depending on style and complexity)
Doing it yourself saves a massive amount—and you can reuse the tools for baseboards, window trim, and future remodels.
⭐ FAQ: Questions People Actually Ask About Installing Door Trim
1. Do I absolutely need a miter saw for this?
Short answer: no. Longer answer: You’ll probably want one. I tried doing my first doorway with a hand saw and one of those plastic miter boxes, and the corners looked like two pieces of trim that got into an argument. A basic miter saw—not even a fancy one—makes the whole thing way less frustrating.
2. Should the trim go up before or after I paint the room?
Most of the time, I put the trim up after painting the walls. It keeps the edges cleaner, and I’m not trying to cut in around old trim. But if the walls are already painted and you’re just updating the casing, it’s not a big deal—go slow when removing the old stuff so you don’t peel off chunks of paint.
3. What’s the “best” material for door trim?
There isn’t one perfect choice. I like poplar because it paints really nicely and doesn’t dent every time you breathe near it. Pine is fine, but softer. MDF is cheap, smooth, and… also easy to mess up if you hit it with a nail gun at the wrong angle. PVC is basically for rooms where water is your enemy (bathrooms, laundry rooms, that sort of thing).
4. My miters never close perfectly—what am I doing wrong?
Honestly, probably nothing. Doors and walls aren’t always square, and sometimes you’re fighting the house, not your saw. I always test-fit the pieces before nailing anything. If there’s a tiny gap, I adjust the angle by a hair. If the wall is crooked, I stop worrying and fix it with filler or caulk later. That’s just real-life carpentry.
5. Do I really need to caulk around the trim?
Suppose you want it to look “finished,” then yes. Without caulk, you’ll see little shadows and cracks that make the job look halfway done. A small bead—just a small one—around the inside edge and at the corners makes a huge difference. Think of caulk as the magic eraser in trim work.
6. What if my walls aren’t straight? Can I still do this?
Yep. Most walls wander a bit. Sometimes a lot. You shim behind the trim where it needs a tiny push, or tilt the piece a little until it looks straight to the eye. After paint and caulk, nobody can tell. Crooked walls are… part of the fun.
7. How long should one door take if I’m learning as I go?
Your first door might take longer than you expect—maybe an hour, maybe two if you’re being picky. Mine took forever because I kept remeasuring everything like the tape was lying to me. It gets faster, though. By the third door, you find your rhythm and stop second-guessing every move.
⭐ Conclusion: Door Trim Is One of the Best DIY Upgrades
I’ll be honest — the first time I put new trim around a door, I wasn’t expecting much. I figured it would look a little cleaner, and that was about it. But after I tapped in the last nail, stepped back, and really looked at it, the difference almost felt like I had replaced the whole doorway. Even the room looked straighter somehow. It’s incredible how something that thin can frame a space and make it feel more intentional.
I also learned pretty quickly that trim work isn’t one of those jobs where you have to be a master carpenter. You get better as you go. My first door had a tiny gap at one of the miters that annoyed me for a week. I kept staring at it every time I walked by. Next door, I took an extra minute to double-check the angle and got it right. By the third door, I wasn’t overthinking any of it — measure, cut, test fit, nail, done. It becomes almost calming once you find your pace.
What surprised me the most was how motivating it is. You finish one doorway and immediately start eyeing the next one, and then the hallway, and then every room you pass through. It’s one of those projects where you actually see the improvement right away, not months later.
If you’ve never installed door trim before, try one. Don’t worry about doing the whole house. One door will show you exactly what’s possible, and—at least in my experience—you’ll end up wanting to redo every doorway you’ve got.
Finish Carpentry Trim: 14 Easy DIY Projects by Admin August 1, 2025 DIY Finish carpentry trim is one of the most impactful and affordable DIY upgrades you can make to your home. Whether you’re finishing a newly built…


")

")

")