Bed is a favorite place for many. There’s nothing like spreading out on the bed after a long hard day and just relaxing. Those few minutes of quiet relaxation, before drifting off to sleep, can be the nicest part of the day. That good night’s sleep is also a very important part of preparing us for the next day. That’s where having the right mattress, with the right support system under it is so important.
Going back a few decades, most beds consisted of a mattress and box springs, sitting on some sort of frame. But things have changed since then. New materials, especially some of the newer foam rubber materials, combined with new ways of constructing mattresses have resulted in thicker mattresses with a “pillow top,” have made the need for box springs unnecessary. Today, if you try to buy a box springs, you’ll get something that looks like a box springs, but there aren’t any springs, it’s just a hollow box, providing support for the mattress.
Basically, the box springs are no longer necessary with these modern mattresses. This has led to new bed designs, including lower, platform beds and beds built on an underbed dresser. But perhaps the biggest change has been the common use of the “Bunkie board” (sometimes spelled “Bunky board”), instead of a box spring.
The name “Bunkie board” apparently comes from the idea that this sort of support was used for the mattresses on bunk beds, long before it was used for other beds. “Bunkie” is merely a shortening of the name.
One thing to be aware of is that if someone were to put a modern mattress on an old box springs (from back when they really had springs in them, it could void the warranty. Another thing that can void the warranty is putting the mattress directly on slats, without support across the full length and breadth of the mattress.
Commercial Bunkie Boards
The solution that the furniture industry has come up with is what’s known as the Bunkie Board. This is a flat object, between one and three inches thick, which provides a foundation or support for the mattress to sit on. Unlike box springs, it doesn’t flex, as that function is no longer needed by these newer mattresses. All it does is provide support.
New beds, or more properly bed bases (what we used to call frames) will have a Bunkie board built into them. That may be a solid platform that runs across the length and width of the bed or it could be a framework of slats which cover more than 50% of the total surface. In either case, it is providing consistent, even support to the mattress.
It’s also possible to buy Bunkie boards separately, which can either be put on top of an existing box springs, allowing for a high bed or use alone, without a box or box springs, allowing for a low bed, depending on what is preferred.
Is there an Advantage of Buying a Commercial Bunkie Board?
Perusing through the web, it seems that people believe that a Bunkie board is stronger than plywood. All I can say to that is that they’re either comparing it to thin plywood or they don’t know how strong plywood actually is. Assuming that the right type and thickness of plywood is used, it will be plenty strong enough.
But that’s not the only complaint which people make about plywood; there are two others. One is that bare plywood isn’t as attractive as a fabric covered Bunkie board and the other is that bare plywood can have splinters along the edges, which can damage the mattress. Both of those complaints can be solved by the simple expedient of fabric coating a plywood Bunkie board. With that in mind, it really doesn’t make any sense to buy a commercially manufactured Bunkie board, when a stronger, better one can be made in the workshop.
Making a Bunkie Board Out of Plywood
It’s not hard to make your own Bunkie board out of plywood, as the basic design of a Bunkie board is rather simple. The one thing to be cautious about is splinters, as they can get into the mattress, causing premature wear. But there are ways of dealing with that. There are actually several different ways of making a Bunkie board out of plywood; we’ll explore a few.
The first and probably most important decision to make is what plywood material to use for the Bunkie board. The general term “plywood” no longer just refers to traditional plywood, but to all engineered sheet wood products, as well as a wide variety of wood products which are made of boded layers of wood veneer, laid perpendicular to each other.
Is it possible to use these other plywood products for a Bunkie board? The simple answer is yes. But neither particle board, OSB or MDF, the options people are most likely to select, are going to be as strong as plywood will be. To make up for that, it would be necessary to construct a thicker Bunkie board, with multiple layers of those plywood materials.
On the other hand, there is no reason to select an expensive plywood product, such as hardwood plywood, applewood, or marine-grade plywood. The added benefits of these materials won’t matter in this application. Normal construction grade, softwood plywood is sufficient to the task.
Regardless of the construction method used, the Bunkie board must be made to fit the mattress. standard mattress sizes are:
Because twin and twin XL beds are smaller than a single sheet of plywood, they can be cut out of a single sheet, without having to deal with the issue of joining two sheets of plywood together. All that’s needed is to cut the dimensions or have the lumberyard do it for you on their panel saw, and then finish the board. 1/2” or 5/8” CDX plywood should be used for this.
Construction Method 2 – Overlay Panel
Once we get larger than a standard size 48” x 96” sheet of plywood, all other size Bunkie boards must be made out of more than one sheet of material. If the goal is to have a solid Bunkie board, without any seam, then it will be necessary to construct the Bunkie board out of overlapping layers of material, so that the seam is offset between the two layers, giving the necessary support. This is the strongest form of homemade Bunkie board that can be built.
Bunkie board – overlaid panel
Since two layers of plywood are being used for this construction, 3/8” thick plywood is sufficient. While thicker plywood can be used, it is not necessary.
Construction Method 3 – Hinged Panel
Another way to handle a wider Bunkie board, without having to make a full-sized panel, which might be difficult to move in and out of rooms, is to make a folding Bunkie board, hinged in the middle. Such a board would consist of two equal sized halves, hinged on the top side, in the middle, with a piano hinge. It would be best to use a piano hinge, rather than door hinges, because they don’t protrude as much, provide more points of connection to prevent breakage, and provide support across the entire length of the board.
Construction Method 4 – Dual Panel
Of course, those two panels can be made, without having to hinge them, keeping them as separate panels. This would be much like the two box springs used with a king sized bed. Since a 76” x 80” stiff box springs can’t fit through the average doorway, separate box springs are used for the two sides. The same can be done with Bunkie boards.
In this case, 5/8” to 3/4” plywood would be best, although it would be possible to use ½” plywood, if there is some sort of center support. Many bed frames designed for use with a Bunkie board will already have this built into the frame. If there isn’t one, a simple support of almost any type could be used, as long as the edges of both boards would sit on it.
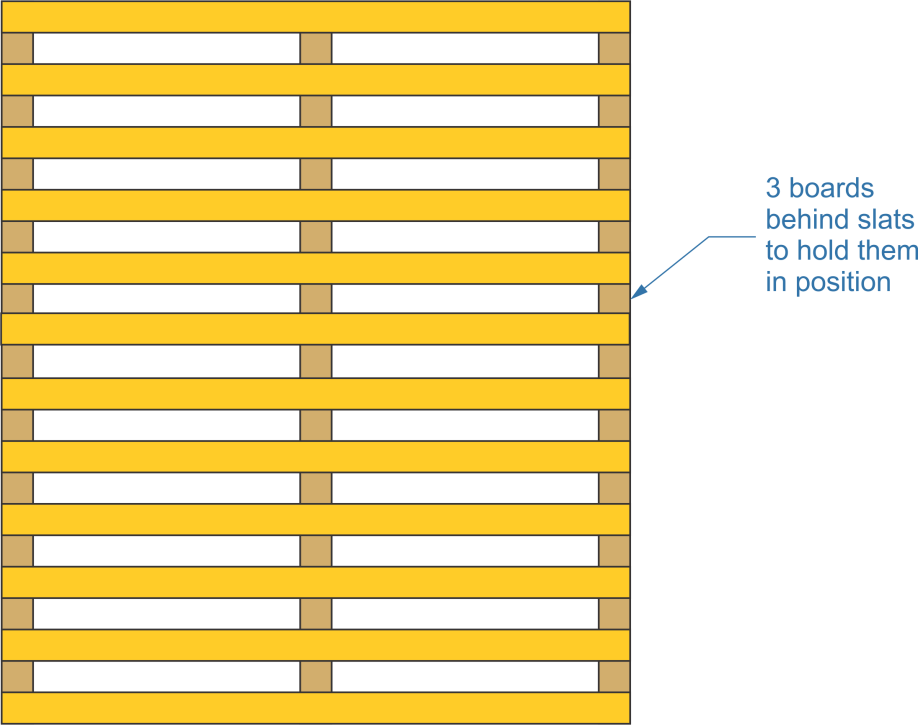
Construction Method 5 – Slatted
Many commercially manufactured Bunkie boards are actually not solid, but made of wood slats. This can be done with plywood as well, for less than buying that many pieces of 1”x 3” or 1”x 4”.
Bunkie board – slatted
This can be done by ripping the plywood in 3” or 4” strips, then gluing and nailing it together, forming the same sort of framework as is made for these commercial boards. The plywood should be at least ½” thick, but ¾” thick, while it can be used, will be rather heavy.
Finishing the Bunkie Board
With the basic Bunkie board assembled, it would be a good idea to go over the top surface and fill any knotholesholes/how-to-drill-straight-hole/holes-without-electric-drill or cracks in the veneer. Those sharp edges will wear on the fabric cover of the Bunkie board, eventually causing holes. Once the putty is dry, sand the entire surface smooth, as well as the edges.
For a little better finish, round over the edges and corners of the Bunkie board with a ¼” roundover bit in a router. Eliminating that sharp edge will help eliminate wear on the cloth, eventually leading to failure.
Some people choose to put a layer of quilt batting on the Bunkie board, before the cloth covering. This is an especially good idea for a slatted Bunkie board, where there are more edges and corners exposed. The quilt batting can be attached with a quality upholstery spray (adhesive). If quilt batting is not used, quilted upholstery fabric is a good option.
Upholstery fabric should be attached to both sides of the Bunkie board, back side first. This fabric is usually available in much wider bolts than fabric used for making clothing, so there shouldn’t be any need to sew the fabric together, making seams. Rather, cut a piece of upholstery fabric large enough to cover the back or bottom side of the Bunkie board and glue it in place with the upholstery spray. Cut the edges of the fabric flush with the edges of the board.
Lay down another piece of upholstery fabric, face side down, on the floor or work area, which is at least 10” longer and 10” wider than the Bunkie board. spray the back side of the fabric with upholstery adhesive and then lay the Bunkie board on the fabric, top side down, centering it.
Use a staple gun to attach the edges of the fabric onto the back or bottom of the Bunkie board, overlapping the edge of the fabric already glued there. When stapling, fold the edge of the fabric over one inch, so that there isn’t a cut edge exposed, which could begin to unravel. A hammer might be needed to drive in staples which don’t go in all the way when stapling them.
Related Posts:
Particle Board vs. Plywood: What is the Difference? by Admin June 5, 2023 Grades The term "plywood" applies only to solid plywood – an engineered wood product made of wood veneers glued together with the wood in cross-grain texture,…
How to Install Foam Board Insulation in Attic by Admin May 19, 2021 Installing Attic insulation is critical to keeping a home warm in the winter and cool in the summer. More heat radiates out of the house through…
How to Oil a Cutting Board by Admin June 3, 2021 Finish Cutting boards are a popular project amongst woodworkers, allowing them an opportunity to express their creativity on a fairly simple project, which is still extremely…