State pride is a variable thing. The residents of some states are adamantly proud of the state they live in, while the residents of other states seem almost carefree about it. In either case, a wooden state cutout can be a nice addition to a home’s décor, especially in a more casual part of the house, like a den or family room. Of course, one can go farther than just the state and make a national cutout out of wood as well, to show their patriotism.
State cutouts can be made in pretty much any size and of pretty much any sort of wood. Commercially manufactured ones are usually made of ¼” thick plywood, while homemade ones are most commonly made of scrappine from other projects. Reclaimed wood has become extremely popular as a material for making wooden state cutouts, providing a rustic look and keeping the cost of the project just about down to zero.
The Pattern
Regardless of what material is going to be used to make the wooden state cutout, it all starts out with a pattern. Fortunately, there are a large assortment of state outlines and silhouettes available online, which can be used for free. Choose one that is just an outline, if possible; but what’s even more important than that is that the picture used be of high resolution. The larger the picture, as measured in pixels, the cleaner and neater an outline it will provide. It’s also better to use a vector outline, rather than a bitmap, if one is available.
Stencil Cutter
With the picture selected, the next trick is to turn it into a pattern. Some have suggested using an electric stencil cutter. The same machine is more commonly used for cutting out self-adhesive vinyl logos and words for applying to gifts, signage and even putting sayings on the wall. Special stencil material can be bought for these machines, which has a low-tack adhesive, allowing the stencil to be removed after cutting.
But few of the woodworkers I’ve seen have one of those machines. So we need to rely on other methods. Of course, if only a small wooden state cutout is being made, it can be printed right off the computer. It’s best to use cover stock, rather than normal printer paper, so that the stencil will be stiff.
Pieced-together Printed Pattern
For larger wooden state cutouts it may be necessary to print the pattern on several pages and then tape them together. Some graphics programs, like Corel Draw and Microsoft Publisher make this easy to do, as they have an option for “tiling” the print in full size, with overlap. A few hints about using this option:
Start by creating a page that is the overall size desired and then create the outline in the full-size that it should be printed out as.
If the state outline has long straight sides, like the northern and southern borders of Tennessee, add some irregularly spaced diagonal lines, cross-hatching the inside of the state to help determine where the pieces actually overlap. Otherwise, it can be impossible to figure out the exact height or length to make the proportions of the state come out right when putting the pieces together.
Make sure the line thickness is wide enough that it will be easy to see when printed.
Set the tile overlap larger than the 0.25” that is usually the default setting. A 1” overlap makes it easier to align the pieces.
Make sure that the tiling option is checked in the print window, as well as the check box to print full-size.
Check the image in the print preview, to see that it is tiling. If the image seems to be wasting a lot of paper, check to see if the program allows for adjusting the image’s position on the page or adjusting the orientation (landscape or portrait) of the paper. Selecting for the image to be printed on the upper left-hand corner of the page can help to eliminate wasted paper in some cases.
When piecing the various pages together, be sure to cut off the blank margin around the edges of sheets that overlap others. That way, there won’t be any blank spots in the outline.
It is easiest to align the sheets if a window is used as a light box, allowing the image of the bottom sheet to be visible through the top one.
Once in position, tape the sheets together, then turn them over to tape them from the back side as well.
Care should be taken in cutting out the pattern. Any sloppiness in the cutting will translate directly to the wood, making the outline there sloppy as well. Painstaking care must be taken in cutting the outline exactly. A small pair of sharp scissors, like those used for cutting hair or sewing can help tremendously in getting a clean, neat cut.
Video Projector or Television Set
One final way to make a large pattern is to use either a television set or a video projector. With the television, project the image onto the screen and cover the screen with white butcher paper, taping it in place, to trace the pattern onto. Take care when tracing not to use a lot of pressure, so as to avoid damaging the screen. Don’t use a permanent marker, as that might bleed through and stain the screen.
If a video projector is being used, tape butcher paper, poster board or clean cardboard to the wall and project the image onto it from the projector. The image can easily be traced and then cut out.
Making a Large Enough Board
Small state cutouts can be made out of scrap boards, assuming that the scrap pieces of boards are large enough for the state cutout to fit onto it. But what if that’s not available? One option that’s not all that popular is to use plywood. But even if quality plywood is used, chances are that there will be voids in the edges, which don’t look all that great.
Most people use multiple boards to make their state cutouts, whether those are new boards or recycled ones. In either case, the same methods can be used to connect those boards together. While thinner boards are more common, the effect given by making the state cutout out of thicker boards is impressive, giving a 3D effect.
Screwing Boards to Battens
The easier method for attaching boards together is to nail or screw them to battens. For this method, two or sometimes three structural boards are set behind those which make up the design, perpendicular to the face boards. In most cases, the battens are run vertically, while the face boards are run horizontally.
This method works extremely well with reclaimed wood, which may not be of even thicknesses and may have uneven edges, making it hard to join them together. Any size board can be used and it doesn’t matter if they are all the same length, just as long as they are long enough for the pattern to fit on. Make sure that the hardware used to attach the face boards to the battens is within what will be the outline of the state.
When using battens, it’s a good idea to glue the face boards to the battens, as well as nailing or screw them on. With recycled boards, using regular box nails or drywall screws works nicely, as the hardware helps with defining the wood as being repurposed wood.
There are other things that can be done to accentuate repurposed wood. One of those is to run some pieces through a planer, upside-down, so that material is removed from the back side, making the boards of different thicknesses intentionally as a design element. While doing that, finishing the boards differently, with some stained different wood tones and others burnt to bring out the grain would add to the effect.
It is harder to edge glue boards together, such as what would be done for making a tabletop, but it makes for a neater finished project. Edge gluing is not difficult, if one has enough clamps available. A couple of pairs of cauls can be useful as well, as they will help keep the surface of the material level and from bowing under the pressure of the clamps.
Before trying to edge glue boards together, it’s a good idea to run them through a jointer, making sure that the edges are straight and perpendicular to the face. That will help prevent bowing and any gaps between the boards.
Lay out the board and dry fit them together, making sure that they do fit and that the clamp are adequate for holding the boards. clamping force radiates out from the point of contact at about a 45 degree angle, so there should be enough clamps to ensure that the seams closest to the clamp faces will receive pressure across the entire seam. If there are not enough clamps available, adding additional boards outside the glue-up can help spread the pressure farther.
The cauls are placed above and below the boards being edge glued, so that one half of a caul set is directly on the workbench and the other half of the set is right over it, with the boards being edge-glued in-between. Clamps should be applied to the cauls, pulling them together at both ends and helping them to apply force to the wood being glued, ensuring that all the boards are flat. Please note that the cauls should be coated in wax, so that glue doesn’t stick to them.
Remove the clamp and apply glue to the mating surfaces, covering the surface entirely. Too much glue is actually better than not enough, as the excess can squeeze out. Set all the boards in place, clamp them, but don’t tighten the clamps all the way, then apply the clamps to the cauls. With those clamps tightened, the main clamps can be tightened down the rest of the way.
Wood being glued together should be clamped for 24 hours to ensure that the glue has sufficient time to dry.
Cutting out the State Outline
With the boards attached together, it’s time to transfer the pattern to the boards and cut them out. To transfer the pattern, simply trace around the cutout pattern with a pencil. This is easier if the pattern was made out of cover stock, but can still be done if ordinary printer paper was used; it just takes more care to make sure the pattern edge doesn’t lift, fold or move.
The outline of the state can be cut out with a variety of different tools, depending on what’s available:
Scroll Saw – the best tool to use where there are a lot of curves, such as where one state line is a meandering river.
Band saw – can work just as well as a scroll saw and probably cut faster, if the curves on the outline aren’t overly severe for the blade. A narrow blade is better for cutting tight curves.
Jigsaw – essentially a handheld version of a scroll saw. The big problem with using a jigsaw is avoiding any sort of sideways pressure on the blade, which could cause it to bend. Once bent, all the cuts will be at an angle.
Rotozip – the Rotozip tool is a rotary cutting tool, similar to but smaller than a router with a straight bit. It allows for very tight, intricate outlines.
Regardless of which tool is used for cutting out the outline, chances are that the outline will need sanding to smooth out blade marks, errors where the blade strayed away from the line and rough spots in the cutting. An oscillating spindle sander is ideal for this. If one of those is not available, then using a drum sander in a drill press or even in a handheld drill will work.
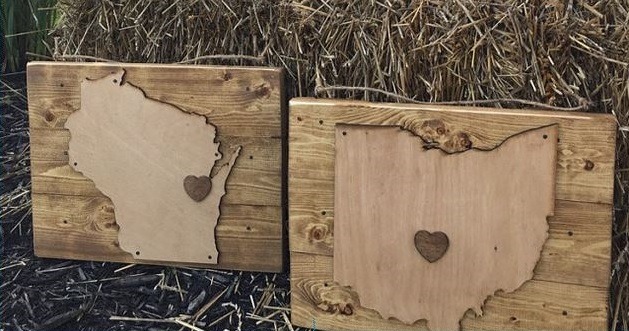
It’s not really all that common, but some people like to mount their state cutout onto a square or rectangular background. This doesn’t make much sense for a state like Colorado, where the state is a rectangle, but it makes a lot of sense for states like Alaska and Florida, where part of the state is a string of islands. While the islands can be left off, that might not be desirable.
In order to mount the state cutout to a background, the background can be made by either of the methods mentioned above, using battens or edge-gluing. The cutout itself can also be made with either method. The one difference is that in the case of battens, the background will be the battens for the face boards. So even if the boards are attached temporarily to battens for cutting out, they will need to be removed and attached to the background.
It’s easier to finish the background before attaching the cutout. hardware can either be attached through the front or the back. Doing it though the back is harder, as it is easy to misalign the state cutout; but it carries the advantage of hiding the nails or screw used to hold everything together.
Different people choose to finish their state cutouts in different ways. As I mentioned earlier, repurposed wood can be finished in a variety of ways, using a combination of these in the same cutout. If different finishing methods are going to be used on different boards, they should all be finished, except for the topcoat, before assembly.
Another excellent effect is to use various different types of wood for an edge-glued state cutout, taking advantage of the different colors and grain patterns in the wood and using those as design elements.
Still another option is to paint or stain the cutout to represent the state flag. This is easier to do with some state’s flags than others, due to the shape of the state and the complexity of the flag. The New Jersey state flag, for example, is rather complex and the state is small; so it would be hard to paint that on the state, unless the woodworker is an accomplished artist as well. On the other hand, simpler flag designs, like those of New Mexico, Alabama, Colorado, Alaska and Texas are easy to paint onto their state’s cutouts.
Related Posts:
Wooden Garden Troughs by Admin May 20, 2021 DIY Adding green growing things to any living space just makes it more livable. Interior decorators and workplace designers figured this out long ago. That’s why…
How to Clean a Wooden Cutting Board by Admin June 4, 2021 Finish There’s a lot of false information around about wood cutting boards, mostly due to restaurants not using them. This has led people to think that…
How to Make Wooden Gears by Admin June 22, 2021 DIY Wooden gears and sprockets have been in use for millennia. While the actual history of early gears is rather unclear, they were first written about…