When the word “rings” is used, it can spark a lot of different thoughts in people’s minds; mostly because there are a lot of different things that the word rings can refer to, from hardware to wedding rings. But when we apply the word rings to jewelry, the ideas begin narrowing down. While there are lots of different styles of rings out there, they’re pretty much all made of precious metals, or at least something that is pretending to be precious metals. That doesn’t mean they have to be though; rings can be made out of wood or just about any other material one can think of.
Wood rings are actually a thing now, with specialty businesses cropping up and people making them for sale on Etsy. As with most things wood, the real beauty in a wood ring is the wood itself, which can be much more visually interesting than silver or gold, while also being a less expensive material to work with. Wood provides a huge variety of color and patterns, both here and in whatever other project we do. The really nice thing is that it is a material we are already working with, so we don’t necessarily need a whole new set of tools to make rings, although there might be a couple of specialty items we might want to buy. But for those who don’t have the budget for new tools, there are ways of making wooden rings with almost no tools whatsoever.
This is a great project for using small pieces of leftover exotic wood or exotic wood veneer. In a sense, we could call a wooden ring the ultimate project for using up our smallest scraps. Even making pens requires larger wood blanks than making rings. So for the parsimonious woodworker who has been looking for something to do with all those tiny scraps that they don’t want to just throw away, making rings might just be the thing.
While the diameter of rings might vary, they shouldn’t be thick. Two millimeters is considered normal thickness for a ring, comfortable for most people. When the ring gets to 2.5mm thick, it starts getting uncomfortable. The only part of the ring that should be thicker than 2mm is the face of the ring. The width of a woman’s ring can range from 1.6mm up to 4mm, while a man’s ring can range up to 7mm and is rarely narrower than 4mm. If a wider face is desired (up to about 20mm), then it is typical to narrow the band down in the back, while leaving the face wider.
As with just about anything else in woodworking, there are multiple ways of making wooden rings. What method a particular woodworker selects will be driven more by the tools they have available to them, rather than any other reason. Chances are that one of these methods will work for everyone, regardless of what tools they have in their workshop.
Pretty much any hardwood can be used for making rings, but the denser the hardwood the better. Wood species which are not as dense are much more likely to break in the process of cutting out the ring.
Speaking of Tools
While it is possible to make wooden rings without having to buy any specialty tools, there are a few tools that might be good to buy if wooden rings are going to become part of the normal project repertoire.
Ring Size Gauges – These are a set of rings in standard sizes, used to determine what size finger a person has, so that the ring can be made to fit their finger. Ring sizes are different for men and women, so a full set will usually look like two sets of rings.
Ring Sizing Mandrel – Normally used by jewelers to alter the size of a ring by stretching it, this is useful for measuring the size of a ring or the size of a hole cut into a block of wood that a ring will be made of.
Stepped Ring Mandrel – If a lot of rings are going to be made using veneer, this is a much more accurate way of making those rings to a particular size, rather than using sockets.
Small Saw – Scroll saw, coping saw, fret saw or jewelers saw for cutting out the shape of a ring and/or cutting it to the finished thickness.
Forstner Bits – While a relatively common woodworking item, I mention it here because they are the best way of starting to cut the hole in the ring. Spade bits will not provide as smooth a hole and can wander a bit.
Dremel of Flex-shaft with Drum Sander – Forstner bits only provide limited sizes for the rings. To get other sizes, it will be necessary to first drill a hole that’s smaller than the ring size and then open the hole up by sanding the inside of it. This is best done with a small drum sander, of the type that is sold by the Dremel Company. While this sander can be attached to a cordless drill, one of the advantages of working with the Dremel is that it is lighter and smaller, making it more maneuverable.
For the Lathe
One of the ways of making wooden rings is to turn them on the lathe. If this is going to be done, it obviously requires having some means of holding the ring blank. Wooden rings that are turned on the lathe are normally made on a mini-lathe, although it is possible to make them on a full-sized lathe as well, just as wooden pens can be made on a full-sized lathe.
Expanding Ring Mandrel – This is a mandrel that fits inside the hole drilled in the ring blank, holding it by applying pressure to the inside of the ring.
Lathe Chuck with Pin Jaws – This is more about the lathe jaws, than it is about the chuck itself. One can buy a lathe chuck that comes with pin jaws, but it is more common to buy pin jaws for an existing four-jaw chuck, as the jaws are removable. The name “pin jaws” refers to a set of jaws that is small; which is necessary to allow it to fit inside a ring.
Please note that either of these options is needed, not both. They are both intended to do the same thing.
Making a DIY Expanding Ring Mandrel
While the expanding ring mandrel mentioned above is for use on a lathe, it is not only useful on the lathe. As long as a drill press or even a hand drill is available, an expanding ring mandrel is useful for holding a ring, so that the outside of it can be worked on. This is especially important for sanding.
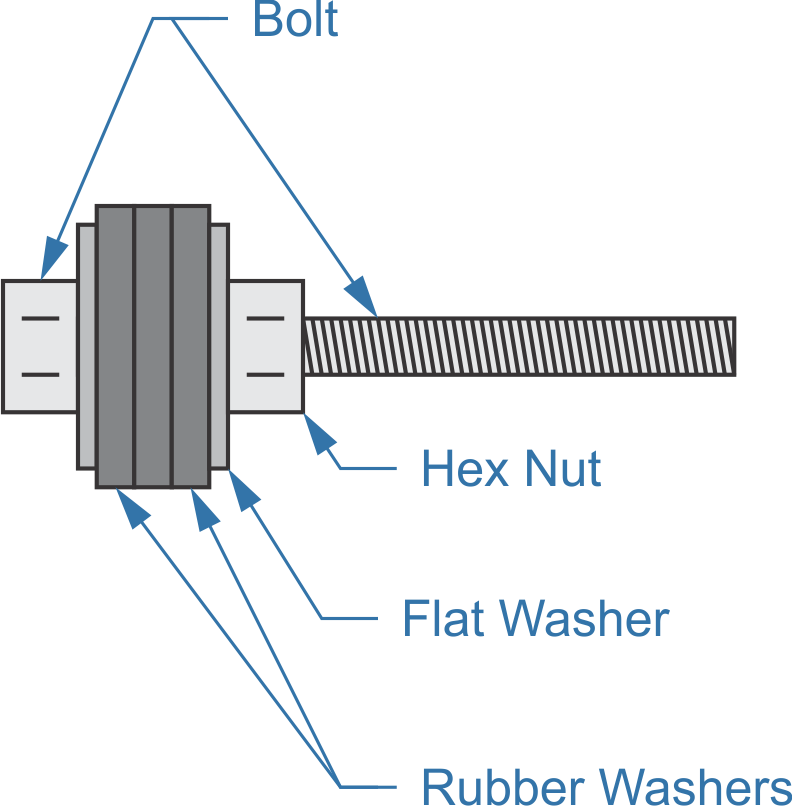
It is not necessary to spend a lot of money on an expanding ring mandrel, as one can be made of common hardware items. All that’s needed is a bolt, nut, pair of normal flat ashs and a couple of rubber washers. A wide variety of rubber washer sizes should be able to be found in the plumbing repair section of any home-improvement center.
The key to determining what size hardware is going to be used to make the mandrel is the two flat ashs. Those have to be small enough to fit inside the ring, while not being so small that they won’t provide the necessary support for the rubber washers. So pick the largest size flat washer that will fit within the size ring to be made and then buy the nut and bolt to fit it.
Expanding ring mandrel
As for the rubber ashs, they will need to fit snugly to the inside of the ring, when the nut is tightened. To get this will probably require buying washers that are a touch too big and then sanding them down to size. Ideally, they should just slip into the hole in the ring. Then when the nut is tightened, it will crush the rubber washers, causing them to expand and grip the inside of the ring. In order for this tightening action to occur, it is essential that the bolt have threads all the way up.
Size the mandrel to fit the ring size desired by assembling it and putting it in a drill or drill press, just barely tightening down the nut. It may be necessary to add a second nut, temporarily, to act as a jam nut. Then sand the outside of the rubber ashs on coarse sandpaper, checking the size frequently using a ring size gauge.
Please note that although this ring mandrel is adjustable, it probably won’t fit more than one or two ring sizes. It will be necessary to make one mandrel for every size wooden ring that will be made. But considering that the parts won’t cost much; that’s really not much of a problem.
Using a Ring Core
Not all wood rings are made over a metal core, but using a ring core provides a distinct advantage. The metal core (they are usually stainless steel) makes for a much stronger ring, helping it to last longer. Both metal and ceramic cores are readily available online and are usually listed as “ring cores for woodturning.” When using a core, the inside hole of the wood part of the ring must be made to fit the outer diameter of the core. Then the outside of the core is sanded and the wood is glued in place with either epoxy or CA glue.
The wood part of the ring and the core should be connected together as early as possible in the ring making process. That basically means as soon as the inside diameter of the ring has been formed. Installing the core will give added strength to the ring, helping prevent damage to the ring during the subsequent work.
Let me make it clear that while cores are mostly intended for making rings that are turned on the lathe, they can be used with any of the three methods we’re going to be discussing.
Making a Wooden Ring Using a Drill
For those making their first wooden ring, it usually makes more sense to start out making the ring with either a drill press or an electric hand drill (either cordless or corded). The drill press is easier, but for those who don’t have one, any drill will do.
One of the most important parts of making the ring is sequence. Both the inside and the outside need to be cut and both can be cut with the drill. But if they are not cut in the right order, alternative methods will have to be used.
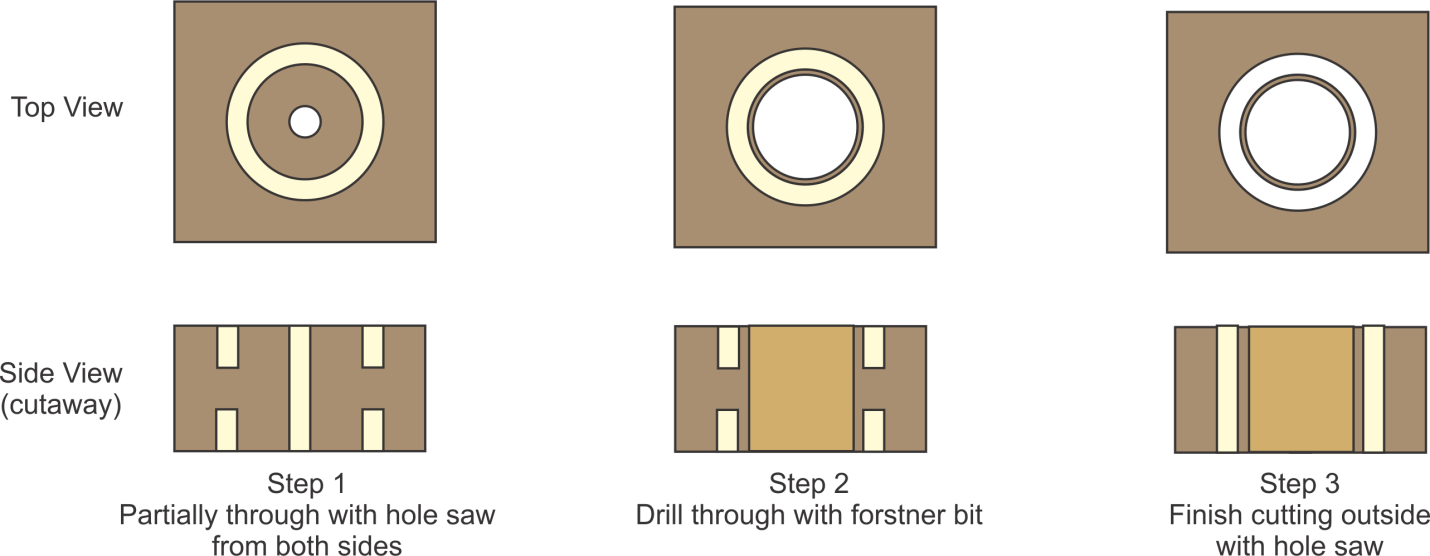
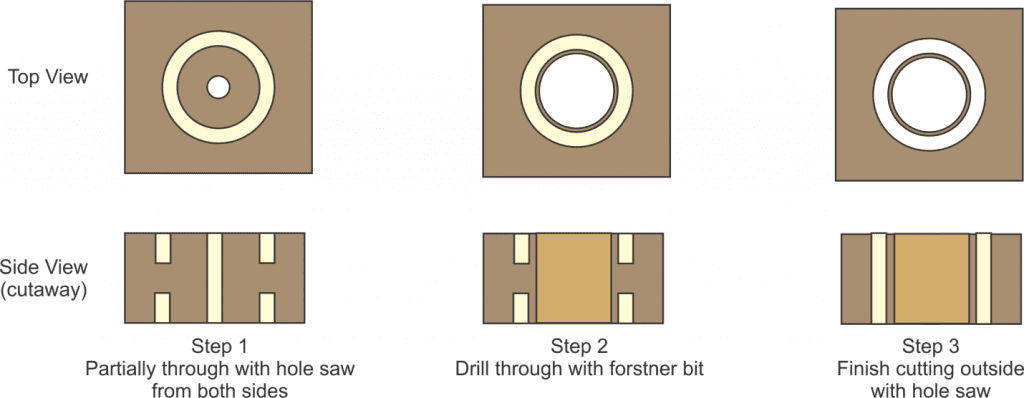
Drill cutting ring
As is shown in the series of diagrams above, the first step is to cut partially through with a hole saw, creating the outside of the ring. Once the pilot drill bit comes through the other side, the workpiece is flipped over and the hole saw is used to cut partially through from that side as well. It is imperative that the hole saw not go all the way though, as that will make it impossible to cut out the inside of the ring. The material will be too thin to hold it in a vice for cutting.
The second step in the process is to cut through the middle of the ring with a Forstner bit. The pilot in the center of the Forstner should still be able to center the bit in the middle of the area that has been cut out, allowing the hole to be perfectly concentric. Still, considerable care will be needed, especially when starting the hole through. Finally, with the center cut out, the hole saw can be used to finish the outside cut, leaving the roughed-out ring blank.
From here, the rest of the process is sanding. Lots and lots of sanding – both on the inside and the outside of the ring. As the ring profile is not very thick, it is best to start out with medium grit sandpaper, rather than coarse grit. The expanding ring mandrel shown above is extremely useful for this, as it allows the ring to be rotated on the sandpaper, pretty much eliminating the risk of flat spots and uneven sanding. The inside will need to be sanded as well, although the Forstner bit will leave a fairly smooth surface. More sanding will be needed on the inside if the ring needs to be made larger.
When sanding the outside of the ring, it is normal to give the ring profile somewhat of a domed shape, rather than just being flat. This is not only more attractive, but also makes the ring stronger, as there is more material providing support.
With a scroll saw available, it isn’t necessary to use the three-step drilling process outlined above. The inside can be cut out with the Forstner bit and then the outside can be cut on the scroll saw. This also gives the opportunity to alter the outside profile of the ring, making the top of the ring thicker, wider or of a different shape. The most common alternative ring shape for wooden rings is a “flat top ring.” That must either be cut out by hand or on a scroll saw.
The scroll saw can also be useful if a wider ring is desired. I mentioned earlier that a wide ring would need to have the back of the ring thinner than the face. This is accomplished by cutting the material away for the back and sides of the ring. That can be done on the scroll saw or with a band saw.
Making a Wooden Ring on the Lathe
Turning a ring on the lathe is fairly easy, but requires some finesse. This is much finer turning than what most woodturners are used to, at times skimming shavings off the ring that are paper thin. Smaller cutting tools might be required, especially a small scraper for cutting the inside of the ring to size.
The other thing that’s required is a waste block, either chucked up in the lathe’s chuck or mounted to a faceplate. It is important that the face of the waste block be exactly perpendicular to the axis of rotation, so if it isn’t it needs to be trued up. Attach the wood blank to the center of the waste block with double-sided tape and hold it in place with a live center in the tailstock.
With the material chucked up in the lathe, rough turn into shape, while leaving the diameter considerably larger than the finished diameter. Then drill a pilot hole in the center of the blank. Don’t try to drill the hole out to size, but rather use a small scraper to widen the hole out in small increments, until the inside diameter either equals the ring size or the outer diameter of the ring core. Finally, thin down the material, using a skew chisel to bring it down to the ring’s final width.
Take the ring off the waste block, removing it carefully so that it doesn’t crack. If a ring core is being used, it should be glued into the ring at this point. Once the glue is dry, mount the ring back in the lathe, using a mandrel; either the expanding mandrel we talked about making earlier, a commercially manufactured expanding ring mandrel or one of the other types of ring mandrels on the market.
The outer part of the ring can now be turned to its final shape. Keep in mind that there won’t be much material left when the ring is turned down to size, so it won’t be very strong. Work carefully, taking off a much smaller amount of material at one time than would be done for making a bowl or spindle. Once the final profile is achieved through turning the ring, sand the surface to smooth it out.
Making a Wooden Ring without Tools
There is a method for making a wooden ring without any tools, other than a hobby knife and some sandpaper. Something round, of the right size for the ring, is needed to form the ring around. This is usually a socket, which is, of course, a tool. But literally anything round that’s the right size could be used, like a pill bottle, a piece of copper pipe or the stepped mandrel I mentioned above (but that’s a tool). It would be a good idea to wear disposable rubber gloves for this method.
The idea is to make a small bentwood lamination out of wood veneer. This requires having the necessary veneer, which should not be paper backed and without any adhesive applied to it. Cut a narrow strip of the veneer, slightly wider than the desired width of the ring. Cut the strip off to a length that corresponds to three times the circumference of the socket or other cylinder that is being used as a mandrel. Taper one end of that strip down as finely as possible by sanding it.
It is a good idea to soak the veneer in hot water for a few minutes to make it more pliable. The water should be just shy of boiling temperature. After a few minutes, remove the veneer strip and dry it off as well as possible. Then it’s on to making the ring.
Wrap the strip of veneer around the mandrel, starting with the tapered end. Continue wrapping until the entire strip is wrapped around the mandrel. Then cover the veneer with masking tape, ensuring that it will not come loose. It can help to roll it a couple of times, in the direction of the wrap, on a table or other hard surface to ensure that the tape is tight. Then remove the mandrel and set the veneer aside to dry. alternatively, it can be placed in a toaster oven on low to dry for an hour.
Remove the tape. The veneer strip should remain fairly well wound, although it won’t be as tight as it was with the tape on. Start wrapping it around the mandrel again, working from the same, tapered end. When it reaches the point of overlapping, start gluing the second layer on top of the first, using either CA glue or epoxy. Spread the glue the full width of the wood strip to ensure there are no air bubbles. Work only a short distance at a time, no more than 90 degrees around the ring, until all the veneer is glued.
As with the other ring making methods mentioned above, the final step is sanding the ring, taking time to shape it to achieve the right contour, as well as sanding the edges to ensure that the layers of veneer are all even and have bonded together to make one unified piece.
Modifications to Ring Designs
There are probably countless different ways that these ring making methods can be modified to make a plethora of different ring designs. Entire blogs exist, just talking about different ways of making wooden rings. But there are a few basics that show up over and over again.
Probably the most common of these is to use multiple materials, laminated together. On the simplest level, this could mean layering different colors of veneer, gluing them together to make a blank the right thickness. Once finished, each of those different wood veneers will show as a different color in the ring. Those veneers can either be commercially available veneer or veneer that is cut in the workshop out of available stock.
A modification on laminating the pieces together would be to make layers in the laminate where several different types of wood veneer are placed together in the same layer, creating something like a segmented wood turning.
It is also possible to do inlays into a wood ring, either one that is made of a solid piece of wood or one that is laminated. The dots used on the edge of a guitar fretboard make good ring inlays and are available in a variety of colors, materials and shapes, including more exotic materials like mother of pearl.
An inlay band can be made all the way around the ring, inlaying mother of pearl or soft crushed minerals. This requires either using a pre-made ring blank or turning a ring on the lathe. If the ring is being turned on the lathe, it is necessary to cut a channel in the middle of the ring for the inlay. It is a good idea to leave the overall outside diameter of the ring slightly large, so as to allow sufficient wood available to sand, while sanding the inlay.
Inlay material is available from woodworking, jewelry and craft outlets, both online and brick and mortar stores. When selecting a material for inlay, keep in mind that the inlay material will have to be sanded and shaped. Soft materials, which can be sanded, are required.
The inlay material is glued into the groove in the ring, using CA, epoxy or UV actuated glue. A fairly quick drying glue, with a high tack, is best. The glue will have to hold the inlay material in place until the glue sets, as well as set fast enough to keep the material from falling out and allowing the ring to be rotated for continued work. It is best to place the chips of inlay material in place, individually, using a small pair of tweezers. This allows the opportunity to ensure that the pieces fill the groove as well as sitting tightly against each other.
Allow the glue sufficient time to dry fully before proceeding. Then sand the inlay material down flush to the level of the ring, going through the various grits of sandpaper to produce a smooth surface.
Finishing Wooden Rings
Wooden rings can be finished by any of the same means used for finishing other woodworking projects. However, this is a jewelry item and as such should end up with an extremely smooth, shiny surface. It is advisable to use a much more thorough sanding process than might be used with other woodworking, going through many stages of sanding; down to 400 or greater grit sandpaper. In cases where inlays are put into the ring, it is recommended to sand down to 1200 grit, before polishing.
One of the best finishes for wooden rings is CA adhesive. While we normally use this for gluing things together, it provides a tough, durable finish, with a nice high gloss. CA can be sanded and polished to bring out its luster. Several coats should be applied (10 or more), as the coats are generally extremely thin.
Related Posts:
How to Make a Wooden Car by Admin April 23, 2021 DIY Wooden cars are classic toys, of the type that our granddads and great-granddads played with. They’re the kind of toys which can be made in…
How to Make Wooden Gears by Admin June 22, 2021 DIY Wooden gears and sprockets have been in use for millennia. While the actual history of early gears is rather unclear, they were first written about…
How to Make Wooden Climbing Holds by Admin September 6, 2021 DIY The sport of rock climbing has been around since the late 19th century. That’s not to say though, that people didn’t climb cliff faces before…