Perhaps one of the most common decorations in a western home is that of a cross. Crosses take on a wide range of styles and are made from a wide range of materials; but they all signify the same thing in societies with a Christian heritage – the cross which Jesus Christ was crucified on. For this reason, they are a very popular item in the home, with a lot of spiritual and emotional significance to those who own them.
It should be noted here that there is a distinct difference between a cross and a crucifix. The crucifix is used by the Catholic Church and depicts Christ on the cross. Non-catholic Christians, whom the Catholics refer to as “Protestants” (a name rejected by those so-called), use a cross without Christ on it, stating that Christ is no longer on the cross, but has been risen from the dead. For the sake of this article, we will be talking about crosses, not crucifixes. However, they can be converted to crucifixes by carving an image of Christ, as he would have been hanging on the cross and attaching it to the cross. However, most woodworkers are not wood carvers, so we are not all capable of making that addition, without having to buy the figurine of Jesus.
Wood is the oldest and most consistently used material for making crosses, honoring the original cross, which was made of wood. While other materials can and are used, there’s just something about a wooden cross that tugs upon the heartstrings, reminding the viewer of what the cross is all about.
Crosses can be made in a never-ending series of styles, with people constantly finding new ways of expressing the same theme in wood. While styles change with time, the cross itself is always clearly discernible in the design. Some of these crosses are quite ornate, especially if we look at those made in the past. Modern styling is more simplistic, but can still be quite beautiful.
Christians in the western world have universally adopted the shape of the cross as being that of the small letter “t,” without the tail at the bottom. Yet there is no clear historic evidence that the cross that Christ was hung on was made in this style. While the Romans did use this style of cross to crucify condemned criminals, they also used crosses that were shaped in a “T” and an “X.” Nevertheless, church tradition holds that Jesus was crucified on a cross of the shape that is widely accepted.
Simple Cut Out Crosses
The simplest way of making a cross is to cut one out of a solid board of wood. This can limit the size considerably, unless the cross is cut out of an edge-glued slab. But for those who like using a scroll saw, this type of design offers the opportunity to cut some embellishments into the design. Should larger crosses be desired, it’s really not all that hard to edge-glue boards together and such panels can even be purchased from the local home-improvement center.
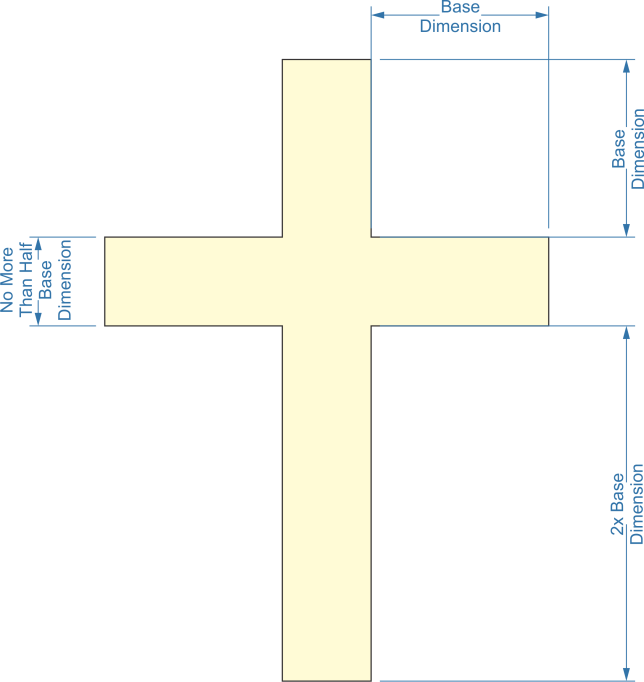
The key to making this or any other cross look right is the proportion of the dimensions. While these are not exact, the top and two side arms need to be the same length and the bottom arm should be twice as long. The thickness of the arms, which should be the same for all of them, should not exceed half the length of the arms.
Cross dimensions
Such crosses are normally cut out with a scroll saw, although if a simple cross, like the one shown above, is to be made, it is actually easier to use a bandsaw, as making straight cuts with a scroll saw can be tricky. Cutting a little outside the line leaves material available to pare away, bringing the design right down to the line. This will usually produce a cleaner end product than trying to cut the line and eliminates much of the risk of accidentally cutting inside the line and ruining the project.
More complex crosses cut out of a single board are often done from a pattern, many of which can be found online. The pattern is transferred to the face of the board by tracing over the edges. This can either be done with carbon paper, or if carbon paper is not available, by rubbing a soft pencil over the back of the pattern, transferring the graphite onto the back side of the pattern. For better results, an artist’s charcoal pencil can be used in place of a normal lead pencil.
Cutout crosses
One thing that scrollers tend to do is use thinner material when they are cutting more complex designs. So the cross on the left above might be cut out of typical 4/4” material (3/4” thick), the two others would probably be cut out of ¼” thick hardwood plywood or Luan plywood. The same would hold true if using a handheld jigsaw or even a coping saw to cut it out.
One key to cutting intricate designs in hardwood plywood is to buy plywood that has a thick face veneer. Another important key is how the wood is cut. The surface facing up will tend to splinter along the cut line, from the friction of the saw blade passing through it. This splintering can be limited by covering the surface of the plywood with painter’s tape before cutting. It is also good to flip the plywood and the pattern over, cutting from the back side. That way, the splintering will be hidden against the wall.
Adding Additional Adornment
Some people like to add additional adornment to their cross, usually with a simpler cross style, rather than the more complex cutouts shown above. This adornment can consist of cordage, giving the appearance of tying the two pieces together. Another popular addition is to add four large spikes, two overlapping horizontally and two overlapping vertically, forming a cross on top of the cross. These are usually attached to the base cross with wire, run through small holes drilled in the cross.
Another way adornment can be added to the cross is to cut out another slightly smaller cross out of another type of wood and gluing it over the original. This can be combined with a fancier, scrolled cross, where the back cross is simple and the overlaid one is scroll cut to provide a fancy design.
The same thing can be done with other symbolism that might mean something to the owner of the cross. A musician who plays in the church worship team might appreciate a cross that has a music staff overlaid on it. A married couple might appreciate one that has intertwined wedding rings out of wood attached to it. A family name, made out of wood letters could adorn the living room of a home.
Reverse cutout Cross
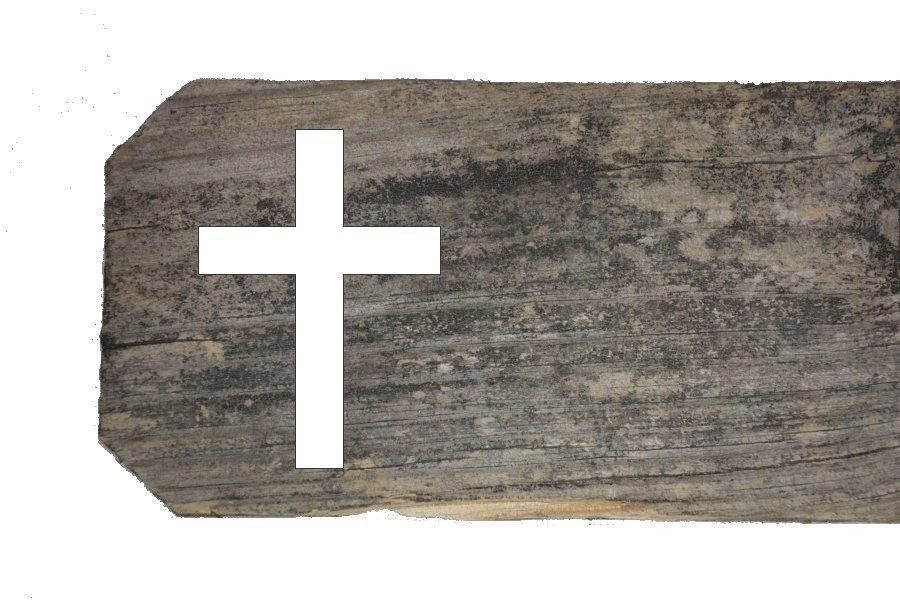
The same basic technique can be used to make a reverse cutout, where the shape of the cross is cut out of a solid piece of wood, leaving the wood in place. This works especially well with reclaimed wood, such as barn wood or wood that is salvaged from replacing a cedar privacy fence.
Reverse cross
The real difference in making a cross in this manner is that a hole must be drilled within the area that will be cut out for the cross and the blade inserted in that hole to start cutting out the cross. That’s actually the same technique used for the fancier cut out crosses above, in order to cut out the negative spaces in the design. The same level of complexity can be accomplished with a reverse cutout like this, but care must be taken in the design, to ensure that there will always be a material bridge between the main board and any pieces which are left in place, within the outline of the cross.
Another thing that this sort of design allows is adding something else to the overall design, in the area that is left open in the picture above. One such possibility is to cut out a rectangle, rabbeting it on the bottom side, so that glass can be put in the hole, turning the cross into a picture frame.
Adding a Base
So far, I’ve discussed these crosses as if they were to be hung on the wall, which is what most people do with them. Nevertheless, it is possible to turn any of them into a free-standing cross, by the simple expedient of adding a base. If that is going to be done, the bottom arm of the cross needs to be made a bit longer, adding the thickness of the base to the length of the arm. On fancier cross designs, a straight tab (tenon) might be added, rather than just extending the arm.
The base can be made out of anything from a cut off piece of dimensional lumber to a fancy, carved wood sculpture. Whatever is used, make sure that it is heavy enough so that the overall piece does not become top-heavy, causing it to fall over. If necessary, cut out some space on the bottom of the base and fill it with lead to give the base extra weight. Lead shot or lead ingots can be glued in place with normal PVA wood glue. To hide the weight, glue a piece of felt over the bottom with rubber cement, trimming it flush with the edges of the base.
Adding the cross to the base is extremely easy. All that’s needed to accommodate the cross is to cut a mortise in the middle of the base, which the tab will fit snugly into. This is good practice for those who are just learning how to cut mortises. For the novice, it’s best to make the base out of hardwood, rather than softwood, if a mortise is going to be cut into it. It can be very hard to cut a clean mortise in softwood. The two can then be glued together.
As an alternative to cutting a mortise, the cross can be made without the tenon and the two pieces drilled, allowing them to be connected with a dowel. This can be tricky too, as it entails drilling into the bottom end of the cross. Care must be taken to ensure that the hole is drilled straight.
Making a Simple Cross for a Grave
Currently, graves are marked with either an engraved stone marker or a cast bronze plaque. But for at least a couple of centuries before that, they were marked with a wood cross. Depending on the circumstances, these crosses might be made out of two sticks lashed together with rawhide cord or they might be properly made by a carpenter. It all depended on the time and place and what was available.
The same sort of simple cross can also be used within the home or as yard décor. They are typically made of either 1”x 4”s or 2”x 4”s, although larger material works as well for a larger cross. A six foot high cross for the yard, made out of either 1”x 4”s or 2”x 4”s would look flimsy, with the wrong proportions. That tall cross would need material that is 6” to 8” wide and it would be better if it was a good 4” thick.
These crosses tend to be simple, as fancy cut out crosses like the ones we talked about above are more likely to suffer weather damage. It is hard to paint or varnish the inside of cutouts, such as found on the crosses above. That leaves a place for moisture to get into, allowing wood-eating fungi to start breaking down the wood. A simple cross can be much more easily sealed, making for something which will last longer.
The simplest way of making such a cross is to overlap the two pieces and nail or screw them together. Many grave markers have been made through the years, which was no fancier than this. However, it is much better to attach the two pieces together with a lap joint. Lap joints are one of the strongest woodworking joints available and much less likely to be affected by weather than other joints.
To make the lap joint, mark the center of each of the two boards, defining a space exactly in the middle that is the width of the opposite board. Then cut halfway through the boards in the space so defined. Most people do this on a table saw, using a sled to hold the piece perpendicular to the blade. It’s up to the woodworker whether they just crosscut the edges of the lap joint or use the table saw blade to take out as much material as possible, making multiple overlapping cuts. Either way, care should be taken when setting the depth of cut, so that it is exactly half the board’s thickness or just a shade less. The remaining material can then be cut out with a bench chisel.
Lap joints should be glued well, so that the entire joint is filled with glue and there is no crack for moist to seep into. painting or varnishing will finish sealing off the wood, protecting it from moisture.
Making a “Unity Cross” for a Wedding
Some couples choose to use a unity cross as part of their wedding ceremony, rather than the more common unity candle. While the unity candle symbolizes two becoming one, the unity cross symbolizes three becoming one, bringing Christ into the relationship. This is done by braiding three separate cords that are attached to the cross.
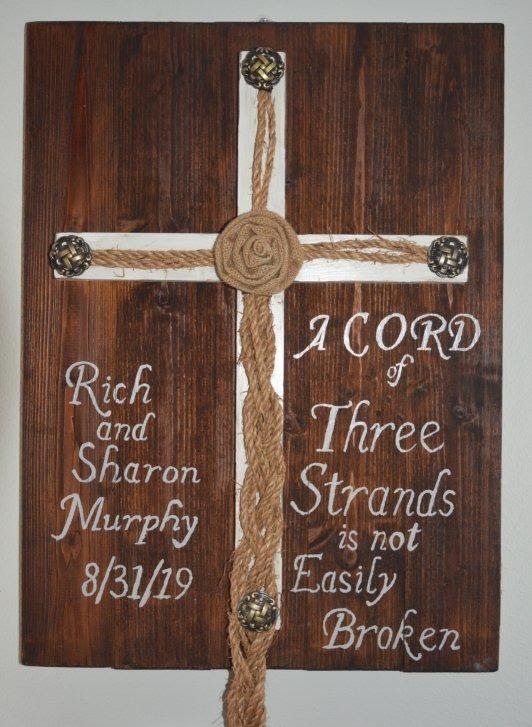
Unity cross
In the cross above, the cross itself is very simple, much like the kind we just discussed making for a simple grave marker. It has been mounted to rough finished wood that has been edge glued to make a tablet. It is typical to paint the names of the couple, their wedding date and even a favorite scripture passage in the background. Five drawer pulls (one under the burlap flower) are screwed through the cross to provide someplace for the cords to be attached to.
In order to make the background tablet for this unity cross, the rough cut boards were attached together with cross-bars in the back, along the style of making a barn door. However, they could be joined and then edge-glued together. Either method will produce about the same results, with the difference being that the cross-bars make the plaque stand out from the wall slightly, giving an impression that the unity cross is floating in front of the wall.
Before the wedding, cords are attached to the upper three drawer pulls. At a predetermined time during the wedding, the couple wraps the three cords around the middle pull, bringing them together. Then they braid the three cords, which are ultimately tied together at the bottom, below the edge of the plaque and attached to the bottom pull.
Making a Layered Wood Cross
A very popular style of cross today is what is known as the layered wood cross. This is a cross that is made of narrow strips of several different types of contrasting woods, often exotic woods, showing off the colors of the various types of wood as they come together to make a cross that is like multiple crosses; yet put together to make one very attractive unit.
The key to making this sort of cross is the base cross that it is all fastened to. Other than that part, everything is miter cuts and gluing. But that base cross must be strong, with the arms at exactly perpendicular to each other, so that it will provide support for the other pieces and so that the mitered joints on the other pieces come together perfectly. In order to make that possible, the central cross must be lap jointed, with a tight-fitting lap joint, for strength.
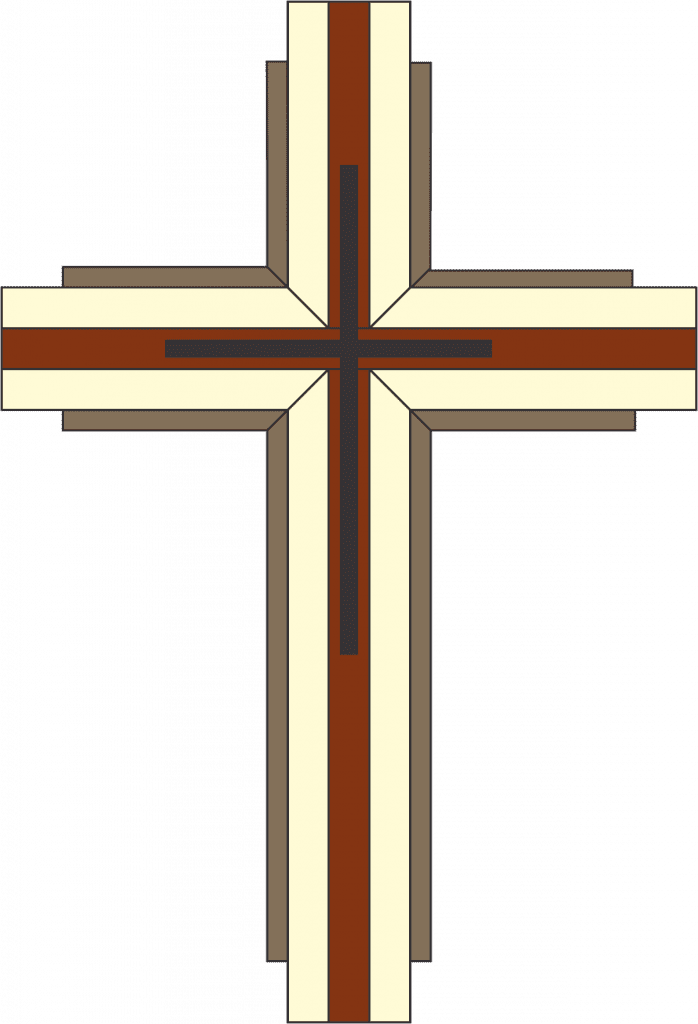
Layered cross
In the cross shown above, the central cross might be made of redheart or mahogany for the color. The lighter wood surrounding it might be maple, with walnut on the outside. Those pieces might be thicker, sticking out away from the wall farther than the red heart and maple. Finally, a smaller cross made of ebony or African blackwood sits on the top of it all.
The real key to making this work is the accuracy of cutting the miters. If the woodworker has a good miter saw, which cuts accurate miters, then that’s not a problem. But what if the miter saw in question isn’t all that accurate? Two alternate means are available:
The first is to fill any gaps in the mitered joint. This can be done with tinted wood putty, but it will probably be a closer match if some of the sawdust from cutting the wood is saved, then mixed with wood glue to make a putty out of.
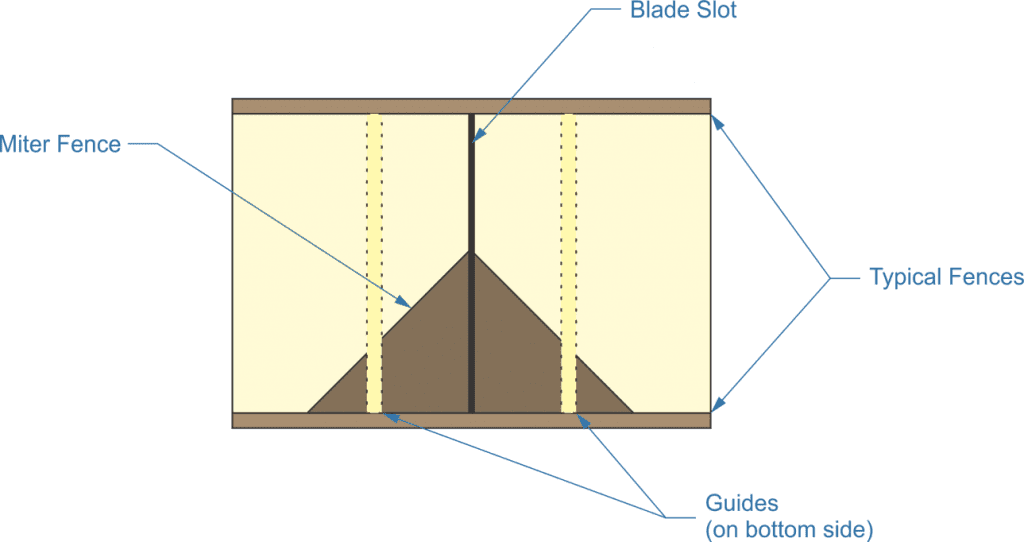
The second is to make a miter sled for the table saw. This is much like a normal sled, with the exception that the fence is actually a perfectly square piece of thick plywood that has been cut corner to corner to make a triangle. That is attached to the bed of the sled, with the point of the triangle aligned so that the blade will bisect it. Opposite sides of a miter joint can be cut on opposite sides of the sled, ensuring that they will fit together snugly.
Miter sled
The simple miter sled depicted above will allow for accurate cutting of any mitered frame, as well as the pieces needed for the cross. Even if the miter fence is installed slightly off kilter, the pieces will still fit together properly, as long as the piece of wood used for the fence is cut at exactly 90 degrees. A corner of a mill-cut piece of plywood might be good for making this piece.
There’s a lot of gluing and clamping in making this sort of cross. The pieces are not nailed together. So it has to be assembled in stages, setting up and gluing each layer of wood, one at a time. A lot of clamps are required, so the limiting factor on how much can be glued at one time might be the available clamps. But no matter what, don’t try to glue too much at one time, as the more pieces being glued at one time, the greater the possibility that something will slip out of position.
One other concern for gluing this sort of cross together is keeping the pieces all on the same plane, especially those pieces that are the same height, such as the red heart and maple in our diagram. It is useful to use cauls above and below the pieces, while gluing, to make sure that the pieces stay on the same plane and don’t twist in relation to each other.
Making a Wooden Cross Necklace
Crosses are not only common as household adornments, but also for use as jewelry. While most of these are made of silver, gold or some other metal, jewelry crosses can also be made out of wood. The same sorts of methodologies we’ve been looking at throughout this article can also be used to make a cross necklace. The trick, in most cases, will be making the cross small enough to be used as jewelry.
In the case of the layered wooden cross, rather thin strips of wood are needed for making a cross necklace. It would actually be easier to make the main part of the necklace so that it is a couple of inches thick and then slicing it into several crosses on the bandsaw, once the glue is dried. Any secondary layer, like the ebony in the cross above, would be glued to the main part of the cross after band sawing it.
Related Posts:
Wooden Garden Troughs by Admin May 20, 2021 DIY Adding green growing things to any living space just makes it more livable. Interior decorators and workplace designers figured this out long ago. That’s why…
How to Clean a Wooden Cutting Board by Admin June 4, 2021 Finish There’s a lot of false information around about wood cutting boards, mostly due to restaurants not using them. This has led people to think that…
How to Make Wooden Gears by Admin June 22, 2021 DIY Wooden gears and sprockets have been in use for millennia. While the actual history of early gears is rather unclear, they were first written about…