Computers have become a household norm in much of the industrialized world. While not everyone owns a computer, roughly 90% of American households have at least one computer. While laptops have become the norm for a lot of people, as their prices have approached that of desktop units, there are still plenty of desktop computers around; even some old ones which are still in use.
Some people may have forgotten, but computers used to come in an off-white case, unlike the black cases which are so common today. There is no faster way of demonstrating to friends and neighbors that one is using old, out-of-date technology for surfing the internet and answering emails, than to have one of those off-white computers in the home. That alone drives a percentage of computer sales, as it seems that nobody wants to be seen as being out-of-date.
But the reality is that it really doesn’t take all that powerful a computer to do the things that most people use them for. The real driver of computer technology is gaming, where 3D generating the graphics require a massive amount of computer power and memory. But that “latest and greatest” computer won’t do any better for searching the web and checking e-mail than a 486 built in 1989.
Of course, for any woodworker, having a wood encased computer in the workshop is just plain cool. Building one can make that piece of technology fit into the larger scheme of things, camouflaging it, so that the workshop doesn’t appear like an office.
Some woodworkers may do this just because they are between projects and their eye falls on their aging computer sitting on their desk. But for others making a wooden case for their computer just seems like setting things in order. In either case, making that case out of wood can be a cool project, with the opportunity to show a bit of one’s creative side.
So What’s Required?
In order to build a truly unique computer case out of wood, it’s necessary to throw conventional wisdom aside and think outside of the box, as we redesign this box. The computer cases that we’re all used to seeing are based upon designs that are developed for use in business offices, not for their artistic styling. Even the most artistic of them are usually still rather conventional in their appearance.
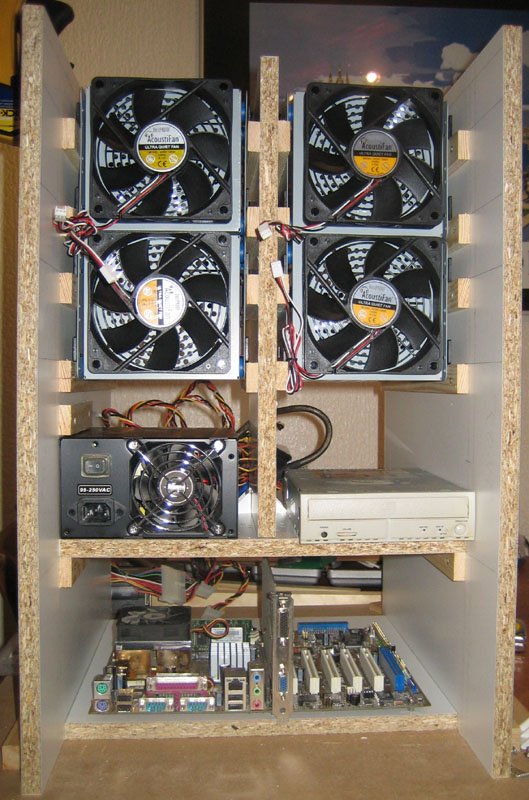
The various components which are mounted in the computer can be mounted horizontally, vertically or at an angle, just as long as they are secure. The only components for which mounting direction might be an issue are optical drives, which need to have a detent to hold the disk in place, if they are mounted vertically or upside-down.
It has been proven a number of times that computer cases don’t all need to look alike. A number of different manufacturers have made some rather unusual cases, from cubes, to pyramids, even hiding the computer itself inside the keyboard or monitor. So the ultimate design is only limited by the imagination of the case’s creator and how much work they are willing to put into it. If someone wants a computer case that looks like Iron Man’s helmet or a Victorian era teletype (those didn’t actually exist), they just need to figure out how to do it.
At the same time, there are some base requirements for any computer case, in order to make it functional. The actual functional elements are all things that will be installed inside that case, but the case itself must be built to accommodate them.
It has to have ventilation, including a place to mount at least one fan and a vent for the air to flow back out through. This is to keep the microprocessor cool, as modern microprocessors produce a lot of heat.
The entire thing should be enclosed, both to try and keep dust out (which the fan makes impossible) and as a safety measure to keep fingers out of the computer.
There needs to be an opening to mount some sort of control panel; which often includes USB ports, memory card readers, and connections for microphones and headphones.
Most of the connections are part of an I/O (input/output) panel, which is often attached to the motherboard. This needs an access hole in the back of the case.
There is usually an access adjacent to the I/O panel for any connections to boards mounted in the expansion slots.
A power switch should be readily accessible somewhere on the case.
A power supply will also need to be mounted, with its access panel accessible through the back of the case. This includes a fan, the power cord and sometimes a second power switch.
If there are going to be any drives, such as a Blu-Ray, there needs to be someplace to mount it, with access from the front of the computer.
Finally, there needs to be a removable access panel, allowing all the working components to be mounted inside the case.
While most computer cases don’t have it, adding an air filter over the fan is extremely helpful, as it will keep most of the dust out. Just remember that the filter has to be cleaned or replaced periodically, just about as often the home’s A/C filter does.
If you look inside most commercially manufactured computers, there are three main things which are immediately obvious from the inside, all of which are mounted to metal:
The motherboard
The power supply
A mount for hard and optical drives
While these things are normally mounted to metal, they do not have to be. However, adding metal brackets, which are all connected and are connected to the power supply shelf will ensure a good ground for everything. That’s useful to help protect the computer from static shock.
This metal bracket can be easily fabricated out of sheet steel or aluminum, bending it so that it makes contact with the power supply on the back wall. hole in it will allow for the mounting of the drives, at least on one side. Other holes, drilled through it, can be used to run cables through, if hiding the cables is desired to keep the inside appearance clean, as is common with computers which have a transparent side panel for styling.
While the access panel can be made of thin plywood, most wood computer cases are made with either clear Plexiglas or aluminum access panels. These materials allow that access panel to be thinner, as well as offering some additional style advantages, such as being able to see inside the computer or perforating the panel to act as an air vent.
It’s a good idea to use a router with a roundover or chamfer bit in it, to relieve the wood around the various connection panels. Since the wood being used for the case is thicker than the metal that computer cases are normally made of, if this is not relieved, it might be a bit difficult to have the necessary finger access for tightening and loosening connectors.
If the computer is going to be sitting on the floor, it is a good idea to provide some sort of feet to raise it up off the floor a couple of inches, in order to help keep pet hair and dust out of the computer. Even then, it’s a good idea to open up the computer every few months and clear out the dust, something that most of us don’t bother to do.
Making the Case
I don’t want to go into too much detail here about how to make the case, as I don’t want to stifle anyone’s creativity. But I would like to make a few comments on how to make a case which will meet the needs of the computer and function properly, thereby reducing the frustration of the builder.
To start with, don’t even try building a computer case until all the components are on hand. Computer cases are often made with a very tight fit and not a lot of extra space. It’s often necessary to remove some components, in order to have access to others. Having everything on hand allows the actual parts to be measured, rather than just taking measurements off of a commercial case. Those measurements might not work out, when building out of wood.
Some critical measurements include:
The size of the motherboard
The space above the motherboard specifically where the expansion slots are
Access to the expansion slots and memory slots
Space for mounting hard drives and optical drives
The basic case is nothing more than a wood box. It is in how that box is finished and what embellishments are put on it, that the woodworker has an opportunity to show off their skills. This can include making details out of different types of wood, to show off the wood’s grain and coloration, making the computer case in a retro style, or making a futuristic case.
One of the easiest places to add some styling is in the vents. wood slats have long been used for vents in homes. While they are not common for computer cases, a series of thin wood strips would make a much more attractive grille for the vent than a perforated piece of metal.
In order to have acceptable mounting for the I/O panel, motherboard and drives, it might actually be easier to cannibalize the existing metal case, cutting those items out of it. While this is not a requirement, all of that can be done out of wood, it can be helpful in making an attractive case that is also functional.
While there are some items which need to be accessible from the front of the computer, such as a power switch, optical drives and ports, there’s nothing that says that those items can’t be hidden behind a door. Making a swinging front panel for the case, which allows those items to remain hidden, except when in use, can go a long way towards making the computer case more attractive. Using a spring latch, rather than a cabinet door pull, makes it possible to even hide the fact that there’s a door there at all.
One of the trickier parts of making a wood computer case can be finding an effective way to mount internal hard drives. But that’s not as much of an issue as it might seem. While internal drives used to come in different sizes, today they are all 3.5” wide and 1” tall. Two parallel pieces of plywood, with separating strips mounted to them, can create slots that those hard drives can be slid into, with the connection end sticking out.
Even though the mount itself is made of plywood, it would probably be a good idea to mount a piece of ½” aluminum angle, pre-drilled to align with the mounting holes on the hard drives. That will allow for a more secure mounting of the hard drives, helping to prevent damage while moving the computer.
A similar mounting system can be used for optical drives, especially if the computer is going to have more than one. The only real difference is that the bays need to be 6” wide and 1-3/4” tall.
Another option, instead of building a separate wood case, is to build the computer into a piece of furniture. Ideally, this would be done when the piece of furniture is being built, but it can also be done as a retrofit to existing furnishings. All the factors listed above need to be taken into account when doing this.
One of the things that can be done in building a computer into a piece of furniture, which can’t really be done when building a wood computer case, is that the parts can be split up and located in different parts of the furniture. If we were to take a typical dresser and build a computer into it, the motherboard might be mounted in the space between the side of the drawers and the sidewall of the carcase, while the power supply might be in the base. Front access panel items could be located in a panel installed in the top drawer, while the I/O panel would be in the standard location of being mounted in the back panel.
To make such a design even more effective, it would be useful to work with Bluetooth technology as much as possible, using a Bluetooth keyboard, pointing device, and monitor. The speakers could be built into the case, keeping them hidden.
Related Posts:
Wooden Garden Troughs by Admin May 20, 2021 DIY Adding green growing things to any living space just makes it more livable. Interior decorators and workplace designers figured this out long ago. That’s why…
How to Clean a Wooden Cutting Board by Admin June 4, 2021 Finish There’s a lot of false information around about wood cutting boards, mostly due to restaurants not using them. This has led people to think that…
How to Make Wooden Gears by Admin June 22, 2021 DIY Wooden gears and sprockets have been in use for millennia. While the actual history of early gears is rather unclear, they were first written about…