The earliest combs which have survived until today date from about 5,000 years ago. The ancient Egyptians carved combs and used them. Whether other cultures did as well or whether they did so before the Egyptians started doing so is something we just don’t know. Most of the materials that early combs were made of would not survive the ravages of time.
Good modern hair combs are mostly made of hard rubber, which is both more flexible and more durable than polypropylene plastic, the other popular material. But those are common combs, of the type that can be found in the big box stores and supermarkets. Combs can and have been made of a wide variety of material, including bone, tortoise shell, ivory, iron, tin, gold silver, lead, reeds, wood glass, porcelain and even paper-mâché.
While wood combs have existed throughout history, they have been thought mostly to be something for people who couldn’t afford anything better. But that viewpoint is changing, as people are beginning to realize the advantages of wood combs.
These advantages come from a combination of the natural properties of the wood and the design of the comb, which usually has wide teeth with wide space between them. There are numerous advantages, some of which will be more important to one group of people, while others may find their own proponents. These advantages include:
Naturally nourishes the hair – wood naturally distributes scalp oils throughout the hair, rather than leaving them at the scalp or having them cake up on the comb itself
Gentle on the hair – Wood is a natural material, with a negative electrical charge, so it will not cause static buildup in the hair. Wood combs are also less likely to cause pulling of the hair
Healthy scalp – Wood combs massage the scalp better than combs make with other materials and sharper teeth. The rounded teeth are less likely to bruise the scalp
Encourages hair growth – Because wood combs do not cause the same problems that metal and plastic ones do, the user is more likely to comb more, causing the hair to grow. At the same time, because the wood comb doesn’t cause the pulling and breaking those other materials do, hair loss is minimized
Helps reduce dandruff – Thanks to the lower amount of irritation that wood combs cause to the scalp, the comb doesn’t knock and scratch the scalp, causing cells to die and fall out as dandruff
Durable – Wood is naturally resilient and wood combs are as well. Properly made, a wood comb will outlast metal and plastic combs.
Wood combs are also excellent for the beard, for these same reasons. A number of companies which specialize in beard products promote the use of wood combs over other materials, due to these above-listed benefits.
Care of Wooden Combs
Because wooden combs are made of wood, they are susceptible to the same sorts of damage as any other wood product. Care must be taken, in order to avoid damaging them. For this reason, avoid using wood combs in conjunction with water, especially soaking or washing them with water. Just like any other wood product, wood combs will soak up water, eventually leading to deformation of the teeth and splitting. Harsh chemicals, detergents and other soap products should be avoided.
Rather than washing wooden combs, oil them, allowing flaxseed or linseed oil to soak into the wood. Once the oil has been given adequate time to dry, wipe down the comb with a dry cloth, soaking up excess oil and dirt. Vaseline can also be used in much the same way.
If buildup of dirt and debris is found in the teeth of the comb, fine sandpaper can be run between them, using a gentle brushing motion with the sandpaper to clean out the debris.
Can We Make Our Own Wooden Combs?
Commercially manufactured wooden combs are surprisingly inexpensive. Nevertheless, this does not preclude making our own. A wooden comb is fairly easy to make, although care must be taken in the cutting of the teeth. This is a project that can serve as a test of our patience and cutting ability.
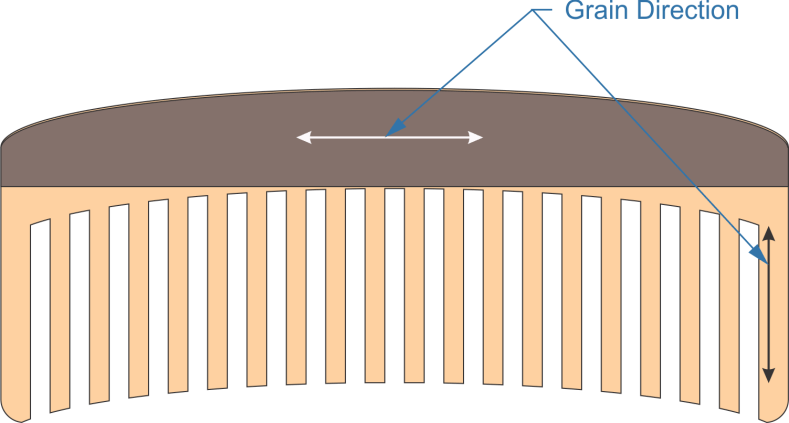
One important consideration when making a wooden comb is grain direction. As we all know, wood is stronger across the grain than in the direction of the grain. It is easy to separate the individual grains of the wood, causing a project to break, but hard to break the grains. This weakness can be problematic for a comb however, as it is necessary for the comb to be strong in both directions. The teeth need to be strong, so that pulling them through the hair won’t break them, while the handle or overall length of the comb needs to be strong, so that the leverage needed to pull the comb through the hair won’t break the back of the comb.
The normal means of dealing with these conflicting needs is to use plywood; but that won’t work in this case. Not only would the comb still be weak in both directions; but the exposed end grain in the teeth of the comb would be likely to catch and pull hair.
The solution is to make the comb as a laminate of three thin layers of wood, with the main body of the comb being laid out so that the grain runs along the length of the comb’s teeth. The overlaid laminate parts are just attached on the handle, with the grain perpendicular to the teeth, making it thicker and providing strength along the length of the comb.
A variety of different woods can be used for making the comb, but it is best to use a closed grain hardwood with a fine, straight grain. No knotholes/how-to-drill-straight-hole/holes-without-electric-drill or wavy grain can be allowed, except perhaps for some small ones in the handle. It is important that the grain run straight down each tooth, as a wavy grain will most likely cause the teeth to break.
Make a pattern for the comb, either laying it out by hand or on the computer. Just like commercially produced combs, the size and spacing of the teeth can vary. There are some extremely fine-toothed combs which are available on the market, although most combs have larger teeth, with something to the order of 1/16” to 1/8” teeth.
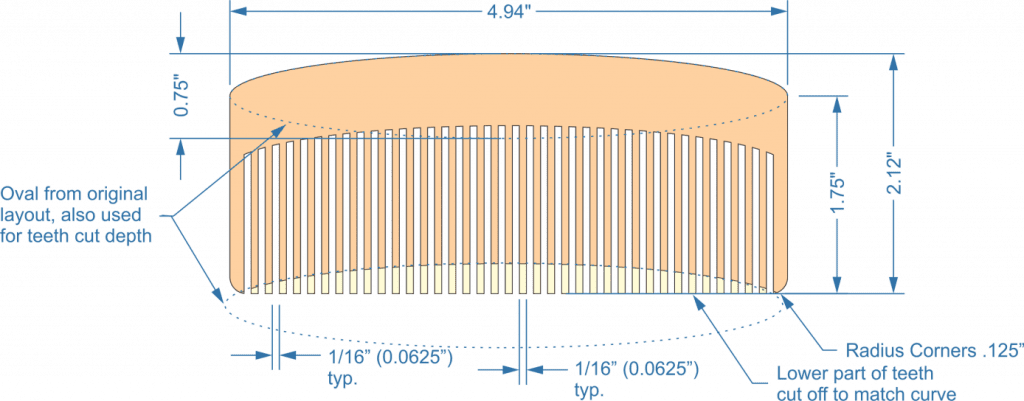
Basic comb layout
The diagram above shows the basic layout for a simple comb. I created this by drawing a rectangle 1.75” high by 4.94” long. Actually, I started out with 5” long, but shortened it when it turned out that the end tooth at one end was longer than the other. an oval 4.94” long and .75” high was amended to this, “welding” the two parts together and giving the top curve to the comb’s back. Both the points and roots of the teeth were cut to follow this same curve.
Please note that the points and roots of the teeth do not have to follow this curve, although the roots of the teeth almost invariably do. However, there are some combs made with the points and roots of the teeth forming a straight line.
The diagram above shows 1/16” wide teeth, spaced 1/16” apart. For comparison sake, the drawing below shows an almost identical comb pattern, with 1/8” wide teeth, spaced 1/8” apart. In addition, slabs have been added to the sides of the handle, proving strength. Notice that the grain in these side pieces has been run in the opposite direction to provide strength.
Wide tooth comb layout
Adding a longer handle to the design is rather simple. The only consideration is to take care to ensure that the handle does not break while cutting the teeth, which must be done before the sides of the handle are attached.
Long handle comb
In order to turn the above short comb into a long-handled one, all that’s required is to extend the handle to one side. This is done on the pattern by drawing a circle, with the top of the circle in line with the top of the comb. In this case, the circle was 1.25” in diameter, but it could be any diameter desired. Curved lines from the main part of the handle to the circle are all it takes to finish out the design. In this case, the center layer, which has the teeth, will need to extend all the way through the handle. Notice the curved transition on the underside. The two outer slabs of the handle are as shown in brown.
Making the Comb
Start by resawing three pieces of wood, one for the main body of the comb, with the teeth, and the other two to act as the sides for the handle. The center piece which will have the teeth should be a maximum of 1/8” thick, after planing or sanding the sawed pieces smooth and flat. Side pieces for the handle are usually the same; but they can be cut anywhere from 1/16” to ¼” thick, depending on personal preference. Check the pieces for flatness with a straight, holding the straightedge up against the sides of the wood pieces and looking for gaps where light shows between the wood and the straightedge.
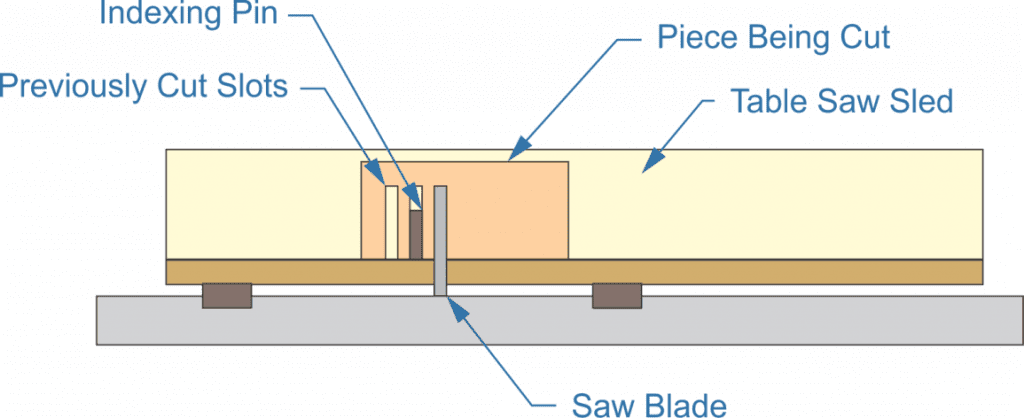
Glue the pattern pieces to the three pieces of wood and cut them out on a scroll saw. As an alternative, the teeth can be cut on a table saw, with a crosscut sled set up for indexing, much like what is used for making finger joints. If narrow teeth are desired, rather than the 1/8” teeth, matching the normal saw kerf for a table saw blade, then a narrow-kerf saw blade can be used. The big advantage of this method is that it provides a much easier way to cut the comb’s teeth, while being extremely consistent.
Indexing sled
In the diagram above, spacing of the teeth is controlled by the indexing pin, which is set into the back wall of the table saw crosscut sled. This ensures that each time a tooth is cut, the spacing is identical. The teeth will all be cut to the same depth, unless the saw blade’s height is adjusted between cuts. That can be done, to provide the same sort of curved root edge as shown above. Please note that if the comb’s teeth are going to be cut in this manner, it is better to cut them out of a rectangular piece of stock, before cutting the outside profile. However, if the teeth are going to be cut on a scroll saw, the outline and the teeth can be cut as part of the same operation. A fine saw blade is recommended.
Once the teeth for the comb are cut, they should be sanded, before the handle pieces are laminated onto the center section. Ideally, the teeth should be tapered somewhat, down towards the tips. This can be done via sanding, either with a belt sander or by hand. Be sure to sand the teeth as well, rounding the edges and eliminating any potential splinters or places where hair might catch in the cut marks. Once sanded, there should be no visible saw marks between the teeth.
laminate the two sides of the handle to the center section. Many people do this in one operation, but there is a lot of risk that the pieces will slide against each other during glue-up, as the glue makes an excellent lubricant for them to slide. To help prevent that, it is best to glue one side at first, then allow the glue to dry before gluing on the other side.
If the outside profile of the three pieces was not fully cut before, cut it out now; then it’s back to the sander to round all the edges and make sure that they line up. It takes a lot of sanding to properly finish a wooden comb, so be patient. It will be worth it.
For a finish, some sort of oil can be applied, like Danish wood Oil. The wood will probably soak up a lot of oil, so it is worthwhile applying two to three coats, allowing the oil to soak in between coats. When finished, wipe the comb dry, removing the excess oil.
Related Posts:
How to Make a Wooden Car by Admin April 23, 2021 DIY Wooden cars are classic toys, of the type that our granddads and great-granddads played with. They’re the kind of toys which can be made in…
Wooden Garden Troughs by Admin May 20, 2021 DIY Adding green growing things to any living space just makes it more livable. Interior decorators and workplace designers figured this out long ago. That’s why…
How to Clean a Wooden Cutting Board by Admin June 4, 2021 Finish There’s a lot of false information around about wood cutting boards, mostly due to restaurants not using them. This has led people to think that…