Wood floors have made a comeback, with many people preferring them over other flooring options. That’s not surprising, considering wood flooring’s natural beauty and durability. Wood tends to make a home look richer, partially due to the perception of how costly these floors are and partially due to how many finer homes we’ve all seen with wood floors.
Today’s wood flooring is different from what it was in the past. Whereas wood flooring of 50 years ago was solid wood, today’s is more likely to be a laminate, made of a wood surface layer, attached to a composite base. In some cases, the wood is actually bamboo, which can be stained to look like a variety of different woods. Fabricating wood flooring in this manner lowers cost, makes the flooring easier to install and provides cushioning for walking on the floor.
For those who want to take wood flooring to the next level, the normal way is to install inlays into the floor. These come as either medallions or border strips and can be used together in combination for a more luxurious appearance. In the past, these wood floor inlays were a common feature of mansions and other stately homes, as well as government buildings and businesses which desired to convey a sense of wealth and position, such as banks and lawyers’ offices.
Those older wood floor inlays were often made on-site by skilled master carpenters; but today they can be bought from a number of manufacturers, making it possible for installation in just about anyone’s home who so desires. While costly, they are much less costly than the hand-made ones of the past, mostly due to modern manufacturing technology.
Selecting a Wood Floor Inlay
For the best selection in wood floor inlays, it is best to shop online, although they can also be purchased through most floor covering stores that sell hardwood flooring. A wide variety exists, with the most common shapes being round or square. Many of these designs are also available in different sizes, ranging from 12” all the way up to 70”. Obviously, the larger and more complex the inlay medallion, the more costly it is.
There are also more modern inlay styles, where the inlay might be in the shape of a guitar or a tree. While installed essentially the same, these can be harder to install, as it is harder to make the appropriate cutout. They can also affect the resale of the home, as not everyone would want an inlay of an electric guitar in their floor, where they might be more willing to accept a normal medallion.
Standard thickness for these inlays is ¾” to match the old standard thickness for hardwood floors. However, they can be purchased in a variety of lesser thickness, from 5/16” up to 5/8”, to match the various thicknesses of hardwood flooring on the market. It is important that the thickness of the existing flooring is known, before buying an insert.
Regardless of the thickness, the wood design part won’t be any thicker or thinner. Rather, the difference in thickness will be made up in the plywood backer that the hardwood design is mounted to.
Please note that the assumption is that the installed insert will match the thickness of the existing wood flooring. That’s at least in part based upon the expectation that the wood flooring is installed over a subfloor. However, this may not be the case in some older homes. In those homes, it will be necessary to use a thinner insert, cutting out only part of the existing floor’s thickness and using the remaining part as support for the insert and to provide strength to the floor for walking on it.
As for the overall size of the insert, that’s mostly dependent on the aesthetics of the room it’s being installed in. In most cases, the idea is to have the insert create an accent in the middle of the room. Of course, that doesn’t work if a piece of furniture is covering it, like a dining room table. Rarely is an insert installed that takes up most of the room, except in the case of a grand entryway.
Installing the Wood Floor Inlay
When purchased from a commercial manufacturer, the wood inlay will arrive packed in wood. There will be a thin plywood panel protecting the face of the inlay and the edges will be protected by the inlay being set into a piece of plywood that is cut out to fit it. Don’t throw this piece away as being nothing more than packing material; it is also the template for routing out the flooring to install the insert.
Start by removing the inlay from this template and checking to verify that it is not damaged. Then set it aside in a safe place, while the floor is prepared. Measure the placement of the inlay and mark it on the floor. Then set the template in place, centering it over that marking. Check the position and alignment twice, before cutting once, and then nail the template to the floor with a brad nailer. Don’t overdo it, as too many holes will be harder to fill.
Using a straight bit and matching sized baring, rout out the outline of the inset area to the full depth of the insert. This usually means just barely routing through the wood flooring, without damaging the subflooring underneath. In cases where there is only flooring and no subflooring, only rout out to the depth of the insert. Take care to ensure that the bearing follows the template all the way around. Any high points will keep the inlay from fitting in.
In the case of inserts which have internal corner, it will probably be necessary to clean out those corners with the hammer and chisel, as the router won’t get all the way into them.
Remove the wood flooring from within the routed outline, with a pry bar, hammer and chisel. Ensure that all of the nails originally used to hold the wood flooring in place are removed as well. Vacuum out any chips and sawdust from the recess, caused by routing.
With the flooring routed out to fit the insert, dry fit the inset to check. It’s a good idea to attach some masking tape to the bottom of the insert, before doing this, to act as a means of removing the insert from the cutout, without having to pry it out. One of the important things to check for, besides fitting snugly into the opening, is that it doesn’t rock from a nail or wood chip that got left in the hole.
Spread urethane flooring adhesive on the subflooring, inside the hole, with a toothed trowel. Then set the inset into the opening, pressing it down all the way around. It may be necessary to use a rubber mallet to ensure that the inset is seated fully. Place something heavy on top of the inset and leave it for the adhesive to dry.
If there are any gaps between the insert and the wood surrounding it, they can be filled with colored wood putty. Apply the putty before sanding, so that it can be sanded smooth to the same surface height. Keep in mind that putty will shrink, so overfill slightly, allowing it to be sanded down flush.
Any insert should have the final sanding and finish applied along with the rest of the floor, unless the floor was already sanded and finished. However, in those cases, the area of the floor around the insert will probably need to be refinished, as the finish will be damaged by the process of sanding the insert flush with the floor. Keep in mind that some wood floors are stained and not the original color of the wood, so sanding and refinishing may leave the wood mismatched.
Is it Possible to Make Your Own Wood Inserts?
Most people buy commercially manufactured wood inserts and install them on their home’s floor. There’s a wide variety of excellent styles already available on the market, making it easy to find something that will match the home’s décor. But what if a woodworker wants to make their own wood insert, is that even possible?
The pieces of most wood inserts on the market are probably cut by CNC equipment, especially the more complex designs. However, there was once a time when all of these were fashioned by skilled craftsmen. So if they could do it back then, we should be able to do it now as well.
If you look at the medallions or borders available on the market, one thing stands out; that is that the design uses the same elements over and over again. Often, the design can be seen to be symmetrical around a center axis or even around several different center axes, set at different angles to each other. This repetition makes it easier to build the medallion or edging, as it is possible to cut many of the same piece, using it around the design.
Wood inset layout
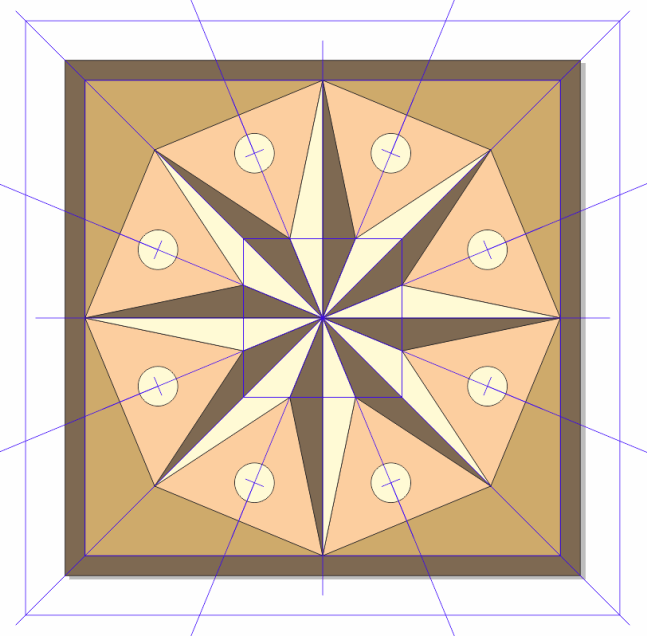
Any such design starts out on paper or at least being drawn on the computer. In the drawing above, for a 12” square inlay, the layout lines I used for developing this simple medallion design are visible in blue. It is clear from the layout, that the same point is being repeated eight times, dividing the square into 22.5 degree segments. We can also see that the design can be broken down into eight segments, four of which are of one design and another four which are of an opposite design. I’ve outlined each of these, one in red and the other in blue, in the diagram below.
Opposite design elements
One of the nice things about opposite design elements like this is that they can be made the same and then one of them flipped over to create the opposite layout. So, in reality, there are eight segments to this design, with four of them being flipped over from the others.
The other thing noticeable about this second drawing is that the dark colored frame has been removed. That’s because it would make more sense to attach that after making and assembling the eight sections, so that the frame doesn’t have to have extra seams in it. All that would be required would be the mitered corner.
Breaking that down a step further, we can see that the only difference between the two opposite segments are the triangular pieces around the edges. With those removed, we end up with eight triangular pieces that are exactly the same, as shown in the diagram below. As mentioned before, the outer triangular section, which goes between the octagon and the frame is mirror imaged, making the one difference between the red and blue outlined sections of the overall design. I’ve pulled the outer triangle away in the diagram below, to make this more obvious.
Segment
With this understanding of how the design is made up, we can talk about how to make the individual sections of the design. Keep in mind that the concepts we’re going to talk about here will work with almost any medallion design. It’s just a matter of adapting this methodology to the specific design.
How to Make the Medallion
All such inset pieces start out with a design, usually drawn out on stiff paper, although the design can be done on the computer and then the individual pattern pieces printed on cover stock. When making the pattern on the computer, take care that the actual printed size turns out as it is intended. Not all printers are accurate in this.
Rather than making eight segments out of thin material for the inner part of the medallion, it is easier to make one out of 8/4 stock and then cut it into eight separate slices, resawing the assembly on the bandsaw. So, to start, it’s necessary to cut the four pieces shown above out of 8/4 stock. The different colors indicate different types of wood. It’s probably best to cut the pieces outside the scribed line, then plane or sand them right up to it. Accuracy is paramount for making this work.
The three pieces that make up the main triangle segment can then be glued together with normal wood glue. Some blocks will probably have to be used for clamping, as there are no parallel edges to tighten the clamps to. But if opposite angle blocks are placed around the triangle as shown in purple in the diagram below, then a band clamp is tightened around those blocks, there will be good surfaces for normal F-clamps to tighten up onto.
Clamp blocks
Once the glue dries, the circle can be drilled and a dowel rod inserted to fill it. Then the assembly can be taken to the band saw and resawn into the pieces. At the same time, the outer triangle piece can be resawn to the same thickness.
With all the pieces now made, they can be laid out and glued onto a piece of plywood to make the medallion’s design, starting from the middle and working outwards. Care is needed to ensure that all the parts fit together properly, without leaving any gaps. Don’t try to do everything at the same time; but rather work outwards in rings; doing the triangle middle pieces first, the smaller triangle fillers next, and then the dark frame last.
With the entire medallion assembled and the glue dry, it will probably be necessary to plane or sand the surface smooth. Take care not to cut too much off with the planer, as the wood pieces of the design are a little less than 1/8” thick.
What About Veneer?
After looking at that process, the natural question that may occur is why not make the medallion out of wood veneer, rather than out of thicker material. That would be possible; but most veneer on the market is 1/40” thick (0.025”). That’s about the thickness of a band saw blade. So, if 8/4 hardwood is used to make the design above, the wood ends up being 0.228” thick, almost a quarter inch.
While wood veneer can actually be used to do this successfully, the problem boils down to how thin the veneer actually is. With a thickness of 0.025”, it would not be able to sustain much damage, without the damage going all the way through the veneer. While the method described above might be a bit harder the first time it’s attempted, the resulting medallion would be much more resistant to damage.
Related Posts:
How to Level an Uneven Plywood Floor by Amy Reed December 26, 2022 DIY Plywood sheets are best used for subfloors in attics, basements, or around the house. When using the material as a structural base beneath carpet, laminate,…
How to fix a Squeaky Plywood Floor by Admin September 8, 2023 Repairs The plywood basement floor is a carpet that is sometimes known to slide and squeak, and we all find this very annoying, especially if this…
Vinyl Stencils for Wood by Admin April 30, 2021 Tools Stenciled signs on wood are one of the trendy home décor items we find everywhere from knick-knack shops to truck stops. Some carry witty or…