
Trusses and rafters are the two methods used for framing the roof on a home or other building with a pitched roof. Rafters are the more traditional approach, having been used since men first started building permanent dwellings. Trusses aren’t quite so ancient, even though they were first used about 2500 bc. Modern trusses, used in home construction, first came out in 1952 and were patented then.
Today, over 80% of new homes are built with trusses, rather than rafters. The main reason for this is cost. In raw material alone, trusses are 40% to 60% cheaper than making a roof using rafter or “stick” construction. There’s also a much lower labor cost, as a truss roof can be installed in a day, while a stick constructed roof can take a week; and that week will be of much more skilled carpenters’ time than that needed to install trusses.
Nevertheless, there is still a place for rafters in modern homes, as they allow for some capabilities that trusses really can’t match. Even in cases where trusses are modified to allow for these capabilities, they don’t do it as well as rafters do. Specifically, I’m talking about times when a high vaulted cathedral ceiling is desired or where it is desirable to put a room in the attic. Rafters are also useful in cases where there are complex roof structures to be built, that it would be difficult to build trusses for.
What are Trusses?
Trusses are wood roof structures which take advantage of the natural strength of the triangle. Squares and rectangles are weak structures, where a triangle is strong. You can easily see this weakness, any time you try to make a cabinet frame or shelving unit out of wood. Without a back or other bracing to hold the case square, it tends to collapse to one side. But if you make a triangle out of three pieces of plywood and stand it up like that case, without a back, it will stand on its own.
The reason for this is that with a triangle, there is literally nowhere for anything to move; the sides and angles must stay the same. On the other hand, in the case of either a square or rectangle, the corners can change, turning into a parallelogram, without the sides changing at all.
This is why many bridge structures are made of trusses. Surprisingly, trusses are even stronger than massive I-beams, although we see those I-beams used extensively in building bridges as well. But while steel or precast I-beams may be used for overpasses and approaches to bridges, the longer spans and largest bridges will almost always be made with trusses.
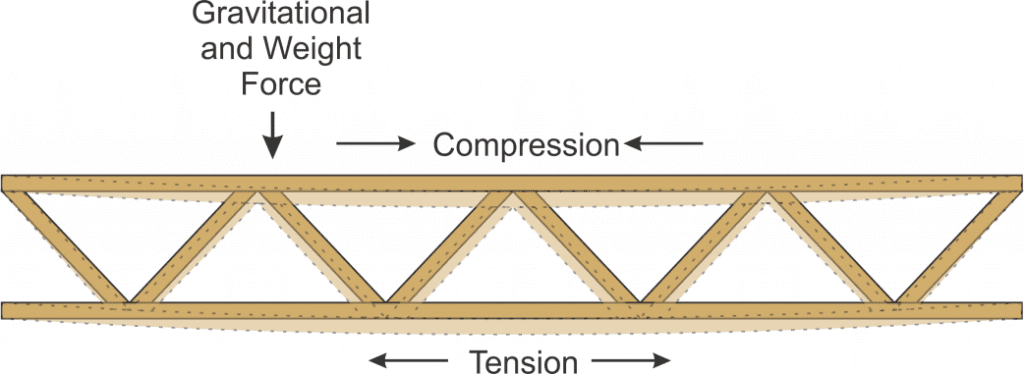
In the diagram above, we see the force of gravity and the weight of whatever load is on the truss pressing down on it. This tries to deform the truss, causing the center to bend down, as the shadow image shows (exaggerated). The upper stringer of the truss is put under compression and the lower stringer is put under tension (pulling on it). These two opposing forces are transferred from one to stringer to the other by the diagonal braces making up the web in the interior of the truss, ultimately preventing the truss from deflecting downwards like the gravitational and weight forces are trying to force it to deflect.
The same thing happens in an I-beam. So why are trusses preferred over I-beams for long spans? Because trusses accomplish the same thing using much less material, thereby lowering costs, as well as with a much lighter structure. So the structure can ultimately support more weight, because it isn’t having to work so hard to support itself.
While I-beams can be made out of steel or precast concrete, Concrete (like any stone) is only strong under compression, not under tension. It depends on rebar to provide strength under tension.
Applying this to Roof Structures
Although a roof structure is shaped differently than a bridge truss, the principles we just discussed still apply in the same way. By using trusses, rather than rafters, roof structures can be made out of 2”x 4” dimensional lumber, rather than 2”x 10”s or 2”x 12”s. That greatly reduces the material cost, while keeping the load-bearing strength of the roof nearly identical.
Roof trusses can also be made to span a much greater distance than a stick built roof structure can. With stick built roofs, you are limited by the length of the material you can find for the bottom stringer, which is the ceiling joist. This causes the use of a supporting wall down the center of most homes, so as to support the overlap of two pieces of lumber which are making this joist. No matter what you do, you are limited to an overall span of 30 feet, limiting the design of the home.
On the other hand, trusses can be made which span as far as 60 feet, without the need of any supporting wall or columns. This greatly affects the design of the building, allowing for much larger rooms and overall building size.
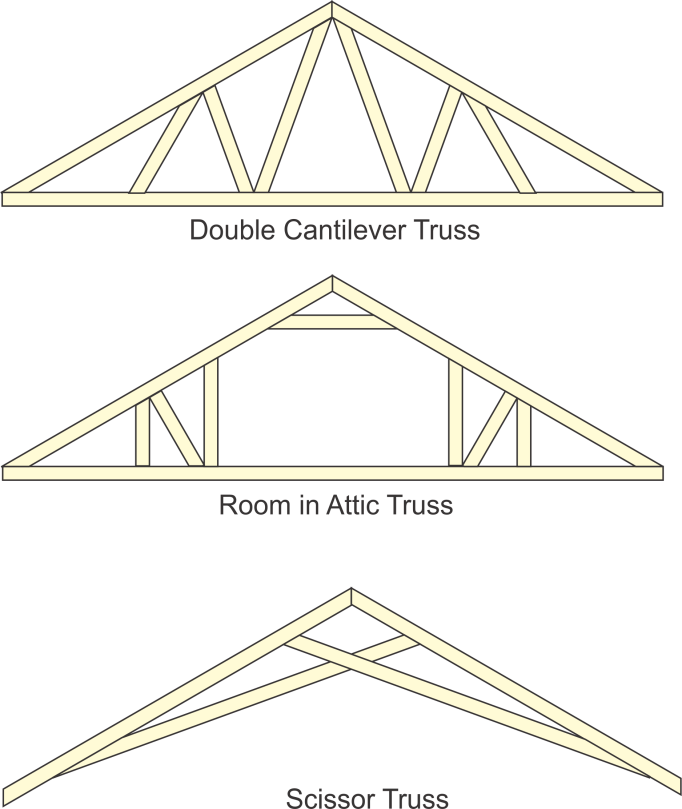
Trusses can be made in many different styles, with the three shown below being only a few of the most common. Truss styles can also be combined, so that one side of a truss is scissors, allowing a cathedral ceiling over the main living area, while there is a full truss over the bedrooms. It all depends on what the architect selects, when he designs the home.
It’s not shown in the drawings below, but all joints in trusses are covered by plates, which are nailed through to connect the different parts of the truss. In many commercially manufactured trusses, these plates have nails built right into them, so that a press can be used to drive the nails into the wood, making the joint.
Making Your Own Trusses
While most trusses are manufactured by small, local manufacturing companies for lumberyards and home improvement centers, you can build your own trusses on site. It’s a good idea to do this before beginning framing of the home, so that you have the full slab available for laying out and assembling the trusses. If you are building a home with a basement, then assemble the trusses on the floor, before the interior walls are framed.
Making your own trusses is still considerably faster and easier than building a stick roof, if your home’s design allows for it. If you make your trusses in advance, as I am recommending, be sure to store them somewhere where you can keep them off the ground and cover them with a tarp to keep them from getting wet.
To make your trusses, you’ll want to lay out the truss design on the slab or floor and possibly attach some blocking to help you locate the individual pieces. Make a first truss, calculating the angles for your cuts and the overall dimensions for each part. Then you can cut the material in mass, saving time.
One-half inch CDX plywood can be used for the joining plates or “gussets,” nailing them to the 2”x 4” pieces being used to make the trusses with 6d coated box nails. Don’t be stingy with the nails, as they are the main thing holding the truss together.
Installing Trusses
The one difficulty in using trusses for a roof structure is getting them up to the roof. While I have seen carpenters physically lift trusses up from the ground to the top of a second-story home, I wouldn’t want to try it myself. It is considerably safer to rent a small crane or boom for the day, lifting the trusses up to rooftop level.
Trusses are mounted directly to the top plate of the wall. Some places require truss clips for attaching. These are bent metal plates, which attach to the wall structure and the truss, holding them together in the case of high winds, such as from a hurricane. Even if your municipal building code does not require this, it is still a good idea for security.
Temporary cross-braces will need to be added to the trusses, on the underside of the top stringers, to hold the spacing between the trusses until the roof sheathing is installed. You will also need cross-bracing to hold the end trusses exactly vertical. The sheathing will then work to maintain the spacing between the trusses.
Rafter Construction
Unlike trusses, which can be prefabricated, rafters need to be assembled in place. Just as with trusses, you’ve got the problem of getting the material up to the roof level to use it. Since these are larger pieces of dimensional lumber, they can be heavy. However, they are not as heavy as the weight of a truss.
It is extremely helpful and considerably safer to precut as much of the material at ground level as possible, ensuring that it is consistent in size. That leaves only the assembly process to be done from the level of the roof.
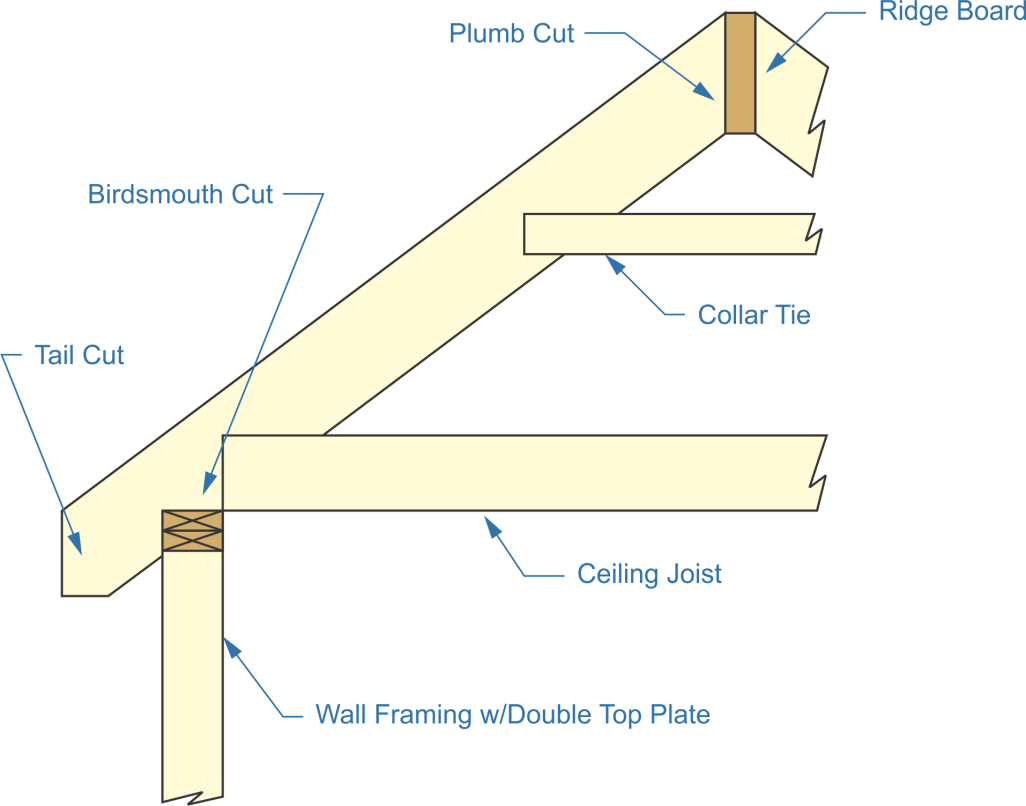
Starting from one end, the two rafters pieces are attached to the tops of the wall and the ridge board is captured between them. Additional rafters are added, working ones way down the roof, with ceiling joists and collar ties added.

Notice that rafter construction of a roof still provides the triangular shape that gives trusses their strength. The big difference is that it is one large triangle, whereas trusses break up the shape into a number of smaller triangles. It is the larger span between supports, since rafters don’t have the web of supports that trusses do, that makes it necessary to use larger dimension lumber for making a roof with rafters, instead of trusses.
The ceiling joist in the diagram above obviously provides for attachment of drywall for the ceilings of the rooms below. It also provides floor joists for the attic space, allowing you to use it for a room or for storage. Together with the collar tie (which is not used in all places), it provides tension, keeping the rafters and walls from spreading apart from their own weight and the weight of snow piling on the roof.
It is not necessary to install temporary stringers to hold the rafters parallel to each other until the roof sheathing is installed, as the ridge board will do that. However, it might be necessary to provide some temporary support for the far end of the ridge board, while starting the construction of the first few rafters.
While truss clips were originally designed for use with trusses, they are just as useful for attaching rafters to the wall, as they are for attaching trusses and will perform the same function, adding safety to the roof, in the case of a hurricane or other gale-force winds.
Pros and Cons of Trusses and Rafters
Both trusses and rafters are still in wide use today, with trusses being the clear favorite in most cases, due to the lower cost of building with trusses. However, there are still homes built with rafters, due to the advantages that they offer.
Advantages of Trusses:
- Lower cost – Building with roof trusses is 30% to 50% cheaper than building a stick roof.
- Accuracy – Because the trusses are manufactured under controlled conditions, there is less possibility of dimensional errors and inconsistencies, reducing the risk of ending up with a wavy roof.
- Time & labor – A truss roof can be built in about a day, whereas a rafter roof can easily take a week to build.
- Weather risk – Because the truss roof can be built quickly, the risk of weather damage due to rain is minimized.
- Span – Trusses can handle long spans over open areas better than rafters can.
- Good for DIY – Because of the ease of installing trusses, they are much easier for the do-it-yourselfer to build with.
Disadvantages of Trusses:
- Weight & size – Due to their weight and size, a semi is often needed to transport trusses and a crane is often needed to get them in position for installing, especially on two-story homes.
- Location – Due to the transportation issues, it can be extremely difficult to get trusses into remote locations.
- Ceiling height – In order to build a truss and have room for the webbing, cathedral ceilings are limited. They also limit the ability to make sculptured ceilings, with insets in them.
Advantages of Rafters:
- Dramatic ceilings – Rafters are ideal when trying to make soaring cathedral ceilings.
- Transportation – There is no transportation issue in getting the materials for rafters to a jobsite, as there can be with trusses.
- Complex roofs – Rafters allow you to make complex roof designs more easily, as you aren’t trying to fit the roof’s design into standard truss frameworks.
- Ready now – The lead time for buying materials to make rafters is however long it takes you to drive to the lumberyard.
- Go small –Rafters are much more convenient when building small projects, such as adding a room onto a home or building a shed.
- More space – Since there is no internal truss webbing, the entire attic space is available to be converted into a room or used for storage.
Disadvantages of Rafters:
- Cost – Rafters cost considerably more to build with than trusses, due to the larger dimensions of the material used.
- Expertise – Stick construction is more complex, requiring more expertise on the part of the construction crew.
- Time – It takes longer to build a roof structure of rafters than it takes to install trusses.