One thing that every child wants, besides a pony, is their own swing set/jungle gym/playhouse in the backyard. While electronic toys seem to have largely captured the younger generation’s minds; there is still a place for physical play. Playing on a swing set or jungle gym helps our children develop important gross motor skills and learn how to control their bodies in situations which require more skill than walking or sitting.
It would be possible to write an entire book on making these swing sets and jungle gyms; and one could build 100 of them, with no two being the same. The great variety is based largely on people’s imaginations; but the size and complexity is often limited to the budget they can afford.
As far as budget is concerned, building a swing set or jungle gym from scratch is considerably cheaper than buying a kit and can cost as little as 1/10 the cost of buying a pre-assembled one. The expensive part of any of these sets is the custom parts, such as swing seats, ladders and climbing wall “rocks.” But pretty much all of that can be made in the workshop, with a little ingenuity and patience, saving money on the overall project.
Few swing sets are just swings on an A-frame. While they may start out that way, it usually doesn’t take long before we’re adding additional parts to that. One of the many things that kids seem to like having is a platform that’s raised up off the ground. This allows their imaginations to see their swing set as a fort, castle or space ship, and themselves as defending it against all attackers.
As soon as that raised section is added, it’s time to add a ladder. Granted, there are always those children who will find a way to climb up without any sort of formal ladder, but that’s not something to be counted on and their way of getting up on that platform might not be safe. A ladder is a good addition to any swing set and once again, it will help teach children important motor skills.
There are a number of different ways of building a ladder for the kid’s swing set; but regardless of what sort is built, there are a couple of very important things to keep in mind:
Rungs will need to be set closer together than they would for adults. A normal ladder for adults has the rungs spaced 12” apart. For small children that should be brought down to 6” and for older children 9” is best. Consistent spacing, with the rungs all being exactly parallel is important.
The ladder will be outside, so it has to be able to withstand the weather, without being damaged. A good finish is important.
The materials we work with are stronger than we tend to think. Most of the time, we pick those materials based upon how much they flex, not wanting something to bend, rather than being able to support the weight. A single 1”x 2” would be strong enough to support a child’s weight; but would probably flex enough to make both mommy and child uncomfortable. On the other hand, a 2”x 4” is actually overkill. Somewhere in-between the two is a 1”x 4”, which would probably work well.
Ladders should always be attached, not just leaned up against the swing set. A good angle can be achieved if the bottom is cut at 60 degrees. If the bottom can be anchored as well, either to the swing set itself or to the ground, that’s even better.
Of course, any ladder is going to have to fit the swing set it is built for. Most of those platforms are five to six feet above the ground. That’s high enough that the kids won’t outgrow it all that quickly, while still being close enough to the ground for safety. Make sure to measure the distance from the platform to the ground, taking into account the angle of the ladder.
Building a Round Rung Ladder
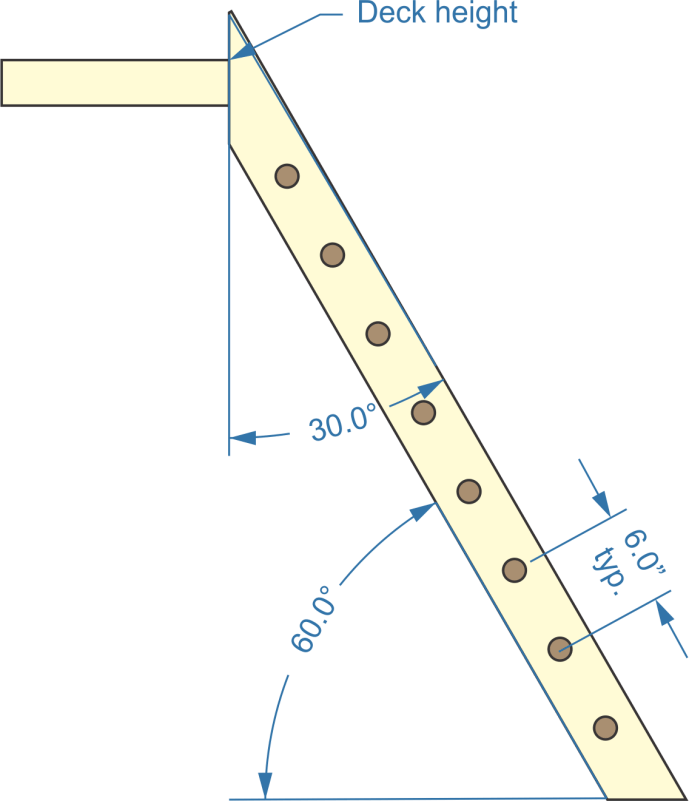
One of the more common styles of ladders is one that is made with round rungs. The rungs themselves are easy to make, as we can find dowel rods that are 1-1/4” to 1-1/2” in diameter. As closet rods are 1-1/4” to 1-3/8” in diameter, that’s a good alternative, which is a bit less expensive. The one specialty tool that might be needed is either a spade bit or forstner bit that’s the same diameter as the dowel or closet rod.
Round rung ladder
While 2”x 4”s can be used to make this ladder, I’d make it out of 1’x 4”s, unless I happened to have the 2”x 4”s sitting around. The 1’x 4”s will provide sufficient strength and stiffness, without needing to go to the heavier material.
Before drilling the holes for the rungs, cut the stringers to length and angle cut the ends. While it would be possible to use the ladder without angle cutting the ends, it would probably be harder to attach it at the top end and the bottom end would tend to dig into the ground, putting extra strain on the connection at the top end. If the ground is soft, it wouldn’t hurt to add a foot to the ladder, another piece of 1”x 4” or 2”x 4” that spans the distance between the stringers and 6” to 12” to either side. This will help keep the ends of the stringers from sinking into the ground.
Make a line down the center of the two stringers and mark off spacing for the hole every six or nine inches, right down that centerline. It would be a good idea to clamp the two pieces together while drilling, so as to ensure that the two holes line up perfectly. Drill all the way through from one side.
Cut the rungs for the ladder out of the dowel rod or closet rod. They should be 12” long, plus two times the thickness of the stringers. That way, when assembled, the ladder will have 12” of clear space between the rungs, plenty of space for even an adult to climb up. Clamp the stringers to the workbench and insert the rungs, gluing them to both stringers. Fasteners are not actually necessary, but it wouldn’t hurt to put a single finish nail through the edge of the stringers and into the middle of the rungs, as a precautionary measure, in case one of the rungs is not properly glued.
Once the glue dries, the ladder is ready to be attached to the swing set. Be sure that children do not play on it for 24 hours, to give the adhesive sufficient time to dry fully.
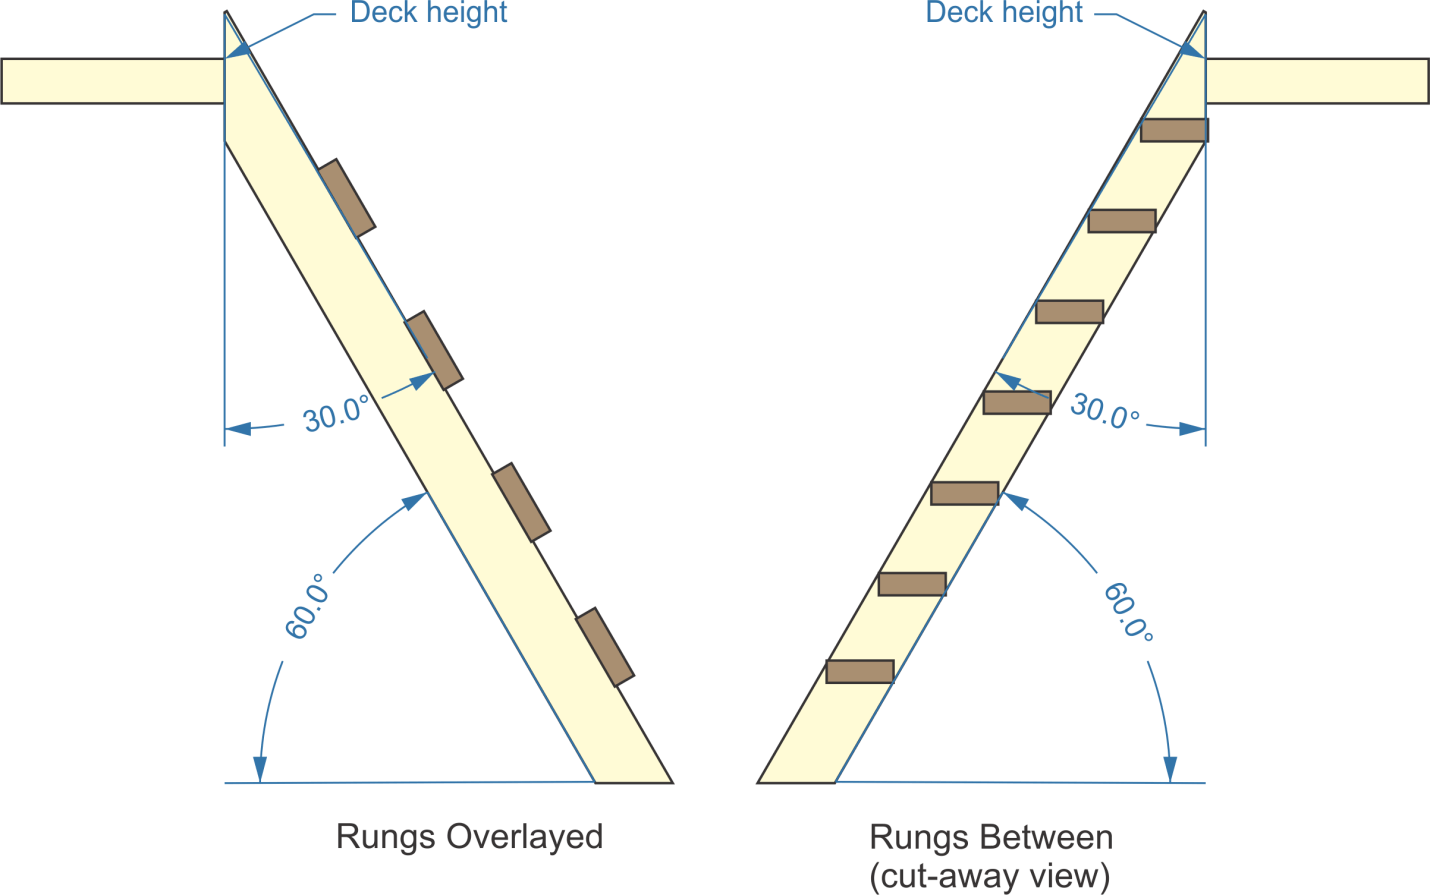
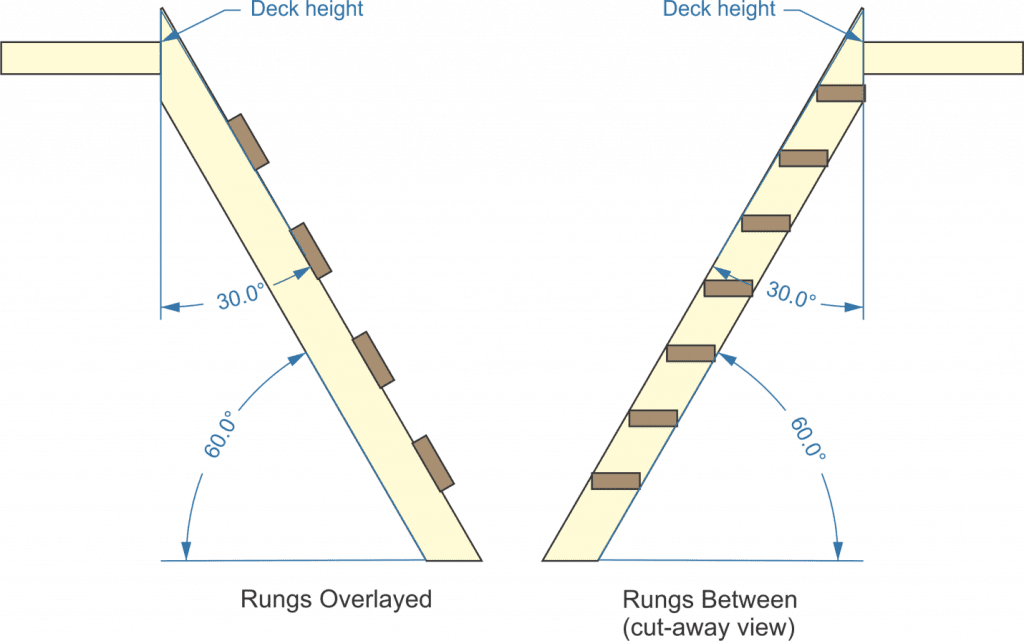
Some people prefer to use 1”x 4”s for the rungs of their ladder, instead of making it with round rungs. Personally, I don’t think the kids care. There are two different ways of doing this, as shown in the drawing below.
1×4 rungs
In the drawing on the left, the rungs are overlaid onto the edges of the stringers. This allows nailing or screw through the rungs into the stringers, making for a very strong joint between the pieces. But this style has some distinct disadvantages as well. For one thing, the rungs are considerably farther apart. Some of that can be solved by using thinner material, such as a 1”x 2”. That works well, as long as clear material, without knots or wane is used. The other thing about this style is that the rungs tend to be spaced farther apart. That could be a problem, depending on how big the children playing on it are.
In the drawing on the right, the rungs are placed between the stringers, much like making steps. This is much easier for the child to climb up, but much harder to make. One option is to just nail through the stringers into the edges of the rungs (or steps). While the nails would be strong enough to hold a child’s weight, the problem comes with time, as rotting, combined with the expansion and contraction of the wood due to moisture, will make the nails loosen up on the nails, causing the ladder to become unsafe.
Obviously a better means of connection is required with this sort of ladder. One option is to cut ¾” square cross-sections of 1”boards and use that as blocks under the ends of the steps. They can be glued and nail to the stringers and then the rungs can be glued and nailed to them. The other option is to drill through the stringers, into the ends of the rungs, doweling them together with 3/8” dowels. Two dowels per rung would provide the necessary strength.
Making a Rope Ladder
The third option is to make a rope ladder for the swing set. This gives a nice pirate feel to their play area, besides being a more challenging obstacle for them to learn to climb. While that might not be good for smaller children, as they grow, creating more challenging things for them to play on is an important part of their growth and development.
Rope ladders can be challenging, especially because it can be difficult to get the knots in the rope to come out just the way one wants them to. If the knots aren’t in the right places, the rungs will be uneven, making it even harder to climb. There’s a way to make this easier, as well as a way to go around the knots altogether.
To start with, the rope itself should be ½” or larger in diameter. A larger rope provides more stability, as well as making it easier to use the second method I’m going to show you. The rungs can be cut from 2”x 4”s, but 2”x 2”s or 2”x 3”s will make a neater ladder and it will be possible to put the rungs closer together.
Start by cutting the rungs 15” long. Then drill two hole through the ends, parallel to each other, 1” from the two ends. The holes should be 1/16” larger in diameter than the rope. It would also help to sand the ends, eliminating sharp corner for kids to scratch themselves on.
Cut the rope in two and apply an anti-fray treatment to the ends. Depending on the material the rope is made of, this could mean searing the ends with heat, wrapping them with tape or doing it like the old sailors did, where they wrapped the ends of rope a particular way with thread or smaller rope. Tie an overhand knot in one end of each rope and if possible, apply a couple of drops of superglue or other adhesive to the knots to keep them from coming undone.
Clamp one rung to one end of the workbench with the hole horizontal to act as the mount at the top of the ladder. Run the two pieces of rope through the holes, bringing the knots up tight against one side. Then run the ropes through the holes on the next rung, laying that rung on the table.
Here is where the two methods differ. If the rope is going to be tied, then overhand knots need to be tied, under this new rung. In order to get the position of the two knots equal, place a box or some cutoff scraps of wood between the two rungs, establishing the spacing. When tying the knot, insert a screwdriver or other rod in the knot and use it to push the knot up against the rung while tightening it.
For the other method, which doesn’t require tying all those knots, it will be necessary to mark a line on the rungs, right on the centerlines of the hole. Once the rung is slipped onto the rope and positioned, two drywall screw can be run through the wood and into the rope, effectively pinning it in place. When mounting the ladder to the swing set, hide the screw heads by putting them to the back.
Related Posts:
DIY Ladder Stand by Admin October 11, 2021 DIY Hunting deer is challenging, to say the least. Unlike some other types of game, deer are very flighty and will quickly run away if they…
Wooden Nativity Set by Admin November 28, 2021 DIY Nativity scenes are one of the most classic Christmas decorations there is. Sometimes called a “crèche” or a “Christmas crib,” the scene depicts the birth…
Wooden Swing by Admin October 8, 2021 DIY A wooden swing adds something to any home, whether that’s a porch swing, a free-standing swing on a patio or something suspended from a tree…