The spiral staircase has been in use in architecture for roughly 1,900 years, although researchers seem to think that the concept goes back over 3,000 years. Originally, they were a defensive measure, used to force attackers to use a very narrow front, giving the defenders an advantage. This advantage was amplified by building all spiral staircases ascending clockwise, forcing attackers to expose more of their bodies as they fought their way up the stairs, while having difficulty wielding their own swords, which would end up hitting the tower wall.
The study of castles, especially medieval castles, is fascinating. Those castles are a machine, exquisitely designed as a defensive tool. It is there that we see the spiral staircase first come into its own. Round towers were commonly used as defensive strongholds in castle walls. Most of those towers weren’t large enough in diameter to house a princess (she was in the castle keep), but were nothing more than a spiral staircase, leading to a fighting platform at the top. Defenders used those staircases to mount the wall and then if the fighting moved inside the castle, there would be fighting on the stairs.
Since castles were made of stone, the spiral staircases in those towers were as well. Those stairs were inset into the walls, cantilevered towards the center of the tower. In the case of narrow towers, the center end of the stairs were designed to stack, forming a column. But in larger towers, there was no center column, with the stairs merely resting on each other. In these cases, it was the outer wall which actually supported the stairs.
As time went on and the castle was no longer a viable tool of war, spiral staircases didn’t disappear. Rather, their purpose changed. Instead of being part of the defenses of a castle, spiral staircases were used when there wasn’t room to shoehorn a regular staircase, even a switchback staircase into a building.
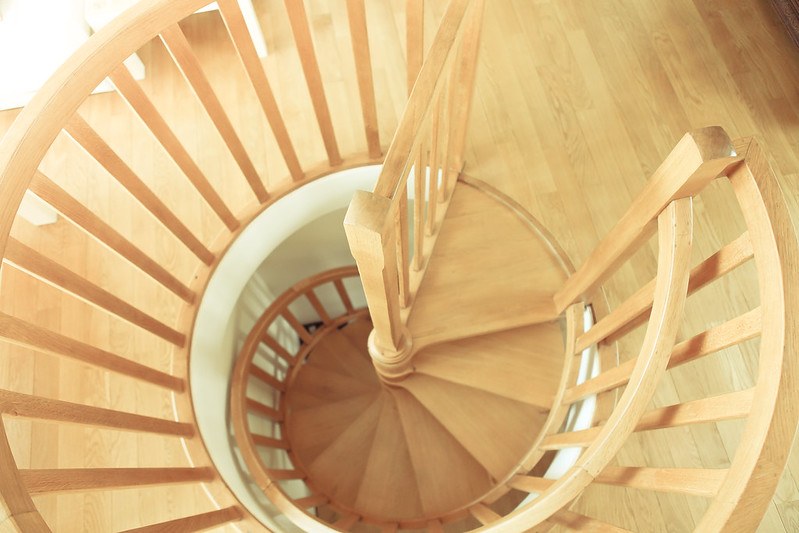
These spiral staircases were usually made of wood and are perhaps some of the most amazing examples of woodworking in history. While most still depended on a central column for support, most no longer had the outer wall for additional support. All the weight of the staircase was supported by that central column, which was often of wood as well.
But what about cases where there was no central column? There are numerous examples of spiral staircases which use the outer wall for support, without any central column. But there are also a few examples of wood spiral staircases, which seem to defy gravity, as there is no central column or outer wall for support. Perhaps the most famous of these is the Loretto Chapel staircase in Santa Fe, New Mexico.
This staircase was built by an unknown craftsman who legend has it appeared out of nowhere to provide the nuns of the chapel a means of climbing up to the choir loft, in response to their prayers. The amazing staircase is built without nails, made of a wood that is not available in that region, with no visible means of support. Yet it has stood now for over 150 years. The carpenter who built it disappeared without receiving payment or the thanks of the nuns. A railing was added by another carpenter some years later.
While the owners of the Loretta Chapel want to perpetuate the myth of this staircase being “impossible,” the truth is that it is quite possible, otherwise it wouldn’t exist. Even so, it is an amazing piece of carpentry.
What makes staircase of this type work is that the outer and inner stringers (the spiral-curved vertical connecting pieces on the outside and inside of the steps) act as two parallel beams, carrying the weight of the stairs. As the years have proven, they are both strong enough and springy enough to handle the weight and vibration of people climbing the stairs, transferring the weight down to the bottom step, sitting on the floor.
Spiral Staircase Kits
Most spiral staircases put into homes today are kits. They all have a central metal column, which is the main supporting element of the stairs. Individual stair treads, which can vary in style, are slid onto this column from above, positioned, and fastened in place.
One of the major requirements to be able to put a spiral staircase into a home is an adequate place for the staircase to be installed. That usually means designing the home, with the staircase in mind. If the home has a basement, then the ground floor subfloor will need considerable extra support where the staircase is to be installed, because all the weight of the staircase will be sitting on a steel base plate which is only about six inches square.
At the top end of the stairway, you need to have some sort of landing, allowing you to exit the stairway and enter into an upstairs hallway. This can be done a couple of different ways, with the top of the stairway actually being fully enclosed, with an opening on one side that spills out onto the hallway or having the stairway connect to a balcony. It all depends on the design of your home.
Surprisingly these kits are really not all that expensive, for what they are, and come with everything you need. You can’t just walk into your local home improvement center and pick one up though; you will need to be sure that your staircase is properly sized for your application. Kits have some adjustment in their rise and the manufacturers can help you to ensure that your staircase will perfectly meet your needs.
Be cautious about this, because you want the amount of rise for each step to be consistent. A short step rise can create a trip risk, amplified by the fact that going up the stairs can tend to make one a little disoriented.
These spiral staircase kits can have wood stair treads, metal stair treads or open grate treads. You can also buy kits which provide the necessary brackets for the treads, allowing you to make your own custom treads of whatever type of wood you want.
If you decide to install a spiral staircase in your home, you may want to have a second staircase to your second floor elsewhere. It is difficult to carry even a box up or down spiral staircases; carryingfurniture on them is all but impossible. If the only staircase you have is a spiral one, then you will need to use a hoist or forklift to move furniture in and out of the upstairs rooms.
Installing a Spiral Staircase Kit
Before installing any spiral staircase, one must take into account where the entry and exit from the staircase will sit. Both need to be easily accessible, in locations which allow for easy access. Most staircase kits provide for one full revolution per floor of rise. So, if your plan does not allow both sides to face the same way, you’ll need to make up for the additional amount of turn by use of a landing at the top end. Some kits come complete with this landing, made of the same material as the step treads.
The first and most critical piece to install is the central column. This needs to be centered correctly and spaced the right distance to allow for the landing at the top end. So, you measure for its location at the top and then locate where to mount the base plate by use of a level. Set it in place and be sure to check three or four times before bolting it down. Once installed, you really don’t want to move it.
The stair treads in these kits are complete units, combining the tread and mounting brackets. They are first set onto the central column from the top, sliding them down the column and allowing them to stack. Once all of them are on the column, the included landing can be slid onto the column and attached to the floor structure for the second floor and the column. This landing also acts as the top bracket for the stairway, holding the central column steady and keeping it from shaking.
With the top landing in place, the total vertical rise of the staircase needs to be measured and divided by the total number of stair treads. This will give you the vertical rise per step.
Working from the top down, each step is aligned and attached to the center column with large set screws. Besides measuring for the vertical rise, the step tread must be located to the proper angle around the column. This must be accurate, aligning with the step tread (or landing) above, while leaving just enough room for the stair rail balusters to be installed between the two steps. These balusters attach to both the upper and lower of each pair of treads, connecting them together and adding stability against vibration. They must install exactly vertically.
Each additional step tread is located and attached to the central column, in the same way that the first one is, and then attached to the central column with the same sort of set screws. Since the bracket goes around the column, fitting closely around it, the set screw is enough to hold it in place.
With all the steps in place, the balusters are attached to the steps, if they haven’t already been. Then the handrail can be attached to the top of the balusters. Additional spindles are added, if required, between the balusters, to finish off the staircase.
Making a DIY Spiral Staircase
Should you decide that you want to make your own spiral staircase, rather than buying a kit, installing it is much like installing the kit. The one big difference is that you are making all the parts yourself.
I’ve seen a number of different DIY spiral staircases, made from different materials and in an variety of different styles, ranging from something that looks like it could be a kit, to an all plywood version and passing through a rough timber version, with the step treads being logs that have been flattened on one side. The potential possibilities are just about endless.
All of these have one thing in common; a central column, just like the kits have. You can make your own column out of three or four inch diameter thick wall steel tubing, with a ½” thick steel mounting plate welded to the base. If you don’t have the capability of welding it yourself, any welding shop should be able to supply it.
Working with a central column means that all the steps are cantilevered. So ultimately, the weight of the step tread and anyone standing on it has to be transmitted back to the central column. This requires that either the design of the step tread or a bracket attached to the bottom side of the step tread be strong enough to support that weight.
In theory, a single triangular piece of ¾” thick plywood would be strong enough to do that, if it was attached to the bottom side of the step tread, with the base in contact with the column. However, you might want to go with a bit more than that, either using metal, using more than one layer of plywood, or putting a transverse strip of plywood on the bottom of that triangle, essentially turning it into a wood I-beam.
For most DIY stair treads, the tread is roughly triangular, with the point of the triangle attaching to a circle, which goes around the column. There are some critical dimensions you must keep in mind, in order to comply with building code:
The minimum tread width is 7 ½ inches, measured 12” from the central column.
Each step tread is roughly 1/12 of a circle, or 30 degrees.
The minimum step tread width, from column to the outer edge, is 26”
You must have a minimum of 6’ 6” of headroom between the top of one step and the bottom of a step above it.
The maximum rise for steps is 9 ½”
The smallest overall diameter of a spiral staircase is usually 42” (3’ 6”)
For the spiral staircase made out of plywood mentioned above, the entire staircase, other than the column and railing, was made of layers of plywood, cut and stacked. Each step consisted of approximately a dozen layers, which were individually cut on a CNC router. This used about 1 ¼ sheet of plywood per step. Each successive layer was wider than the one below, making the bottom side of the stairs into a continuous curve of tiny steps (the size of the plywood thickness) rather than the size of the step rise.
The layers of plywood were stacked together, glued and screwed, making each step. Because the step was so thick (the full height of the rise) there was no need for an additional bracket to support the cantilevered step. This ingenious design actually used material very efficiently.
An easier design, if you don’t have a CNC router, and if you want a more rustic-looking staircase, is to use logs, flattening the top and boring a hole through them, so that they will slide over the column. The trick here is boring that size hole through the log; but that can be accomplished by using a hole saw and chiseling out the wood, once the saw has reached its maximum depth.
Regardless of how you make your steps, the column is actually what is carrying the weight, so your main design criteria is to ensure that the cantilevered steps can support your weight and they will effectively transfer that weight back to the central column. Before building, you might want to make an experimental step and jump up and down on the outer edge, ensuring that it is strong enough.
Related Posts:
Refinishing Wood Staircase by Admin July 21, 2023 Finish Wood stairs have an exquisite look, along with richness. But wood stairs tend to wear off, as the staircase tends to be a high-traffic area…