Plywood is ubiquitous in the construction industry— in fact, it is almost synonymous with construction. However, in addition to its importance in the construction industry, plywood has now found use in the photography and screen printing industries. Plywood can be used as a medium for printing items as small as a photograph to large signs. The methods to make these plywood signs (or pictures) can be as simple as the typical t-shirt silk screen press to transferring an image from a thin film via a gel to a large printing machine where the plywood acts almost like a piece of paper in a typical office inkjet printer. All three methods produce a wonderful result on a sturdy and long-lasting panel.
Like any woodworking project, the finished product depends entirely on surface preparation. If you want a crisp, sharp image on your plywood, you should probably start with plywood that’s been graded at least as “A” (AA is even better). Plywood is given a letter designation, much like grades in school— C and D graded plywood is visually unattractive and best used in construction where appearance isn’t important. A-graded plywood is often used for fine furniture projects and is suitable for screen printing. Baltic birch plywood works best for screen printing because it’s almost (but not quite) white in color. Even A-grade needs some surface preparation prior to plywood screen printing. If you want to produce a coarse, rustic or distressed plywood print, you can use rough or unsanded wood. Just make sure the wood has a consistent color, no knots and a clear grain.
Sanding
If you want sharper, well-defined image, you’ll need to sand the plywood prior to printing. Start with 120 or 150 grit sandpaper and work your way up to 400 grit. Sanding to 120 or 150 leaves a rougher surface and allows the inks to bleed a little bit into the wood pores; this can be advantageous and/or desirable. If you’re looking for a sharp, clear picture, then sanding to 320/400 grit will leave you with a glassy smooth surface. If you don’t want to sand the surface, you could alternatively apply 2-3 coats of a sealer and smooth that out between coats. This avoids going through several grades of sandpaper and also minimizes dust. Once you’ve prepared the surface, make sure it’s free from dust, sanding residue or dirt.
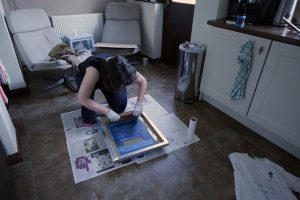
Once the surface has been prepared, you can choose the screen mesh that’s consistent with your desired level of detail. The process of screen printing is pretty straightforward and has been around for years—a quick internet search will yield several tutorials. Screen printing on wood normally involves using just one color, but click here for a good method for screen printing with multiple colors. This method was utilized for a poster and can easily be adopted for thin (say 6mm Baltic birch) plywood to produce stunning images.
Picture Printing on Plywood
There are other methods to print on plywood. One common way involves transferring an image that’s been pre-printed from an inkjet printer onto transparency paper. Transparency paper has a rough and a smooth side (make sure you print on the rough side). After the plywood has been properly prepared, there are several steps involved in transferring the image from the transparency paper to the plywood. First, coat the surface with a transfer gel, make sure the coat is pretty thick. Once the surface has been coated, align the edges of the plywood and the image paper—tape works well.
Then, register the transparency paper onto the gel—make sure the rough side is down. Remove any air bubbles that form during the registration, a roller helps remove them. The registration step transfers the image to the gel. The image transfer happens quickly, so you really need to be careful to make quality picture printing. Wait a few minutes and then remove the image from the plywood. You now have a beautiful photo set into your plywood backing. Let this dry for a couple of days and apply a UV resistant top coat. Hang and enjoy!
Related Posts:
Can Plywood Get Wet? How to Dry Wet Plywood by Amy Reed March 30, 2023 Repairs Plywood is one of the most universal building materials on the market. It can be used for all kinds of construction – from roof building…
Plywood Stairs Makeover by Admin September 17, 2021 Repairs Contractors are always on the lookout for ways to reduce the cost of building homes. This is especially apparent in tract homes, which by definition…
Beech Plywood by Admin November 5, 2021 Hardwood Birch plywood is one of the more popular hardwood plywood varieties, being commonly used in cabinetmaking, furniture making and even in making jigs in the…