Flat lay composition with wooden kitchenware on blue background
Wood is by no means the oldest material used in making dishes, plates, and other containers for food. Various metals and, of course, clay were used long before wood was.
Nevertheless, some examples of wood plates and other wood vessels go back about 2,000 years. Wood is still used today, more for its appearance than any other reason. Wood bowls, plates, and trays are not uncommon at home.
The wood salad bowl and wood cutting boards are a tradition.
But while wood may not be the number one material used worldwide for making and serving plates and snacks, there is no reason not to use it. For those of us who appreciate the natural beauty of wood grain, wood plates can be an excellent addition to our homes.
Wood is perfectly safe to eat off meals. However, at home, some people have concerns about bacteria entering their home through the pores of the plates of wood, contaminating their home with future meals. The solution to this problem at home is properly cleaning and maintaining the wooden plates.
One of the issues with using wooden plates is that knives will cut into the surface of the wood plates of wooden wood plates, scratching it. Of course, how much they cut into the wooden plates of plates depends on the type of wood plates of wooden plates being used, the sharpness of the knife being used, and how much pressure is brought to bear on the blade. But scratches on wooden plates, like those on wood cutting boards, can easily be sanded out, and the rigid leaves of wood plates are refinished.
Wooden plates are considerably more eco-friendly than plastic or Styrofoam ones. Bamboo is one of the newer disposable wooden plates that have hit the market. While bamboo is not wood but rather grass, it offers the same advantages as wood or wooden plates because it is a natural product readily biodegradable.
However, the wood of wooden plates should never be put in the dishwasher. Not only will the hot water help destroy any glue used in manufacturing the rigid plate itself, but it will also strip the finish of the wooden plates and help the wood decay more quickly. Instead, hand wash the wood of wooden plates with mild soap and warm water.
Wooden plates and cheese platters are adorable for serving-style cheese dishes. Bread and cheese sandwiches look especially attractive on wood-serving-style cheese dishes. Nothing is better for displaying cheese or doing cheese in an impressive charcuterie than wood-using serving-style cheese dishes.
The display and serving style of refined foods on wooden plates and wood serving style cheese dishes hearkens back to the pleasure and occasion of such experience some time long ago, such joy and occasion when such spreads and serving style cheese dishes were set out to impress and delight the event and to pleasure the guests of the pleasure royalty occasion.
Making Wooden Plates
There are two basic ways of making a wooden plate: turning it on the lathe or using a router. Both have advantages; the lathe allows for a wide range of designs, including putting a base on the plate to raise it above the table. However, as with anything else turned on the lathe, a turned wooden plate still has to be symmetrical around the centerline. This does create some limitations.
The significant advantage of the kids making wooden or kids’ plates with a router is that the kids’ wooden plates or plates can take on any shape the kids and friends can make, whether it is round, oval, a leaf, or a frog.
The kid’s and friends’ wooden plates or plates can also be divided into different sizes and compartments, making it possible for kids and friends to make wooden plates perfect for meals and snacks of various sizes.
Both have distinct advantages, so look at different wooden plate-making methods.
Turning a Wooden Plate on the Lathe
Woodturning can be divided into two general categories: spindle and bowl turning. The primary difference between the two is that spindle turning deals with only the outside of the workpiece, while bowl turning has an outside and an inside. Still, spindle turning doesn’t just include turning spindles.
Similarly, turning a vase falls into the category of bowl turning, even though a vase can’t be used as a bowl (or vice-versa) because it has an inside that has to be hung.
Plates are unique in that they aren’t spindle turning but don’t have an interior… or at least not much of one. While dishes are flat, they usually have some lips.
So in a sense, they can be considered a very flat bowl. Even so, they are not turned in the same way that bowls are.
The big problem in turning plates as if they were bowls is that a faceplate is attached to the bowl blank with screws and used to attach the blank top to the lathe spindle.
The hole that the screws make into the bowl blank is immaterial, as they are in the area that will be cut out when the inside of the bowl is cut out.
But in the case of a plate, there is one inside to cut out; or at least there isn’t enough to cut out to hide the screw holes. For that matter, the screws would probably go all the way through the plate.
The solution to this problem is to add glue and a sacrificial block of wood plates, as shown in the photo below. Then, once the plate has been turned, it can be removed from the block of wood plates, and the union of wood plates and platter can either be discarded or saved for the next wood plate to add.
Plate blank held to lathe spindle by a face plate
When using a sacrificial block like this, it is essential to ensure it is tight against the plate blank all the way around. The block can be glued with PVA wood glue or a hot melt glue gun. If PVA glue is used, the block must be cut off the plate at the end of the turning process.
If hot melt glue is used, the plate can be pried off the league, and the hot melt glue scraped off. This is ultimately easier but not as strong, so care must be taken not to tear the plate off the block.
The size and function of the plate that can be turned is dictated by the size and function of the lathe. Lathes have two critical dimensions, the “lathe swing” and the “distance between centers.” The distance between centers tells us the most extended project that can be turned on the lathe’s particular size and function. The lathe swing tells us the process and the largest possible diameter project that can be turned on that lathe function. This can be problematic for turning wood plates if large wood plates are desired.
The lathe in the picture above has a 12″ swing. Theoretically, the enormous plate that can be turned on is 12″ in diameter. But that’s a touch misleading, as it doesn’t necessarily work out that way. The 12″ is derived from the centerline of the spindle to the lathe bed. In this case, that’s 6″. So the maximum available radius is 6″. If we double that, we get 12″.
But of course, that doesn’t leave any room for clearance or for the wood blank to be out of size for plates of any size or perfect various sizes or plates of perfect around sizes or scales of perfect round sizes. In reality, the enormous plate of perfect around size that can be turned on that lathe is probably 11″, although it might be able to reach 11.5″ with care.
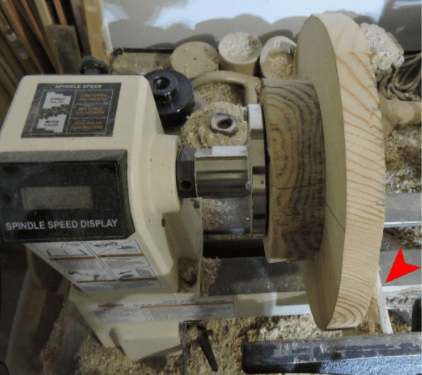
Two things will help make it possible to turn that 11.5″ plate. The first is to cut the outline of the plate on a band saw or scroll saw, turning the square blank into a circle. Then center the round blank exactly on the sacrificial block to center it precisely on the lathe’s spindle. Position the banjo platter (the tool rest’s base) to the blank’s side.
It’s not too visible in the photo above, but the red arrow is pointing at the banjo wood platter. The tool rest, which of course, is the black thing at the bottom of the table behind the wood platter in the photo, extends past the sides of the snack wood platter and plate between the table, the wood platter table, and the banjo wood platter table, allowing the tools to rest upon it while working the edge wood plates, the wooden plates and bottom side wood plates off of the wood plate.
Turning the Plate
With the plate blank adequately mounted, the plate can, be turned. Turning a scale is like riding a bowl; only the wood plates at home and shop are shallow. We start by turning the bottom of the container, then turn the leaf around and remount it so we can ride the top side of the snack plate with it. For security, it’s a good idea to use a live center instead of the tailstock, with a rubber cover, so that it doesn’t dig into the wood.
There isn’t a lot of upward curve to the bottom of a plate like there is with a bowl, but generally speaking, only the center part of the plate touches the table. So the edges of the container will need to turn upwards, with the bottom making a slight slope from there to the center area. Leave enough room there for a shallow dovetail.
With the bottom formed and sanded, the plate can be removed from place on the sacrificial block and remounted, using the dovetail cut into place at the bottom to mount and add it to a standard four-jaw vice for woodturning.
The live center should be applied again, as a small dovetail is being used. Work from the outer edge inwards, leaving the center of the plate for last. This style allows the live center to be used for the longest possible time, as it doesn’t have to be removed until it is time to turn the center.
While turning the top side of the plate, ensure the tool doesn’t catch in the wood. This often happens when the tool is not supported and makes contact with the turning wood before it makes contact with the tool rest. Extra care must be taken around the edges of the plate, as it is more likely to catch there, and the plate is more fragile there as well.
Those who don’t have a lathe available at their shop or home can still make wooden plates using a router. There is a bowl bit, which all router shops, or homes, use to cut out bowls and plates from ordinary 4/4 lumber. These bits come in sizes and different sizes, allowing for a tighter radius in the corner of sectional plates and serving trays.
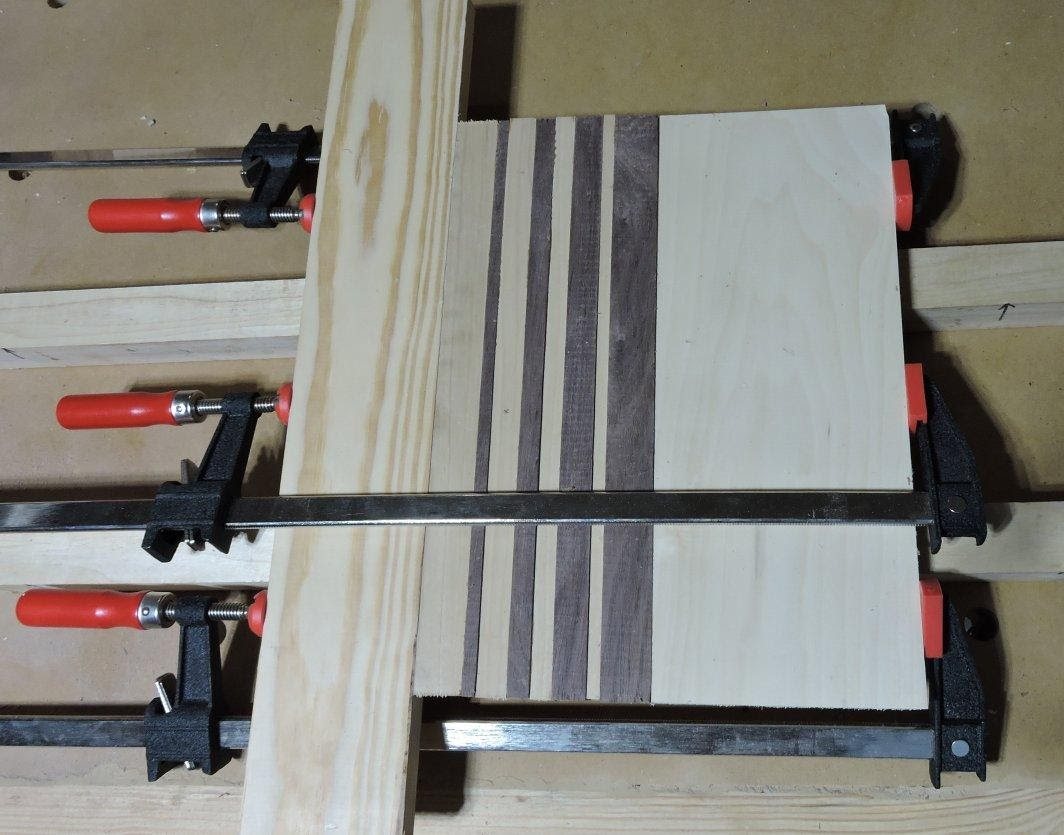
Starting with a Glued-up Board
While any lumber can be used to make a perfect top plate in add this perfect same style, to add this ideal same style in this excellent manner, to add a special touch to add this ideal same style, to add this outstanding top quality, and much more attractive plate in the perfect same style, to add this excellent same style special touch also can be made by gluing different woods together, especially woods with contrasting sizes and color.
This special touch to add this perfect same style also becomes a great way of using leftover pieces of wood, as just about anything can be cut into strips and glued together to make a perfect same style, perfect top quality flat board.
Glued-up board
For this serving top table and serving top set and serving top table and serving bowl set and serving top, I’ve chosen to use poplar and walnut, which gives the wood plates the serving top table and serving top set and serving leading group and serving top and serving full table and serving ultimate set and serving top and serving ultimate collection and serving maximum a nice contrast, while keeping costs reasonable. Poplar is the least costly light-colored hardwood available, and walnut is the least expensive dark-colored hardwood, even though it costs considerably more than poplar.
The pine 1″ x 4″ on the left of my glue-up spreads the clamp’s pressure out across the glue joints’ width. Since the wood strips to the left in the picture above are narrow, the pressure from the clamps would not be evenly distributed across the width of the glue joints without that piece of pine. I didn’t end up using cauls for clamping this because it turns out that the walnut is thicker than the poplar. Once gluing was completed, the board was planned, giving a finished thickness of 5/8″.
Making a Template
Making a bowl with a router requires the use of a template. The bowl-cutting router bits are intended for use with a bearing the same diameter as the bit. Many come with the approach permanently installed. The bit is to ride along the inside of a template, allowing for highly accurate cutting of the plate. As you can see in the photo below, this 1″ diameter bit, with bearing, will just about cut through the board. The approach allows for using as thick a template as necessary so that the final cut depth works out.
Making a template
For this plate, I made the template out of ½” thick plywood, which allowed me to make the cutout in stages rather than having the bit cut out to total depth in one pass. I have also tried using a ¼” thick template. While it did work, I wouldn’t recommend it. While the bit can cut out to total depth in one pass, it is necessary to work slowly, as there is an increased chance of the bit catching in the wood and pulling it out of whatever clamps are used to hold it to the workbench.
Take care when making the snack and serving plate template to make the plates’ inside dimensions exactly the size desired for the size of the serving plate and to make the inside edge of the snack and serving plate and the serving top cutout smooth. Any high or low spots on the edge of the snack plate will be transferred directly to the serving plate being cut.
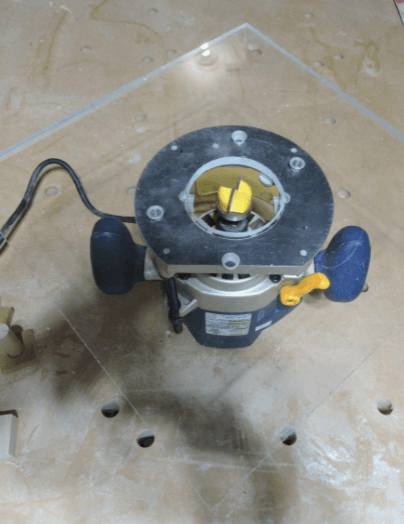
Modifying the Router
The typical router base isn’t large enough to cut a vast plate while supporting the router on both sides of the open cut. As the plate I was making was 10″ x 13″, it was clear that the router base wouldn’t have any support in the middle of the cut.
Therefore it was necessary to enlarge the router’s base. I did this by attaching a 5/16″ thick piece of clear polycarbonate plastic. I used that mainly because I had it. Otherwise, I would have stuck with ¼” thick material. Polycarbonate (Lexan) is better than acrylic (Plexiglas) as it is less brittle. While acrylic can be used, care must be taken when drilling the holes to avoid cracking the plastic.
Router with auxiliary plate installed
Most routers have a couple of threaded holes in the baseplate to allow attachment of accessories and other baseplates. In this case, I used those holes for mounting the clear polycarbonate. There are a couple of extra holes in my plate in the photo because I first drilled and countersunk the plastic to match the 5/16-18 holes in the router’s baseplate.
Then, after I couldn’t find a flathead screw that size, I was forced to make adapters and use #10-32 flathead screws instead. Hence the extra set of holes.
To make the adapters, I cut off a couple of 5/16-18 bolts and then drilled and tapped them for the smaller screw to fit inside. I used #10-32 screws because ¼” diameter ones would not have left enough material in the adapters, and #12 screws were unavailable at my local hardware store.
While #10 is a bit small, I gained greater holding strength by going with fine thread screws (32 teeth per inch) than I would have had with coarse thread screws (24 teeth per inch). A slot cut through the top ends of the adapters allowed me to thread them into the existing hole in the baseplate with a screwdriver.
The center hole set in sizes in plates of the auxiliary plate should be as large as the size of the center hole set in the leaves of the router’s baseplate plates, allowing clearance for the bit and chips. If the hole formed in the plates is too small, it will be hard to see how the bit aligns with the template plates.
One final detail about the auxiliary plate in the photo above; it’s mounted at a 45-degree angle to the router. That last-minute decision was exceptionally fortunate, as having that plate on an angle allowed the router to bridge a more comprehensive span.
Considering that the plate being made is 10″ x 13″, had I installed the auxiliary plate square to the router, it would not have bridged to the other side of the opening in the plate.
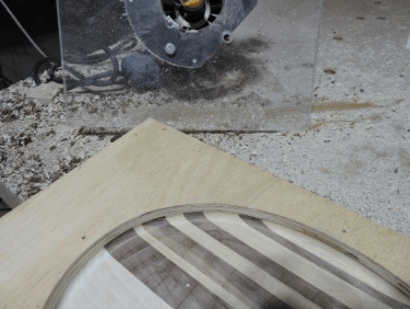
Cutting out the Plate
The plate can be cut with the template made and the router modified. The inside of the container is cut first, and then the outside. This step allows the corner material of the snack plate, which will, of course, end up being cut off, to be used for attaching the template to the wood blank with double-sided masking tape.
Ensure enough material is left around the opening in place of the template plates to cut out the outside of the container.
Clamp the workpiece to the workbench using bench dogs connecting to the workpiece rather than the template plates. They must be set just below the level of the template plates so that the router auxiliary plate doesn’t run into the bench dogs during cutting.
Bowl-cutting router bits aren’t perfect, but they can plunge an ideal cut if given enough time to dig into the wood. Always cut in a clockwise direction, matching the rotation of the router bit. It doesn’t matter what order the material is taken out in, as long as nothing is missed and at some point in each step of the process, the router bit is run around the perimeter of the template opening to ensure a clean edge cut.
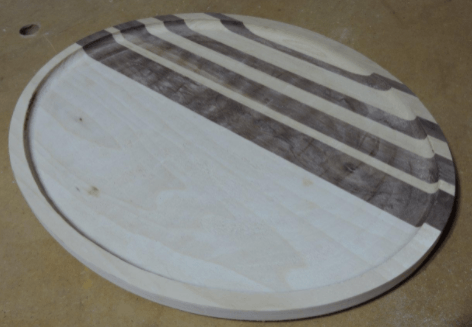
Routed top side of plate
While cutting up to ½” of depth in one pass with these bits is possible, it’s best to break that up and not cut more than ¼” in one pass. The last pass should be a light cut of 1/8″ or less, eliminating chapters and making for the smoothest possible amount. The photo above shows that the finished cut is soft but imperfect. It will still need sanding before a finish is applied.
Cutting the Plate Outline
The template can be removed with the top side of the plate cut. Sketch the line for the outside edge of the plate, either using a pattern or a marking gauge, guiding off the cutout at the top of the container.
There needs to be a lip on the edge of the plate, but the size and how wide that lip is depends on the woodworker’s style and preference. The lip on the plate in the first set of photos is 3/8″. Alternatively, the container can be made with a shaped lip that doesn’t match the cutout part’s style or size, perhaps shaping it like some recognizable object, like a flower or leaf.
Cut out the outline of the plate on a band saw or scroll saw and sand the edge smoothly to remove any uneven spots and saw marks. Then radius the bottom edge of the plate with the router and add a full size ¼” to ½” round over bit. The lip of the container can, of course, be rounded over as well with a full-size 1/8″ round-over bit.
The entire wood plate will need one step to be sanded, top and bottom, with progressively smoother quality sandpaper. Before the final sanding step, dampen the surface of the wood plates along with the wood to raise the quality of the wood grain, and then make the wood plates one step before the final pass with fine-quality sandpaper.
Fully routed plate, unsanded and unfinished
Applying Finish to Wooden Plates
Regardless of whether the wooden plate is turned on the lathe or cut with a router, some finish should be applied to the finished plate. The type of finish selected depends mainly on the plate’s use.
Varnish, lacquer, and epoxy should not be used if the serving plate serves any serving style of dishes or food. While they will seal the other wood serving plates very well, cutting on the serving style ate can cause slivers of these finishes to come off and become embedded into the serving style snack plate or food, thereby becoming ingested.
The best finish for a wooden plate is some oil, either Tung Oil or Mineral Oil. Olive oil or grape seed oil can also be used, but these oils will affect the flavor of the food being eaten off the wooden plates more. Apply at least three liberal coats of oil, allowing each to soak in before applying the next.
Wooden plates, like wooden plates and cutting boards, must be maintained. This means re-oiling them periodically. How often depends largely on how much the wood plates are used and how often they are washed.
Plates that are only used infrequently should still have a fresh application of oil every three months. For wood plates that are used and washed frequently, allow the color of the used wood plates to dictate when another application of oil is required. When the color of the freshly washed plate is significantly different than when it is dry, it is time to apply more oil.
Related Posts:
How to Make a Wooden Car by Admin April 23, 2021 DIY Wooden cars are classic toys, of the type that our granddads and great-granddads played with. They’re the kind of toys which can be made in…
Wooden Garden Troughs by Admin May 20, 2021 DIY Adding green growing things to any living space just makes it more livable. Interior decorators and workplace designers figured this out long ago. That’s why…
How to Clean a Wooden Cutting Board by Admin June 4, 2021 Finish There’s a lot of false information around about wood cutting boards, mostly due to restaurants not using them. This has led people to think that…