
I’ve used screws as my main method of joining wood together for most of my life. It’s only recently when those screws have become largely replaced by dowels or mortise and tenon joints. Still, there are many times when screws are just the best and most convenient fastener choice to use.
Of course, screw aren’t perfect, just like any fastening system. Any woodworker needs a full arsenal of joining techniques available to them, as not all projects can be joined together in the same way. What works perfectly well for one project, might just mess up, when used on something else. Such is the case with using screws. There are some times when screws make a near-perfect joint and others where joining the pieces together with screws seems to do more damage to the project, than helping it. This damage often takes the form of split boards, especially when wing near the edges or ends.
Nails and screws both work by compression. As they are inserted into the wood, the fasteners push aside wood fibers, which then push back against the fastener, holding it in place. This interface between the fastener and the wood can be damaged by rotting of the wood or by shrinkage of the wood if wet wood is used. But as long as it doesn’t rot or shrink, the fastener can be expected to hold the wood joint together indefinitely.
There is a problem inherent in this sort of fastening though; the risk of splitting. If the fastener puts too much sideways pressure on the wood grain, it can force it apart. Two things aggravate this risk; high wood density and low wood grain cohesion. Woods with a high density have less room between the cells of the wood for the fastener to use. So the fastener will push the wood grain aside more readily. If that wood has a low cohesion between the cells, it is easier for that to lead to splitting.
The solution to this problem is to remove some of the material by drilling pilot holes and/or clearance holes in the parts being joined together. In that way, we can be sure of having a solid joint, while at the same time avoiding damaging the wood we are joining together.
Pilot Holes versus Clearance Holes
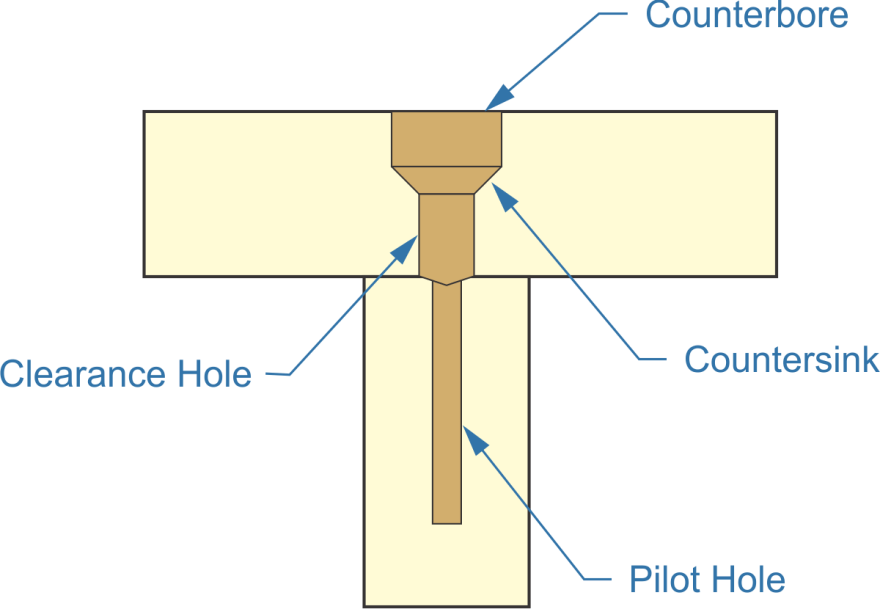
Pilot holes are often confused with clearance holes, so let’s get that out of the way, before going any further. A pilot hole is a hole drilled into a piece of wood, which guides the screw into place, while removing enough material so that the body of the screw doesn’t put too much lateral pressure against the wood grain. On the other hand, a clearance hole is larger, allowing the screw to go through the wood without putting any lateral pressure on the wood whatsoever.
Done properly, pilot holes are drilled into the base piece, which the other piece of wood is being attached to. They need to be sized in such a way as to ensure that the screw threads can still bite into the wood grain, allowing the wood grain to compress against the threads, even if the hole is large enough so that the wood is not compressing against the body of the screw.
Clearance hole are drilled into the piece to be attached and should be sized to allow the screw to slip through the piece of wood, without the threads biting into the grain. When the screw’s threads do bite into the hole, it establishes those threads as part of the screw joint. But if the two pieces of wood aren’t tight up against each other, when the screw goes into them, it can actually force a permanent gap between them.
This raises the question of how the screw holds the wood together, if there is no pressure from the screw threads cutting into the first piece of wood. The answer is that the screw’s head, regardless of the head style, acts to pull the two pieces of wood together, through clamping force. In this, the compression mentioned earlier is only about holding the fastener into the wood, not in holding the pieces of wood together. That’s true of both screws and nails, as in both cases it is the head of the fastener, pulling against the part of the fastener that is being held by clamping force, which holds the pieces of wood tightly against each other.
For wood screw, there’s one other element required; a countersink. Wood screws are traditionally made with a flat head, intended for use in a countersunk hole. While there are some round head, pan head, hex head and bugle head wood screws on the market today, the vast majority are still flat head. Using flat head screws on wood projects allows the screw’s head to be inserted all the way into the wood, hiding it.
Allow me to throw another term in here – counterbore. A countersink is an angled depression in the wood, intended to mate up perfectly with the sloped bottom side of the screw head. But what if the idea is to sink the screw into the wood far enough so that a wood plug can be inserted above the screw head, hiding it completely? A deeper countersink won’t allow for this, as the countersink will continue to be drilled at the same angle. Rather, a straight-sided upper section to the hole is needed, above the countersink. This is called the counterbore and is made to fit the size of the wood plug. Adding a counterbore to a screw hole isn’t required, unless the woodworker desires to totally hide the screw head.
Another type of Pilot hole
The term “pilot hole” is also used in other ways than for fastening wood. In the case of drilling larger holes, especially in metal, a smaller hole may be drilled into the material in order to guide or “pilot” a larger bit as it drills into the material. Several stages of drilling might be done between the smallest pilot hole and the time the final hole diameter is reached.
This procedure is used mostly to alleviate wear and tear on drill bits and drill motors. Hard materials put considerably more stress and strain on drill bits and motors than softer materials will. By using a pilot hole and stepping up the size, less force is required for drilling the hole and less heat is generated by friction. That’s especially important when drilling through metal.
Selecting Pilot Hole Drill Bits
When drilling pilot hole into wood, it is important to select the right size drill bit. Too small a drill bit will not leave enough material for the screw’s threads to grab, while too small a hole will eliminate the benefit that the pilot hole was drilled to provide. Still, it’s better to drill a pilot hole that’s a little too small, than one which is a little too big.
To determine the drill bit size that’s correct for a particular wood screw, it is necessary to know the screw’s minor or root diameter. This is the diameter at the base of the screw threads, basically the smallest diameter we can find, excluding the tapering of the tip.
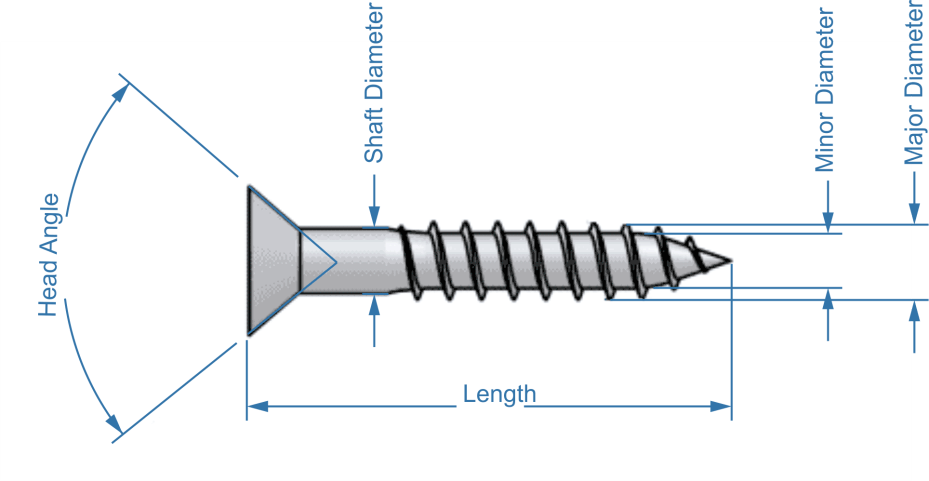
The minor diameter can easily be measured by use of a digital caliper, but in most cases that isn’t necessary. In order to select the right size drill bit for the pilot hole, all that’s needed is to hold the drill bit in front of the screw. If any of the screw’s core material is still visible in the threaded part of the screw, then a larger drill bit is needed. Ideally, the drill bit should just overshadow the core of the screw.
A similar comparison can be made for selecting a drill bit for drilling clearance hole. The only difference is what the drill bit is being compared to. In this case, the best part to compare the drill bit with is the part just under the head, where there isn’t any thread. If the screw is threaded all the way up to the head, it is necessary to compare the drill bit with the major (outer) diameter of the screw’s thread. While a minimal clearance is acceptable; too much of a clearance will allow the pieces to move laterally when connected together.
Of course, there is an easier way to go about this; that’s to use a chart, like the one below to determine what size drill bit to use to drill pilot hole.
Clearance and Pilot Hole Sizes for Wood
| Screw Size | Pilot Hole – Hardwoods | Pilot Hole – Softwoods | Clearance Hole |
| #1 | 1/32” | 1/64” | 5/64” |
| #2 | 3/64” | 1/32” | 3/32” |
| #3 | 1/16” | 3/32” | 7/64” |
| #4 | 1/16” | 3/64” | 7/64” |
| #5 | 5/64” | 1/16” | 1/8” |
| #6 | 3/32” | 5/64” | 9/64” |
| #7 | 3/32” | 5/64” | 11/64” |
| #8 | 1/8” | 3/32” | 11/64” |
| #9 | 1/8” | 3/32” | 3/16” |
| #10 | 1/8” | 7/64” | 3/16” |
| #11 | 5/32” | 9/64” | 13/64” |
| #12 | 9/64” | 1/8” | 7/32” |
| #14 | 9/64” | 7/64” | 1/4” |
Drilling the Pilot Hole
Drilling holes seems like an easy task, but in reality it is an easy task to mess up. Even after decades of drilling holes I still find that I make mistakes, especially the mistake of drilling holes that are not perpendicular to the surface of the wood. That’s why I personally use a drill press for drilling holes whenever I can, rather than depending on my ability to hold the drill straight. Some purists might not agree with my methods; but the work.
Before drilling any hole, it’s important to mark where it should be. Relying on one’s ability to “eyeball” the hole location is a sure way of making holes that go into nothing, missing the board they’re supposed to connect to. If there’s a concern about marring the surface of the wood with pencil marks, covering the area to be drilled with painter’s tape will protect the wood, as well as helping to reduce the chances of the wood surface chipping while drilling.
It’s best to not depend on the ability to align the drill bit with the penciled “X” on the tape or wood surface, as the point of the drill bit is considerably larger than the intersection of that X. Rather, make an indentation in the wood where the hole is to be drilled. This can be done with an awl, but I prefer using a pocket automatic center punch, which I keep in the pocket of my shop apron. The center punch produces a nice clean, consistent indentation, which works well as a guide for most drill bits.
While normal twist drill bits can be used for drilling both pilot and clearance hole, brad point drill bits are better. The problem is that they aren’t always readily available in all the sizes listed in the chart above. However, when they can be used, their brad point fits well into the indentation in the wood, giving positive control over the bit’s location.
If both pieces of wood are going to be drilled, always clamp them together. Don’t count on your ability to hold them together with your hands. Clamping is much more sure and less likely to slip.
Start by drilling the pilot hole through the attaching board and into the anchor board, stopping when the hole is just as deep as the screw is long. If necessary, use a depth stop collar on the drill bit or wrap it with a piece of masking tape to identify when the hole is deep enough.
Once the pilot hole is drilled, the boards can be unclamped, allowing the clearance hole to be drilled into the attaching board. In this case, the pilot hole will act to guide the drill bit, ensuring that it will remain properly aligned. A brad point bit should not be used in this case, as the pilot hole is too big for the brad point, so the drill won’t be able to self-center. A normal twist drill will naturally self-center on the hole, maintaining concentricity of the holes.
Follow up the clearance hole by drilling a countersink, in cases where flat headed screw will be used. Use one of the screws as a gauge to determine when the countersink is deep enough.
In cases where a counterbore is going to be used, the countersink step can be skipped, as the point of the countersink will cut the countersink for the screw head, assuming that a normal twist drill is used to drill the counterbore. There are actual counterbore bits available on the market, but those are designed for drilling counterbores in metal and have a pilot on them that is the right size for a clearance hole drilled for a machine screw. They are not the right size for wood screws.
Lots of Drills
As we can clearly see, it can take a number of different steps to do all this drilling. Cordless drills make this easier, as they come with keyless chucks. Even so, it can be useful to have more than one cordless drill, so that each of the various bits can be chucked up in their own drill, making it possible to avoid all those drill bit changes.
Another Option
Another option for drilling the pilot hole, clearance hole and countersink all in one step is to use a stepped bit which combines a two-stage drill bit for the pilot hole and clearance hole, along with a countersink. Some of these are tapered bits, while others are stepped bits. While a bit more expensive, especially for the good ones, this combined bit makes the job of drilling holes for wood screw considerably easier.