As long as people have been cultivating plants, they’ve probably been building trellises of one sort or another. A trellis offers a convenient place for climbing vines, allowing the vine and its fruit to get up off the ground, which helps the fruit to ripen, while reducing the chances of decay and pests destroying the fruit.
The pergola can be considered a modification or specialization of the trellis. Originating in Rome in about 1640, the pergola is often used for growing grapes, getting the vines up out of the way, while providing shade. People still use pergolas the same way today, often building them over their patio or deck, so that they can most benefit from the shade the pergola offers.
While you can buy kits for making trellises and pergolas, you don’t necessarily need to. The basic design for a pergola is fairly consistent and trellises can be made to look any way you want. I like making trellises out of whatever scrap material I have lying around, as that provides me with a cheap way of getting the trellises I need for my garden. While many of these have been made out of scrap dimensional lumber, plywood works just as well, since I am often cutting it down to a cross-section of ¾” square.
Making a Trellis
I’ve made trellises out of just about any scrap material I’ve had lying around, either dimensional lumber of plywood. Technically, if you wanted your trellises to last for a number of years, they should either be made out of pressure treated wood or a wood that is not easily affected by the weather.
However, I’ve always considered my trellises to be more or less disposable, expecting them to last no longer than a growing season. In reality, I get two to three growing seasons out of them, and that’s without treating the wood in any way. If I were to treat the wood with a waterproof finish of some sort, they would last considerably longer.
Trellis 1Trellis 2
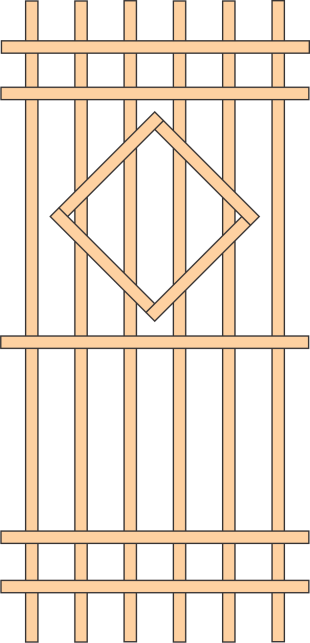
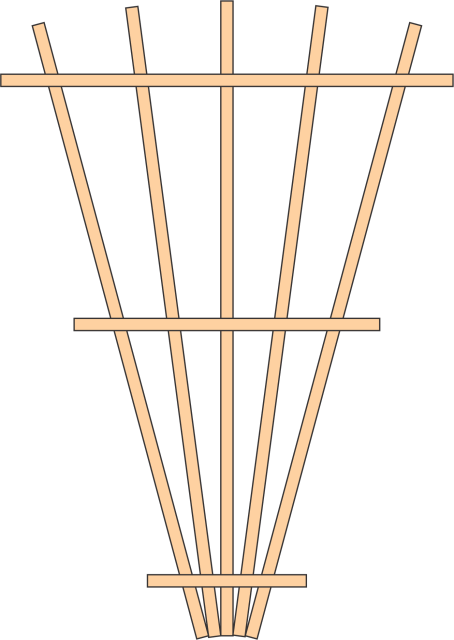
Trellises can take on many different forms, although they are usually rectangular or fan-shaped, as shown in the diagrams above. How your various pieces fit together really isn’t of much importance, as long as they are close enough together so that the tendrils on the vine can wind around them, holding the vine in place.
One important consideration is the diamonds shown in the trellis on the left. Any structure which just has horizontal and vertical elements, making a square or rectangle is unstable. You need at least some elements attached diagonally, forming triangular shapes, in order to keep the overall structure from collapsing.
If the diamond on the trellis on the left did not exist and all the joints were attached with only one nail, you could actually collapse the trellis, “folding it up” by pushing on either side at the top. Adding that diamond is what gives it strength. You see the same thing done with the diagonals in the trellis below.
Trellis in garden
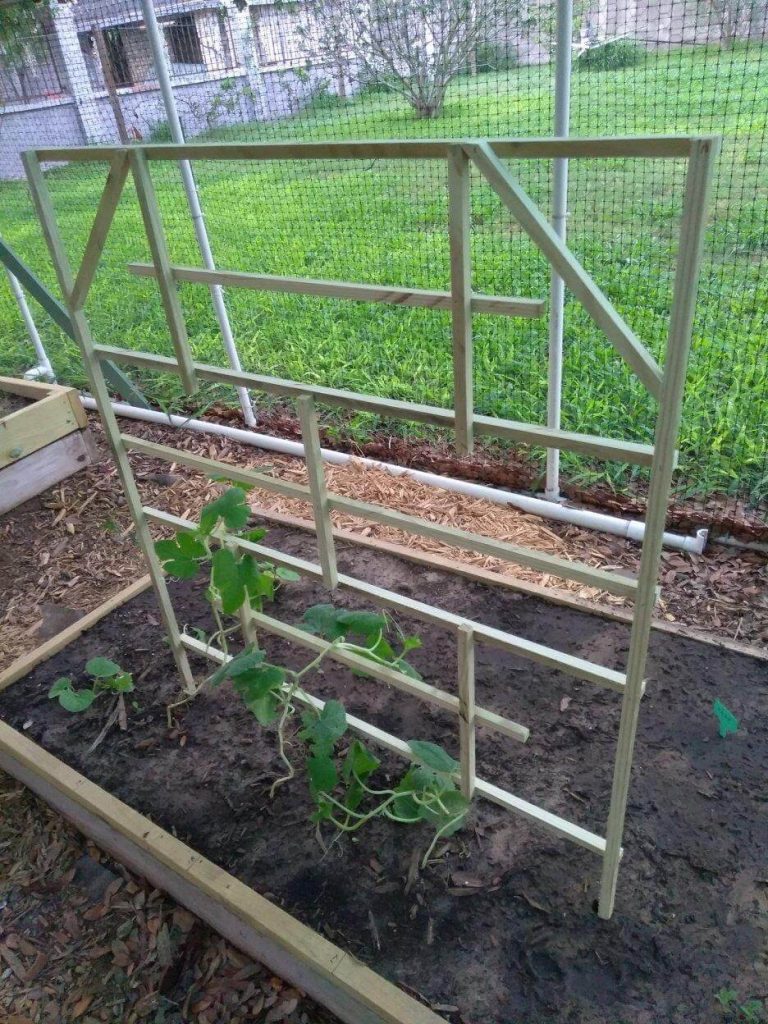
Regardless of the form of your trellis, you may very well have to help the vine “find it” by placing it onto the trellis. Once it is on the trellis, it will continue growing upwards, guided by the sun.
The basic trellis isn’t all that strong, even though they are usually used in a manner to be self-supporting. The trellis in the photo above has the bottom of the legs sharpened and was driven into the ground. This provides support, but at the same time shortens the life of the trellis, as wood buried into the ground will decay faster, especially if it is not treated in any way.
Nevertheless, a trellis like that shown above, even buried into the ground, is a plaything for a strong wind, especially once it has a vine growing on it. The leaves of the vine catch more wind, increasing the sail area and making it easier for the wind to knock the trellis down.
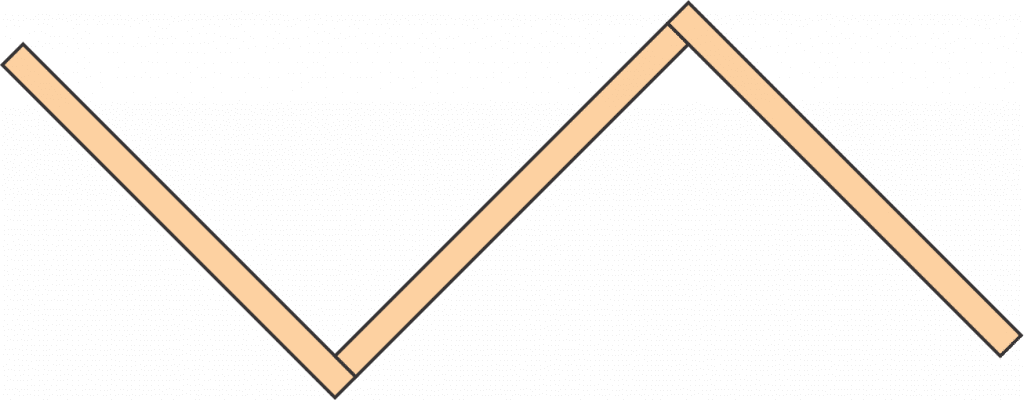
The solution to this problem is to set the trellis so that the wind can’t catch it on the broadside; but that’s not necessarily easy to do, as the wind doesn’t always come from the same direction. It’s better to have some sort of support that is offset from the trellis, to give it additional support. This can be done easily by attaching more than one trellis panel together, forming a zig-zag from above.
Trellis Z
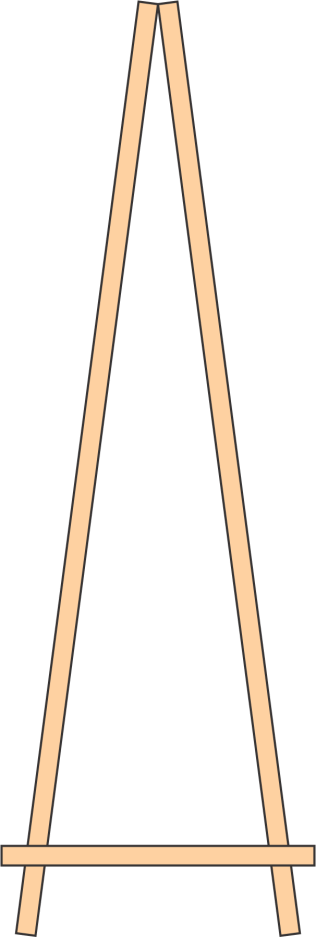
Another possibility is to attach two trellis panels together, forming an A-frame out of them. If they are attached together at the top with hinges, it makes it easy to take down the trellis at the end of the growing season and store it away for the next year.
Trellis A frame
The Pergola
While the pergola can be considered to be a type of trellis, it is considerably more complicated, using considerably more material. Whereas the types of trellises shown above can be made in an hour or two, you can expect to spend a day or two making your own pergola.
The pergola combines the idea of a trellis with an overhead shade. While it is hard to say which purpose the original designers had in their mind, you can find countless pergolas in Italy, most always with grape vines covering them. Yet in the United States, they are more often constructed to provide shade, rather than to provide a trellis for grape vines.
While the pergola can vary in size and somewhat in the details of the design, the basic design remains constant. That is, there are four squares (usually square) supporting it in the corners and the roof consisting of a series of horizontal rafters attached to paired beams spanning each set of columns. Crosspieces, forming a lattice, are attached to the tops of the rafters.
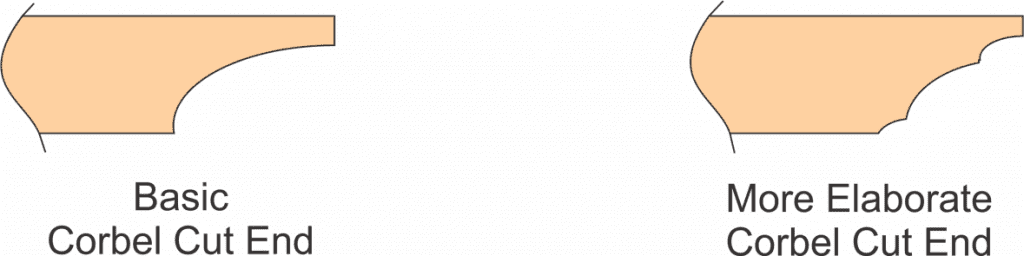
The other thing that is very typical of any pergola is that the ends of the beams and rafters are usually cut to be corbeled in some way, although they can be angle cut instead.
Although pergolas are normally built out of dimensional lumber, you can make the beams, rafters and lattice out of plywood if you so choose. In that case, the beams and rafters would probably be dual-laminated ¾” plywood to give it enough thickness.
Any pergola starts with the columns, which are usually set into holes in the ground. If you are going to dig holes into the ground for the posts, don’t fill them with concrete until you have the pergola’s structure connected together and have checked the columns for plumb and the beams for level. You want to ensure that everything is square. However, if you already have a concrete slab that you are mounting the pergola onto, you could use post bases, bolted to the concrete slab.
Before starting, think about which direction you want your rafters. You’ll get the most shade out of your pergola, if the rafters are running east to west.
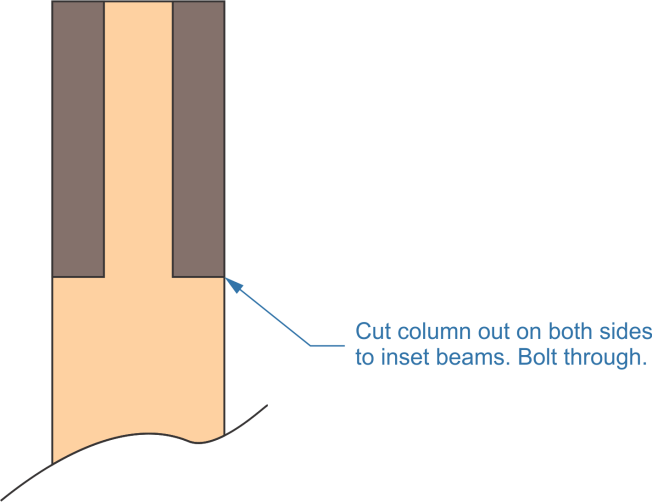
The basic structure of the pergola will consist of the columns and beams. The columns are usually made of 6”x 6” lumber, so as to allow for attaching the beams. For beams, you can use pairs of 2”x 10”s or 2”x 12”s, depending on how big a span you have. The pair is not connected together, but rather is inset into opposite sides of the column. This necessitates cutting out sections of both sides of the column for the beam to set into. It will also be necessary to add angled or curved (corbel) braces at both ends of the beams to ensure that the structure remains square.
Pergola beam inset
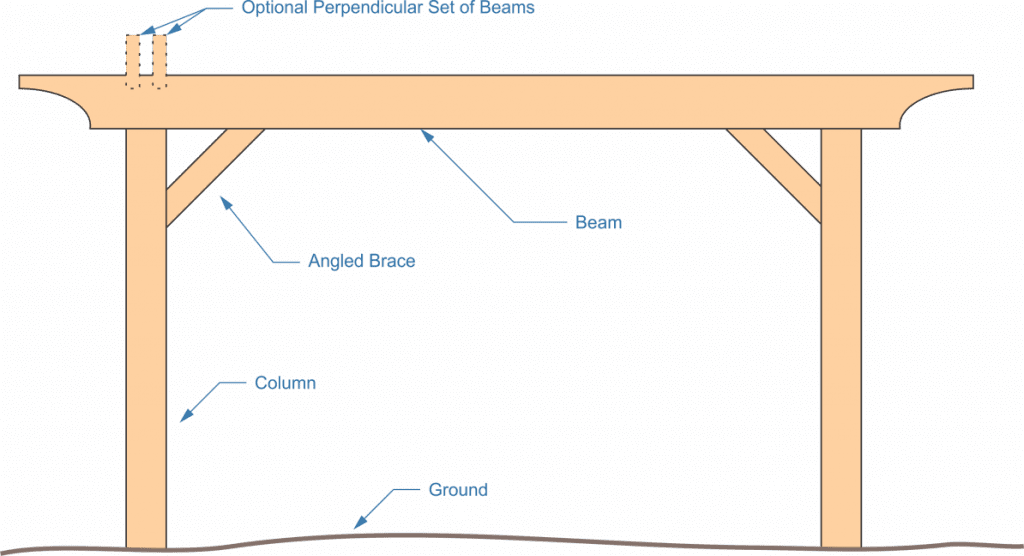
In most pergolas, the beams only run in one direction, tying pairs of columns together. Structural integrity in the other direction is accomplished by the rafters. While not as strong as the beams, they make up for it in quantity. However, it is possible to run beams in both directions, with the perpendicular set of beams sitting on top of the originals and the rafters running parallel to the first set of beams.
Pergola structure
Note that in the diagram above, the optional perpendicular set of beams overlaps the main set of beams. This is because these beams and/or the rafters need to be cut for a half-lap joint, so that they set onto the beam below. However, the beams are not half-lap cut on the top side to match.
While we are calling this a “half lap” it’s not exactly half. Rather, you’re going to need to select a dimension which is somewhere between 1/4 and 1/3 of the height of your rafter or beam, as shown in the diagram below. Just be sure to be consistent, so that all of the boards are cut out to the same depth.
Pergola – half lap cutout
The easiest way to cut out the half lap is to crosscut it with a circular saw, set to the right depth. You can either cut just the extremes, then remove everything in-between with a chisel or make a number of cuts, which will make it easier to take out the material with a chisel.
Another option is to make the outer cuts for the half lap with your circular saw and then use a router, with a straight bit, to cut out the material in the middle. This will allow you to make a good, square cut, with a very flat bottom, a whole lot faster and easier than doing it with a mallet and chisel. That flat bottom will help ensure that the rafters all sit evenly.
Rafters should be 12” to 16” apart, depending on your personal preference. If you want your pergola to supply shade, you’re better off keeping the rafters closer together. But if your main interest is to provide yourself with a trellis, then a wider spacing is good.
If you’re going to attach a lattice on top of your rafters, that is installed perpendicular to the rafters and parallel to the beams. This isn’t a lattice in the normal sense of the word, where you buy the pre-made lattice and then throw it up on top of your pergola, rather it is usually made out of 1”x 2”s nailed to the top of the rafters, 12” apart. Its main purpose is to provide more of a framework for the vines to grow over, so that they don’t fall down through the roof of the pergola.
Using an exterior-grade stain, which does not require varnishing
Using a waterproofing treatment, Thompson’s Water Seal
With the amount of work that goes into building a pergola, you don’t want to miss out on proper finishing. That finish will help protect the wood, so that your work will last longer. If possible, try to refinish it every few years, so that the wood always has that protection from water. However, that might be hard to do, if your pergola has vines growing on it.
In that case, you would probably be best doing it at the same time you prune your grape vines for the next season’s growth. There will be the least amount of vine on the pergola at that time, after removing the previous season’s vine and before the new season’s growth. That will make it the easiest to get to the wood and refinish it.
Of course, you’ll want to plant some grape vines to grow your pergola. I’d recommend planting different kinds, starting at the different corner posts. That way, you’ll get a variety of grapes to enjoy. Grapes don’t require a lot of watering and are very easy to grow. The only difficult part is pruning the plant every year, so that you’ll have fresh growth branches for the vines to grow on. Vines only grow on fresh branches, not on all the old ones; so this is a very important part of getting the most out of your pergola.
Related Posts:
Can Plywood Get Wet? How to Dry Wet Plywood by Amy Reed March 30, 2023 Repairs Plywood is one of the most universal building materials on the market. It can be used for all kinds of construction – from roof building…
Plywood Stairs Makeover by Admin September 17, 2021 Repairs Contractors are always on the lookout for ways to reduce the cost of building homes. This is especially apparent in tract homes, which by definition…
Beech Plywood by Admin November 5, 2021 Hardwood Birch plywood is one of the more popular hardwood plywood varieties, being commonly used in cabinetmaking, furniture making and even in making jigs in the…