As times change, so do styles. This doesn’t apply just to clothes and cars, but to the cabinets and furniture in our homes as well. Different types of wood and wood colors will be popular for a time, and then be replaced by other colors. This leaves the homeowner with having to put up with having furnishings that are out of style or having to do something to change the color of their cabinets and furniture.
One simple option is to paint over the wood, turning it another color entirely. But that option means downgrading from wood grain cabinetry or furniture to painted. There’s a reason we buy wood furnishings and it would be a shame to lose their beauty.
But what do we do when the style changes from one wood tone to another? If it changes from a lighter tone to a darker one, say from oak to walnut, it’s easy to stain the oak with walnut stain or to use one of the tinted varnishes that are available, going over the existing finish and making it darker. But that won’t work in the opposite direction. Oak finish over walnut wood doesn’t make the walnut lighter.
Nevertheless, there are ways of lightening darker woods or woods that have been stained darker. It’s generally easier to lighten woods that have been stained darker, than it is to lighten dark woods; but the same methods will work in both cases. This is applicable to wood furniture, hardwood floors and wood cabinetry. However, it is unlikely to work as consistently on fake wood furniture.
One important thing to keep in mind is that your furnishings are unlikely to be just bare wood or stained wood. Rather, they will have a varnish or lacquer finish over the stain. This must be removed before anything can be done to lighten the wood, regardless of whether it is stained or natural.
Keep in mind that like staining wood, this is an inexact science. Wood stain manufacturers always recommend testing their products on a small scrap of the wood that it will be used on. Different pieces of wood will absorb stains faster, affecting the final color. The methodology used to apply the stain, as well as how long the stain is allowed to sit on the wood, before wiping, will also make a difference. These same factors also apply to lightening wood, so start with a trial and keep track of exactly how it was done, so that the process can be repeated.
Stripping the Finish
Lightening wood is usually referred to as a two-part process and kits sold for this purpose typically mention this in their names. That’s because the first step is always removing the varnish or other finish that has been applied to the wood, before the step of lightening the wood itself.
Most wood furniture and cabinetry is finished with varnish. But it is unwise to assume this is so. Some furniture is finished with lacquer, some types of fine wood furniture are oiled and epoxy has been gaining ground as a wood finish as well. So the first step in the process has to be determining what sort of finish is on the wood. That can be most easily accomplished by trying various types of strippers. If a stripper designed for varnish is used, but it doesn’t remove the finish, then the finish obviously isn’t varnish.
Stripping finish off of wood is a messy process. Be sure to work over an absorbent dropcloth, wear rubber gloves, and only wear old or work clothing, where spots or other damage to the clothes isn’t going to matter. Have plenty of rags and/or paper towels available to soak up the material being stripped off the wood.
There are a number of commercially manufactured stripping products on the market. Each has its own proprietary formula, but they all work in a similar way. The stripper is applied to the surface with a cheap paintbrush and allowed to sit. After a period of time, which can range from five minutes up to 30, the softened finish is scraped off with a putty knife or other stiff scraper. Curved scrapers may be needed for removing finish from curved surfaces.
A second application of stripper is often advised, even though the first will usually take 90 percent or more of the finish off. Even so, there may be finish in the pores of the wood that still needs to be removed and the second application provides an opportunity to get to that last little bit of finish.
This process will often raise the grain of the wood, which will be more pronounced after it dries. So it may be necessary to lightly sand the surface of the item, before continuing. To check that all the finish has been removed, pour a small amount of water on the surface and wipe it off. If the water soaks into the wood in some places and not in others, there is still finish that needs to be removed. Trying to remove the stain, without removing all the finish, will result in a splotchy looking finish.
Sanding to Lighten Wood
Most wood stains only penetrate a small distance into the wood. If we were to cut across the piece of wood, we would see that the stained portion is just at the very surface. With that in mind, it is possible to sand the surface of stained wood with fine sandpaper or with steel wool, once the finish has been removed, to lighten it. However, this method will only work to lighten the wood slightly, as it would be necessary to sand deeper than is reasonable to get past the stained part. We must also take into account the original coloration of the wood, as no amount of sanding will lighten the wood beyond its natural color.
A major problem could surface if the visible wood surface is only veneer, rather than solid wood. Most hardwood plywood used in furniture and cabinetmaking is made with very thin veneer, less than 1/40 inch thick. It is easy to sand through this layer of veneer, creating a more serious problem.
Using Chemicals to Lighten Wood
In most cases, it will be necessary to use chemicals to lighten the wood, “bleaching” the wood. While this can be done with actual bleach, such as that used for whitening clothes, chlorine bleach is not the only chemical that can be used to lighten wood. If the wood has been stained with an oil-based stain, then wiping it with mineral spirits can remove a small amount of the coloration, lightening the wood slightly.
When using spirit, it is useful to alternate rubbing with the mineral spirits with rubbing the wood with steel wool. The steel wool will work to remove any grain that rises, without damaging the surface of the wood. Removal of that grain will make subsequent applications of mineral spirits more effective. This is a slow process, so several applications may be needed.
Standard laundry bleach will work for bleaching wood, but not as effectively as one of the two-step bleach products that are on the market. These usually contain a mixture of sodium hydroxide (which is lye) and hydrogen peroxide. Care must be taken when using this mixture, as it is very caustic. Another chemical product which is used to bleach wood is oxalic acid. Always remove the hardware before using any sort of chemicals on the wood, as the chemicals may attack the hardware, damaging its finish or using the hardware to further stain the wood.
Apply the bleaching chemical to the wood with an old natural bristle paintbrush, a sponge or a rag. Although only a thin coating is required, it is essential that the entire surface be covered. Take extra care with inside corner and moldings, to ensure that they are coated as well.
Allow the chemical bleaching agent 30 minutes to work, and then neutralize the bleaching agent with a 50/50 mixture of white vinegar and water. Wipe the vinegar mixture onto the wood with a clean cloth, again taking care not to mix any spots. Once it has neutralized the bleach, clean it off with a damp cloth. Then allow the piece to sit overnight to dry.
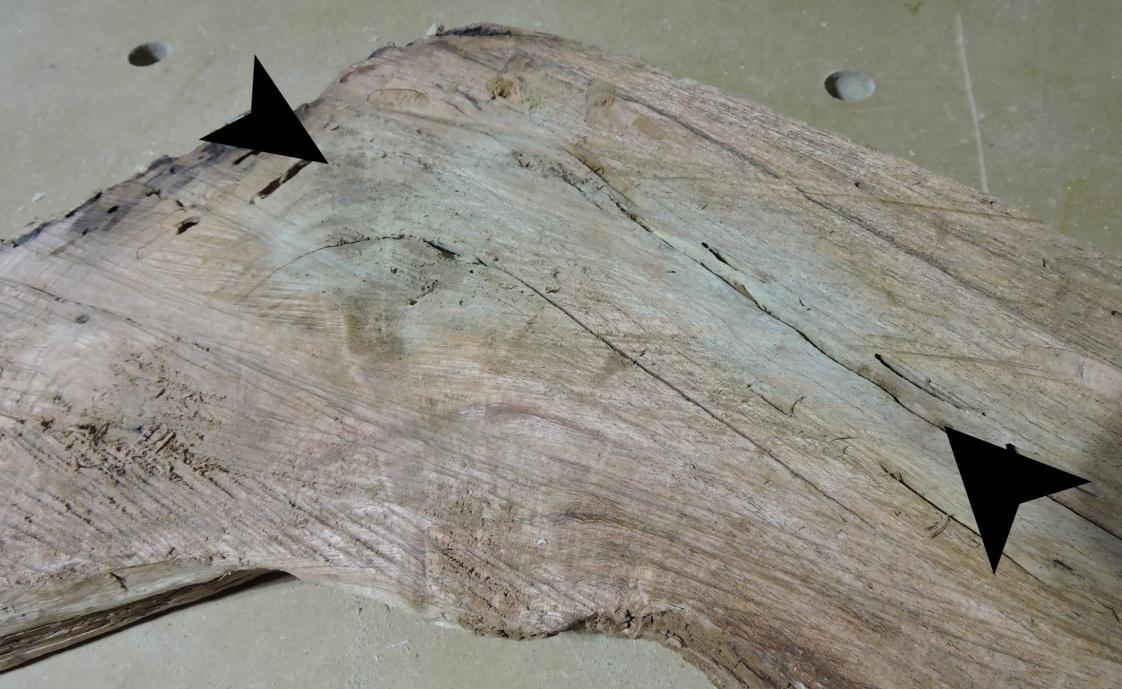
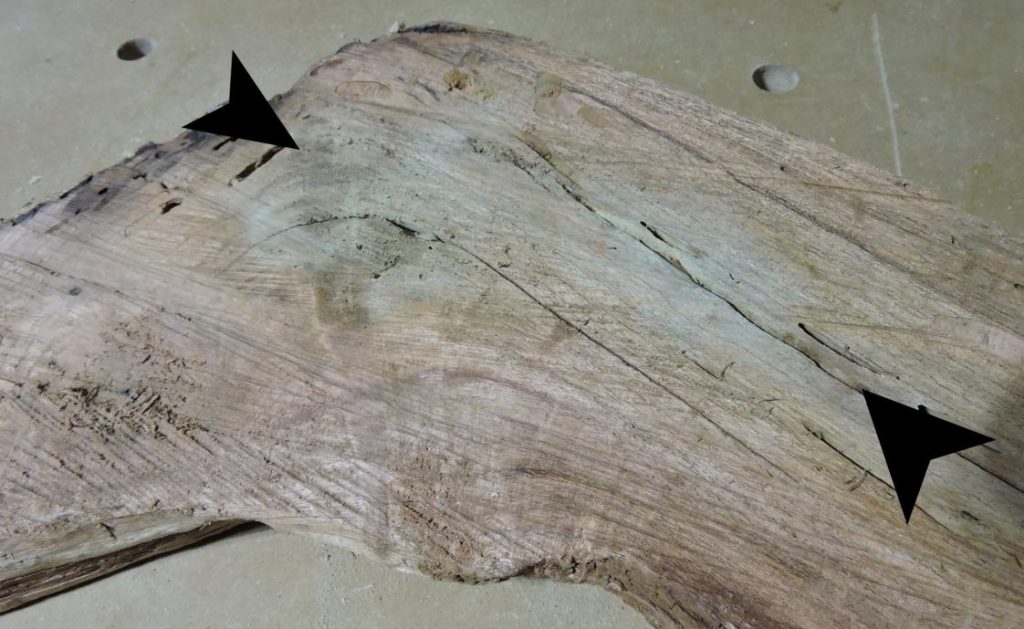
Please note that some types of wood resist bleaching, such as chestnut, poplar, cedar, rosewood and cherry. Others may have their color affected by the process and not just be lightened, as can be seen in the photo below. The normal grain color for this piece of rough-sawn mesquite is reddish-brown to orange, yet the part between the arrows has been turned grey by bleach.
Mesquite bleached by grey
Refinish the Wood
With the finish removed and the color of the wood lightened, it is ready to be stained again and refinished. Before applying another stain or even varnish to the wood, sand it lightly to smooth out the surface. As I mentioned earlier, the liquids on the surface of the wood will raise the grain, which will end up appearing as small bumps, almost like there is sawdust in the varnish, if not removed.
It may not be necessary to stain the wood, before varnishing, if the color achieved from bleaching is what is desired. However, most people will want to stain their furnishings again, before varnishing. As always, check the color of the stain, staining a small, hidden area, to check what color the new stain is on that wood and how dark it will be. Allow the sample spot to dry before proceeding, as the stain may change color slightly as it dries.
Lightening Stain
Stain manufacturers are faced with the enormous challenge of providing stains that will work on any type of wood. The samples they put on the website, in their brochures and on displays in the paint section of the lumberyard should therefore be taken with a large grain of salt. Staining a different species of wood or even a different batch of the same kind of wood can give incredibly different results. That’s why it is always important to do a sample check on the actual wood to be finished, before using the stain.
Stains will not lighten a piece of wood, although they can affect its coloration. Applying oak stain to a piece of cherry wood will add a bit of yellow coloration to the wood, making it somewhat orange; but it will still be as dark as cherry, it won’t lighten up to the color of oak.
But what if the stain selected ends up being too dark? This is a rather common problem. There is only so much we can do to get a lighter finish out of that stain by trying to wipe it off quickly. Most of the coloring action of the stain happens within the first few seconds.
One option is to thin out the stain, before applying it. Before attempting this, check to see what the solvent base of the stain is. There are more and more water-based stains on the market these days, which need to be thinned with water. Oil-based stains (the more traditional ones) need to be thinned with spirit. As a general rule of thumb, mixing the stain half-and-half with the appropriate solvent will lower its color by one shade (as in shade on a paint chip sample).
Another option is to mix different stain colors together. Once again, it is important to verify that the stains being used are made with the same solvent base. Since oil and water don’t mix, oil-based and water-based stains won’t mix either. Mixing colors provides the option of not only lightening the color, but also changing it at the same time.
Always test any experimental changes of stain, whether by mixing it or by thinning it on a hidden part of the item that it is to be used on. Make sure that the surface is fully dry, before applying the stain, as moisture in the wood will reduce the amount of stain, therefore the amount of pigment, that can be absorbed.
Once the stain has been applied, allow the surface to dry overnight and then varnish the piece with two or more coats of polyurethane varnish, sanding lightly between coats to eliminate bumps caused by dust particles getting into the finish. Please note that varnish can affect the color of the stain, casting a yellowish tint on it.
Related Posts:
Vinyl Stencils for Wood by Admin April 30, 2021 Tools Stenciled signs on wood are one of the trendy home décor items we find everywhere from knick-knack shops to truck stops. Some carry witty or…
Wood Floor Inlay by Admin May 1, 2021 Installing Wood floors have made a comeback, with many people preferring them over other flooring options. That’s not surprising, considering wood flooring’s natural beauty and durability.…
Wood Mallet by Admin June 24, 2021 DIY In our modern age of power tools, the wood mallet has all but been forgotten in the home workshop. Yet this is still a common…