Kids are fun, especially when you get to the point of being a grandparent. While parents can enjoy their children too; all too often parents are busy taking care of the needs of everyday life, providing for and caring for their children. By the time most of us get to be grandparents though, we’ve got more free time, mostly because we’re not taking care of children every day. So, we get to enjoy those kids.
Part of that can be making fun things for the grandkids to use, like building them a play house or a kid size picnic table. There’s something about things that are made to fit their diminutive size, which makes small kids automatically like kid furniture over the more adult versions.
One of the easiest such projects is a kid sized picnic table. Not only does such a picnic table give them their own place to eat, but it’s a great place to have them color, paint and work on other artwork projects, because if they mess it up, it’s not really going to hurt anything. After all, it’s the kid’s table.
Picnic tables are a fairly easy project to build, being made of nothing more than 2”x 4”s. This goes for kid size picnic tables as well. It just takes less 2”x 4”s, which are cut to smaller sizes. Not only are 2”x 4”s readily available and inexpensive, but they will produce a kids picnic table plenty strong enough that nobody has to worry about falling apart when the kids inevitably start jumping up and down on it.
Some people make kids picnic tables out of cedar 1”x 4’s, rather than out of 2”x 4”s. That works well too, especially since the cedar is better at resisting decay than pine is. However, while the table is probably strong enough, it may not hold up as well under kids jumping up and down on it.
The one thing I’d do differently on a picnic table for the kids, than I’d do on one for adults, is take extra care in sanding everything, beveling the ends of boards. Kids and splinters aren’t a good combination and we can be pretty sure that if there are splinters available, some kid will find them.
Cut List
I don’t personally bother with a cut list for many of the projects I do. But that’s in part because so much of the time I’m working things out as I go. I’ll have a basic idea of what I want to do and some basic dimensions worked out. Other than that, I’m usually calculating or measuring the dimensions of each piece as I go.
That’s not to say that I’m against cut lists. There are some definite advantages of using them. For one thing, using a cut list allows for cutting everything at the same time, which is a definite time saver. It also helps in preventing errors, as making one generally requires doing a sketch of the project, which allows the dimensions to already have been calculated. Speaking from experience, I’m much more likely to make errors on dimensions when I’m calculating them on the fly, than when I’ve worked out a cut list.
The other advantage over the cut list, in this case, is that some of the parts need to be cut at a 30 degree angle. While most power miter saws have a detent for cutting at 30 degrees, not all do. If the saw being used doesn’t have that detent, care must be taken to set it exactly the same, every time, so that the table sits level on the ground.
Try to get a select grade 2”x 4”s for the project, or the best quality you can. Not everyone carries select grade 2”x 4”s, as they are primarily used for construction framing, where they will not be seen. However, the large knot hole which can show up in what is often sold for dimensional lumber will not make for as attractive a table as one that only has smaller ones.
Before starting to cut, one important decision needs to be made. That is, just how long is the table going to be? I’ve seen kids picnic tables made anywhere from 32” to 48” in length. The longer ones allow for the seating of four small children, while that would probably be a bit tight for the smaller sized table.
Cut the following pieces (I’m assuming a 48” long table):
2 – 2 x 4 x 19 ½” cut at 30 degrees (opposing angles) for table top support
2 – 2 x 4 x 40 ½” cut at 30 degrees (opposing angles) for seat supports
4 – 2 x 4 x 21” cut at 30 degrees (parallel) for legs
2 – 2 x 4 x 36” for spreaders
9 – 2 x 4 x 48” for table top and benches
Assembling the Table
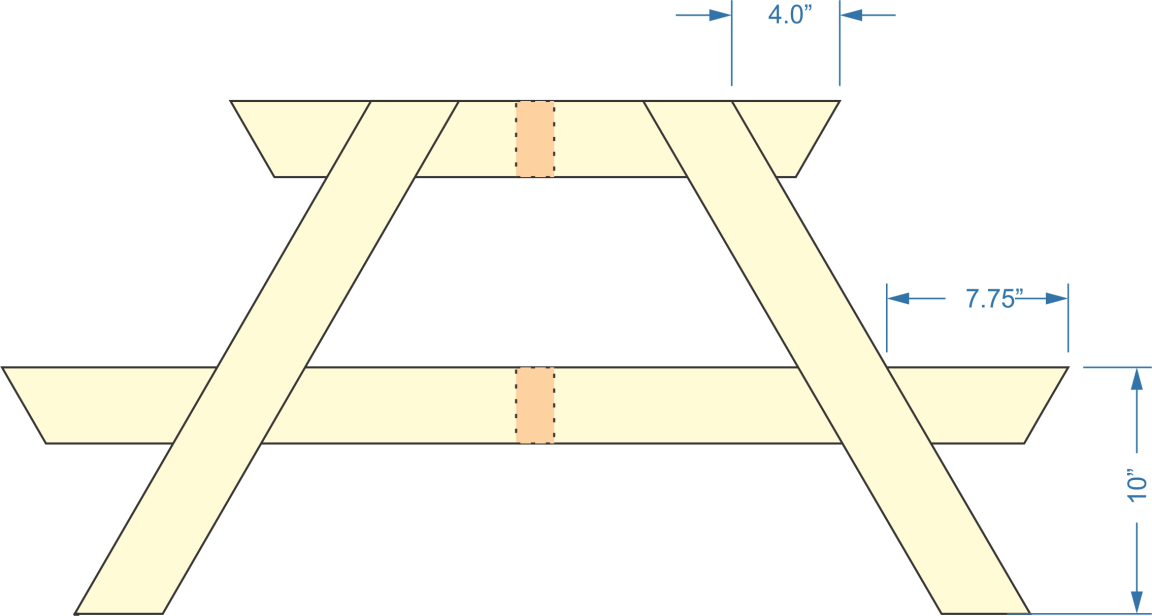
To assemble the table, it’s best to start out by making the two leg assemblies. This can be laid out on the workbench and screwed together with wood screws or decking screws. I’d avoid using drywall screws, as they are not designed to be rust-resistant. Note that the critical dimensions in the diagram below are the distance the seat is above the ground and the amount of extension the seat supports, outside the legs. Everything else can literally fall where it falls and the table will work out alright.
Kids picnic table – legs
In order to ensure that everything works out right, I’d recommend clamping a spare piece of straight 2”x 4” to the workbench top, to use as a baseline. Then clamp something else 7 ½” above it, to act as the line for the seat support to sit on. Set the four parts in place, ensuring that the bottoms of the legs sit flush up against the baseline guide board and the seat support sits up against the guide for it. The table top support can then be put in place, aligning it with the tops of the legs. Check that it is parallel to the baseline, and then clamp everything together, before screw the pieces together.
Two identical leg assemblies will be needed, although they will be attached together so that they are mirror images of each other. This attachment is made via the tabletop, the benches and the two spreaders. Those spreaders are installed in the two darkened areas in the drawing above. They are centered along the length of the table top support and the bench support. It’s best to use at least 8d nails through the tabletop and bench support, into the end grain of these parts.
Installing the spreaders before the tabletop and benches allows for the proper spacing of the legs. The spreaders will also hold the legs upright, while the 2”x 4”s for the tabletop and benches are screwed to their respective supports.
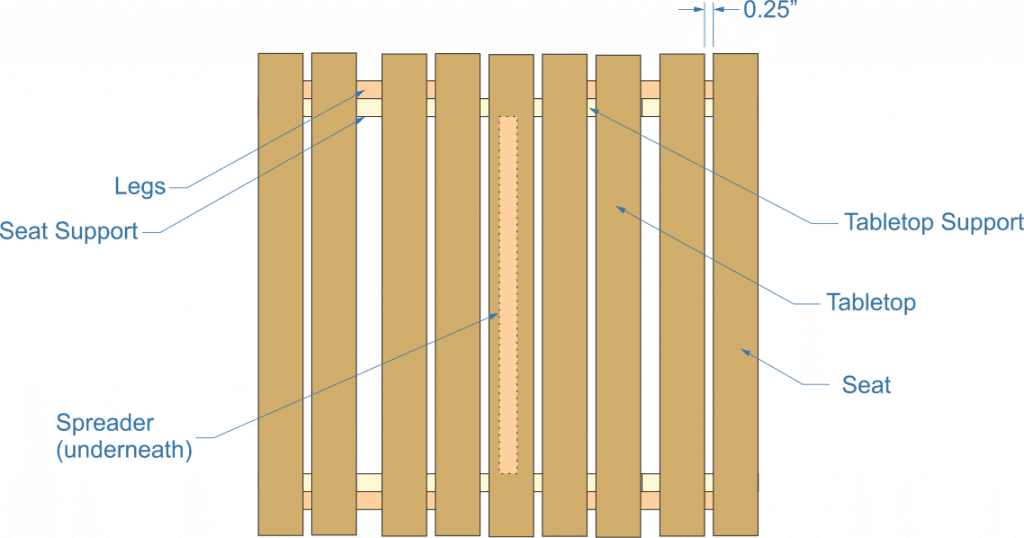
Kids picnic table – tabletop & bench
It’s easier to install the benches first, as those boards will provide support and stability for the legs, while attaching the tabletop. Start from the outside in, aligning the edge of the outer 2”x 4” with the cut angle on the support, so that the support does not stick out and create a hazard. Better to have it fall a little short, than to have it stick out.
Space the 2”x 4”s ¼” to ½” apart. If they are being spaced ¼” apart, a normal carpenter’s pencil makes a great spacer, ensuring that all the spaces are equal. If the larger ½” spacing is to be used, cut a scrap piece of ½” thick wood to use as a spacer.
Finishing the Picnic Table
Since 2”x 4”s were used in the construction of the picnic table, it’s a good idea to sand the surface of the boards, at least the tabletop, bench tops and all the edges, with 100 grit sandpaper. This should eliminate all splinters. Fine sandpaper could be used afterwards, but is not actually necessary. Picnic tables are rustic furniture, so a super-fine finish is not required.
The wood should be finished with either an exterior oil-based stain, paint or some sort of oil-based waterproofing product, like Thompson’s Water Seal. Failure to seal the wood, especially the ends of the boards, will allow moisture to wick into it, causing decay. Properly treated with a wood preserving product, the table should last many years.
Oil-based stains and wood preservatives do need to be reapplied every few years, even if the table looks to be in good condition. As the oil evaporates out of the wood, it allows more moist to get in, potentially leading the way to bacterial and fungal growth that causes decomposition of the wood.
It can be helpful to cover the table with a tarp during storms; but it’s inadvisable to leave it covered. A tarp over a wood like this will trap moisture in, just as easily as it will keep moisture out. So if the wood becomes damp and is covered with a tarp, there will be more time for decay to happen. So, any time a piece of outdoor wood furniture like this is covered for a storm, it should be uncovered once again, as soon as the weather clears.
Related Posts:
Wood Projects for Kids by Admin July 30, 2021 DIY For those of us who enjoy woodworking, both amateur and professional, there’s something almost magical about taking a wood board or log and turning it…
Drill Press Table by Admin April 24, 2021 Installing A drill press is an incredibly useful tool, ignored by many woodworkers. Originally developed to be a metalworking tool, the drill press definitely has a…
DIY Tree Slice Table by Admin June 2, 2021 DIY Tree slices and slabs have been used as crude tables for centuries. While there are examples of elegant wood tables, such as those used by…