A somewhat unusual option, but ideal for people looking for inspiration for a minimalistic or even industrial style of bedroom decorating, is to install a hanging bed rather than a more traditional bed on a frame. While several people range beds and make them as bed kits, most postcodes go with a hanging bed and prefer to make it themselves. This is a project that can be as simple or as complex as the builder desires.
One advantage of a hanging bed is that it allows the space underneath the bed to be used for other purposes besides living space, whether storage or a desk. Hanging beds in children’s rooms makes better use of the area, especially when the bed is high, like the upper bunk in bunk beds. With the high bed, it is easy to put a study desk or toy storage under it, with a ladder or an open staircase, which also serves as storage leading up to it.
Hanging beds also make for fun and exciting options for a back bedroom, deck, garden, or porch; hanging a day bed can be used for children or adults who love taking naps or doing double duty as a porch swing. They work great in loft rooms, where the exposed rafters provide an excellent attachment point.
While it is possible to make hanging floating beds with headboards and footboards, most don’t. This is intended to be a simplistic style, where such things are unnecessary. The one real exception would be a daybed on a porch, where one side and ends of the swing bed are needed so that the swing bed can be sat on as a sofa or porch swing.
Hanging the Bed
Deciding how the bed will be hung before doing anything with a floating bed is essential. Adding the hanging method afterward wouldn’t be as effective as hanging a daybed and could lead to a bed that’s not strong enough to support enough weight. Since the bed is suspended and not sitting on the floor, this is much more important than it would be for a more traditional mattress.
Hanging beds are usually suspended with various ropes, often hemp rope, which has a more traditional look and feel of nature to it in the heart than a nylon or polyester rope will. Sisal, linen, and jute are also traditional rope materials with a similar appearance to hemp. Other options are chain or using steel pipe and fittings, which has become a widespread industrial style for furniture, beds, and fixtures.
When selecting the rope or other material to sleep in, make sure that the weight rating of the string is strong enough for the need to sleep in. This includes the weight of the bed itself and the people sleeping in it. Remember that many adults and people with disabilities tend to gain weight as they grow older, so it would be helpful to account for that. In addition, any nocturnal activity or sleep-in could add stress to the rope and hardware.
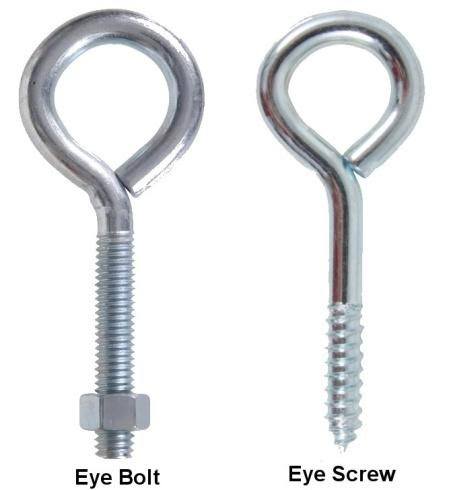
The primary difference between an eye bolt and an eye screw is that an eye screw is made with special wood screw threads so that it will cut into the wood and hold, whereas an eye bolt has machine screw threads to be used with nuts. When using eye bolts, two sizes of nuts should always be used so that one can act as a jam nut, preventing the other from coming loose. Of the two, eye bolts are considerably more potent than eye screws and should be used wherever possible.
Eye bolt and screw
With either design, eye bolts or screw rope must be knotted to attach it. While many choose to use a simple overhand or square knot, an eye splice is better and more finished-looking. At the same time, this might seem like the “impossible knot” to many, but an eye splice isn’t all that hard to do, significantly once you relax and you’ve seen it done once.
One of the challenges in hanging any bed is keeping it level. All four attachment ropes, chains, or pipes must be the same length. Otherwise, the bed will hang crooked, or the frame will twist. This is more of an issue with knotted rope than either chain or pipe.
Where is the Hanging to be Attached
Galvanized pipe is used; the pipe will be connected to the bed platform and the ceiling joists with pipe flanges. But with rope, there are more options. The rope can be passed through the bed platform and tied in a simple overhand knot; in the case of lofts, where exposed beams are attached, it might be possible to connect the rope at that end too. But eye bolts or screws are often preferred to tie a rope.
When attaching rope or chain to eye bolts that are running through the top of the sleeping platform, it is necessary to make the space on the platform more significant than the space of the bed so that there is room for the rope or eyebolt to go into, outside the area where the bed sits. Not much room is needed, only about 1-3/4″ on the floor on each side.
However, to determine if the rope will pass through the platform and then be tied on the bottom side, it’s necessary to decide whether it will pass through the frame or just the platform. In cases where it passes through the frame, those above 1-3/4″ per side are sufficient, but in cases where it needs to pass through the frame, about 3″ is required all the way around.
In the case of designs where eye bolts are run through the sides of the bed frame rather than the top of the sleeping platform. For example, in designs of beds where a metal pile is used, the bed frame needs to be the same size as the dimensions of the mattress, as the hardware will already stick out past the edges of the bed anyway.
To Make an Eye Splice
When it comes time to hang the bedroom bed platform outdoors, it’s necessary to support it somehow, whether with temporary stands or cinder blocks. Ensure the bed platform is level in both directions before hanging items.
Start by untwisting about 20 cm of the end of the rope. Tape the ends of the three strands, so they won’t unravel while you’re working, and the rope itself for the same reason. This tape can be removed later.
Slip the end of the rope through the eye bolt or eye screw and make a loop of whatever size seems aesthetically appropriate and bring the loose ends of the rope to that point. It can be helpful to mark that point for reference temporarily.
The basic idea of making an eye splice is to weave the rope into itself or weave the three cords making up the rope back into the main body of the rope, forming a loop. To do this, the rope must be untwisted enough at the point where the strand is to go through so that the strand can be woven under one strand of the main rope and brought back out again.
Starting with the middle loose strand, untwist the rope enough to slip the end under one strand of the rope and pull it snugly up to the point where the strands separate.
Take the left strand and repeat with the next strand up the main rope, slipping it under that strand.
Then take the right strand and repeat, but this time, slip it under the strand below the one that the middle strand went under in the main rope.
Continue working up the rope, alternating between the three loose strands, with each of them skipping the strand in the main rope that the previous one went under and going instead under the next strand up.
Please note that the third or right strand will go under the other strands woven into the rope. This helps to lock the strands together and into the rope.
With natural fiber rope, three to four full rounds of weaving, weaving each of the three strands into the rope, is sufficient. With rope made of artificial materials (nylon, polyester), a minimum of five rounds should be done because the rope fibers are slicker and more likely to slip.
Once the eye splice is done, the excess material can be cut off at the end and either heat sealed (for artificial fibers) or taped or wrapped to prevent unraveling in the case of natural fibers.
To Hang with Pipe
Hanging with a pipe or chain is simpler than hanging with rope, as there is no need to tie the rope to itself. The number of links needed is selected with a chain, and any extras are removed. The chain can then be attached to the eye bolt with an S-hook. Just be sure to use a strong S-hook rather than one made of thinner wire.
In the case of galvanized steel or iron pipe, the pipe is cut to length and threaded. The major home improvement warehouses’ plumbing departments have cutting and threading machines. They will usually provide this service to home for free. The pipe is then attached to an elbow and the flange via a short nipple. The only difference at the ceiling is that there is no elbow, so the end of the pipe can attach directly to the flange, saving time and fittings.
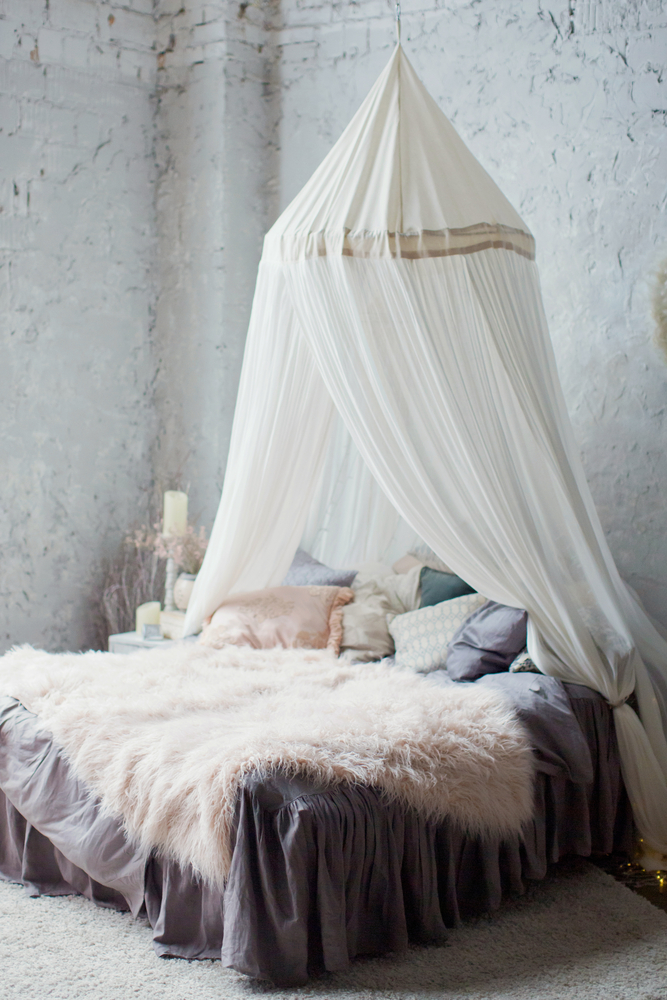
cozy bedroom with a canopy
Attaching at the ceiling:
Eye screws are often used at the ceiling, except for pipe hangers. The main reason for this is that installing an eye bolt’s more or less impossible, as it has to go up through the ceiling joist. While there are probably eye bolts that long, they would be hard to find.
Since eye screws are used, it is best to use oversized ones rather than find something big enough. The larger the diameter of the screw, the longer the thread and the more they will bite into the wood, adding strength.
Since ceiling joists are either 16″ or 24″ apart, there’s a strong possibility that they won’t be in the right position for the bed. In that case, a 2″ x 4″ block should be attached, spanning the space between the joists. Use joist hangers to secure the block to ensure it can handle the weight.
Making the Simplest Hanging Bed Frame
Any hanging bed needs a platform frame rather than the type used for conventional beds. A box or box springs are never used with a platform hanging bed, so the mattress needs support across its width and length. Slats aren’t enough, although a slatted platform with gaps of 2″ or under works fine. If slats are used, be sure to round the edges of the slats so that the wood doesn’t wear away at the fabric on the bottom side of the mattress.
Wood pallets are all needed to make an effortless hanging floating bed frame. The slats on the top and bottom must be cut off flush with the floating hanging bed frame, and then the edges on top need to be rounded to protect the mattress. Connect the pallets, through the floating hanging bed frame, with either deck screws, lag screws, or bolts.
Since the screws will go into the side grain rather than the end grain, screws will create room for a strong, durable joint between the pieces. However, they won’t when going into end grain.
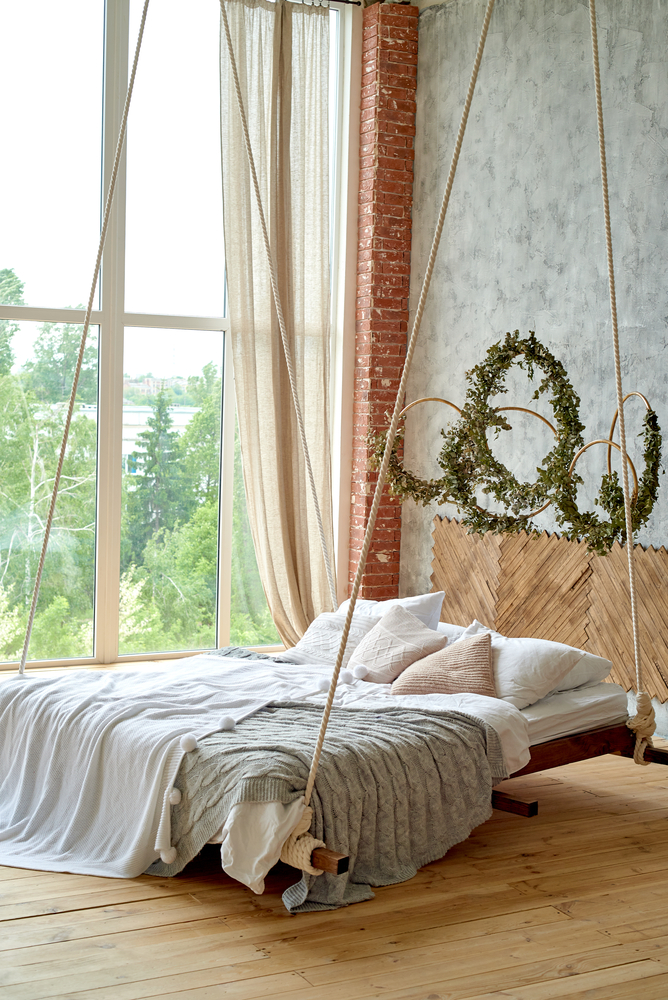
Hanging wooden bed suspended from the ceiling with pillows, cozy white plaid, and knitted blanket near the window, copy space. Trendy room design. Loft interior in Scandinavian style
Making a Better Hanging Bed Frame
While wood pallets allow for making a straightforward hanging bed, most people taste them tastelessly. In that case, it’s better to build a bed frame. There are two basic ways of making these round hanging beds; with overhanging slats or with flush sides:
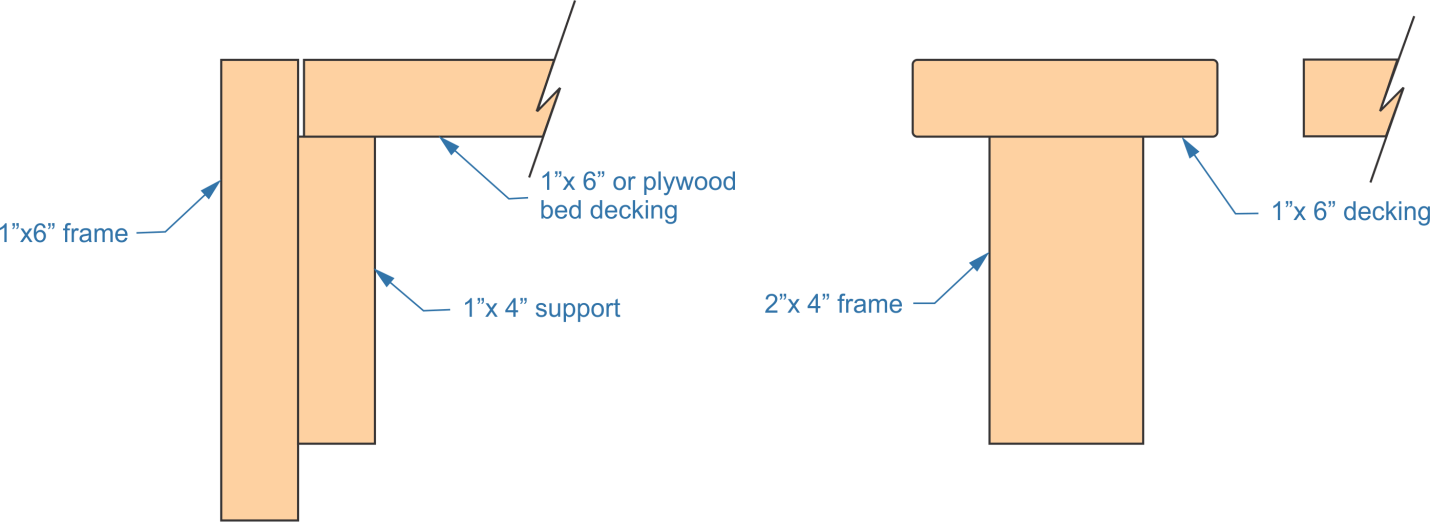
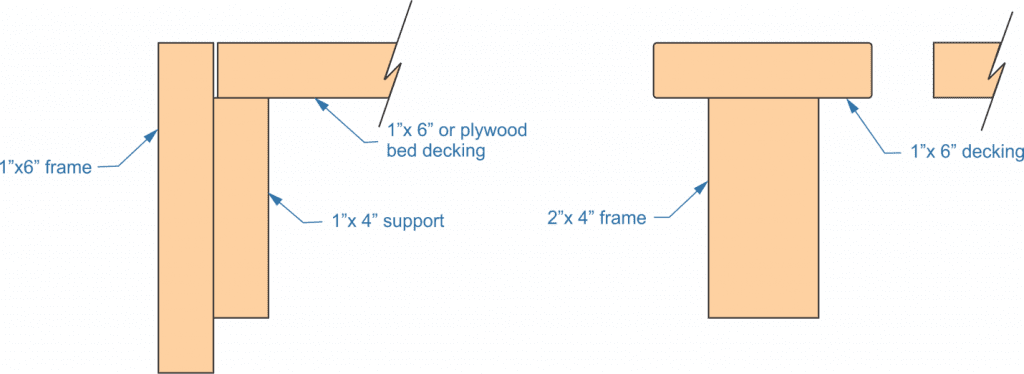
Bed frame construction
In the diagram on the left, the decking is hidden by the bed swing frame. This allows using plywood rather than 1″ x 6″ boards for the decking. To do this, a support member must be attached to the inside of the bed swing frame for the deck to set on the bed swing itself.
In the diagram on the right, the bed swing deck is supported on a 2″ x 4″ or 2″ x 6″ frame. In this case, 1″ x 6″ boards should be used, as the edge grain of plywood cannot be hidden. The decking should overhang the bed swing and frame by one inch.
Remember how the bed will be hung, making the frame the same size and dimensions as the mattress or slightly larger dimensions, price depending, as discussed above. Standard mattress sizes are:
Twin – 75”x 38”
Full or Double – 75″ x 54″
Queen – 80”x 60”
King – 80”x 76”
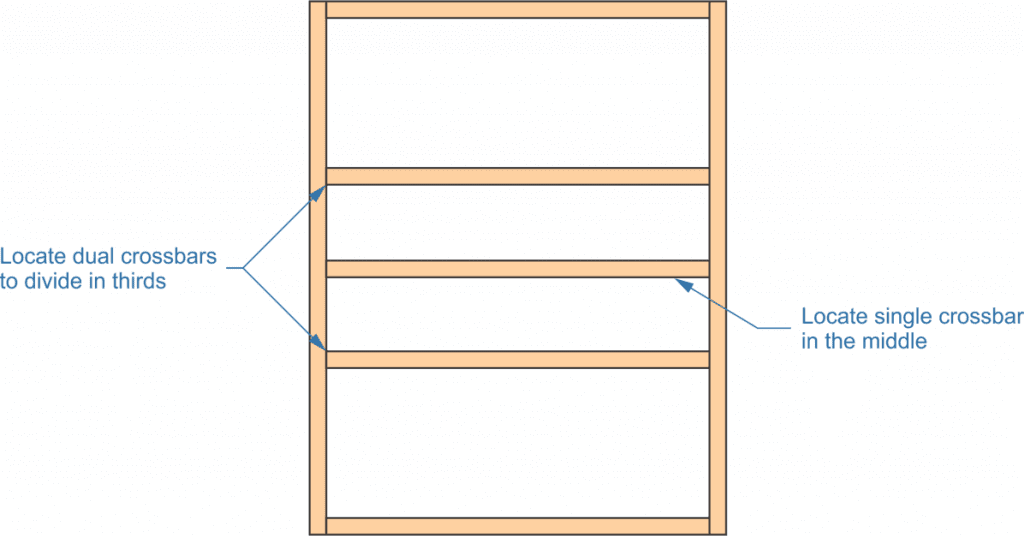
A minimum of one, and better to add two, crossbars should be installed as part of the frame, especially on double or larger beds. While installing a simple frame around the perimeter could probably support the weight, it would create more space for sag. Adding the crossbars, like adding slats in a standard bed frame, spreads the weight out and helps prevent sagging.
Frame crossbar
Screwing the frame together is ineffective, as the screws would go into the end grain. Likewise, gluing the corners isn’t very effective for the same reason. The glue doesn’t connect well with the end grain, either. It’s better to use nails, especially coated nails, to assemble the frame, especially when nailing into the end grain. Glue can be used for attaching the support to the frame on the hidden deck design, and screws or nails can be used for attaching the deck to the frame with either method.
Additional strength can be added to the corner by using metal angle brackets on the corners or a piece of scrap 2″ x 2″ on the inside, gluing and screwing the frame members to it.
For an even more robust and attractive frame, assemble the corners with visible dowel pegs. This is not using the precut and fluted dowel pegs sold for making furniture, as those are too short. Instead, the idea is to drill through one board into the end grain of the other board and then pound a dowel rod coated with wood glue into it. The excess dowel can then be cut flush with the board, making a visible but attractive and robust joint. This is especially good if the wood is to be stained and varnished, as the end grain of the dowel will be apparent.
Related Posts:
Hanging Wall Cabinets by Admin March 4, 2022 DIY Cabinets are an integral part of any home. At one time, cabinets were built in place, often custom made to match the home. Those cabinets…
Hanging Hammock Chair by Admin May 23, 2022 DIY Those who have never had the opportunity to rest in a hammock don’t know what they are missing. Unlike most furniture, hammocks and hammock chairs…
DIY Toddler Bed by Admin April 25, 2021 DIY At some point in time, every toddler needs to move out of their crib and into a “big girl bed” or “big boy bed.” This…