Shelves are an essential part of pretty much any home’s décor. Not only are shelves good for books, but most families have collectibles or knick-knacks that they’ve picked up in their travels. Having someplace to display these items adds to the enjoyment of owning them, making it possible to see them and show them off to friends and family.
One of the outstanding features of modern home décor is the inclusion of floating shelves. These shelves aren’t actually floating, but instead are attached to the walls in such a way as to make it appear as if the shelf is floating. This is accomplished by building the shelf without any visible means of support. Yet the shelf is supported by the way it is attached to the wall. While this doesn’t produce a shelf that is as strong as one which has corbels or a floor-standing shelving unit that would have legs, most floating shelves can support up to 75 pounds, making them good enough for putting books on.
Some floating shelves give more of the appearance of floating than others. A shelf which has molding under it, making it look like a fireplace mantle is still a floating shelf, but doesn’t inspire the same level of mystery as to how it is supported. That shelf will often be five to six inches high, indicating it has some sort of internal support. On the other hand, a simple 2”x 12” hung on the wall as a floating shelf is going to get people wondering what’s holding it up.
It is possible to buy a wide variety of floating shelves from the local big box store or from companies like Ikea. You can also find multiple shelving units with a floating style, as well as shelves which have metal supports. These later ones really aren’t floating, although some people call them floating shelves.
There are a variety of different ways that a do-it-yourselfer can make their own floating shelves, matching their home’s décor and style. Different woods, wood finishes and paints can be used to match existing wood trim or furniture. Building floating shelves which match the wall color does more to create the illusion that the items on the shelf are floating, while a dark stained shelf will put the focus on the shelf itself floating and holding up the things sitting on it.
Using Commercial Floating Shelf Brackets
The easiest way of making floating shelves is to use commercially manufactured floating shelf brackets. There are two basic styles of these, both made of metal. The first style consists of a base plate with tubes welded to it. With this style, holes need to be drilled into the edge of the shelf, for the tubes to go into. The tricky part is drilling the holes straight, so that the shelf will go all the way over the tubes and the shelf sits level. Most commercially manufactured floating shelves use some variant of this sort of bracket.
Commercial bracket 1
If this sort of bracket is to be used, it needs material that is at least 1 ½” thick. It is a good idea to either drill the hole into the edge of the shelf on a drill press, using a drill press vice to hold the shelf vertical or to use one of the various drill angle guides that are available on the market. Trying to hold the drill perfectly plumb and square for a deep hole is difficult.
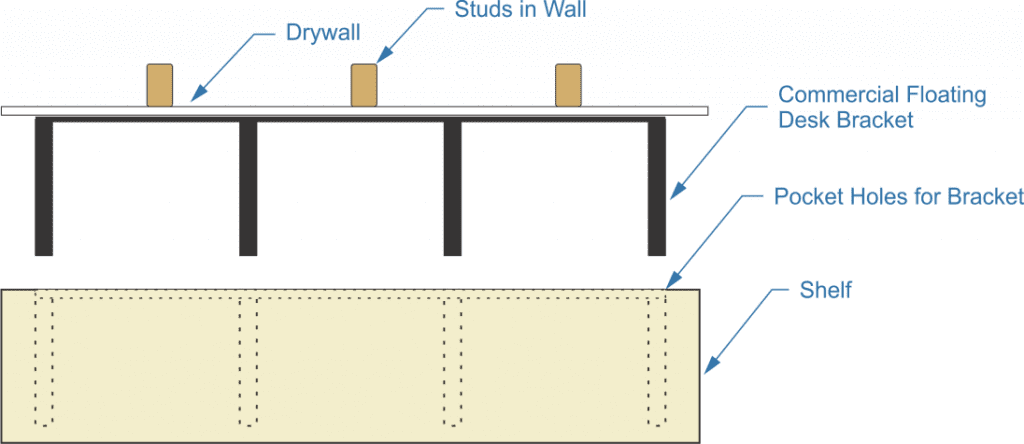
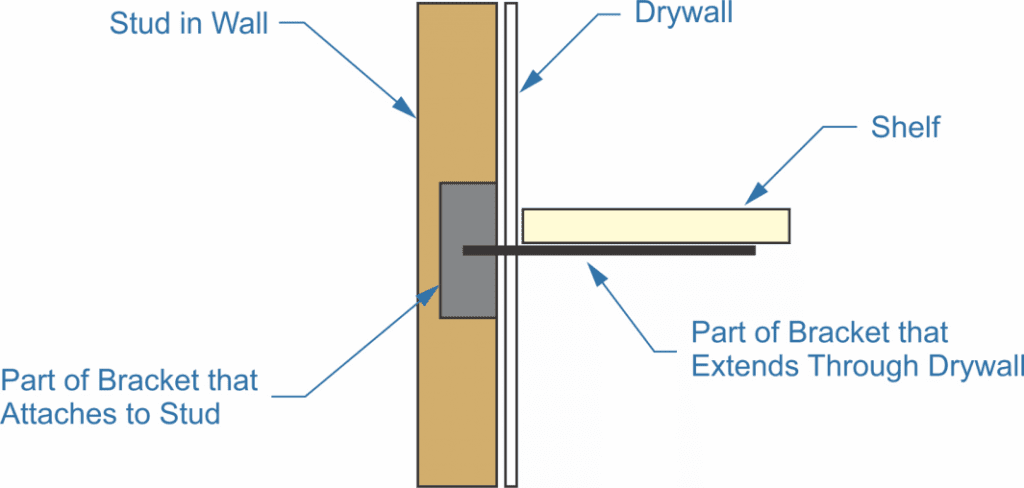
The second type of floating shelf bracket is easier to work with, because those hole don’t have to be drilled. However, this type is harder to hide. The bracket consists of two parts, a vertical one, which is intended to go under the drywall, mounted to the studs. There’s a welded steel strap perpendicular to this, which goes through the drywall and which the shelf sits on top of. When people are standing, the shelf looks to be floating; but if they look at it while seated, they will likely see the steel strap on the underside, especially if the shelf is a light color that contrasts with the color of the bracket.
Commercial bracket 2
With this sort of shelf bracket the hard part is installing the bracket itself, as that has to be done before the wall is finished. attaching the shelf itself is simple, as the shelf sits on the bracket and only needs a couple of short screws to hold it in place.
Making a Box-Style Floating Shelf
The most common style of DIY floating shelf is the box style. This consists of two parts; the box “skin” of the shelf and the mounting bracket. While similar to the first style of commercial brackets mentioned above, these are made at home out of wood.
One of the nice things about this way of making a floating shelf is that it can be made to any style that the woodworker desires, as well as being made of almost any wood available. While hardwoods are popular for this, cedarfence pickets work just as well when one is looking for an inexpensive alternative. It really all depends on what style will go best in the room the shelves will be installed in.
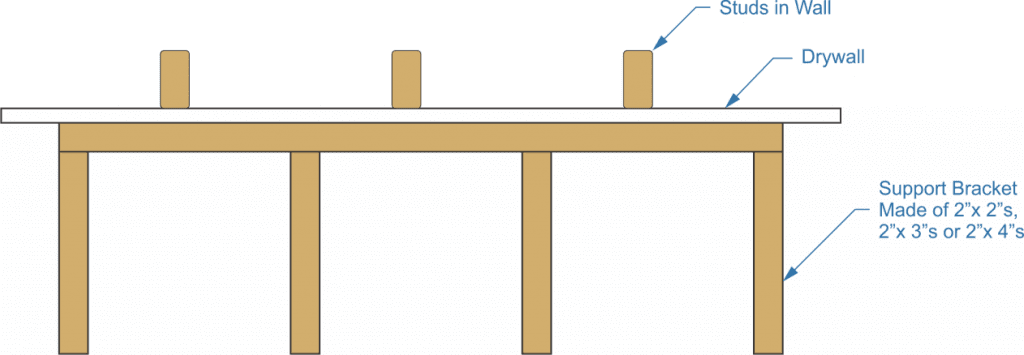
It’s always best to start by building the wall bracket, as it is much easier to adjust the size of the skin to fit the bracket, than to adjust the size of the bracket to fit the skin. Depending on the woodworker’s preference, this can be made of anything from 2”x 2”s up to 2”x 4”s. Keep in mind though, that the thicker the thicker the shelf, the more contact area there will be with the wall, providing more strength and the ability to hold more weight. If smaller than 2”x 4” material is being used, standard studs can be ripped down to create the size desired.
When building the wall bracket, it’s important to keep everything square; but the bigger challenge is connecting it together in a way that will make it strong. Most people talking about how to make this project will say to use wood glue and screw to attach the pieces together. There’s only one problem with that; although screws will grip in end grain, they won’t grip well, so using screws doesn’t provide for the greatest strength. Glue doesn’t grip well in end grain either, as it can pull out.
It is much better to use nails to attach into end grain, but there’s something better yet. That’s to either create mortise and tenon joints or to use dowels. I personally prefer dowels in a case like this, as they are faster and easier to do. Dowel joints are structurally mortise and tenon joints for those who are too lazy to make true mortise and tenons.
To connect this bracket together with dowels, I’d recommend using ½” diameter dowels. Using the 2” precut ones isn’t a good idea, as they aren’t really long enough. Rather, I’d cut some piece of dowel rod to 3” long. Even without the fluting, they’ll work.
Clamp the bracket parts together, ensuring that they are perpendicular. Wrap a piece of masking tape around the drill bit at 3”, to indicate when the hole is deep enough. Then drill ½” holes through the mounting plate and into the ends of the bracket’s prongs. Apply glue to the outside of the dowel and drive it home, bottoming out in the hole, with the end flush with the back side of the mounting bracket. It will take two dowels per prong. If any of the dowels end up sticking out slightly, they can be cut flush with a flush-cut saw. Allow the glue in the bracket to dry, before using it.
Homemade shelf support
With the bracket built, making the shelf’s “skin” is easy. That can be made out of any ½” or ¾” thick lumber. OSB, plywood and other engineered wood products should probably be avoided, as there will be no easy way to hide the grain. MDF will work, if the shelf is to be painted, but solid wood is still the best.
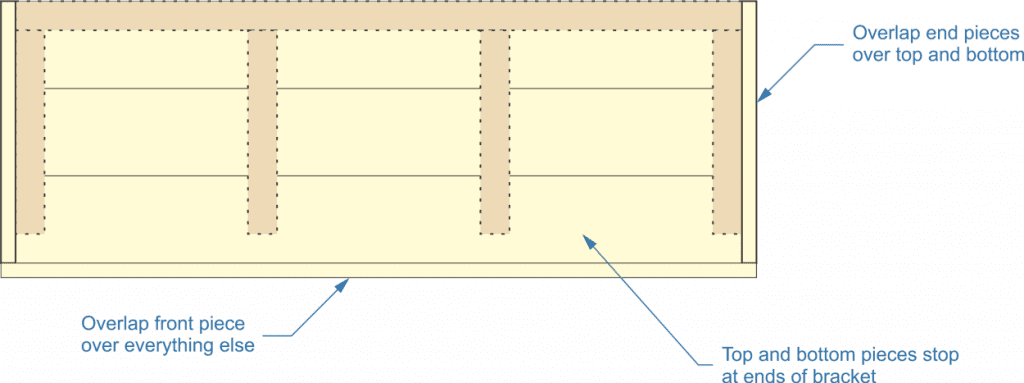
For the best shelf, the construction of the shelf’s skin should be done in such a way as to make the seams as hidden as possible. To accomplish this, the front edge of the shelf should overlap the boards used for the top, bottom and edges and the two edges should overlap the boards on the top and bottom. While there will still be visible seams for those who look for them, the seams won’t be obvious, making the shelf look like one solid piece at a casual glance. This effect will be increased if rough-cut wood is used for the skin, like cedar fence pickets.
The easiest way to assemble the skin is to do it around the bracket, ensuring that it will fit. While it can be built directly around the bracket, I would recommend folding pieces of paper over a couple of times and placing them on top of the bracket parts, forcing a tiny amount of space between the bracket and the top and bottoms of the shelf skin. That way, the majority of the tension to overcome when mounting the shelf will come from the ends of the bracket, not the whole thing.
Homemade shelf skin
The end pieces can be used to attach the top and bottom boards together, if the woodworker is trying to avoid laminating those boards together. However, laminating will help prevent the boards from warping to different degrees, making the shelf top uneven. Use glue and finish nails or brads to assemble the parts. Once the top, bottom and ends are connected together, take the bracket out from inside them, before installing the front piece to the skin. If this little detail is forgotten, it might be difficult to take the shelf skin off the bracket for hanging.
Be sure to apply whatever finish is going to be used, before hanging the shelf. It’s always easier to finish a project on the workbench, than it is when mounted in the home.
Installing the Floating Wood Shelf
To install the shelf, the bracket must first be installed. This means locating the studs within the wall, so that the shelf bracket can be mounted to it. Studs are usually set at 16” apart, although if the home has been remodeled, the studs might be 24” apart.
holes through the baseplate of the mount to align properly with the spacing of the studs. As much as possible, it’s important to mount the bracket to the studs, rather than just into the drywall, as the drywall provides very little strength. Ideally, screw at least 3” long should be used for mounting the bracket to the wall, which will allow 1” of the screw to go into the stud. Two screws per stud are ideal.
If it is impossible to put all the mounting screw into studs, there are some pretty good alternative anchors that can be used in drywall. However, if those are going to be used, we must keep in mind that it will reduce the weight capacity of the shelf to the max weight capacity of those anchors.
Using Pocket Screws for a Single-Board Floating Shelf
While the method detailed above is the most common way of building and installing a floating shelf, some do-it-yourselfers have taken to using pocket screw for this. Pocket screws have gained in popularity as a means of joining wood together, mostly because of their ease of use, especially when building face frames for cabinetry. However, in this case, pocket screws are not going to provide as strong a shelf.
The basic problem is that only one pocket screw can be installed vertically per wall stud, rather than the two which I recommended for use with the aforementioned method of building floating shelves. This won’t be a problem if only a small overall amount of weight is being placed on the shelves. But if the shelves are going to be used for heavy objects, such as books, then chances are pretty high that the shelves will begin to sag after a while. This will be worse, the deeper the shelf is, as the weight will be cantilevered farther.
Nevertheless, it is possible to mount a single 2” thick board as a floating shelf using pocket screw. To help hide the visibility of the screws, they should be mounted from the bottom side, with a minimum 2 ½” long screws being used. To hide the screws even better, plug the hole after the screw is installed with a dowel rod and cut it flush with the shelf’s face, using a flush cut saw.
As an alternative to using pocket screw, the same shelf can be installed with dowel rods. Cut sections of ½” dowel rod 6” long. Then mark a ½” drill bit with masking tape so that it can be used to drill 3” deep hole into the edge of the board. As mentioned before, a jig should be used to ensure that the holes are exactly perpendicular to the edge of the board. Mount the cut dowel rod pieces into these holes, gluing them in place.
With the dowel rods mounted into the shelf, mark their positions on the wall and drill 3” deep by ½” diameter hole into the wall. Once again it will be necessary to use some sort of jig or adapter to ensure that the drill is making holes exactly perpendicular to the surface of the wall, otherwise the dowels won’t go in all the way and the shelf won’t but up against the wall.
With the hole drilled, put some wood glue around the ends of the dowel rods, insert them into the holes in the wall and drive the shelf up against the wall with either a rubber or wood mallet.
Related Posts:
Making a Table with a Floating Top by Admin August 31, 2021 DIY Tables have taken on an extensive variety of different shapes and styles through the ages. Functionally, the shape and style aren’t the important part; what’s…
Installing a Floating Mirror by Admin September 1, 2021 Installing The idea of a piece of furniture or home décor “floating” is a bit of a misnomer. We can’t call up Dr. Strange or the…
Floating Fireplace Mantel by Admin July 3, 2023 DIY Traditional fireplace mantels are mounted on two square pillars, one fireplace mantel being on either side of the other fireplace mantel. This was so commonplace…