Anyone can find a good reason to have a desk in their home. With so much being done on computers these days, a desk is almost a necessity. While it’s possible to park a laptop on the kitchen counter or dining room table, it makes a whole lot more sense to keep it on a desk, where it is out of the way of other things and where other things, like bills, can have a home to be piled.
There are a lot of inexpensive desks out there; but then, when you buy one of them, the saying about “you get what you pay for” kicks in. If you want quality furniture, which will last, then you’ve got to be willing to pay quality prices. Either that, or make a quality desk in the workshop, saving money and having a nice project to do at the same time.
If we look at most commercially manufactured desks, we find that they are predominantly made of plywood products anyway. The low-end stuff is vinyl-clad MDF, usually with a wood grain on it. But in today’s marketplace, that vinyl cladding is extremely thin, making it highly susceptible to damage. So the “assemble it yourself” furniture that looks so good when it’s bought one year, can end up looking pretty seedy the next year.
Even high quality furniture is made from plywood; although in these cases, it is quality hardwood plywood, mixed with some actual hardwood. Still, plywood is used because it provides a large flat panel, which is free from any risk of warping, easy to work with, and considerably less expensive than buying that much hardwood and laminating boards together to make a table top.
Any desk is actually a tabletop with legs. Many add other elements, like drawers, cubbyhole and shelves. But it all starts out with a desktop or tabletop and something to act as legs. If drawers are going to be built in, then those legs might be additional pieces of plywood, as that’s needed for the drawers and slides anyway.
Let’s Talk Dimensions
If we look at desks that are made for use by people who work at a desk all day, there’s actually a lot of ergonomics involved. For those who aren’t familiar with that term, ergonomics is the study of people’s efficiency in their working environment. In other words, it consists of factors to be considered in designing an efficient working environment.
Since we are all different, desks made using ergonomic principles either have to be made to fit an individual, to fit an “average” sized person, or made to be adjustable, so that it matches the user’s height. In most cases, companies go for the average, as the vast majority of people can work comfortably with this furniture.
While a homemade desk is probably not going to be used for working eight hours a day, the same factors affect how comfortable it will be to use that desk in the home, as would exist in the workplace. Worse, if the desk at home is built to different dimensions, it might end up being decidedly uncomfortable to work there.
The most important dimensions to take into account are:
Desk height – This should be 30” above the floor
Keyboard height – Ideal height for a keyboard is actually below the desk height, at 26” to 29” above the floor. Ideally, the forearm of the person working there should sit level.
Monitor height – Measured at the center of the monitor, the ideal height is 36” to 51” inches above the floor. That’s a big span, so to be more specific, the center of the screen should be set so that the user is looking right at it, when their head is inclined 15 degrees.
While there is some variance, desks are rarely less than 24” deep. That’s what is found on most “student desks,” as well as work surfaces in cubicles. However, freestanding desks will be 32” deep, with freestanding executive desks will often be 36” to 40” deep. As for width, a standard office desk is 60” (5 ft.) wide, but for the home it is usually defined by how much space is available.
Building a Plywood Desktop
Any desk project usually starts out with the desktop. While it is possible to start elsewhere, it is the desktop that defines the size of the desk. Since everything else ends up attaching to it, it really makes sense to start out with the desktop.
At the simplest level, a sheet of plywood, cut to the right dimensions, will make a desktop. But few of us actually want that. While it might be functional, it’s not really all that attractive. The edges will be prone to splinters, as well, making it difficult to work with. Better to edge that top in some way.
To start with, the plywood used for the desktop should be ¾” thick. That can be made of one sheet of hardwood plywood or a thin sheet of cabinet-grade plywood, laminated onto a sheet of ½” thick construction-grade plywood. Either way, you basically end up with the same thing, as the core veneers of the hardwood plywood may very well be softwood as well.
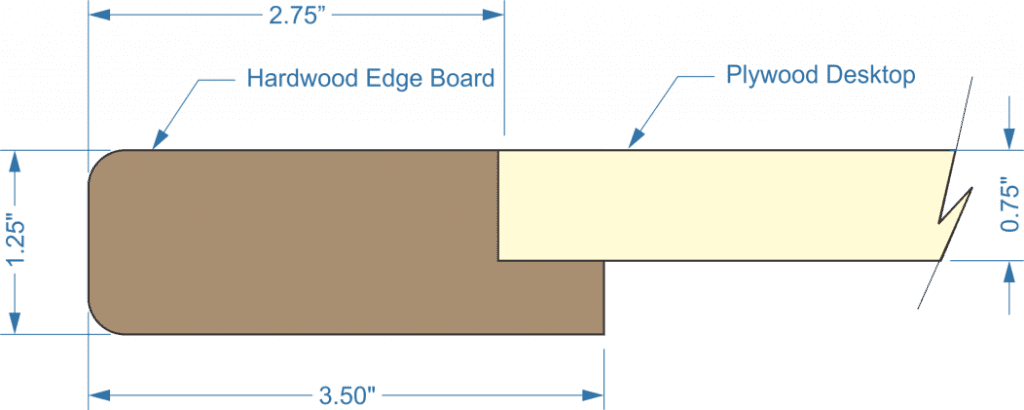
While commercially manufactured office desks vary considerably, most wood desks have more than just banding around the perimeter of the desktop. Rather, they have a wide wood border, which the plywood is mounted flush with. This border is generally thicker than the plywood, anywhere from 1” to 1-1/2” thick.
Hardwood edge
In this case, the hardwood frame to the desktop is mitered in the corners and a large rabbet cut is made in it for the plywood to set down into. The edges of the hardwood may be rounded or otherwise milled, in order to avoid having a sharp edge to live with. It is important to ensure that the rabbet is cut just the right depth, so as to ensure that the hardwood edge and plywood desktop are at the same height. If there is any problem doing that, make the edge boards sit a bit proud, then sand them down to make it sit flush. Sanding the plywood could result in sanding right through the face veneer, an unacceptable option.
When making this, keep in mind that the overall dimensions will be considerably larger than the size of the plywood itself. So, subtract the width of the hardwood edge from the overall dimension of the desktop and cut the plywood to fit. In other words, a 30” x 60” desktop would need a piece of plywood that’s 24-1/2” x 54-1/2”, according to the diagram above. Then cut and miter the hardwood edge to fit the plywood. This will provide a tighter fit than trying to make the frame and fit the plywood to it.
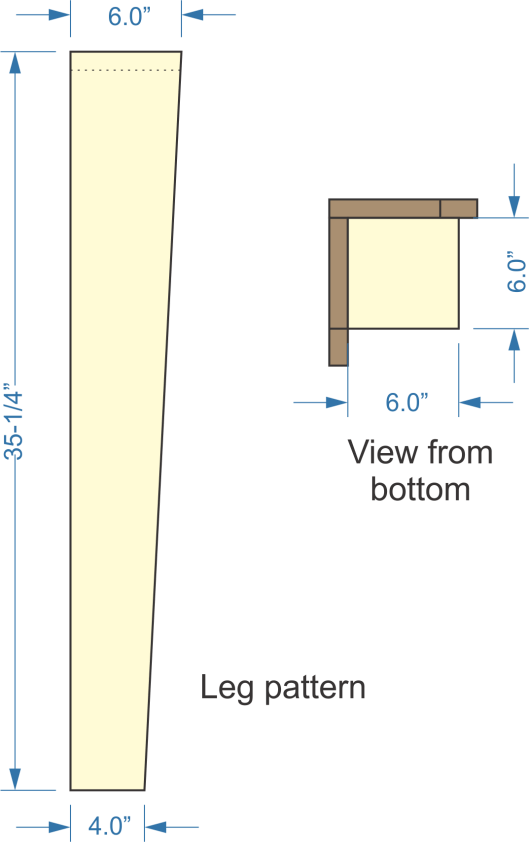
If all that’s wanted is a desktop, without any drawers or other storage space, then legs can be easily made out of the same plywood as well, matching the desktop. In this case, each leg can be cut from two pieces, with each of them being slightly tapered. The two pieces can then be glued and nailed together, forming an angle.
Desk legs
It would be a good idea to apply adhesive-backed wood banding to the edges of the legs, so as to hide the edges of the plywood. This banding comes in different widths and wood types. It has hot melt glue on the back side, allowing it to be attached to the edge of the wood with the use of a clothes iron.
When installing self-adhesive banding to the edges of plywood, always use a piece that’s slightly oversize and then trim it to fit, once it is attached. It is easier to align the banding with one side of the plywood, while bonding it, so that it only needs to be trimmed on one side. Both ends should overlap slightly and then be trimmed off flush with the ends of the board.
To attach the legs to the desktop, install four cleats, made of scrap ¾” thick plywood; mounting each of them a few inches in from each of the corners, gluing and screw them from the underside. The wide (upper) end of the legs can then be glued and screwed to the edges of these cleats, providing a solid connection.
Adding a Keyboard Drawer
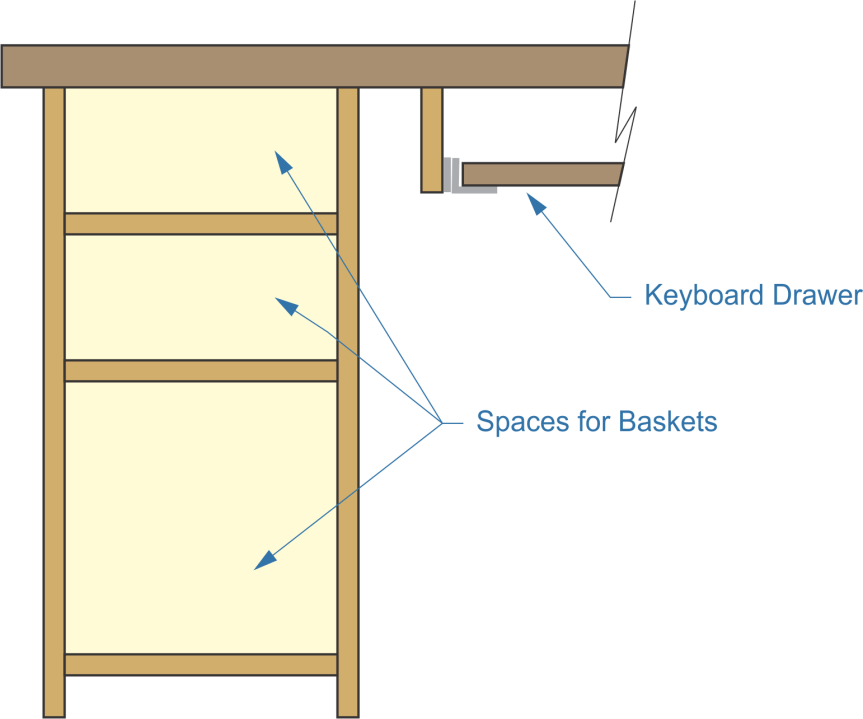
If the desk is going to be used for a computer, it’s a good idea to add a keyboard drawer. As we saw above, in the section on dimensions, the ideal height for the keyboard is actually a few inches below the desktop height. In order to make that possible, it is necessary to mount a shelf protruding out from the side of the desk or add on a keyboard drawer. Of the two, it’s actually easier to use a keyboard drawer.
Of course, the keyboard drawer would be used with a separate keyboard, not with a laptop. While a separate keyboard can be used with a laptop, if the laptop keyboard is going to be used, then the laptop will usually sit on top of the desk, not on the keyboard shelf.
This term, “keyboard drawer” is actually a bit misleading, as this isn’t a drawer with sides, which you can store things in. Rather, a keyboard drawer is nothing more than a flat piece of wood for the keyboard to sit on. The only thing that makes it a drawer is that it slides in and out on drawer slides. Keyboard drawers can be made any width desired, providing just enough room for the keyboard or for the keyboard and mouse together. If a long keyboard drawer is desired, then thicker plywood should be used to make it.
The best sort of drawer slides to use for a keyboard drawer are the type which attach to the bottom corner of the drawer. These work out perfectly for supporting a ½” to ¾” thick piece of plywood, to act as the drawer. This shelf or drawer should have its edges banded with wood banding, just like the legs.
All that’s required to attach a keyboard drawer to the desktop, besides the drawer runner, is a couple of pieces of 1”x 4” lumber. If the desktop is edged with hardwood, these should match. Attach them to the bottom side of the desktop with either pocket screws or angle brackets, perpendicular to the edge and parallel with each other, one inch farther apart than the width of the drawer itself. That will leave room for attaching the drawer glides.
Adding “Drawers” the Easy Way
Many new woodworkers are uncomfortable with the idea of making drawers, although they really aren’t all that hard to make. Simple drawers can be made without dovetail joints or finger joints, although to make fine furniture, learning how to make clean dovetail joints, whether by hand or with a router and jig, is essential.
But for something simpler, baskets can be used in lieu of drawers. After all, they are both basically the same thing, a box to put things in. Rectangular baskets, sitting on shelves, not only make acceptable drawers, but are attractive as well. Just be sure to buy the baskets, before making the shelves they will sit on, as doing it the other way around is a sure recipe for lots of frustration.
Shelves for baskets
The easiest way to attach the shelves to the vertical sides is to glue them and secure them with finish nails. The finishing nails leave a small hole, which is easy to fill. But if a lot of weight will be placed on those shelves, it might be a good idea to use pocket screws for the added strength they offer. This will mean working from the top down, with the desk turned upside-down on a workbench, so that there is sufficient access room for the drill.
Adding a Desk Riser
If the computer has a separate monitor or if a laptop is being used with a separate keyboard, then it is more ergonomic to have the monitor higher than the desktop. As I mentioned earlier, the idea is to have the center of the monitor at a height where the center allows the head to tilt down at a 15 degree angle. How high that actually is off the ground depends on the height of the person and the height of the chair they are sitting in; but for many people, to get that requires raising the monitor above the desktop.
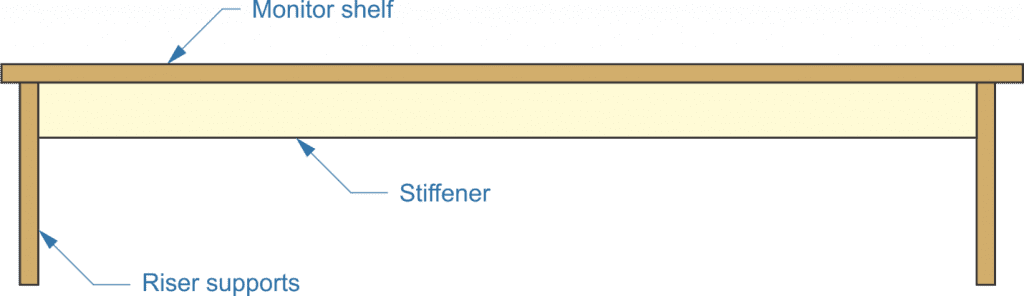
This is easily accomplished by making a simple desk riser to sit on top of the desk. This riser consists of four pieces of plywood, connected together to make an upside-down, squared off U. One stiffener is added, across the width of the riser, to keep the supports from folding in and collapsing.
In the diagram below, shown from the viewpoint of someone sitting at the desk, working, the monitor shelf and risers are about 8” deep. They can be made deeper, up to about one foot, but 8” is the minimum. Notice that the supports are not mounted to the ends of the shelf. This is done for ease of assembly, as if they are mounted to the exact end of the board, they have to be aligned perfectly. But by inserting them slightly, if they end up off a bit, it’s not actually visible. The stiffener is essentially a 1”x 2, cut from the same ¾” plywood used for the rest of it.
Monitor riser
Risers of this sort can be made any length desired. I typically make them the full width of the desk and will add additional shelves and cubby hole, allowing me to use it for organizing papers and other things on my desk. In cases where the riser is high enough, it actually acts to increase the overall size of the desktop, giving the user more usable space.
Related Posts:
DIY Floating Desk by Admin July 26, 2023 DIY Building a floating, wall-mounted desk for modern office furniture requires a different style and special techniques. You can’t make a “floating” desk or like like…
Can Plywood Get Wet? How to Dry Wet Plywood by Amy Reed March 30, 2023 Repairs Plywood is one of the most universal building materials on the market. It can be used for all kinds of construction – from roof building…
Plywood Stairs Makeover by Admin September 17, 2021 Repairs Contractors are always on the lookout for ways to reduce the cost of building homes. This is especially apparent in tract homes, which by definition…