Protecting a finely built piece of wood furniture is just as important as building it. Many a tabletop has been marred or even ruined by people setting drinks or hot dishes on it, leaving permanent marks in the finish. While it is often possible to remove this damage and refinish the tabletop, that’s an extra project that none of us need. Better to protect the tabletop, so the time can be spent building new projects.
That’s where coasters and trivets come in. Coasters protect tabletops from the condensation that forms around cold drinks and trivets protect tabletops from hot serving dishes. While trivets are typically considerably larger than coasters, they are similar in many other ways.
Coasters can and are made of almost any material, ranging from paper to marble. Those printed with advertising slogans are generally made of inexpensive materials, like synthetics or cork; but for a more elegant look that compliments wood furnishings, it’s hard to beat wood. Whether the wood matches the furniture or is made to contrast it, it provides a nice accent to the table while protecting it.
Wood coasters can vary considerably in appearance, not only due to the choice of wood in making them, but also in the manufacture of the coaster. Simple coasters might be made of only one type of wood, while more elaborate ones will mix various species together to produce an attractive pattern. epoxy resin can also be mixed in with the wood, filling gaps between individual wood pieces, whether those gaps are intentionally created or due to combining the live edge of several pieces of wood.
The number of coasters being created at one time may have an impact on design considerations. As we will see in making butcher block coasters, the decision on whether to make the coasters end grain or long grain depends largely on how many coasters are being made. If all that is being made is a set of four, it really doesn’t make much sense to make them end grain. On the other hand, if several matching sets are desired, then it’s much easier to accomplish that with end grain than with long grain.
It’s impossible to cover all the different design options or even techniques for making coasters; but we will look at a few different methods, leaving the ultimate design choices for the woodworker that will make them.
Live Edge Coasters
Live edge tables and countertops have become very popular in recent years. This has spilled over into creating other applications for live edge slabs and log slices, with them being used for such things as serving platters and even coasters. Live edge coasters are easy to make and visually impressive, sure to garner a comment or two from the guests.
While these coasters can be made of any type of wood, it should be kept in mind that the wood will be sliced thin, across the grain. Some types of wood are not strong enough to survive usage when cut in that manner, so should not be used. If unsure whether a particular log will work, cut a slice and see how easily it breaks by hand. If considerable force is required, it will work fine for the coasters.
The other issue that might occur with live edge coasters is that the bark might come off. Each tree species is different and the wood reacts differently as it dries. Oak, for example, shrinks considerably as it dries, but the bark does not. This leaves the bark not very well attached to the wood and makes it easy to peel off. That problem can be solved by filling the space between the wood and the bark with epoxy, before cutting the log section into coasters.
Some other species of wood have bark that in and of itself doesn’t stay intact, such as cedar. When making coasters out of cedar, it is best to remove the bark, rather than trying to use it as part of the design. That can also be done in the case of woods where the bark tends to separate from the wood, such as the aforementioned oak.
Cedar live edge coasters
Making the live edge coasters themselves is rather simple. Start with a log section that is between three and four inches in diameter. square up the end, either perpendicular to the axis of the log or at an angle. An angled cut produces an oval coaster, which can be attractive. Then, using a fence on a band saw, cut as many 3/8” thick slices across the log as needed. It’s always a good idea to cut a few extra, just in case something goes wrong with one or more of them.
The surface of the coasters will have saw marks which must be removed. This can either be done with a planer or a sander. I avoid the planer for this, as the force that a planer puts on the wood can chip out end grain very easily. Rather, I lay the belt sander down horizontally and sand the coasters to remove blade marks. Once those have been removed, a palm sander can be used for smooth surface sanding. Placing the coasters on a rubber mat for sanding can keep the coasters from moving while sanding.
Branding & Engraving Coasters
Some people choose to add some design work to their live-edge coasters by branding them with some sort of personal design. This is commonplace for use in advertising items, but branding the first letter of the family’s name into the coaster or some other symbol that the family identifies with can be attractive.
Rather than branding, laser engraving can be used to burn a wide variety of designs into the surface of the coaster. With laser engraving, each coaster can be given a unique design, if that is desired. Sets of coasters can be engraved around a common theme, such as images that are associated with Christmas.
Live Edge and Resin Coasters
A variation on live edge coasters is to make the coasters using smaller diameter pieces of wood. Small diameter limbs, of the kind we normally throw away, can be cut up on the band saw, making 3/8” thick disks ranging in size from ¼” up to the capacity of the saw. Using a variety of different sizes, in the ¼” to 1-1/2” range to make a mosaic and then filling the space between the slices makes for a very attractive coaster, once it is cut and finished.
To do this, select a number of sticks of varying diameter and cut them up into 3/8” to ½” slices on the band saw. Then set these aside for a month or so to dry. While they can be used with moist in them, they will shrink somewhat while drying, so it’s best to ensure that they are fully dry. I keep a box of these drying on the shelf in my workshop, so that I have them available when I want to use them.
Something will be needed for use as a mold for potting the wood mosaic. Cheap plastic plates, available at any dollar store, make excellent molds for this. They are often made out of polyethylene, which the epoxy will not stick to well, allowing the plate to be removed (but probably not salvaged for reuse) fairly easily.
Using random sized slices of wood that were previously cut and allowed time to dry, make a random mosaic pattern in the plate. This pattern should be larger than the finished size of the coaster, so that the final cut will be through the slices, leaving some of the coaster edge as a cross- section of the wood slices, with the areas in-between showing the epoxy. Spacing between the slices is up to the desire of the woodworker, depending on how much epoxy they want showing.
It is important to glue the slices down to the plate being used as a mold, especially the smaller pieces, as they will float in the epoxy. A hot melt glue gun works well for this. Only a small dab of glue is required.
Dscn2346
With the wood mosaic in place, mix up sufficient epoxy to fill the spaces in-between. To determine the amount of epoxy needed, pour uncooked rice into the plate, filling all the cavities in-between the wood slices. Level it out, just above the level of the slices and then pour the rice out into a measuring cup. The resulting measurement should equal the amount of epoxy needed for potting the trivet.
Epoxy compounds used for potting wood are different than those used as an adhesive. They are of a thinner viscosity and have a longer working time, with a correspondingly longer drying time. They can either be used as they come, which will harden clear or dyed ground mica can be added to the epoxy, while mixing it, to tint it a variety of vibrant colors. Allow the potted coaster at least 24 hours to cure totally before working further on it.
At this point, neither the top or bottom surfaces of the coasters will be smooth and level. It will be necessary to take some material off the surface to level them. However, I’d avoid using a planer for this. When I tried using a power planer, the wood slices weren’t able to withstand the force being applied by the tool. It literally tore the casting apart, splitting the wood slices apart, even though I was only taking a very thin slice off the surface.
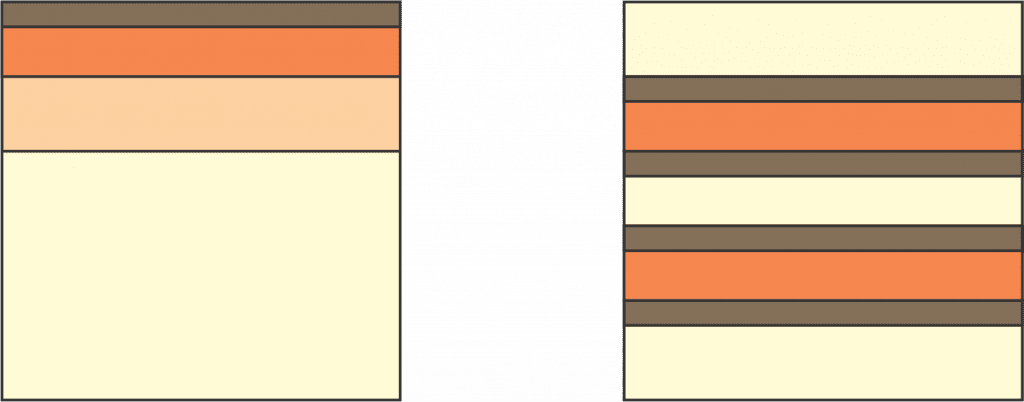
Rather than a planer, I’d recommend using a planing bit in a router or a belt sander. If a planing bit is not available, a straight bit can be used as one. To use the planning bit in the router, a jig will be needed to bridge across the casting, holding the router at a consistent level above it. These are commonly used when doing river tabletops and other projects where epoxy casting is used with wood. The only real difference is that this bridge would need to be much smaller, as the casting is smaller. The diagram below, which is not to scale, shows how such a bridge might be made out of 1”x 2” lumber. Just make sure that all the pieces are dimensioned the same, so that the top surface ends up parallel to the bench top.
Router planing jig
Once planed, the coasters can be cut to size and shape then finish sanded. Keep in mind that they will need a couple of coats of finish, as the epoxy will not be covering the entire surface.
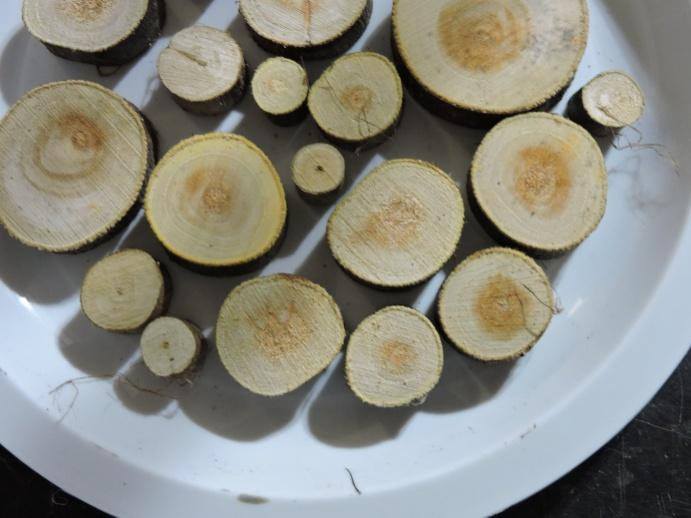
Butcher Block Coasters
Another popular way of making coasters is to laminate different sized strips of wood together, as if one were making a small butcher block. This works extremely well when various different types of contrasting woods are used together, allowing the colors of the wood to create the design. The different colors of wood can be arranged to go from dark to light, be arranged randomly, or be laid out in a symmetrical or repeating pattern. There are infinite design possibilities.
Butcher block coasters
This is a great project for using up leftover pieces of hardwoods, as only small pieces are needed to make a set of coasters. Essentially the coasters are made in a strip, as long as the available material is, and then cut apart. Since coasters are generally no more than four inches square, the maximum length of the glue-up would be 16” plus three saw kerfs. If material that long is not available, then making two glue-ups the same, which are 8” long, will still produce a set of four coasters.
Before gluing anything, the material needs to be ripped on the table saw, making pieces that are 3/8” to ½” thick however wide is wanted. Then glue them together just like any tabletop. Considering the thickness of the wood pieces, it would be a very good idea to use cauls in the clamp-up, so as to prevent the laminated piece from bowing out from the pressure of the clamps.
Use a waterproof glue for this, such as epoxy or Loctite 3, rather than a water-resistant glue. Even though the coasters will be finished with varnish, making them waterproof, there’s no sense taking chances.
After allowing the glue-up to dry for 24 hours, remove the clamps and plane or sand the surfaces level and smooth. If planning, be sure to insert the boards into the planer so that the direction of travel is along the grain to help prevent tearout. Cut the laminated boards into squares or circles the size of the finished coasters; then sand the surfaces and edges smooth. It is not uncommon to round over the edges slightly in the sanding process.
End-Grain Butcher Block Coasters
Just as cutting boards can be made in an end-grain butcher block style, so can coasters. The big advantage of this is if a lot of coasters are going to be made. A 16” long glue-up that is done for making normal butcher block coasters will only make 4 to 5 coasters, whereas the same length glue up for end-grain butcher block can be turned into 32 coasters. Of course, this requires more material, but it’s all glued together at once, so there isn’t much more time required to do the glue-up.
The only challenging thing about this sort of glue up is ensuring that there are no gaps left between the various pieces of wood. pressure needs to be applied to the glue-up from both directions at the same time. Cauls can help with this, as well as spreading the force from the clamp, so that pressure is more evenly applied across the entire length of the laminate.
Once the glue has had ample time to dry, the clamp can be removed. The edges will probably need to be planed or sanded before the individual coasters are cut from the laminate. It is much easier to do this to the whole laminate, rather than having to do it individually for each coaster.
Cut the laminate into ½” slices on the band saw. Then sand them to remove the blade marks, just as I discussed when talking about the live edge coasters. I would not recommend putting these through the planer to smooth the surfaces, as there is a very good chance of tearout.
Turned Wood Coasters
While not as common, turned wood coasters have one distinct advantage over any other type of wood coasters. That is, they can be made with a lip, so that they catch condensation dripping off of glasses, preventing it from dripping down onto the table top.
Turning a coaster is really no different than turning a small, shallow bowl or plate. The only thing to really be concerned about is ensuring that there is enough of a lip to catch the condensation. However, the one big problem is that turning them will waste a lot more material than the other types we’ve discussed, as each one will need to have a dovetail mortise cut into the bottom, to interface with the lathe’s chuck.
A fair representation of a turned coaster can be made by using a bowl router bit. These are generally used for carving out compartments in serving trays and plates, by people who don’t have a router. Properly done, the finished product looks much like it was turned on the lathe. However, these router bits also offer the possibility of cutting a serving tray, or in this case a coaster, that is an unusual shape, rather than just round.
Finish Coasters
Some people leave wood coasters unfinished, so that the wood can soak up the condensation dripping off of glasses. This is actually not a very good idea, as the moist soaking into the coaster will cause the wood to swell. It will later contract again, but the uneven swelling and shrinking of the coasters is likely to cause them to crack.
The best finish to use on wood coasters is a heavy-duty polyurethane varnish. Apply two to three coats, sanding lightly with very fine sandpaper between coats. If the coaster has end-grain exposed, such as in the case of live edge coasters, then it may be necessary to apply three coats before the wood is properly sealed. In that case, once it is properly sealed, a fourth coat should be applied for appearance sake.
In the case of coasters which are made using epoxy, it may be desirable to use epoxy as the finish, rather than varnish. Varnish tends to yellow slightly, so if there is a desire to retain the transparent appearance of epoxy without any colorant added, then it is better to use epoxy for the finish. It can be mixed and then painted on with disposable paint brushes in the same way that varnish is.
Another thing you may want to consider is adding felt to the bottom side of the coasters. Not only does this help prevent the coaster from scratching the table, but it also makes the process of making the coasters easier. It is not necessary to sand out the blade marks or sand the bottom side smooth, if it is covered with felt.
I usually use black felt for covering the bottom of coasters, as it won’t be as visible as any other color. I start by cutting squares of felt which are larger than the coasters. Rubber cement is then applied to the bottom of the coaster and the felt is stuck into the rubber cement while it is still wet. Put pressure or weight on the coaster to keep the felt in place while the cement dries. When the cement is dry a small pair of scissors or a sharp craft knife can be used to cut the felt flush with the edge of the coaster.
Related Posts:
Vinyl Stencils for Wood by Admin April 30, 2021 Tools Stenciled signs on wood are one of the trendy home décor items we find everywhere from knick-knack shops to truck stops. Some carry witty or…
Wood Floor Inlay by Admin May 1, 2021 Installing Wood floors have made a comeback, with many people preferring them over other flooring options. That’s not surprising, considering wood flooring’s natural beauty and durability.…
Wood Mallet by Admin June 24, 2021 DIY In our modern age of power tools, the wood mallet has all but been forgotten in the home workshop. Yet this is still a common…