The Christmas calendar or Advent calendar as some call it is an old time staple of Christmas décor. While not everyone uses one, it’s a handy way of counting down the days till Christmas, especially for younger children who might not quite have an understanding of time. Each day, something corresponding to that date is opened on the calendar, which could contain a piece of candy or small prize. That makes the countdown fun for the children, while also giving them a visual representation of just how long it is till the special day.
Part of the fun of having a Christmas calendar to countdown to Christmas is getting that prize every day, usually a piece of candy. While some people make calendars that don’t have any prizes associated with them, the lack of prizes tends to eliminate much of the motivation for checking the calendar every day. That means it only gets updated when someone thinks of it.
These calendars can take on an almost infinite variety of forms and styles, depending on the creative desires of those who make them. Common overall shapes include a house, Christmas tree and rectangular; but I’ve seen some which were linear or stacked. While most have numbers for the days, that’s not really a requirement with some of the more modern styles. Of course, adding the numbers helps in using the calendar to teach young children to count.
While not a requirement, modern Christmas calendars will typically start out on the first day of December, differing from the class four weeks of Advent from church history. Another option to consider is starting out with the day after Thanksgiving, as that is the beginning of the Christmas season to many people.
A wooden Christmas calendar is a much nicer addition to a home’s Christmas decorations than the simple cardboard ones that can be purchased almost anywhere during the Christmas season. Once made, it can be reused year after year, becoming a favored part of your holiday celebration, especially for the kids who get to eat the candy hidden inside.
Simple Slat Christmas Wall Calendar
One of the challenges of making a Christmas wall calendar is that it usually requires making 25 small boxes for cubbyhole with doors. That can be time consuming, making the project rather tedious. If time is limited, this can be avoided by making a background that 25 small bags can be hung on. Just making the background is easy and can still look attractive with the bags hung on it.
The most common shape for this sort of calendar seems to be that of a Christmas tree. While it is possible to make it in other shapes, just by modifying the design of what we’re going to do, for now, we’ll stick with a Christmas tree to show how the calendar is made.
This calendar can be made out of just about any type of wood, including pallet wood and reclaimed wood from cedarfences. Either of those options would give it a nice rustic appearance, for those whose décor already leans that way. For those whose décor is not rustic, it would be better to make it out of standard 1”x 2” or 1”x 4” dimensional lumber, sanding and painting it.
Slat calendar
The overall dimensions of the wall calendar can be modified to fit the amount of space and material available. If a band saw is available for resawing and/or planer is available to thin the material, it would be good to use material with a ½” finished thickness, rather than standard ¾” thick boards. The two support boards in the back are tapered towards the top, allowing them to meet together. Then the slats are glued and nailed across them. A star or other tree topper can be cut out of thin plywood on a scroll saw and added at the top.
With this sort of design, cup hooks or pegs are mounted to the slats, so that bags can be hung from them. Either extra-small paper gift bags, the size for gift cards, or small burlap gift bags can be hung from the hooks or pegs, with the various day’s prizes in them. Be sure to number the bags, regardless of the type, with a bigger prize for Christmas Day.
Wood Box Christmas Wall Calendar
A more elaborate Christmas wall calendar can be made using small wooden boxes. The boxes can either be made in the workshop or purchased. I’ve small unfinished wood boxes available online from such vendors as Amazon.com, Etsy.com and eBay.com. They are also available through crafts stores or even in Dollar Tree at times. The thing to look for is multi-packs of boxes, as those will offer the best possible price.
It is important to buy the boxes before building the calendar, as the boxes pretty much determine the dimensions of the shelf. Both square and round boxes will work. I’ve seen some nice unfinished wood “pill boxes” that would make a nice advent calendar. Don’t trust advertised dimensions, as they are nominal. I’ve bought 4”x 4” boxes that were both smaller and larger than that dimension by as much as ½ inch.
With the boxes in hand, the dimensions of the calendar can be determined. The calendar itself is going to be like a picture or knick-knack frame, with a lot of little cubbyhole that the boxes themselves fit into. The spaces need to be large enough to allow easy entry and removal, without being sloppy.
Box calendar
In the drawing above, the calendar is made in the shape of a house, with the green boxes sitting on shelves. There are a total of 25 boxes, with the larger one being for Christmas Day. As with the slat calendar, I’d recommend resawing the boards used to make the outline of the house, as well as the shelves. The thinner material will look better, especially after planning to remove the saw marks.
The house above is made with the roof at a 45 degree angle for simplicity sake. The entire back of the calendar is covered with a piece of ¼” thick plywood, giving the shelf stability. Without the plywood, there would be too much of a chance of the house collapsing if pressure was put on opposite corner, even with it being glued and nailed together.
Vertical dividers can be inserted between the boxes, but they aren’t necessary, unless a variety of different sized cubby-hole are being made, to receive a variety of different sized boxes. In that case, more “floors” might be needed for the house or the house may need to be wider to provide the extra space.
The tricky part of this construction will be nailing through the sides, into the ends of the “floors.” If a pneumatic nail gun is used, care must be taken to avoid the nails splitting out the sides. Nevertheless, brad nails should be used, rather than just depending on glue to hold it. While glue provides a strong joint, stronger than the wood itself, the nails help to hold it together while the glue is drying, as well as acting something like rebar in the joint, helping it to not come undone due to lateral force being applied.
In order to glue and nail the calendar together, make sure to draw in the “nail line,” rather than trying to eyeball it. Eyeballing where the nails need to go is a good way of making sure that the nails miss the board and just put an extra hole in the project. It’s also a good idea to first glue and clamp the parts in place, and then nail them. Once nailed, the nails will hold the parts in place while the glue dries, allowing the clamps to be removed.
Making the Boxes
If small boxes can’t be found or the woodworker decides that they’d rather make their own, making small boxes of this type is extremely easy, although making 25 of them can be a bit tedious. The trick to making so many of them is to set it up somewhat like an assembly line, so that the work can be done quickly and easily.
Such boxes should ideally be made out of ¼” thick stock. While that makes for a very nice box, it also makes exact positioning of the nails even more critical. To help avoid nails poking out the sides of the boxes, it’s best to stick to short brads, ½” to 5/8” long.
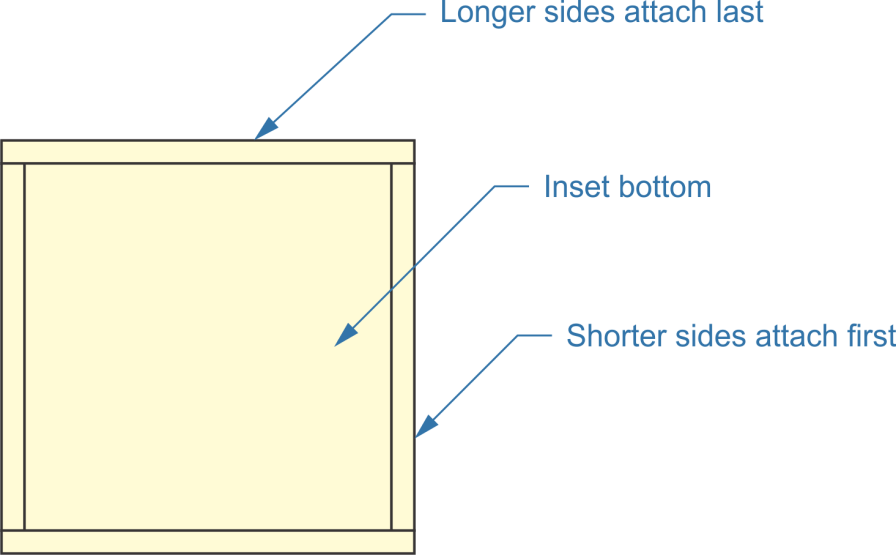
We’re basically talking about a five-sided box, as there really isn’t any reason to make a top. Making the bottom of the box internal, rather than having the sides sit on the bottom helps with assembling the box and gives a more attractive overall appearance. It’s also easier to make two opposite sides overlap the others, rather than having all the sides the same size, with each one overlapping its neighbor as we work our way around the box.
Box
With this design, the bottom acts as the form for the box, establishing its dimensions and helping to locate the sides. The two shorter sides are attached first, both gluing and nailing them to the bottom. The two longer sides can then be located against both the bottom and the sides. Assuming everything was cut to the right size and the parts are aligned properly, all the seams should come out neatly, without anything sticking out too far or not far enough. All that should be required is light sanding, before finish the boxes. Wood beads can be glued to one side, to act as a drawer pull.
Wooden Christmas Wall Calendar with Doors
Many people remember traditional Christmas Wall Calendars as having little doors to open, with the prize inside. This is how the cardboard ones are made and it is possible to make a wooden calendar the same, keeping that nostalgic style.
The calendar itself would be made just like the one above, which was made for little wooden boxes to be inserted into, with one difference. That is, dividers will need to be installed between the various days, so that each door opens onto a unique area.
With this design, the trick is in attaching the doors so that they are hinged. That’s not really all that hard, but for it to be done; assembly has to be done in order. Don’t build the shelf shown above and then try to add doors, it’s much better to add the doors while the calendar is being assembled.
Of course, the 25 doors will have to be cut and sanded before the calendar is assembled. They can be anywhere from ¼” to ½” thick, depending on the woodworker’s preference. But if they aren’t ready before assembly, they can’t be installed very easily, especially since we’re going to use brads as the hinges. The idea is to drill clearance hole for the hinges through the horizontal pieces, and then drive the nails though those holes and into the doors. These clearance holes should be measured out and drilled before assembly.
Since there is no way of easily accessing both the horizontal divider above and below all the doors while the calendar is being assembled, it’s best to build a small jig for locating the hinge nails or pins and driving them into the doors. Then cut off the nail heads, so that the hinge pins can be inserted into the clearance hole.
To assemble the calendar with doors, work from the bottom up. Attach the bottom “floor” and the outside walls together. Then insert the doors into the hole in that floor, setting them on spacers to hold them in place. Align the next floor up, slipping the hinge pins into it and then nailing it to the outer walls. With that supporting the doors, the spacers can be removed and the dividers installed. This will be a bit tedious and quite possibly a bit frustrating, as there’s a need to align several things at once, but by working from one end to the other and from top to bottom, it can be assembled.
Related Posts:
Christmas Wall Shelf by Admin December 14, 2021 DIY Christmas decorations come in all sorts of shapes and styles. Just spend a few minutes in a Christmas shop and you’ll see how inventive people…
Wooden Christmas Tree Decorations by Admin December 5, 2021 DIY The Christmas Tree is one of the oldest Christmas symbols still in common use today. It dates back to western Germany in the 16th century.…
How to Build a Partition Wall by Admin June 1, 2021 Installing At the most basic level, a house consists of walls and a roof, mounted on a foundation. Granted, there are a lot of other things…