The Christmas Tree is one of the oldest Christmas symbols still in common use today. It dates back to western Germany in the 16th century. Some say that it was first used by a monk, using the triangular shape of the tree to describe the trinity. While it is clear that the tree has ties to Christianity in that place and time, there are other possible explanations for its use. One of these was that it was the main prop in a popular play of the time, with the tree representing the “paradise tree” and being hung with apples, representing the forbidden fruit in the garden of Eden.
It was German settlers who first brought the Christmas Tree to America, first using it in German settlements in the state of Pennsylvania. It was not rapidly adopted by other ethnicities and churches, with many seeing it as a pagan symbol. Even as late as the 1840s, the Christmas Tree was not widely accepted. It wasn’t until 1846, when the popular Queen Victoria was shown with a Christmas Tree in the London News that the Christmas Tree became popular. Whatever was done at court, became the fashion in the upper crust.
Regardless of the exact origins of the Christmas Tree, it has since been adopted worldwide as a symbol of Christmas, not only within the church, but in secular celebration of Christmas as well. The brightly decorated and lighted tree can be found in homes around the world, wherever Christmas is celebrated. It would be unheard of in many homes to celebrate Christmas without a tree.
Christmas trees are usually some sort of conifer, as the evergreen trees are some of the few trees which are still green at Christmastime. Trees are decorated in a variety of ways, using lights, garland, gold and silver chains and a variety of ornaments. The honored place at the top of the tree is usually reserved for a star, angel, depending on the family’s preference.
Throughout the centuries that the Christmas Tree has been in use, many people have made their own decorations for their trees. Some have gone so far as to make their own trees, more of an abstract expression of the triangular conifer. A wide range of materials can be used to make both ornaments and the trees themselves, including wood. One of the nice things about these designs is that they pack flat, making it easy to store the tree away for the next year.
Making a Simple 2×4 Christmas Tree
Probably the simplest type of wood Christmas Tree to make is one out of 2”x 4”s. Since the Christmas tree is normally triangular, an abstract tree can be made, by creating a triangle out of three pieces of 2×4, cut to fit together.
2×4 tree
Trees of this height can be made any height, but are usually between 4’ and 10’ tall. Obviously a 10’ tall tree won’t fit in most homes, but they are useful in commercial applications. The tree is intended to be collapsible for easy storage.
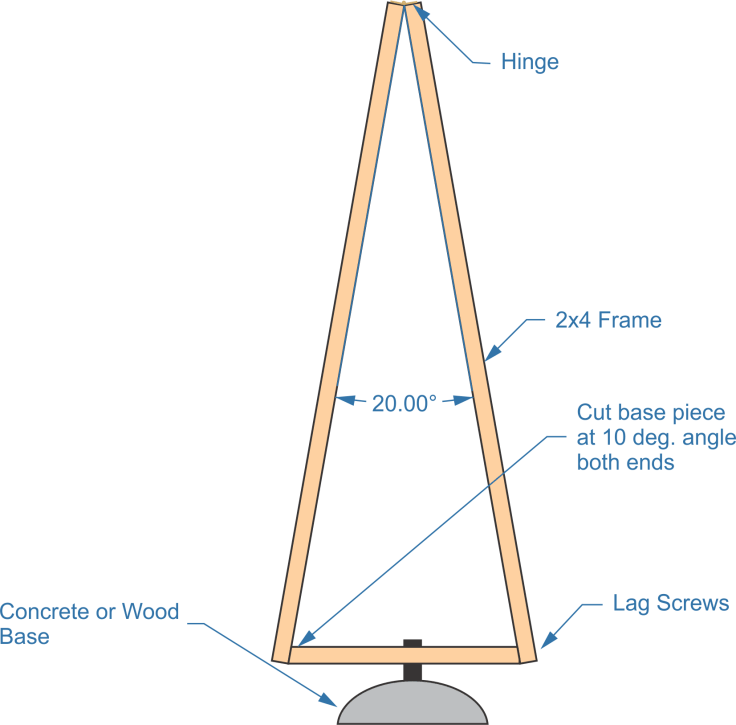
To make this tree, start by picking out two clean 2”x 4”s, as free of knots and wane as possible. Cut them the same length, keeping in mind that they will be sitting at a 10 degree angle, so the overall height of the tree will be slightly shorter than the length you cut them. Connect them together at one end with a standard door hinge, screwing it into the end grain of the boards with 2” long wood screws. Spread them out 20 degrees and place another 2”x 4” across the bottom, marking it for cutting. Attach this 2”x 4” to the two side pieces with lag screws. Paint or stain the entire assembly green or red.
The tree can be used in this manner or placed on a base. The base can be made by crossing two pieces of 2”x 4”, cutting rabbets into the boards so they will nest together. Another option is to fill a plastic bowl with concrete, making a weighted base. Before pouring the concrete into the bowl though, glue a piece of plastic pipe exactly vertical in the middle, so that a connecting pipe can be placed between the base and the bottom cross-member of the tree. Allow to set.
To finish assembly of the tree, use a short piece of pipe set into the base and attached to the bottom piece of the frame, if a base is being used. Then wrap the tree with strings of different kinds of lights, going all the way around the tree, rather than around the individual pieces of wood. lightweight ornaments can then be hung from those strings of lights.
Making a Plywood Christmas Tree
Plywood is a great material for making Christmas decorations, including Christmas Trees. There are a variety of different ways that plywood trees can be made, but we’ll just look at two of them. The others are basically modifications of these two basic methods.
The first is to cut out two identical or nearly identical trees out of plywood and then notch them so that they will slide together, making a cross, as shown in the drawing below. The key in this design is making sure that the slot is just wide enough for the two pieces of plywood to slip together, without so much slop that the tree is unstable. At the same time, enough space must be allowed for paint or other finish, without the two pieces sticking.
Plywood tree
This sort of tree can be made to be free standing, by including the base as part of the cutout or it can be used with a base that attaches to the bottom of the plywood pieces. The easiest way to make a base is to have the tips of the bottom branches touch the floor. Some people make cutouts in the branches, either just circles or shaped slots that follow the curve of the branches.
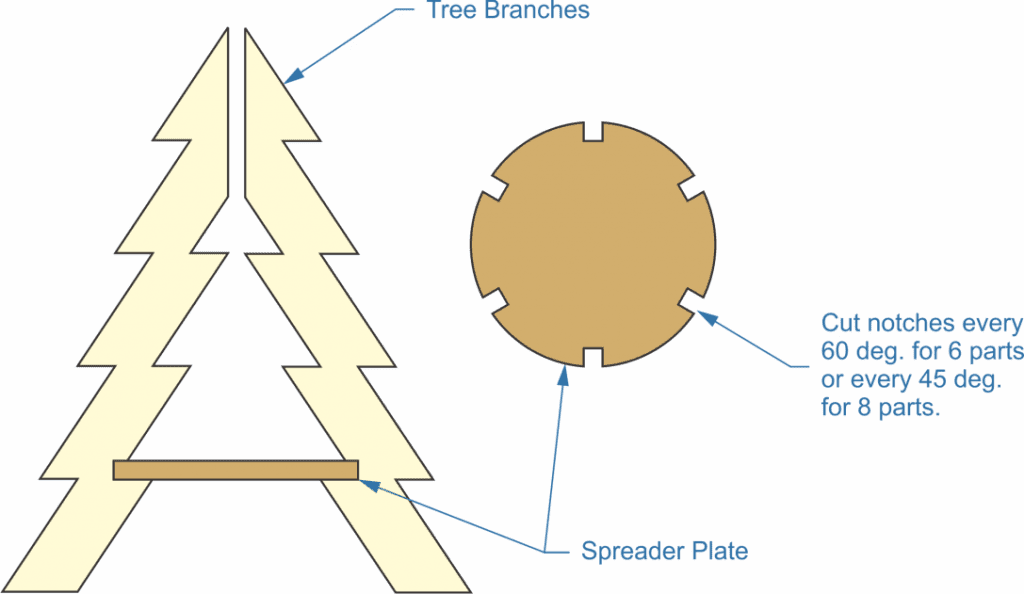
The second sort of plywood Christmas tree is made to be basically hollow. As such, it is a more modern design, but one that a lot can be done with. Rather than only having four sides with branches sticking out, this style of tree can have six or eight, making a fuller tree out of it.
Plywood tree 2
The individual sides of the tree are all cut out of the same sheet of plywood, nesting together to save material. The spreader plate can be cut out of the same plywood or made out of ¾” strips of construction lumber, attached together at the center, depending on the woodworker’s preference. For trees with six sets of branches, the spreader disc needs to have six notches, set at 60 degrees apart. For trees that have eight branch sets the spreader disc needs to have eight notches, set at 45 degrees apart.
Once cut and painted or varnished, the tree is assembled by tying it together with wire or light rope, like a paracord. Drill one hole in the tops of the branches, near the point of the tree and another at the bottom, near the inner corner. Thread the wire or cordage through these holes, pulling the individual pieces together and then tying them together at the top. Do the same at the bottom to keep the pieces from spreading apart and the tree falling.
Either of these trees can be decorated much like the 2”x 4” tree, stringing lights around them and then adding ornaments, hung from the wires. It would also be possible to add cup hooks for hanging, screw the cup hooks anywhere on the sides or edges of the pieces and then hanging the ornaments on them, using normal ornament hangers.
Making a Spiral Christmas Tree
The spiral Christmas tree has become a favorite modern styled Christmas tree, for one made out of wood. It is generally seen as being more elaborate than the plywood or 2”x 4” tree, mostly because people think it is harder to make than it actually is. But it really doesn’t take a lot to make one, other than a table saw and some patience. Smaller ones can even be made of scrap.
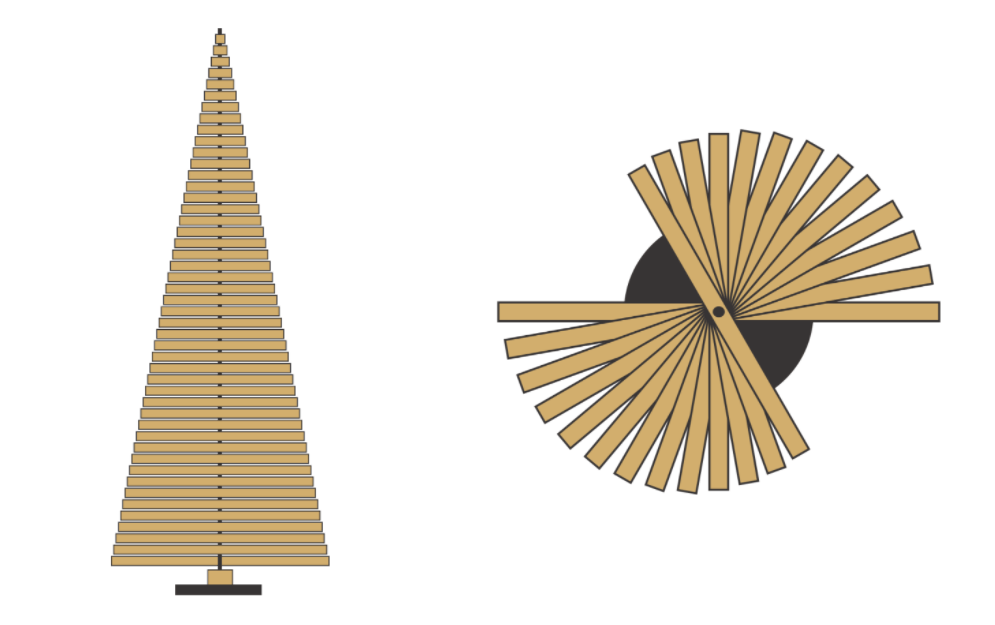
The tree is usually made of a bunch of ¾” square strips of wood, although it can also be made of other sizes or even from dowel rods. The main thing is that they are all the same cross-section, cut to different lengths, with longer ones on the bottom and shorter ones on the top. While the tree can be made to any dimension that the woodworker desires, its height will typically work out to be roughly two and a half times the diameter. So the starting point is figuring out the diameter.
Cut boards to 1/8” longer than what the overall diameter will be. So if the tree is going to be 18” in diameter and 4-1/2’ tall, then cut boards 18-1/8” long. Then cut the boards into ¾” strips on the table saw, which should give them a ¾” cross-section. Other than the bottom piece, which will have to be cut off to 18”, each of these strips of wood will make two layers on the tree.
In order to cut the wood strips into branches, crosscut them with a miter saw or using a crosscut sled on the table saw. Each strip should be cut ¼” shorter than the previous. Keep the pieces cut off, once they reach ¾” long, as those become the branches for the upper part of the tree.
Spiral trees
In order to assemble the tree, either a piece of 3/8” all-thread or rebar will be needed to stack the pieces on. Make a weighted base out of wood, drilling a hole in the middle to mount the rebar or all-thread into. Also drill holes through the center of all the pieces, just big enough to provide clearance for the rebar or all-thread to fit through. A spacer, as shown in the drawing above, may or may not be used between the base and the bottom “branch” of the tree, depending on the woodworker’s preference.
Slide the branches onto the rod, starting with the longest and working shorter. Although the diagram above shows some space between them, that is not necessary, but only done in the drawing to show that they are separate pieces. Once they are all on, a nut and ash can be threaded on, if the rod is all-thread. If rebar is used, the tree topper will have to hold everything together.
At this point the tree will be flat. stand it up on the base and turn each successive branch so that it is slightly offset from the one below, as shown in the drawing above-right. Each of those is turned 10 degrees, but anything from 5 to 15 degrees can be used, depending on how much spiral is desired. Once all the branches are turned to their position, tightening the nut will help hold them in place.
For a tree topper, either cut a wood star out of scrap or buy a star-shaped ornament. Drill a hole that the rod will fit into, in the bottom of the star. Then glue the star to the top of the rod. No other decoration is needed, although small ornaments can be hung on the tree.
Making a Driftwood Christmas Tree
A driftwood Christmas Tree is much like the spiral Christmas Tree, with the obvious exception that it is made out of driftwood. So the first part of making the tree is finding more than enough driftwood to work with. straight pieces are needed, rather than bent ones, although smaller bent ones can be attached to the main branches, acting as “twigs.”
Because the driftwood is irregular, some planning will be required for assembling the tree. By and large, thicker pieces work out better towards the bottom, with thinner ones towards the top. That creates a better visual balance. Cut the pieces off, as needed, so that the bottom ones are longer and the top ones shorter. It might also be necessary to clean the driftwood up some, removing dirt and chips of wood that are going to fall off anyway.
A large section of log makes a great base for this tree, either one that is driftwood or from a deadfall. The log may very well need to be flattened on the bottom, so that it will sit level. If the log has cracked badly enough while drying, it might compromise the structural integrity. In that case, it’s a good idea to fill the crack with tinted epoxy. Drill a hole and insert the rebar or all-thread that is going to be the main “trunk” of the tree.
One other thing that might be needed for the driftwood Christmas Tree, which was not used for the spiral one is spacers. Considering that the driftwood is irregular, pieces may not sit snug up against each other. When that happens, it helps to be able to put a spacer in-between, so as to hide the central rod that’s holding everything together. Spacers can easily be made by cutting slices from a piece of driftwood and drilling a hole through them.
The driftwood Christmas tree is assembled just like the spiral one, slipping the branches over the center rod. Don’t try to spiral them though, as that probably won’t work anyway. Just put them on in random directions, which fits better with the rough style of the wood.
I mentioned using bent pieces of driftwood earlier as twigs. Not everyone does this, but some people like the visual effect this creates. Once the basic tree is assembled, the idea is to nail the bent twigs to the branches, so that they span from one branch to another. This requires the use of a pneumatic brad nailer to attach the pieces.
Making a Kissmas Tree
There are several ways of making Kissmas Trees, but the most common is another modification of the basic spiral tree, adding Hershey’s Kisses to it. In order to make this possible, it is necessary to make the “branches” of the tree wider and not use as many of them. Rather than spacing the branches 5 to 15 degrees apart, they will need to be spaced about 30 to 45 degrees.
A Hershey’s Kiss measures 0.819” in diameter and the same in height. So the branches should be about 1-1/4” in width. The height of ¾” can be maintained, although some people thin this out to ½.” In order to place the Kisses on the branches, it is a good idea to drill shallow indents into the top side of the branches to hold them. These can be anywhere from 7/8” to 1” in diameter and should be about 1/8” deep. It’s best to drill them with a Forstner bit, rather than a spade bit.
Making Wood Ornaments for the Tree
Wood can also be used to make ornaments for hanging on a normal Christmas Tree. Wood Christmas Although they have never really been commercialized, like glass ornaments, wood Christmas Tree ornaments are an old tradition, dating back to the origin of the Christmas Tree. It was a way for people of humble means to make their own ornaments and has become something for children to do as a Christmastime activity, as well as a way of giving a homemade gift.
There are actually a number of different ways of using wood to make ornaments, more than we can cover here. Nevertheless, let’s take a look at some of the more common ones.
Wood Slices
Probably the simplest way of making wood Christmas Tree ornaments is to use wood slices. These can be bought, but any homeowner who ever has to cut a branch off a tree in their yard has the raw material to make a whole lot of wood slices. The best woods for this are those where the bark will stay on the wood once it dries. Slices are best cut on the band saw, but slices of this size can also be cut on the table saw or with a miter saw as well. Slices used for ornaments should be from ¼” to ½” thick.
The slices will need to be dried before using. Typically, wood is air dried before it is kiln dried. But air drying requires a lot of time, so we need to accelerate that process. So, give the wood slices a day or two to start drying, and then place them on cookie sheets, putting them in a 200 degree F oven for about an hour per side. If the first pieces crack from drying too quickly, try soaking them in rubbing alcohol first, which will help to control the drying rate.
Once the slices are dried, drill a small hole for a string near one edge. This becomes the top edge of the ornament. It is a good idea to seal both sides of the ornament, as well as the edges with varnish, before painting any designs on them. pretty much any design can be painted on them, using acrylic artists paint.
Cut Figures
The other major category of wood ornaments is cut figures. This falls into the woodworking category known as scrolling and is done on a scroll saw. A wide variety of designs can be cut out, either just making a silhouette or making a more detailed design, depending on the skill and patience of the woodworker. While pretty much any wood can be used, typically 1/8” or ¼” thick Lauan plywood is used for making this type of ornament.
One nice effect that can be done with cut figures is to cut the ornament design out of thin material and then glue it to another thin piece to act as a backer. In this case, the backer piece might be painted, while the design piece is varnished.
This category of ornaments is being overtaken by laser cutting. It is much easier to cut out these types of ornaments with a laser cutter, which is able to do much more detailed and exacting work than anyone but a really skilled scroller can do. While that takes away some of the craftsmanship of the project, it is a great way of making a lot of ornaments, with only a minimal investment of time.
Turned Ornaments
Finally, I’d like to mention the idea of turned ornaments. Obviously this doesn’t appeal to everyone, as not all woodworkers are wood turners. But turning ornaments is a unique way of creating ornaments which capture the natural beauty of wood, adding that beauty to the Christmas Tree.
Turned ornaments
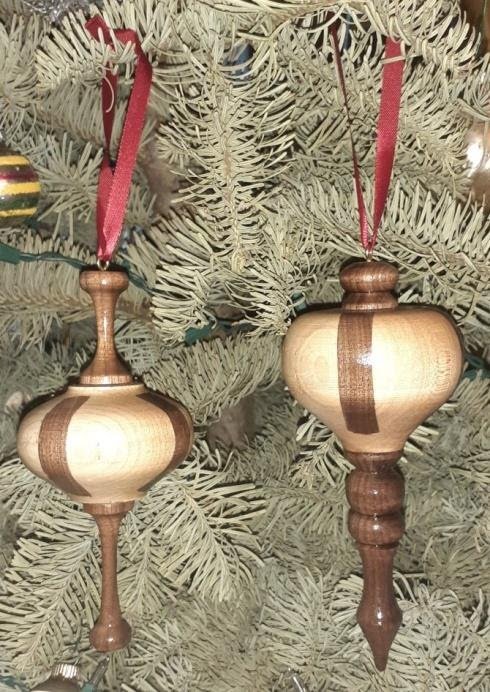
Typically, wood ornaments are turned in three pieces, as can be seen in the photo above. The top button and the bottom spike (for lack of better terms) are turned separately from the main body of the ornament and usually from a different species of wood, providing visual contrast. The real trick to turning ornaments is to hollow out the body, making it thin to save weight. This requires very carefully turning the inside of a small object, without breaking through. The hole in the top and bottom of the body need to be the same size as the tenon turned on the bottom of the button and the top of the spike, so that these pieces can be glued together.
For the ornaments in the picture, I started out by taking a block of maple and routing a ½” wide groove down the center of all four sides. This gave me a place to glue in the strip of walnut, which was ½” wide by ¾” deep. After drying, both ornaments’ bodies were turned out of the same block of wood. Walnut was also used for the button and the spike. A small screw eye in the top of the button provides a place for a ribbon hanger.
Related Posts:
Christmas Wall Shelf by Admin December 14, 2021 DIY Christmas decorations come in all sorts of shapes and styles. Just spend a few minutes in a Christmas shop and you’ll see how inventive people…
Christmas Wall Calendar by Admin December 25, 2021 DIY The Christmas calendar or Advent calendar as some call it is an old time staple of Christmas décor. While not everyone uses one, it’s a…
DIY Tree Slice Table by Admin June 2, 2021 DIY Tree slices and slabs have been used as crude tables for centuries. While there are examples of elegant wood tables, such as those used by…