Wood turning is a specialized area within woodworking. By and large, most woodworkers don’t turn, unless it is a chair maker who turns spindles for their chairs. But that isn’t the same as being a woodturner, who is a woodworker who specializes in the use of a lathe to make turned wood products. Woodturning offers the opportunity to focus on the art side of working with wood, as the wood and its grain will often lead the woodturner in the design decisions they make, choosing a certain style to bring out the natural beauty of the wood.
While there are a number of different wood projects that can be turned on a lathe, woodturning is typically separated into two distinct categories: spindle turning and bowl turning. The simpler of these is spindle turning, as there is no need to turn the inside of the project, only the outside. This can include turning such items as candlesticks and columns, because there is no concave turning. What makes the bowl turning different is the necessity of turning the inside of the bowl, which is considerably harder; whether we’re talking about an actual bowl, a serving dish or a vase.
Turned wood bowls can take a variety of shapes, from the simple “cereal bowl” style that most turners start with, learning how to turn, and can include just about any bowl shape that can be imagined. One of the joys of turning bowls is the ability to experiment with a wide variety of designs, matching the design to the wood blank and to its intended purpose. Some turners specifically seek out ways of making unusual designs, including triangular and square turned bowls.
Pretty much any wood can be used for making a turned bowl, although some woods naturally lend themselves to it better than others. Generally speaking, dense woods with a pronounced grain are the best, such as: figured maple, walnut, cherry, box elder, rosewood, spalted maple, oak, padauk and cocobolo. These woods tend to cut cleanly on the lathe, and resist cracking due to their high density (more on cracking later).
On the other hand, softwoods and low-density hardwoods are extremely difficult to turn on a lathe. While even pine and cedar can be turned effectively, chisels must be kept extremely sharp to avoid tearout. This, along with their low price, makes these woods good practice woods for the new turner, as they will quickly teach the dual lessons of how quickly turning chisels become dull and how important it is that they are sharp.
One of the things that keep many woodworkers from turning is the time it takes to become proficient. Anyone new to turning wood goes through a lot of wood blanks, making mistakes, before gaining the ability to complete even a simple project. Reaching the point of being able to make a decent bowl can easily take a year and more complex designs take even longer to master. Nevertheless, for those who invest the time, turning wood bowls is rewarding and can be profitable.
There is a very real market for turned wood bowls, everything from simple salad bowls to complex, artistic pieces. If one wants to make a living turning bowls, I would recommend going for more complex designs, even designs that mix woods, as they can be sold at a higher price. There is also less competition driving the price down, as complex designs can’t be done quickly on automated lathes.
The Cost of Getting into Turning
The other thing that keeps many woodworkers out of turning is the cost of getting started. Most of us have tight tool budgets and buying the tools necessary just to get started can take a big bite out of that budget, mostly because they are largely specialty tools. Nevertheless, it is possible to get started in woodturning for under $1,000.
The Lathe
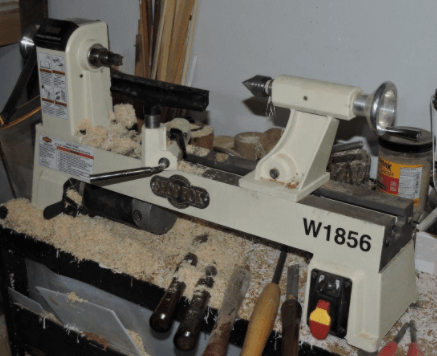
The first purchase to get started is a lathe. As with any other power tool, there is a great temptation to run out and buy the biggest and the best. However, the Jet W1856 shown below is largely considered to be an ideal starter lathe and sells for about $600. This lathe has a 12” diameter swing capacity, meaning that it can turn logs up to 12” in diameter and a 18” length between centers, meaning it can turn log sections up to 18” long. In reality, that works out to a maximum project size of about 9” in diameter and 16” long, which is big enough that most people will never need to replace it with a larger lathe.
Author’s lathe
The lathe will come with some of the most basic accessories, including:
Live center – Inserted into the tailstock (located in the right side of the photo above), this turns freely, allowing the tailstock to support the right side of the work.
Spur center – Inserted into the spindle (the driven part of the lathe, on the left), provides a way of holding spindles between the headstock and tailstock, gripping those spindles so the motor will turn them.
Other Tools
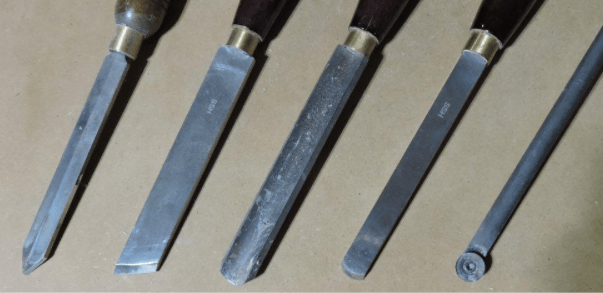
In addition to the lathe, the most important purchase is a set of turning chisels. A fair set of turning chisels, which is enough to get started with, will run in the $80 to $100 range. Once one starts turning, they will realize what specific chisels they want for the work that they do and will usually make additional purchases, either buying specialty chisels or better ones to replace what comes in the set.
The bowl I made for this article was done with the chisels below. They are, from left to right:
Diamond Parting tool – This is used to square up the ends and can be used for cutting off a project from a longer piece of wood. Most have flat sides, but the roughly diamond cross-section of this chisel reduces friction, helping to prevent leaving burn marks on the wood.
Skew chisel – This is the “plane” of woodturning, providing the ability to make the sides of a project flat and straight. Some people use the skew chisel as their main woodturning tool.
Roughing gouge – For others, this is the main woodturning tool, used both to true up the log and then to go the general shaping of the bowl. It can also be used to cut out the inside; a very versatile tool.
Round Point scraper – Used to shape the inside of the bowl; not an absolute necessity, but useful.
Round Carbide scraper (homemade) – This tool accomplishes the same thing as the round point scraper, but it has a carbide blade, meaning that it doesn’t require frequent sharpening. I use it extensively, as my favorite tool for that reason.
Wood turning tools
Please note that there is a lot of overlap in what these tools can do and which tool a particular woodturner chooses to use for a particular task. Shaping the outside of the bowl, for example, can be done entirely with a roughing gouge, a skew chisel or the round carbide scraper, depending on personal preference.
Two additional accessories that you might consider buying are a faceplate and a chuck. I will be showing both of those further on in this article.
Wood to Turn
Finally, there’s the wood. Obviously turning wood means having wood to turn. There are two ways of obtaining wood for turning; buying it or scrounging for it. A number of online vendors sell wood blanks for turning. These are hardwood blocks, in various sizes and wood varieties. Most are limited to six inches square and three inches thick, which is enough for a cereal bowl sized project, but if something larger is desired, it will be necessary to resort to other methods.
Many wood turners get most of their wood for free, scrounging it from piles of logs found on the side of the road, when people cut down or trim trees. This gives an opportunity to find a wide variety of wood to work with. However, identification of that wood might be a problem. My drying shed is filled with log sections that I can’t identify.
This brings up a very important question; whether to turn green wood or dried wood; there are pros and cons to both, with some turners only turning green wood while others turn only kiln dried wood.
The advantage of green wood is that it is softer and easier to cut. The moisture in the wood acts as a lubricant for the cutting tools, giving clean shavings and making it so that they don’t become dull as easily. However, the problem is that in the case of many types of wood, the wood will shrink while drying, causing cracking and warping. Some woods, like oak, are less likely to do this than others, making oak a good wood to turn green.
Woodturners who turn green wood take special effort to control the drying of the finished project very carefully, so as to reduce the risk of cracking. Some only partially turn the project, doing the finishing cuts once the wood is dry and has shrunk or warped all it is going to.
On the other hand, kiln dried wood is harder to turn than green wood. Wood removed will be more in the form of coarse sawdust, rather than shaving and the tools will dull faster. However, this means that the wood will already have shrunk, so any cracking and warping will already have taken place. Cracking can be problematic, unless it can be incorporated into the design.
One way to reduce the risk of cracking is to split the wood down the center before setting it aside to dry. The pith of the log (the center) doesn’t shrink as much as the newer rings of wood, which is part of what causes the cracking. By splitting the wood, this stress is reduced. Splitting the wood also allows the grain pattern of the wood to go across the bowl, rather than up the sides.
Turning the Bowl
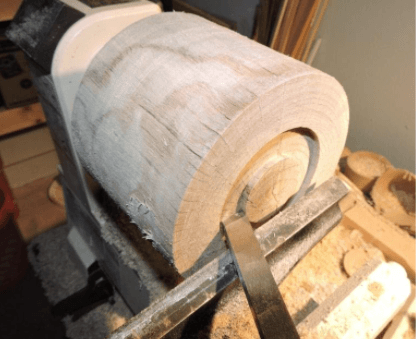
Regardless of whether the bowl is to be turned out of a purchased blank or a log that was scavenged from the side of the road, the first step in turning the bowl is true it up. That means turning the blank into a consistent cylinder, and in the case of working from a log, making sure the ends are square with the sides.
If the bowl is being made out of a purchased blank, scribe as large a circle as possible on one side and roughly cut it out with a band saw. The same can be done on a split log, making the circle on the split face. Cutting out the circle or even cutting to make a hexagon will reduce the amount of material that has to be cut off on the lathe to true up the blank, while also making it more in balance. It will also help prevent tearout, a serious problem when an end grain cut at a 90 degree angle comes into contact with the tool.
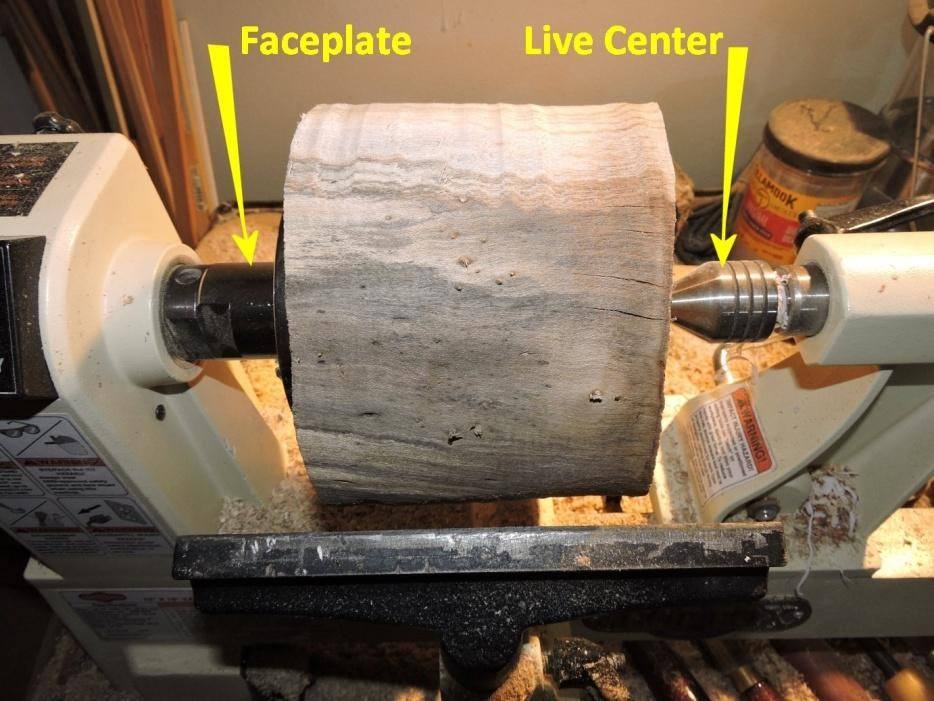
With the blank cut, center a faceplate onto the side of the wood blank which will end up being the top of the bowl and screw it into place with 1” screws. On logs, the best center available may only be an approximation, as the log will likely be out of round. Use as many screws as the faceplate will allow. Attach the faceplate to the lathe’s drive spindle and bring up the tailstock, applying pressure to the live center, so that it goes into that end of the blank.
Faceplate attached to center of log
In the case of working with a log, the bark should be removed before turning the lathe on. In most cases bark doesn’t stay well adhered to the log. Pry it off with a screwdriver or chisel. Failure to do this could result in pieces of bark flying off the log, as it is being trued up.
Turn the lathe on to a relatively slow speed. My lathe has three speed ranges, adjustable by moving a belt on pulleys. The middle range is 960 – 2,400 RPM. The speed within those ranges is controlled by a rheostat, so I started out at the Lowest possible speed in the middle range. At that speed, the imbalance of the log caused a considerable amount of vibration in the lathe, but it was still manageable. As I turned the blank, bringing it into round and squaring up the end, I was able to gradually increase the speed.
The most common tool for truing up a log is a roughing gouge, although a carbide scraper can be used. When the bowl blank is trued up, as seen in the photograph below, a skew chisel can be used to even up the sides, although that is not absolutely necessary.
Before setting the tool to wood, the tool rests need to be adjusted. It is imperative that the tool rest be as close to the piece being turned, as possible, without a risk of the workpiece hitting the rest. If the workpiece hits the rest at speed, it will probably fly out of the lathe. The tool rest should be located just below the centerline of the workpiece; just how far is something that comes with experience and experimentation. As material is removed from the workpiece, readjust the location of the tool rest to maintain it close to the workpiece.
Hold whichever tool is being used firmly in both hands. Either hand can hold the handle and the tool’s shaft, just outside the tool rest. Changing hands occasionally can provide rest for hands that might get tired.
Always make sure that the tool makes firm contact with the tool rest, before it makes contact with the workpiece. This is critical! If the tool makes contact with the workpiece, it will catch. Then when it hits the workpiece, it will catch in the wood. This can cause a variety of unwanted results, such as gouges in the workpiece, chips breaking off the workpiece, or the workpiece flying out of the lathe, hitting whatever gets in its way.
The tool’s angle can vary considerably, although roughly 90 degrees to the workpiece is common. But in some cases, like cutting a groove with a parting tool, it can be helpful to angle the tool up 30 degrees or so, increasing the cut rate. As for right to left angle, it is best to have the tool angled so that it is less than 90 degrees in the direction the tool is moving. In other words, if the tool is being moved from right to left, than the angle on the left side of the tool should be less than 90 degrees, somewhere between 70° and 80°. With either a roughing gouge or a round carbide tool, the end of the tool should also be rotated in the direction that the tool is moving.
Truing up the workpiece
Make progressive cuts with the tool, working from one side to the other, repeatedly, taking off a little bit of material each time. I’ve seen videos where turners were taking off as much as 3/8” of material on one pass, but I’ve never taken off more than about 1/8” in a pass.
With the log trued, the end on the right, which will be the bottom end of the bowl, needs to be squared up, perpendicular to the cylinder surface. This can either be done with the roughing gouge or with a parting tool. If the roughing gouge is used, adjust the tool rest so that it is perpendicular to the lathe’s ways, moving the tailstock out of the way. With the parting tool, the tool rest can remain in the original position, waiting to move the tailstock until all but the very center of the workpiece is removed.
The next step is to cut a dovetail into what will end up being the bottom of the bowl. Some people cut an external dovetail and some cut an internal one, mostly based on personal preference; both will work with the vice. I’ve taken to cutting both, as shown in the photo below. The advantage is that if one of them becomes damaged while turning the inside of the bowl, I can use the other. To cut the dovetail, first cut a groove in a ring. I use the parting tool for this. Then a skew chisel is used to undercut the sides of the ring, making the dovetail. Note that the tool rest has been moved perpendicular to the lathe’s ways for this operation.
Cutting dovetail in base of bowl with a skew chisel
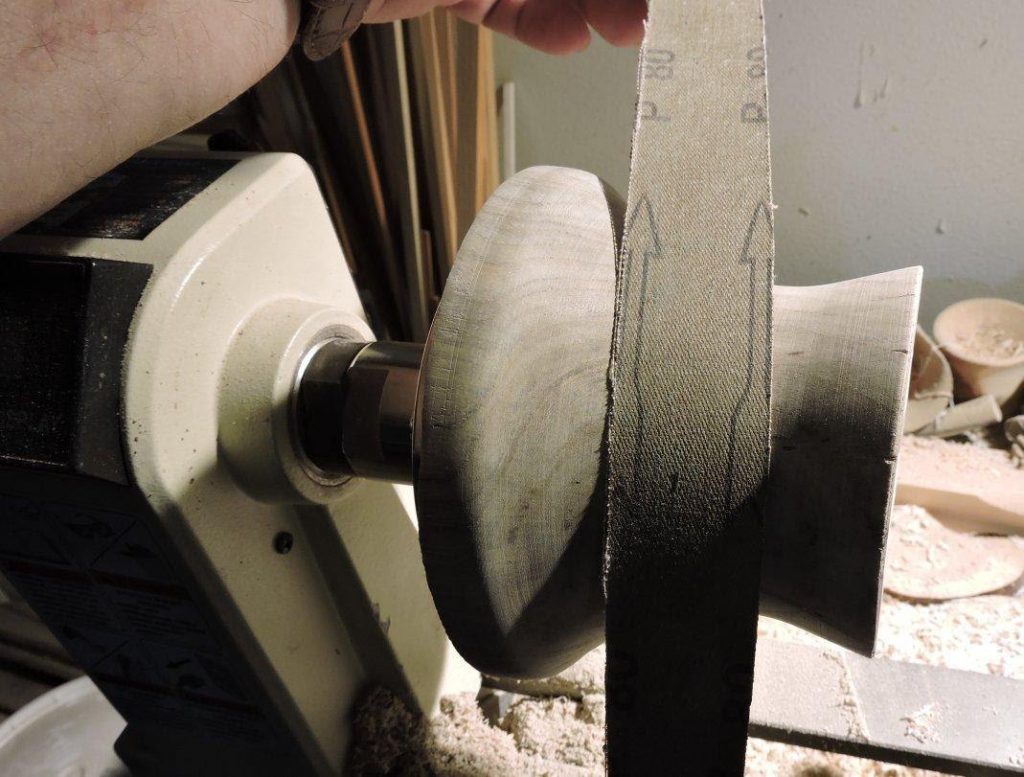
Shaping the Outside of the Bowl
The outside of the bowl is shaped with a combination of the roughing gouge, the round carbide scraper (if available) and the skew chisel. Literally any bowl shape can be cut with these tools, although some others might be required for some of the detailed decoration. It is not required, but moving the tailstock back into place can help prevent problems with the bowl blank flying out of the lathe.
It is always best to work “downhill” when cutting the outside of the bowl. That means cutting from the wider point to the more narrow one. As the faceplate is attached to the top end of the bowl, that means working from left to right, except in the case of a bowl that is wide in the middle and narrow at the top and bottom. In that case, it is best to work from the center outwards, working on half of the bowl’s exterior at a time.
There is always the possibility of a tool catching in the wood and damaging the bowl. Many projects have suffered design changes mid-stream, due to the bowl breaking from a tool catch. If this happens, don’t despair; just figure out what needs to be done to redesign the project and make what is left usable. As skills increase, this becomes less and less of a problem, but even experienced woodturners can have tools catch and damage a bowl.
With the outside of the bowl shaped, it should be sanded smooth, starting with coarse sandpaper and working through several differ grits to a fine, smooth finish. This can be done with any type of sandpaper, but there sandpaper rolls can be bought, which are specially made for it. The narrow strips of sandpaper on the rolls are easier to use, as they contour to the curves better. Some woodturners like to apply a first coat of finish to the outside of their bowl at this point, allowing them to see how it is coming out; but that is not necessary. Applying that one coat of finish doesn’t prevent further shaping and sanding.
Shaping the outside of the bowl
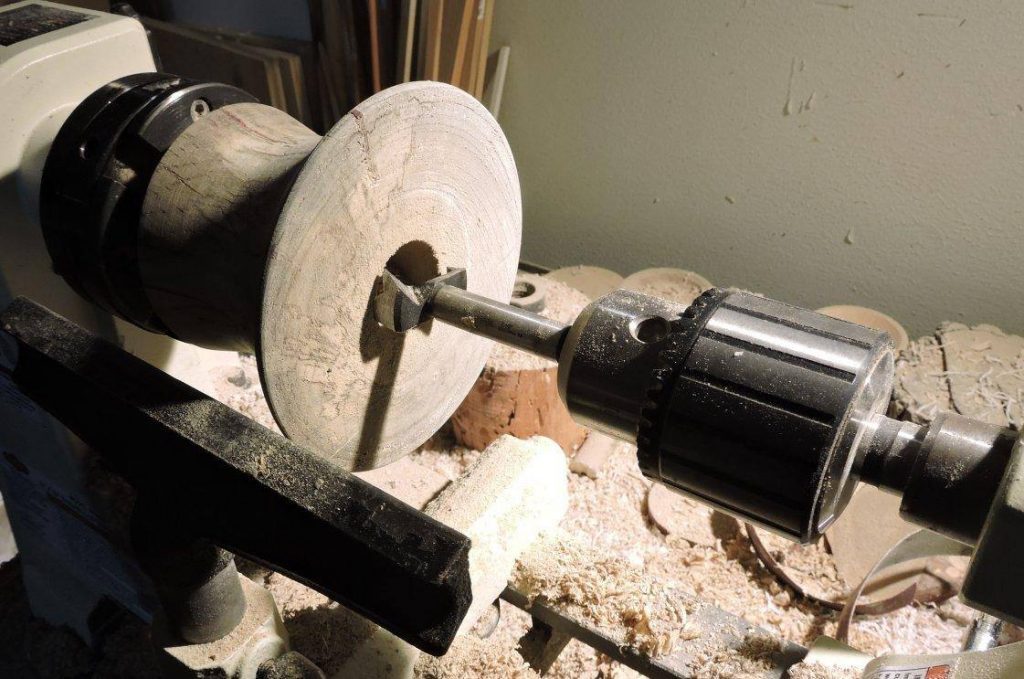
Shaping the Inside of the Bowl
The challenging part of making any bowl is shaping the inside of it. While the outside is the part that everyone sees, the inside can cause more problems for the turner. More than anything, the chances of catching the tool on the wood, causing chips and breakage is very high. Take care to ensure that the tool is firmly set against the tool rest, before it can come into contact with the wood.
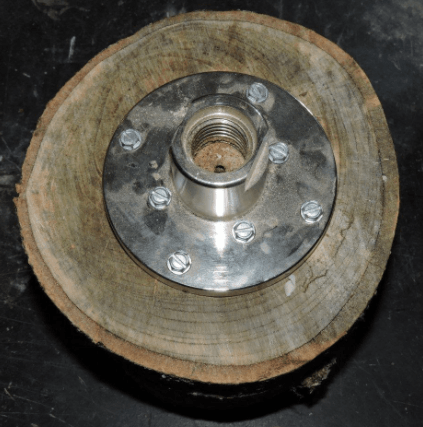
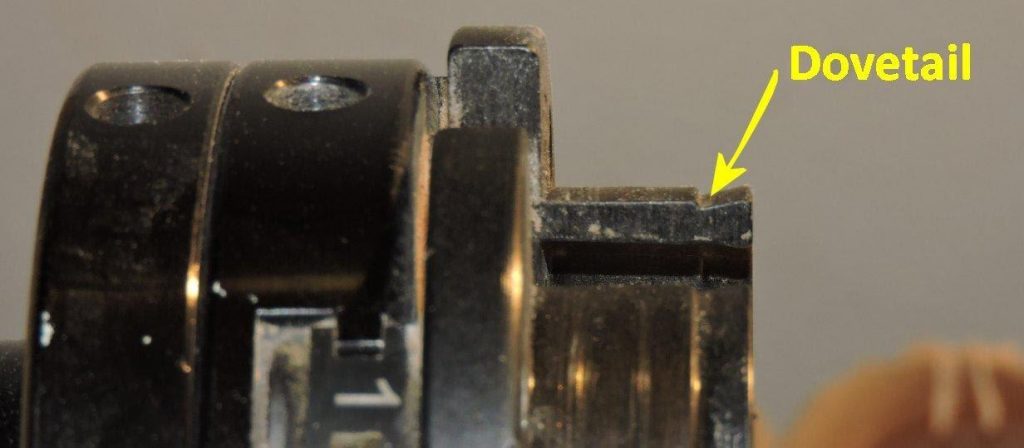
We’ve had the faceplate screwed to what is the top of the bowl; but that’s the part we’re going to be working on now, removing the material that the screws are run into. So it’s necessary to remove the faceplate and put a chuck on the lathe’s spindle. The type of chuck that is used has a dovetail, as shown in the photo below. This mates up with the dovetail that was cut into the bottom of the bowl earlier. The chuck is dovetailed on both the outside and inside, allowing it to grip the bowl either way.
Dovetail
It is easier to start the inside by cutting a hole in the center with a forstner bit. This isn’t a requirement, but it is helpful; and the deeper the center of the bowl is, the more helpful it is. Actually, it is best to use a series of forstner bits, rather than just one, working from one inch diameter up to the largest size available. Just cutting a 2” hole generates a lot of friction, leading to singing of the wood and dulling of the bit. Don’t go quite as deep with the forstner bit as the inside of the bowl is intended to go, as the center point and edge of the bit dig a bit deeper. This needs to be cleaned up as the inside of the bowl is cut out.
Shaping the inside of the bowl
Once the center hole is cut, turning the inside of the bowl can be done with a roughing gouge, a round scraper or the carbide round scraper. Sharp tools will be even more important on this part, than they were shaping the outside of the bowl. Dull tools just won’t remove the material.
The lathe should be at a slower speed for shaping the interior of the bowl, than it is for the outside. On the outside 1,200 RPM or even more isn’t a problem. But when doing the inside, the lathe should be lowered down to a speed of 400 to 600 RPM, with the tool in contact. The lathe will lose some speed once the tool comes into contact with the workpiece, so be sure to check the speed once contact is made.
Take extra care with the lip of the bowl, as that is highly susceptible to breaking. Once the lip thickness has been attained, stay away from it as much as possible, working either from a point a little bit in from the lip towards the center or from the center out, stopping short of the lip.
As with the outside of the bowl, once the inside is cut, it should be sanded and finished.
As wood dries, it tends to crack. This is especially true of logs picked up on the side of the road. I mentioned earlier that splitting can be reduced somewhat by splitting the logs before they are dried. Another option is to incorporate the splits into the design.
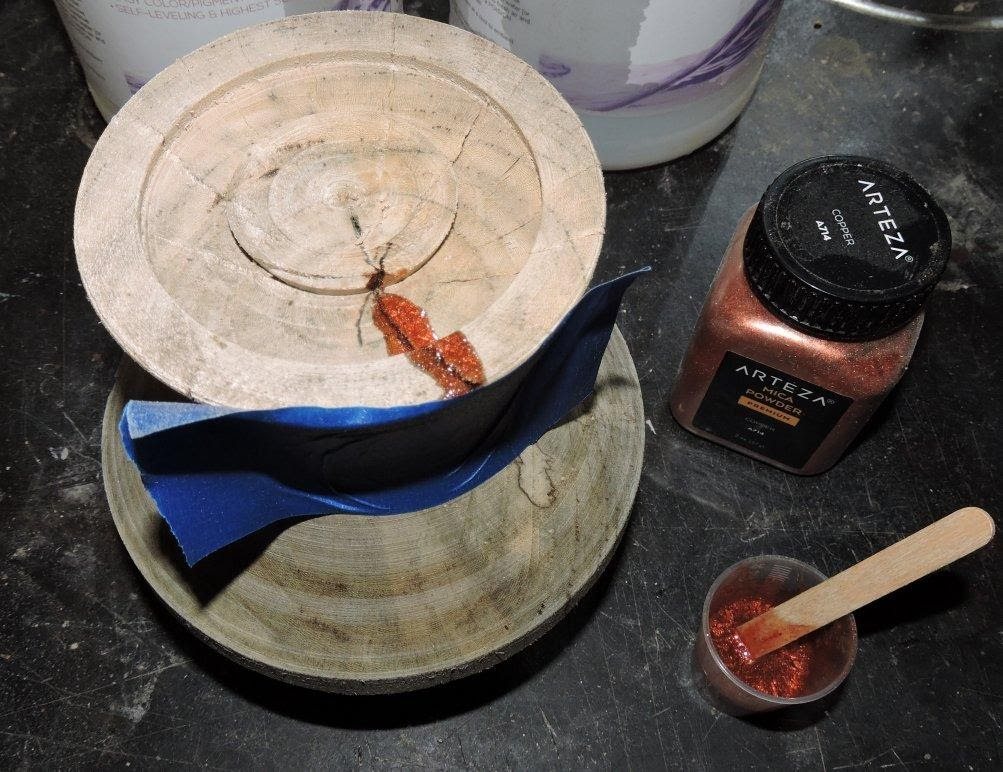
During the process of making the bowl used for the photos in this article, I stopped for the night. When I awoke the next morning, there were a number of cracks in the wood. Rather than throw the project away, I filled those cracks with colored epoxy, following the Japanese idea of Kintsugi, where they put broken pottery pieces back together with gold, turning the flaw into a feature.
Dealing with cracks in the wood
The photo above only shows one crack being filled; but as I waited for the epoxy to set, several other cracks formed, which also had to be filled. I used copper colored, tinted mica powder to provide an accent color to the epoxy, which complimented the color of the wood nicely.
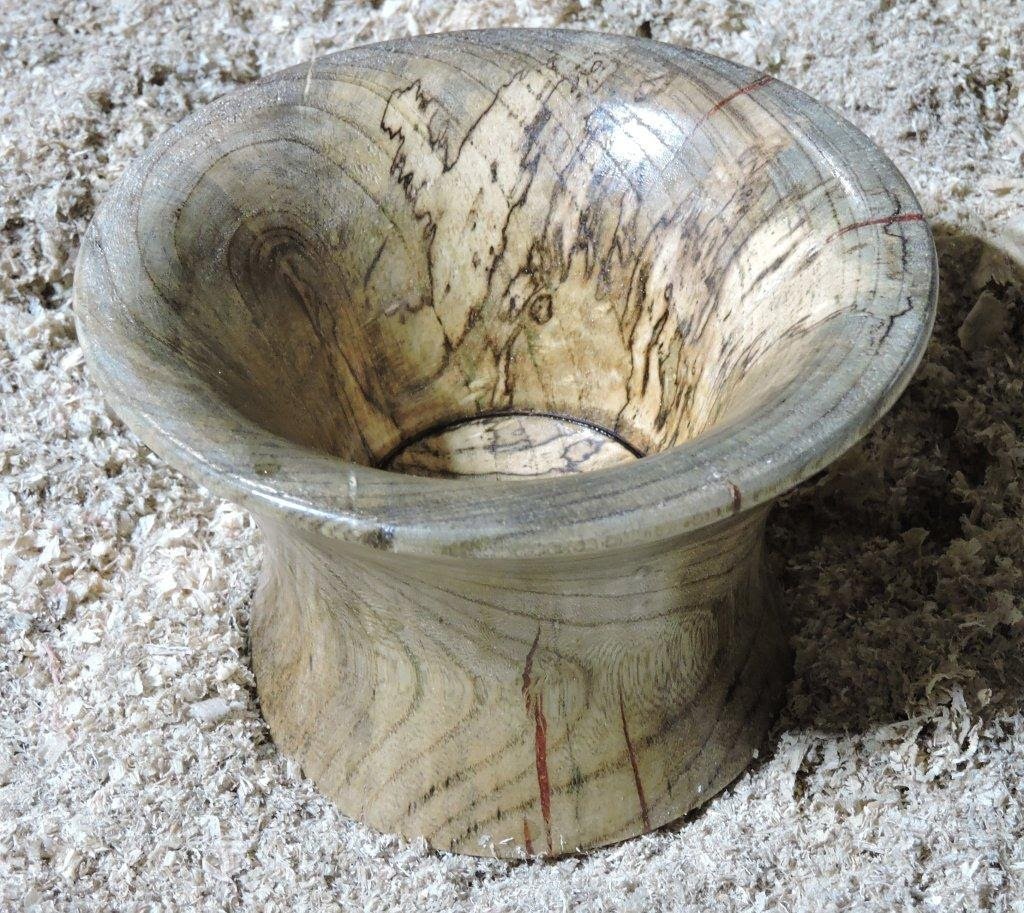
One of the really great things about woodturning is that a lot of the beauty of the finished product is the beauty of the wood itself, specifically the wood’s grain. As I was turning the piece for the pictures in this article, I noticed a series of lines on the cross-section of the blank, which were not part of the wood grain. I’m not sure what they are; perhaps something caused by some disease in the tree’s past. Nevertheless, I modified the bowl’s design to take advantage of them, making sure that they would be visible on the inside of the bowl. They show up on the outside as well, but not as artistically.
You can also see several cracks in the bowl, which I filled with the copper-colored epoxy. Rather than being a flaw, they have become part of the beauty of the finished piece.
Finished wood turned bowl
Related Posts:
Vinyl Stencils for Wood by Admin April 30, 2021 Tools Stenciled signs on wood are one of the trendy home décor items we find everywhere from knick-knack shops to truck stops. Some carry witty or…
Wood Floor Inlay by Admin May 1, 2021 Installing Wood floors have made a comeback, with many people preferring them over other flooring options. That’s not surprising, considering wood flooring’s natural beauty and durability.…
Wood Mallet by Admin June 24, 2021 DIY In our modern age of power tools, the wood mallet has all but been forgotten in the home workshop. Yet this is still a common…