Some things just never seem to go away. That’s why, in a day of screw off tops, there are still plenty of wine brands that use real corks and beer brands that require a bottle opener. This makes it essential to have corkscrews and bottle openers in our homes, even if we don’t use them very often.
Of course, that could just mean having a cheap handheld bottle opener. Many people don’t bother going any farther than that. But to those who have an actual bar set up in the home or even on the back patio, having a mounted bottle opener seems the way to go. Not only does it eliminate the need for the host to open everyone’s bottles for them, but there’s a coolness factor involved too. A wall-mounted bottle opener just seems to fit in with gathering together with the crew for a cold one.
These bottle opener boards, as they’re called, are also a great means of personal expression, as they can be made in a wide variety of styles, often with a humorous saying stenciled on them. That adds to the ambiance of the home’s drinking room, as well as giving people a bit of a laugh.
Really the idea is making the board, more than the bottle opener itself. While there are ways of making a DIY bottle opener (one of which we’ll look at), most people start out with a bottle opener that’s designed for mounting on the wall and mount it on a plaque instead. A variety of styles can be bought online, with prices running as low as two dollars, if bought in quantity and as high as about $15 for the fancier ones.
Basic Bottle Opener Board
A basic bottle opener board consists of a board with a wall-mounted bottle opener mounted to it. The board itself is usually a piece of 1”x 4”, cut 10” to 12” long. As an alternative, old cedarfence pickets can be used, if a more rustic style is desired. Another option would be to cut the board to some meaningful shape, like the shape of the state you live in, a ship’s wheel or a deer’s head. Those who have a scroll saw at their disposal can get rather fancy with this.
Once the board is cut to length or the outline has been cut out, round the edges over, all the way around, with a ¼” radius router bit, to eliminate any sharp edges and splinters. Then sand the board smooth on the front and edges.
All that has to happen to turn this into a bottle opener board at this point is to attach the bottle opener and come up with some way of hanging it. Even so, most people go farther than this, adding design work to their board. Before the design work is added, at least one coat of varnish should be applied, sealing the wood’s surface.
Adding Designs to the Board
Most designs are painted onto a bottle opener board, often with the aid of a stencil. To make a stencil, design it on the computer first; all that’s needed is an outline. Once satisfied with the design, print it onto cover stock, rather than normal printer paper. Normal printer paper is likely to tear or curl up while using it as a stencil. The thicker cover stock will give a cleaner finish.
While pretty much any design will work, most are one color only and consist of a cute saying like, “Save Water, Drink Beer.” Any graphics should be kept simple.
Cut out the outline of the stencil with a sharp hobby and crafts knife, making sure to get all the corner clean and the curves smooth. Carelessness at this point will show up as a sloppy design on the finished board.
The easiest way to paint the design is by taping the stencil in place and using spray paint. Take care when taping the stencil down, as the air pressure of the spraying paint will tend to try and lift the stencil off the wood. The best way to handle that is to cut the outside of the stencil fairly close to the cut out part, so there isn’t a whole lot to rise up. Then, once the stencil is taped in place, cover the remainder of the board with newspaper, taping that to the stencil.
Paint the design on two or three thin coats, rather than one thick one. That will reduce the chances of the paint running and ruining the design.
For Full-color Designs
Full-color designs can be made on the computer as well and applied to the bottle opener board. In this case, the design must be printed on a laser printer, as the ink used in inkjet printers is water-based. If a color laser printer is not available in the home, the picture can be taken to any office supply or printing center on a thumb drive and printed on their color copiers.
Cut out the design and glue it to the board, either with a thin coating of white glue or with rubber cement. Care must be taken in either way, so as to avoid leaving edges loose or creating wrinkles in the artwork. Allow the glue to dry thoroughly, and then paint over it with several coats of clear varnish or epoxy, decoupaging the design to the plaque.
Typically, decoupage is done with a lot of coats, but it doesn’t have to be. If a heavy finish like that is desired, it can be accomplished in one coat by using a fairly heavy-bodied epoxy potting compound. Cover the work surface with something to catch the dripping epoxy fist. I like to use disposable cookie sheets for this. Then prop the board up on something so that its edges aren’t touching the tray and pour on the finish. Once it sets, sand off the drips on the back, flush with the wood.
Adding a Cap Catcher
Of course, the basic bottle cap board can be improved upon. The number one way of doing this is to add a bottle cap catcher. That’s actually more or less necessary, if you don’t want to end up with bottle caps on the floor. While it is possible to catch them by hand, it seems that there are a lot of people who miss.
Magnet Bottle Cap Catcher
One kind of fun way of catching the bottle caps is to hide a magnet inside the board, about six inches below where the bottle opener itself is going to be mounted. This is easy to do, if a 1” hole is bored into the back of the board, with a Forstner bit. Make the hole as deep as possible, but take care not to poke through to the front side.
With the hole bored, glue two 1” diameter rare earth magnets into the hole and allow the glue to set. It is hard to get glue to stick to these magnets, because the surface is so slick. So use a little too much glue when gluing them in, so that the glue oozes out from under the magnets, around the edges and forms a bead around the edge. That will hold the magnets in.
Glass Bottle Cap Catcher
If an appropriate glass is available, like a whiskey glass or a shot glass, it can be used as a bottle cap catcher. All that’s needed is to cut a round hole, sized to match the glass, in a square piece of the same 1”x 4” that’s being used to make the board. Round the front edge of the piece, so that there are no sharp corner for anyone to bump into and round the edges with the ¼” roundover bit. Then mount the board perpendicularly onto the backing board, so that it will hold the glass below the bottle opener.
Wood Bottle Cap Catcher
Since the backing board is made of wood, it only makes sense to make the bottle cap catcher out of wood as well. The board itself forms the back of the box, so all that’s needed is the sides, front and bottom. Of course, the bottom can be left off, if the purpose is to play a trick on anyone using the bottle opener.
In order to make the box, a piece of 1”x 6” will be needed for the front. However, the sides and bottom can be cut from the same 1”x 4” as the back. Glue and nail the pieces together, taking care to make the edges line up flush. Once the glue is dry, round over the outer edges of the box with the ¼” roundover bit, just like the backing board.
If a wood bottle cap catcher is being incorporated into the design, then it only makes sense to continue whatever graphics or lettering onto the catcher as well. Perhaps a two-part design could be used, with the punchline written on the catcher.
Turning the Bottle Opener Board into a Game
Some of the best bottle opener boards out there have taken the whole idea father, turning the act of opening a bottle into a game. The idea is to have the bottle cap fall down into a freeform maze, then see which slot it falls into at the bottom, much like a simple arcade game.
A larger piece of wood is needed for the backboard. How big is dependent on what’s available and how much space is available to mount the finished bottle opener board. pretty much any size will do.
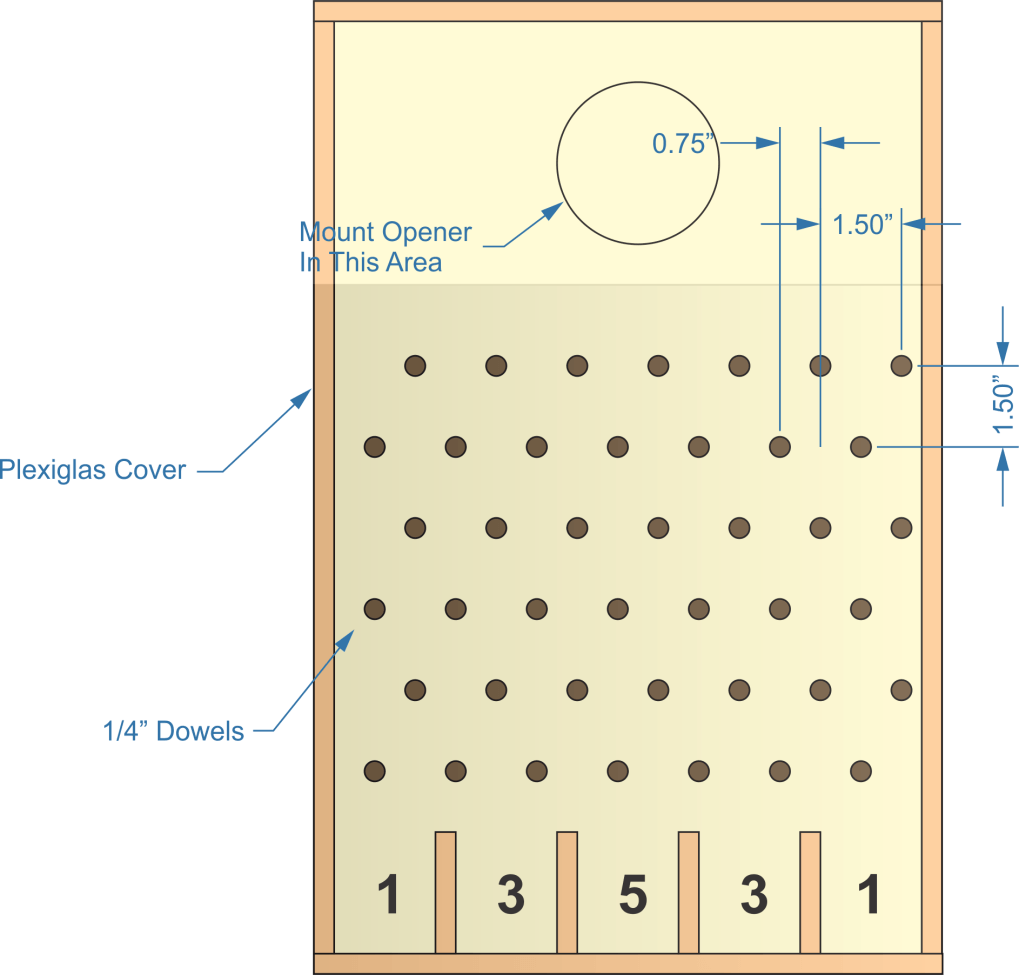
Make a frame for the board out of ¼” or ½” thick material. Allow it to stick out about ½” from the surface of the board. Then make some dividers out of the same material, as shown in the diagram below. Attach those, gluing and clamping them, until the glue has time to set.
With the basic board made, cut a number of pieces of ¼” diameter dowel rod ½” long plus the thickness of the backboard. These should be glued into hole drilled into the backboard, in staggered rows, as shown in the diagram. Make sure that there is enough space between the dowels for the bottle caps to fit through easily.
Finally, cover most of the board with Plexiglas, leaving enough of an open area at the top to mount the bottle opener. Guests can pop the top off, then watch to see if their bottle cap makes it into the five slots. The prize can be another bottle of beer.
Related Posts:
How to Install Foam Board Insulation in Attic by Admin May 19, 2021 Installing Attic insulation is critical to keeping a home warm in the winter and cool in the summer. More heat radiates out of the house through…
How to Oil a Cutting Board by Admin June 3, 2021 Finish Cutting boards are a popular project amongst woodworkers, allowing them an opportunity to express their creativity on a fairly simple project, which is still extremely…
How to Clean a Wooden Cutting Board by Admin June 4, 2021 Finish There’s a lot of false information around about wood cutting boards, mostly due to restaurants not using them. This has led people to think that…