Balance boards originally started out as a therapeutic tool, used by physical therapists in the treatment of people who were recovering from injuries to their legs, lower back and anything else that affected their physical balance. It was then found to be useful as well for the treatment of those who have had damage to the ear, such as a ruptured eardrum, as our sense of balance is actually controlled by the brain’s interpretation of the pressure in the inner ears.
In more recent times, balance boards have also been found to help with cognitive development, helping children develop gross motor skills. Even children who are as young as three years of age can benefit from the use of a balance board. But this has been nowhere as dramatic as with children who display symptoms of dyslexia, as one of the challenges people with dyslexia have is difficulties with properly maintaining their balance.
I personally became interested in balance boards because of dyslexia. Not only am I a dyslexic, but a former relative of mine opened and operated a tutoring center specializing in helping children with dyslexia, ADD and ADHD. One of the many tools she used in working with these children was a series of balance boards that I built for her.
Balance boards are readily available today and fairly inexpensive. But that doesn’t preclude the idea of making our own. Not only is this an easy project that we can do for the benefit of our own families, but children actually need a series of balance boards as their skills improve, each one challenging them further than the previous one, as it is more difficult to maintain one’s balance on. As they can be made largely out of leftover wood (not to say scrap), it’s certainly a cost-effective project.
There are actually many different styles of balance boards out there and there’s a good reason for that. First, there’s what I just mentioned about increasing levels of difficulty. Secondly, there’s the idea that some balance boards help with different types of balance than others do. Finally, manufacturers often feel they have to come up with something unique, in order to capture their section of the market. We’ll look at making a few different types.
Making a Basic Rocker Board
The most basic form of balance board, at least from the point of use, is the rocker board. This is a deck with a curved bottom. The degree of curvature can be varied, with a shallow curve being a good starting point and then the rockers being replaced with others that have a more pronounced curve, as the child improves in ability.
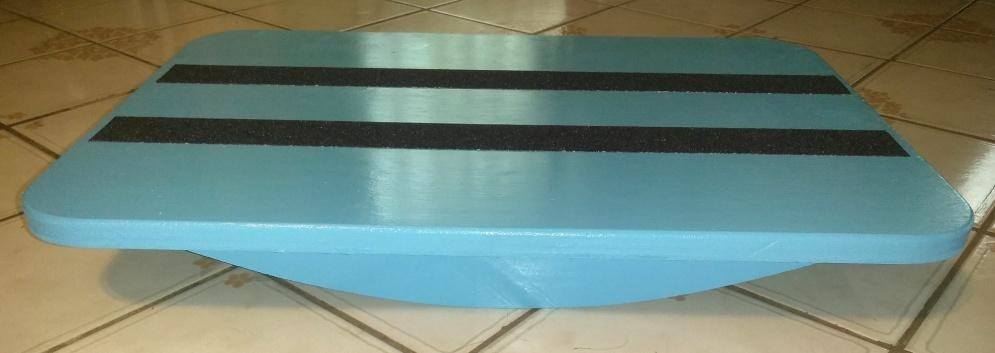
Rocker board
The deck needs to be roughly 12” x 24” and made of ½” to 5/8” thick plywood, preferable without any voids. As you can see in the photo above, two strips of adhesive non-skid tape have been applied to the top of the deck, helping the child using the balance board to keep their feet from sliding. This particular board has 4” tall rockers, making it too advanced for most children to start with.
Better to start with a rocker board that has 2” tall rockers, and then replace them with ones that gradually increase in height, as the child gains in skill. I didn’t do this in the rocker board shown above, as it was not intended to have replaceable rockers, but in making one for my own children, I would make the rockers removable, using screws to hold them to the deck, without any glue.
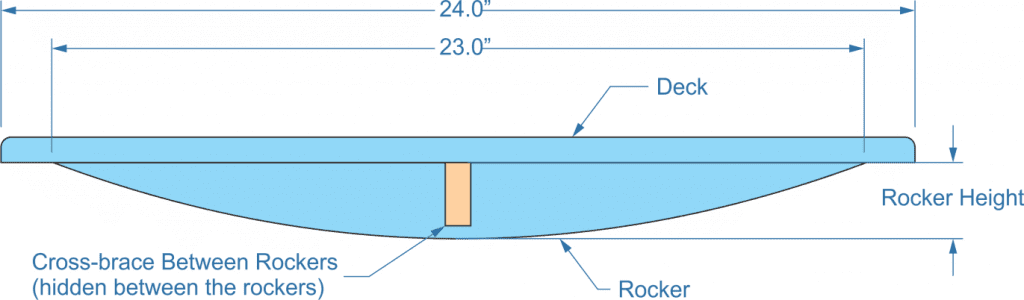
Rocker board dimensions
As is shown in the diagram above, there is a hidden cross-brace between the two rockers to help keep them from collapsing. In addition to screw the rockers to the deck, the rockers should also be screwed to the ends of this cross-brace, which in turn needs to be securely attached to the bottom of the deck, as it will not be replaced when the rockers are.
It is easier to make the rocker board with the rockers slightly shorter than the length of the deck, so that it doesn’t have to meet up perfectly with the ends. I used a beam compass to draw the curve of the rocker, but the same thing can be done with a string and a pencil. It is important that the rockers be smooth, without any flat spots, and identical. To accomplish this, it’s easier to cut them slightly outside the line, and then tape them together with double-sided masking tape for sanding to the line on a belt sander. Once the profile is achieved, separate the two rockers and round the edges of them with a router and a roundover bit. Radius the corners of the deck to remove sharp corners and then round the edges and corners of the deck as well.
Making a Roller Board
As children improve their balance on the rocker board, they need a greater challenge. Only so much can be done by increasing the height of the rockers on the rocker board. Eventually it will become impractical to continue increasing them. At that point in time, it’s best to replace the rocker board with a roller board.
The basic difference between the roller board and the rocker board is that the roller board adds side-to-side movement to the motion that the rocker board provides, making it harder to balance. At the same time, the roller itself is a smaller radius than the rocker, adding another level of difficulty.
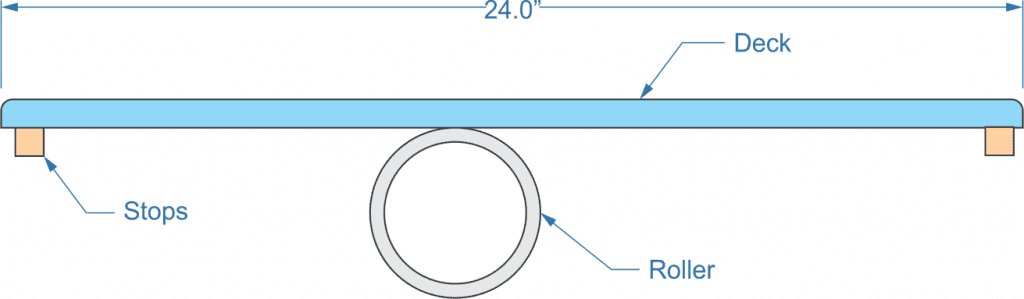
The platform for the roller board can be made in the same way as the rocker board, with the exception that it doesn’t need a cross-brace underneath it. Some people add stops at the ends, to keep the deck from rolling off the board. All that’s needed for the stops are ½” square strips of wood, screwed to the bottom of the deck. It is best to make them removable, so that they can be taken back off, once the child’s ability with the roller board improves.
Roller board
For a roller, a piece of PVC pipe, cut to length, will work. I’d recommend starting with a 6” pipe and then moving to 4” as the child’s balance improves. Three inch pipe is about the smallest size that can be used with this sort of balance board, as anything smaller makes it so that the ends of the board touch the ground too easily.
Making a Wobble Board
The next stage of complexity is the wobble board. This not only forces the child to work on balancing from side to side, but from front to back as well. Commercial wobble boards accomplish this by using a half ball, attached to the bottom of the board. We can accomplish the same thing by using two semicircular pieces of wood.
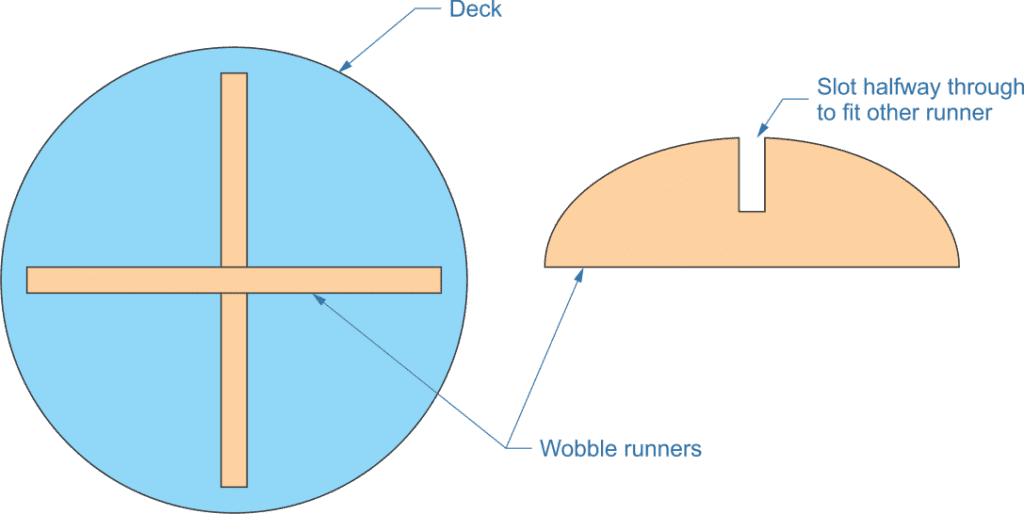
The deck of the wobble board is different from the rectangular deck used on the rocker board and roller board. In this case, we need a round deck. This can vary in size, just as long as it is big enough for the child to get both feet fully on the board; but the majority of wobble boards are roughly 16” in diameter. Like the others, the deck is made out of ½” to 5/8” thick plywood, preferably a type without voids in the core veneers. Adhesive non-slip tape should be applied to the surface, to help the child keep their feet from sliding on the surface.
The wobble part of the board is made of two semi-circles of plywood, cut to form a semi-circle. As with the basic rocker board, the higher the curvature of the runners on the wobble board, the harder it is to retain balance on it. So it’s a good idea to start out with a lesser curve, allowing the child to work their way up to a more rounded runner as their skills improve.
As with the basic balance board, the runners are made out of plywood. The difference here is that they perform the task of providing bracing for each other. As shown in the diagram below, one runner is cut just over halfway through from top, with the other runner cut just over halfway through from the bottom (not shown). The two parts can then be interlocked, forming a solid X. This is attached to the bottom side of the wobble board’s deck. If the runners will eventually be replaced, attach them with screw, making them easier to remove.
Wobble board
Laminated Balance Board
The last type of balance board I want to mention is the laminated balance board. This style has become popular since it was first introduced by Montessori schools. While it really doesn’t do anything that the others don’t do, it is popular for its appearance, as well as the larger deck. Laminated balance boards are usually 36” long, as opposed to the 24” length of the basic rocker board. This extra length puts the ends of the balance board farther off the floor, making it more enjoyable for children’s play, while helping them work on their balance. Children using this sort of balance board won’t need to graduate to one with higher rockers, as the board itself provides the ability for the child to use the board in more aggressive ways, helping to improve their balance.
Making a laminated balance board is really not a cost-effective project, as it will generally cost more to build, than to buy one. Nevertheless, the process of making one can be satisfying and is a great way of learning how to laminate large pieces of veneer to make curved surfaces. There are distinct challenges in laminating large curved surfaces, as opposed to laminating something thin, like a rocking chair rocker.
The big difference in laminating large surfaces like this is clamping. It is rather difficult to use our normal collection of clamps to clamp across an entire surface like this. The only way to do it with the clamps most of us have in our workshops is to use a series of cauls over the stack of veneer and clamp the cauls to the form that the laminate is being made over. But there’s another way that’s even better. That’s to use a veneering vacuum bag.
The vacuum bag has been specifically created for making large curved laminates, such as the doors of curved-front cabinets and skateboards. A form is still needed, providing the shape that the balance board will take. Layers of veneer are cut to the desired size, glue is applied between each layer and they are stacked on the form, which is then placed inside the vacuum bag. With everything in place, the bag is sealed and vacuum is applied, drawing the air out. This causes the bag to collapse onto the stack of veneers, pressing them together against the surface of the form. The laminate is kept in the vacuum bag until the adhesive has had time to dry.
The vacuum bag works exceptionally well because it is able to apply even pressure across the entire surface of the laminate, ensuring that it will bond evenly, without the risk of flat points or high points that can happen when using clamp and cauls to clamp the veneer stack to the form.
Once the glue has finished curing, the vacuum is released, the bag opened, and the finished laminate is removed. In most cases, it will be necessary to do some final shaping, as the laminate is usually made oversized, in case the layers of veneer don’t align perfectly. The final cutout, rounding the edges, sanding and finishing is like any other project made in any other way.
Related Posts:
Wooden Balance Bike by Admin December 27, 2021 DIY The balance bike has been developed as a replacement for putting training wheels on a bike. While there are those who speak against them, one…
How to Clean a Wooden Cutting Board by Admin June 4, 2021 Finish There’s a lot of false information around about wood cutting boards, mostly due to restaurants not using them. This has led people to think that…
How to Install Foam Board Insulation in Attic by Admin May 19, 2021 Installing Attic insulation is critical to keeping a home warm in the winter and cool in the summer. More heat radiates out of the house through…